Trans. Nonferrous Met. Soc. China 30(2020) 181-190
Indentation size effect of germanium single crystal with different crystal orientations
Ning LIU, Xiao-jing YANG, Zheng YU, Lei ZHAO
Faculty of Mechanical and Electrical Engineering, Kunming University of Science and Technology, Kunming 650500, China
Received 16 April 2019; accepted 27 September 2019
Abstract: In order to study the indentation size effect (ISE) of germanium single crystals, nano-indentation experiments were carried out on the (100), (110) and (111) plane-orientated germanium single crystals. The true hardness of each crystal plane of germanium single crystals was calculated based on the Meyer equation, proportional sample resistance (PSR) model and Nix-Gao model, and the indentation size effect (ISE) factor of each crystal plane was calculated. Results show that, the germanium single crystals experience elastic deformation, plastic deformation and brittle fracture during the loading process, and the three crystal planes all show obvious ISE phenomenon. All three models can effectively describe the ISE of germanium single crystals, and the calculated value of Nix-Gao model is the most accurate. Compared with the other two crystal planes, Ge (110) has the highest size effect factor m and the highest hardness, which indicates that Ge (110) has the worst plasticity.
Key words: germanium single crystal; indentation size effect; Meyer equation; proportional sample resistance (PSR) model; Nix-Gao model
1 Introduction
Germanium single crystal is an important semiconductor and infrared optical material. Compared with the traditional semiconductor material, silicon, germanium has twice the electron mobility and is characterized with high infrared refractive index and low dispersion rate, which is beneficial to reducing image aberrations in the field of optical devices. Therefore, it is widely used in many important domains such as optical fiber communication, aerospace, and military equipment [1,2]. About 95% of germanium in the infrared optical field is used to make infrared lenses and viewing windows, such as infrared detectors on space shuttles and space stations, individual infrared night vision devices in military equipment, infrared night vision systems for tanks, and infrared thermal imaging weapon defense systems. At the same time, the solar germanium-based substrate batteries that have emerged in recent years have high photoelectric conversion efficiency and have a longer service life than conventional silicon battery. However, germanium single crystal is a hard-brittle material and it is easy to produce shredded chips during the processing, which makes it difficult to obtain a smooth surface [3]. At the micro-nano scale, the germanium single crystal also exhibits a significant indentation size effect (ISE), and the hardness of the material will decrease with the increase of the applied load [4]. As the hardness of the material is closely related to other mechanical properties such as elastoplasticity, strength and wear resistance of the material, it is necessary to study the ISE of germanium single crystal under micro-nano conditions.
Most of the investigations on the ISE of metals and foil materials are based on nanoindentation experiment and crystal plasticity finite element method (CPFEM) model. Some scholars have carried out nanoindentation experiments on single crystal metals or semiconductor materials such as sapphire [5], silicon single crystal [6], aluminum single crystal [7] and iridium single crystal [8] to study their basic mechanical properties. LIU et al [9] studied the anisotropic accumulation of single crystal copper during indentation based on plastic slip theory and established crystal plasticity finite element method (CPFEM) model. The activation of different slip systems contributes to the anisotropy of pile-up patterns. Also, they studied the effects of grain/phase boundary (GB/PB) on mechanical properties and microtexture evolution of Cu bicrystals and Cu�CAl bicrystals based on (CPFEM) model and Bassani and Wu hardening law [10]. LI et al [11] used two-dimensional crystal plasticity finite element simulation to study the grain scale plasticity of NiTi shape memory alloy (SMA) during uniaxial compression deformation at 400 ��C.
Also, there are many studies about the size effect of metal foils or crystals. For example, OUYANG et al [12] studied the effect of grain size and material thickness on C5210 phosphor bronze thin sheets by tensile experiments. LIU et al [13] conducted a nanoindentation experiment on high-purity tungsten and studied the effect of indentation size and grain/sub-grain size on the hardness of the material based on the Nix-Gao model. LIU et al [14] studied the size effect of aluminum single crystal during indentation based on the CPFEM model, and indentation size effect was explained by the Mises stress, critical resolved shear stress and the lattice curvature. However, the ISE of germanium single crystal are rarely studied. Because of the anisotropy of germanium single crystal, the mechanical properties of different crystal plane orientations are different. Therefore, in this work, the load-depth and hardness-depth curves of different crystal plane-orientated germanium single crystals are studied by nanoindentation experiment, and the ISE of germanium single crystal is analyzed based on Meyer equation, proportional sample resistance (PSR) model and Nix-Gao model.
2 Experimental
The samples used in the experiment were (100), (110) and (111) crystal plane-orientated germanium single crystals. The size of each crystal plane was 10 mm �� 10 mm �� 0.5 mm. The experimental materials were polished and the surface roughness is less than 0.5 nm. In order to ensure the accuracy of the experimental results, the surface of the material was firstly cleaned with acetone to eliminate stains on the surface and then the material was fixed on the metal block with glue (Fig. 1).
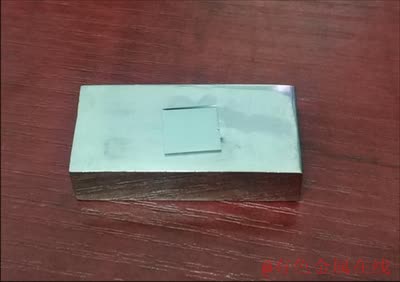
Fig. 1 Material fixed on metal block
The standard static method was employed in the nano-indentation experiment, the loading depths were set to be 30, 70, 100, 500, 1000 and 2000 nm to obtain mechanical properties such as hardness and elastic modulus of different crystal planes of germanium. The loading strain rate was 0.05 s-1 during the experiment, and the unloading process was not started until the load reached the maximum indentation depth for 10 s. In order to ensure that the adjacent test points did not interfere with each other, a separation distance of 100 ��m was set between every two test points. After the relevant parameters were set, the nano-indentation experiment was performed, and the device connected to the experimental instrument automatically output the load-displacement curve.
3 Results and discussion
3.1 Mechanical parameters of material
Table 1 gives the mechanical parameters of the material obtained by the experiment, where h is the experimental design indentation depth; Pmax is the maximum loading load; hc is the contact depth of the indenter and material; hf is the residual indentation depth; E is the elastic modulus; H is the hardness of material.
Table 1 Mechanical parameters of materials obtained from experiment

3.2 Mechanical property curves and surface topography
Figure 2 shows the load-depth curves of germanium single crystal of different orientations. It is shown that at different indentation depths, the unloading curves of different crystal planes of germanium single crystal are not returned to the initial position, which indicates that the material produces plastic deformation during the unloading process.
Figure 2(a) shows that when the indentation is shallow, the load-depth curve of different crystal planes of germanium single crystal appears to fluctuate significantly, which is mainly caused by the work hardening of germanium single crystal [15]. Also, when the unloading depth is about 300 nm, a pop-out point is generated on the unloading curve (marked in Fig. 2(a)). During the unloading process, the deformed surface of the material gradually recovers. As is seen from the unloading curve, the load-depth curves of the material do not return to the initial point, which demonstrates that the material undergoes plastic deformation during the unloading process. Therefore, it can be considered that the pop-out point on the unloading curve is the critical point at which the material changes from elastic deformation to plastic deformation. As shown in Fig. 2(b), when the indentation depth reaches 600 nm, there are pop-in points on the load-depth curves of the three crystal planes, which demonstrates that the internal structure of the germanium single crystal material has changed. The reason is that there is a phase change inside the material or the generation of dislocation sources in the material. As the load increases, the crystal structure of the germanium single crystal transforms from diamond cubic structure to the metallic ��-tin phase, which results in the change of mechanical properties of the germanium single crystal [16]. Therefore, the loading curves become discontinuous, and there are pop-in points on the loading curve. At this time, the internal atomic lattice of the germanium crystal begins to break. Figure 3 shows a deformation diagram of Ge (110) under SEM at a depth of 500 nm. It can be seen from Fig. 3 that when the indentation depth reaches 500 nm, cracks begin to occur at the edge of the indentation.
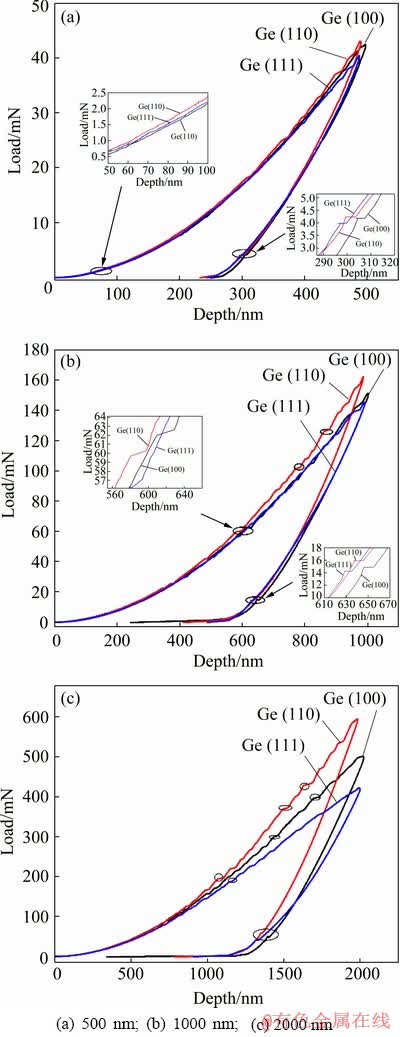
Fig. 2 Load-depth curves of single crystal germanium at different indentation depths
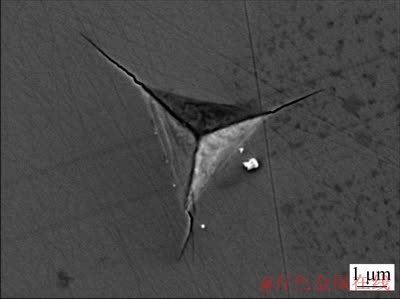
Fig. 3 Surface topography of Ge (110) with indentation depth of 500 nm
Figure 2(c) shows that as the indentation depth is further increased, the pop-in points on the load-depth curves of the three crystal planes of the germanium single crystal begin to increase, which indicates that the brittle fracture of the material increases at this time. When the indentation depth is little, the germanium single crystal mainly undergoes elastic deformation, and the initial hardnesses of the three crystal planes are close, so that the load-depth curves are relatively close. Since germanium single crystal is an anisotropic material, the mechanical properties of each crystal plane are different. As the load increases, the atomic lattice fracture degree of each crystal plane is different, which results in a difference in the load-depth curve. When the indentation depth is 2000 nm, the differences in the load-depth curves of the three crystal planes become larger, and at the same indentation depth, the load of the Ge (110) is the largest, which demonstrates that the Ge (110) has a larger hardness than the other two crystal planes.
Figures 4 and 5 show the elastic recovery rate and the hardness/elastic modulus-depth curves of different crystal planes of germanium single crystal at different indentation depths, respectively.
It can be seen from Fig. 4 that the elastic recovery rate of different crystal planes of germanium single crystal shows a tendency to rise first and then decrease. When the indentation depth is little, the germanium single crystal has a high elastic recovery rate, which indicates that the elastic deformation mainly occurs at this time. As the indentation depth gradually increases, the elastic recovery rate begins to decrease, and the material mainly undergoes plastic deformation and is accompanied with elastic deformation. Combined with the load-depth curve analysis, it can be concluded that the germanium single crystal undergoes elastic deformation, plastic deformation and brittle fracture during the loading process.
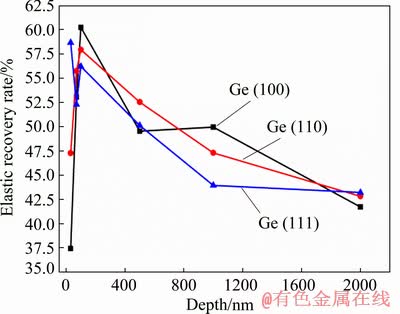
Fig. 4 Elastic recovery rates of each crystal plane of germanium single crystal with different indentation depths
Figure 5 shows the variation of the hardness and elastic modulus of germanium single crystal under different indentation depths. The hardness and elastic modulus of different crystal planes of germanium single crystal both decrease with the increase of the indentation depth, showing an obvious ISE phenomenon. And when the indentation depth is 2000 nm, the hardnesses of the Ge (100), (110) and (111) are 7.58, 9.18 and 6.67 GPa, respectively, and the elastic moduli are 117, 131 and 106 GPa, respectively. The Ge (110) has the largest hardness and elastic modulus compared to the other two crystal planes, which is consistent with the law of the load-depth curve of germanium single crystal.
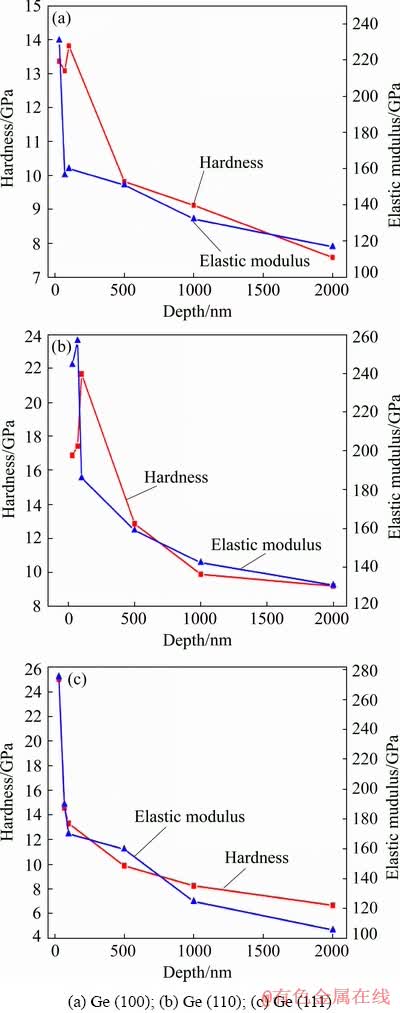
Fig. 5 Hardness-depth and elastic modulus-depth curves of different crystal planes of single crystal germanium
3.3 ISE of germanium single crystal
The reason for the ISE can be explained as follows. In the initial stage of indentation, the indenter only acts on the upper surface of the material, and the hardness and elastic modulus of the material mainly depend on the strain distribution of the surface layer of the material, which results in the significantly decrease of hardness and elastic modulus of the material in the low load region [17]. In addition, the dislocations, plastic deformation and residual stress are generated inside the material due to the subsurface damage during material processing. As the indentation depth increases, the work which is done by the indenter is converted into the plastic deformation energy of the material, and the dislocation density and residual stress of the material begin to decrease, which results in a corresponding decrease in hardness and elastic modulus of the material, thus exhibiting the ISE phenomenon [18,19].
Currently, there are three main methods for investigating the ISE of material: Meyer equation, strain gradient theory and proportional specimen resistance (PSR) model.
3.3.1 Meyer equation
The Meyer equation is the simplest and broadest method to describe the ISE [20,21]. According to the Meyer equation, the load and the indentation depth satisfy the following relationship:
 (1)
(1)
where A and n are constants related to the material, and n is also known as the Meyer equation index; Pmax is the maximum indentation load; hc is the contact depth of the indenter with the material. The values of A and n can be obtained by taking a natural logarithm of the two sides of the equation and performing a linear fit. Figure 6 shows the fitting curve of ln Pmax and ln hc for each crystal plane of germanium single crystal, where r is the correlation coefficient of the fitted curve.
As is shown in Fig. 6, the Meyer equation index n of Ge (100), (110) and (111) are 1.8815, 1.8529 and 1.7700, respectively. When n=2, the material will not produce an indentation size effect; when n<2, the material will perform a significant size effect; when n>2, the material will exhibit an inverse indentation size effect.
Although the Meyer equation can well reflect the ISE of the germanium single crystal, the physical meaning of the parameters A and n in the equation is not clear and the true hardness of the material without indentation size effect can not be calculated so that it is usually used as an empirical formula [22]. Therefore, further research is needed to investigate the relationship between load and pressure depth.
3.3.2 Proportional specimen resistance (PSR) model
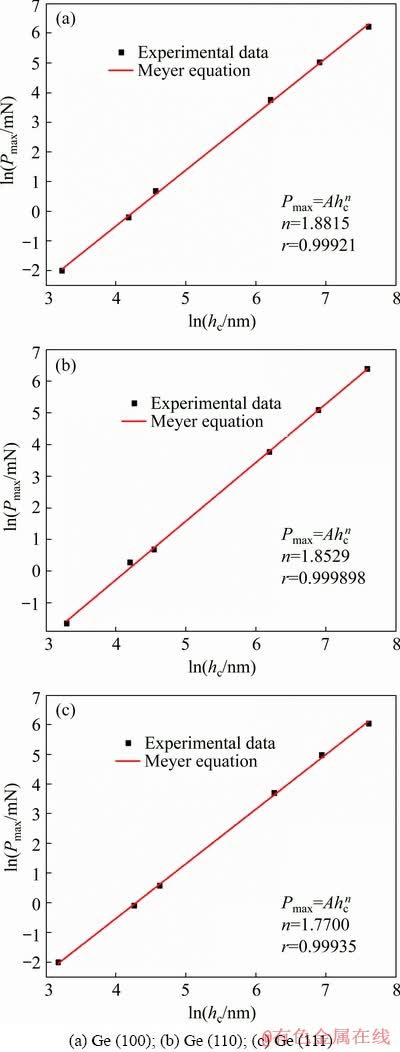
Fig. 6 Fitting curves of ln Pmax and ln hc based on Meyer equation
The PSR model assumes that during the loading process, there is the friction between the material and the indenter due to the elastic deformation of the material. The surface of the material will have a resistance against the indenter, and a part of the indentation load will offset this resistance [23]. The expression for this model is
 (2)
(2)
where a1 is the elastic resistance of the material and the frictional resistance between the material and the indenter; a2 is the hardness of the material. For a given material, a1 and a2 are constants. Shifting Eq. (2) and then dividing it by hc on both sides of the equation yield
 (3)
(3)
The values of a1 and a2 can be obtained by fitting Pmax/hc-hc to Eq. (3). For the Berkovich indenter, according to the Oliver�CPharr theory [24], the hardness of the material is calculated as
 (4)
(4)
namely,
 (5)
(5)
Figure 7 shows the fitting curve between Pmax/hc and hc. According to the fitting results, it can be seen that the PSR model can also effectively describe the ISE of each crystal plane of the germanium single crystal. The hardnesses calculated based on Eq. (5) of Ge (100), (110) and (111) are 4.991, 5.956 and 4.265 GPa, respectively.
3.3.3 Nix-Gao model
The Nix-Gao model was proposed based on the strain gradient theory [25,26]. The model considers that when the indenter is loaded into the material, the indentation is caused by a dislocation loop generated by geometrically-necessary dislocations in the material under the indenter. During the loading process, the strain gradient effect of the material results in the change of geometrically-necessary dislocations, which causes the ISE. Based on the strain gradient theory, the dislocation density can be expressed as [25]
 (6)
(6)
where ��G is a geometrically-necessary dislocation density; �� is the angle between the indenter and the surface of the material, and for the Berkovich indenter, ��=70.3��; b is the magnitude of Burger��s vector; h is the indentation depth. According to the von Mises flow law and the Taylor relationship, the indentation hardness and the indentation depth satisfy the following relationship [27]:
 (7)
(7)
where H is the hardness measured by the experiment; H0 is the hardness of the material without considering the strain gradient effect; h is the indentation depth; h* is the observable depth of the size effect, which is also known as the microscopic size characteristic length of the material.
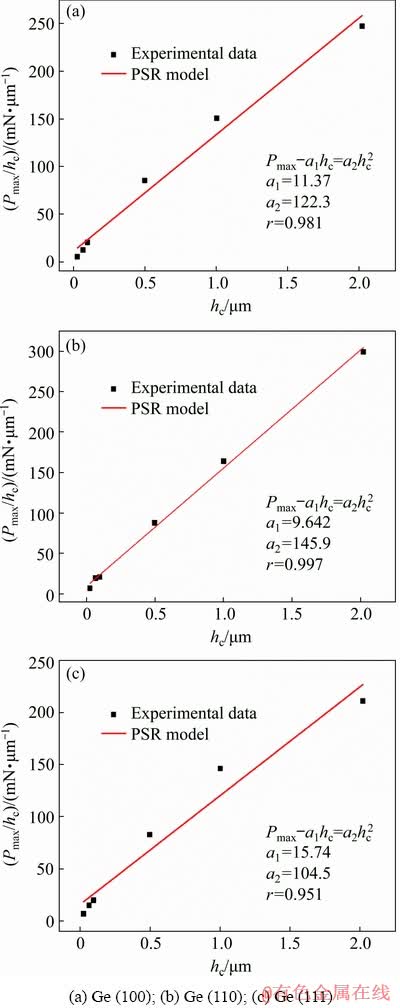
Fig. 7 Fitting curves of Pmax/hc and hc based on PSR model
The values of H0 and h* in Eq. (7) can be obtained by conducting the nonlinear fitting function. According to the analysis of Fig. 5, three crystal planes of germanium single crystal do not show an obvious size effect until the indentation depth exceeds 100 nm due to the influence of work hardening. In order to ensure the accuracy of the analysis results, only the last four groups of data were taken for analysis. Figure 8 shows fitting curve of H-h based on the Nix-Gao model.
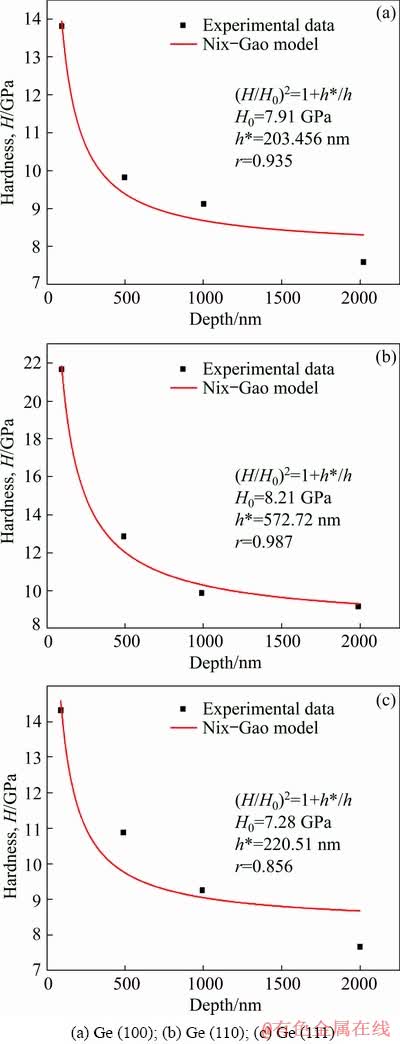
Fig. 8 Nonlinear fitting curves of H-h based on Nix-Gao model
According to the fitting results, the microscopic characteristic lengths h* of Ge (100), (110) and (111) are 203.456, 572.72 and 220.51 nm, respectively, and the corresponding hardnesses are 7.91, 8.21 and 7.28 GPa, respectively. When the indentation depth does not exceed h*, the germanium single crystal will exhibit a significant size effect phenomenon; while the indentation depth is more than h*, the size effect of the germanium single crystal will weaken. The Nix-Gao model considers the relationship between the hardness H and the indentation depth h, while the PRS model doesn��t take the hardness H into consideration. Due to the existence of work hardening, the hardness value calculated based on the Nix-Gao model is higher than that of PRS model.
In order to quantify the strength of the size effect, MANIKA and MANIKS [28] investigated the power-law exponent relationship between the nanohardness and the indentation depth of the material, and found that the hardness and the loading depth satisfy the following relationship:
H=Ch-m (8)
where C is a constant, which is only related to the shape factor of the indenter; m is the indentation size effect index, whose value can reflect the strength of the indentation size effect. The value of the size effect index m can be obtained by conducting the linear fitting of ln H and ln 1/h from Eq. (8). Figure 9 shows the fitting curves between H and of 1/h.
From the fitting results, the size effect indexes of Ge (100), (110) and (111) are 0.191, 0.295 and 0.217, respectively. Usually, for metal and semi- conductor materials, the value of m is between 0.12 and 0.32. And the better the plastic properties of the material are, the smaller the value of m is [28]. Compared with Ge (100) and Ge (111), Ge (110) has the largest size effect index m and the highest hardness according to the previous study. Therefore, it can be concluded that Ge (110) has the worst plasticity. MANIKA and MANIKS [28] also gave m values for several different materials. The values of m for Au, Ag and In are 0.15, and that for Sn is 0.16; while the value of m for Al2O3 is 0.32. It is known that as for metal materials such as Au and Ag, their atoms interact through metal bonds, while the Al2O3 atoms are connected by covalent bonds. Germanium is a semiconductor material but has metallic properties so that the value of m is between them. Therefore, it can be concluded that the value of m is related to the bonding mode between the material atoms.
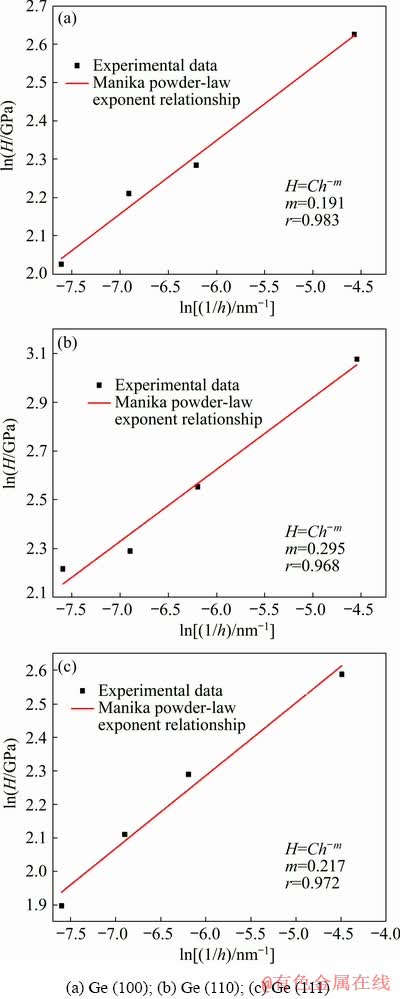
Fig. 9 Relationship between hardness (H) and reciprocal indentation depth (1/h) of single crystal germanium
Combined with the above analysis, all three models can effectively describe the ISE of germanium single crystal. However, there are inevitable defects in the crystal material. The Nix-Gao model considers the geometrically- necessary dislocations under the indenter, and the calculated result is close to the change trend of the hardness curve. Therefore, Nix-Gao model is more accurate in describing the ISE phenomenon of germanium single crystal.
4 Conclusions
(1) During the loading process, germanium single crystal undergoes elastic deformation, plastic deformation and brittle fracture, and there are pop-in points and pop-out points on the load-depth curve. Compared with the other two crystal planes, Ge (110) requires the largest load when reaching the same indentation depth.
(2) When the indentation depth exceeds 100 nm, the hardness and elastic modulus of each crystal plane of the germanium single crystal decrease with the increase of the loading depth, which shows a significant indentation size effect.
(3) Meyer equation, PSR model and Nix-Gao model can all effectively describe the ISE of germanium single crystal, but the Meyer equation cannot be used to calculate the hardness value of germanium single crystal. The hardnesses calculated based on the PRS model are 4.991, 5.956 and 4.265 GPa, respectively. The charactristic lengths h* of Ge (100), (110) and (111) calculated based on the Nix-Gao model are 203.456, 572.72 and 220.51 nm, respectively, and the corresponding hardness values H0 are 7.91, 8.21 and 7.28 GPa, respectively; the size effect index m are 0.191, 0.295 and 0.217, respectively. When the indentation depth does not exceed h*, the germanium single crystal performs a significant ISE phenomenon; while the indentation depth is more than h*, the ISE weakens.
(4) Compared with the Ge (100) and Ge (111), Ge (110) has the largest hardness and size effect index m. Namely, Ge (110) has the worst plasticity. Therefore, it is not suitable to select this crystal plane for processing in the actual production of germanium parts.
References
[1] ZHENG N R. Application of Ge and market analysis [J]. Guangdong Trace Element Science, 1998(2): 12-18. (in Chinese)
[2] SHEN Z W, CAI S H, ZHAO J W. Current situation and sustainable development suggestions of germanium resources in China [J]. Mining Research and Development, 2015(11): 108-112. (in Chinese)
[3] JIANG F, LI J F, SUN J, LI F Y, LU D. Research actualities of ductile machining for hard and brittle materials [J]. Tool Technology, 2007, 41(8): 5-10. (in Chinese)
[4] ZHAO B. Research on brittle-ductile transition mechanism of single crystal germanium in micro-nano scale [D]. Kunming: Kunming University of Science and Technology, 2017. (in Chinese)
[5] KE R, ZHANG Y M, ZHOU Y F. Study on nano-indentation size effect on c plane of sapphire single crystal [J]. Journal of Synthetic Crystals, 2013, 42(10): 1978-1988. (in Chinese)
[6] LI D G, LIANG Y C, BAI Q S. Nano-indentation experiments on anisotropic mechanical properties of single crystal silicon [J]. Aviation Precision Manufacturing Technology, 2008, 44(2): 9-12. (in Chinese)
[7] DUAN Q, WU Y L. Nanoindentation test and finite element simulation on single crystal aluminum samples of different crystallographic orientations [J]. Journal of Synthetic Crystals, 2015, 44(12): 3467-3472. (in Chinese)
[8] GEN Z B, LI S M, ZHONG H, HU R, LIU Y, LUO X M. Dislocation nucleation and room temperature deformation of single crystal iridium [J]. Rare Metal Materials and Engineering, 2018, 47(1): 255-260. (in Chinese)
[9] LIU M, TIEU K A, PENG C T, ZHOU K. Explore the anisotropic indentation pile-up patterns of single-crystal coppers by crystal plasticity finite element modeling [J]. Materials Letters, 2015, 161: 227-230.
[10] LIU M, LU C, TIEU K A. Crystal plasticity FEM study of nanoindentation behaviors of Cu bicrystals and Cu-Al bicrystals [J]. Journal of Materials Research, 2015, 30(16): 2485-2499.
[11] LI H, JIANG S Y, SHI L X, ZHANG Y Q. Prediction of grain scale plasticity of NiTi shape memory alloy based on crystal plasticity finite element method [J]. Transactions of Nonferrous Metals Society of China, 2019, 29(4): 775-784.
[12] OUYANG J D, CHEN M H, WANG N, ZHANG Q C, WANG H. Size effects on deformation behavior of C5210 phosphor bronze thin sheet [J]. Transactions of Nonferrous Metals Society of China, 2015, 25(4): 1114-1121.
[13] LIU G Y, NI S, SONG M. Effect of indentation size and grain/sub-grain size on microhardness of high purity tungsten [J]. Transactions of Nonferrous Metals Society of China, 2015, 25(10): 3240-3246.
[14] LIU M, LU C, TIEU K A. Crystal plasticity finite element method modelling of indentation size effect [J]. International Journal of Solids and Structures, 2015, 54: 42-49.
[15] YANG X J, LIU Y R, YANG X J, FANG C C. Experiments on anisotropic mechanical properties of single crystal germanium [J]. Journal of Agricultural Machinery, 2014, 45(5): 322-326. (in Chinese)
[16] LAI M, ZHANG X D, FANG F Z. Nanoindentation-induced phase transformation and structural deformation of monocrystalline germanium: A molecular dynamics simulation investigation [J]. Nanoscale Research Letters, 2013, 8(1): 353-353.
[17] TANUSRI P, TANUSREE K. Studies of microhardness anisotropy and Young��s modulus of nonlinear optical crystal. l-Arginine hydrochlorobromo monohydrate [J]. Materials Letters, 2005, 59(11): 1400-1404.
[18] HUANG H, WANG B L, WANG Y, ZOU J, ZHOU L. Characteristics of silicon substrates fabricated using nanogrinding and chemo-mechanical-grinding [J]. Materials Science and Engineering, 2008, 479(1-2): 373-379.
[19] ZENG D, JIE W, WANG T, ZHA G. Residual stress and strain in CdZnTe wafer examined by X-ray diffraction methods [J]. Applied Physics: Materials Science & Processing, 2007, 86(2): 257-260.
[20] ADRIAN L, ALLAN M. Optimization of nanostructured tribological coatings [J]. Proceedings of the International Congress of Mathematicians, 2006, 3(4): 763-788.
[21] SHI H, ATKINSON M. A friction effect in low-load hardness testing of copper and aluminium [J]. Journal of Materials Science, 1990, 25(4): 2111-2114.
[22] ATKINSON M. Further analysis of the size effect in indentation hardness tests of some metals [J]. Journal of Materials Research, 1995, 10(11): 2908-2915.
[23] LI H, BRADT R C. The microhardness indentation load/size effect in rutile and cassiterite single crystals [J]. Journal of Materials Science, 1993, 28(4): 917-926.
[24] OLIVER W C, PHARR G M. Measurement of hardness and elastic modulus by instrumented indentation: Advances in understanding and refinements to methodology [J]. Journal of Materials Research, 2004, 19(1): 3-20.
[25] WILLIAM D N, GAO H J. Indentation size effects in crystalline: A law for strain gradient plasticity [J]. Journal of the Mechanics & Physics of Solids, 1998, 46(3): 411-425.
[26] DURST K, FRANKE O, BOHNER A, GOKEN M. Indentation size effect in Ni-Fe solid solutions [J]. Acta Materialia, 2007, 55(20): 6825-6833.
[27] STEENBERGE N V, SORT J, CONCUSTELL A, DAS J, SCUDION S, SURIN~ACH S, ECKERT J, BARO M D. Dynamic softening and indentation size effect in a Zr-based bulk glass-forming alloy [J]. Scripta Materialia, 2007, 56(7): 605-608.
[28] MANIKA I, MANIKS J. Size effects in micro-and nanoscale indentation [J]. Acta materialia, 2006, 54(8): 2049-2056.
��ͬ����ȡ�������ѹ�۳ߴ�ЧӦ
�� �������������� ֤���� ��
����������ѧ ���繤��ѧԺ������ 650500
ժ Ҫ��Ϊ���о������ѹ�۳ߴ�ЧӦ����(100)��(110)��(111)����ȡ��������������ѹ��ʵ�顣����Meyer���̡�������������(PSR)ģ�ͺ�Nix-Gaoģ�ͼ��������������ѹ�۳ߴ�ЧӦʱ����ʵӲ��ֵ�������� Manika���ɹ�ϵ�������������ijߴ�ЧӦ���ӡ��������������ڼ��ع����з������Ա��Ρ����Ա��κʹ��Զ���3���Σ���3����������ֳ����Եijߴ�ЧӦ����3��ģ�;��ܽϺõ���������ijߴ�ЧӦ������Nix-Gaoģ�͵ļ���ֵ��Ϊȷ������������������棬Ge (110)�ijߴ�ЧӦ����mֵ��ߣ��Ҿ�����ߵ�Ӳ��ֵ�������þ��������������
�ؼ��ʣ������ѹ�۳ߴ�ЧӦ��Meyer���̣�������������(PSR)ģ�ͣ�Nix-Gaoģ��
(Edited by Bing YANG)
Foundation item: Project (51765027) supported by the National Natural Science Foundation of China
Corresponding author: Xiao-jing YANG; Tel: +86-13668718025; E-mail: xjyang@vip.sina.com
DOI: 10.1016/S1003-6326(19)65190-3