Trans. Nonferrous Met. Soc. China 22(2012) s624-s628
Influence of tool plunge depth and welding distance on friction stir lap welding of AA5454-O aluminum alloy plates with different thicknesses
Jun-Won KWON1, Myoung-Soo KANG1, Sung-Ook YOON1, Yong-Jai KWON1, Sung-Tae HONG2, Dae-Il KIM1, Kwang-Hak LEE1, Jong-Dock SEO3, Jin-Soo MOON4, Kyung-Sik HAN4
1. School of Materials Science and Engineering, University of Ulsan, Ulsan 680-794, Korea;
2. School of Mechanical Engineering, University of Ulsan, Ulsan 680-794, Korea;
3. Technical Research Laboratories, Shin Young Co., Ltd., Yeongcheon 683-360, Korea;
4. Automotive Parts Innovation Center, Ulsan Technopark, Ulsan 681-802, Korea
Received 21 May 2012; accepted 12 November 2012
Abstract: AA5454-O aluminum alloy plates with thicknesses of 1.4 and 1.0 mm were friction-stir-lap-welded (FSLWed). The influences of the tool plunge depth and welding distance on surface appearance, macrostructure and mechanical properties of the FSLWed plates were experimentally investigated. The tensile shear load of the FSLWed plates was compared with that of the adhesive-bonded plates. Defect-free FSLWed zones were successfully obtained in all the tool plunge depths and the welding distances. The FSLWed zones exhibited the relatively smooth surface morphologies. Under all the FSLWed conditions, the FSLWed zone exhibited higher average hardness than the base metal. In addition, the upper plate exhibited a higher average hardness than the lower plate, although there was no special tendency in spite of the change in the tool plunge depth and the welding distance. The maximum tensile shear load of the FSLWed plates was much higher than that of the adhesive-bonded aluminum alloy plate. Especially, under the FSLW condition of the plunge depth of 1.8 mm and the welding distance of 40 mm, the tensile shear load of the FSLWed plate reached a level about 41% greater than that of the adhesive-bonded aluminum alloy plate. In addition, the maximum tensile shear load of the FSLWed plate was increased with the increase of the welding distance.
Key words: friction stir lap welding; AA5450-O aluminum alloy; tool plunge depth; welding distance; mechanical properties
1 Introduction
Recently, in the automotive industry, much attention has been focused on aluminum and magnesium alloys because of their unique properties, especially lightweight properties. This is because requirements for the automotive industry have become more severe in connection with reduction in mass, fuel consumption and environmental impact. For their practical applications, bonding and welding technologies should also be established aside from alloy design, microstructure control, plastic forming, casting, surface treatment, etc. Friction stir welding (FSW) is one of the attractive technologies for welding of a wide variety of metallic materials. Especially for aluminum [1-4] and magnesium [5,6] alloys, the FSW has been actively studied as a new solid state welding technique, since it was invented by the welding institute (TWI)[7].
In this study, AA5454-O aluminum alloy plates with the thicknesses of 1.4 and 1.0 mm were friction-stir- lap-welded (FSLWed). And then, the influences of the tool plunge depth and welding distance on surface appearance, macrostructure and mechanical properties of the FSLWed plates were experimentally investigated. In addition, the tensile shear load of the FSLWed plates was compared that of the adhesive- bonded (AB) plates.
2 Experimental
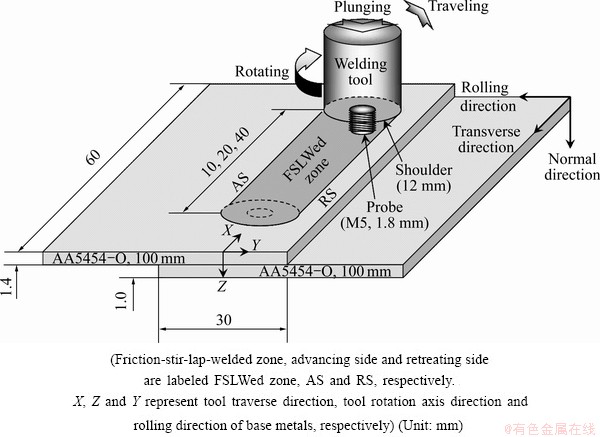
Figure 1 shows the schematic illustration of the friction stir lap welding (FSLW) process in this study. The AA5454-O aluminum alloy plates with the thicknesses of 1.4 and 1.0 mm had a width of 100 mm and a length of 60 mm, which were used as the base metals (BM). The shoulder diameter of the welding tool was 12 mm. The probe had a diameter of 5 mm and a height of 1.8 mm. The plates with the thicknesses of 1.4 and 1.0 mm were fixed on the upper and lower sides, respectively. The tool was rotated in a clockwise direction at a constant speed of 1500 r/min. And then, the probe was plunged into the materials. The tool plunge depth was changed in the range of 1.6-2.0 mm. The rotating tool was traversed at a constant speed of 100 mm/min along the weld line perpendicular to the rolling direction (Y-axis direction) of the base metals. The tool rotation axis (Z-axis) was tilted by 3�� to the tool traverse direction (X-axis direction). The welding distance was changed in the range of 10-40 mm.

Fig. 1 Schematic representation of friction stir lap welding process
Microstructural observations and Vickers micro- hardness tests were performed on a Y��Z plane which was a cross-section perpendicular to the tool traverse direction. The hardness tests were carried out with a load of 0.98 N for a duration time of 10 s. Tensile shear tests were carried out for the as-FSLWed plates at room temperature with a constant crosshead speed of 1 mm/min.
3 Results and discussion
3.1 Influences of tool plunge depth
3.1.1 Surface appearance
Figure 2 shows the influence of the tool plunge depth on the surface appearances of the aluminum alloy plates which were friction-stir-lap-welded at the constant welding distance of 40 mm. In all the tool plunge depths, no observable large defects were formed in and near the FSLWed zone, although the burr was formed on the retreating side (RS) of the FSLWed zone. The surface morphology of the FSLWed zone was relatively smooth under all the conditions, without a special tendency in spite of the change in the tool plunge depth.

Fig. 2 Surface appearances of aluminum alloy plates friction- stir-lap-welded at constant welding distance of 40 mm under tool plunge depths of 1.6 mm (a), 1.8 mm (b) and 2.0 mm (c), respectively (BM represents base metal zone)
3.1.2 Macro-structures
Figure 3 shows the influence of the tool plunge depth on the optical macrographs of the cross-sections perpendicular to the tool traverse direction of the aluminum alloy plates which were friction-stir-lap-welded at the constant welding distance of 40 mm. Defects such as voids, cracks and unbonded zones were not observed in and near the FSLWed zone, showing that defect-free welds were successfully obtained in all the tool plunge depths. The concentric onion was clearly observed in the FSLWed zone in all the tool plunge depths, although the smallest onion ring structure region was formed at the tool plunge depth (d) of 1.8 mm. In general, this onion ring structure is the most prominent feature observed in a number of stir zones which are composed of very small grains formed by the dynamic recrystallization during FSW process [8,9].

Fig. 3 Optical macrographs of cross-section perpendicular to tool traverse direction of aluminum alloy plates friction-stir- lap-welded at constant welding distance of 40 mm under tool plunge depths of 1.6 mm (a), 1.8 mm (b) and 2.0 mm (c)
3.1.3 Hardness properties
Figure 4 shows the average Vickers micro-hardness of the BM and FSLWed zone on the cross-section perpendicular to the tool traverse direction of the aluminum alloy plates which were friction-stir-lap- welded at the constant welding distance of 40 mm. In all the tool plunge distances, the FSLWed zone exhibited the more average hardness than the BM. In addition, the upper plate with the thickness of 1.4 mm exhibited a higher average hardness than that of the lower plate with the thickness of 1.0 mm, without a special tendency in spite of the change in the tool plunge depth. It was noteworthy that, at 1.6 and 2.0 mm, the average hardness of the FSLWed zone in the upper plate reached a level about 10% greater than that of the BM (about HV0.162). It is believed that this increase of the average hardness led from the grain refinement in the FSLWed zone, as with other researches [4,10].

Fig. 4 Average Vickers micro-hardness of FSLWed zone on cross-section perpendicular to tool traverse direction of aluminum alloy plates friction-stir-lap-welded at constant welding distance of 40 mm
3.1.4 Tensile shear load
Figure 5 shows the influence of the tool plunge depth on the maximum tensile shear load of the aluminum alloy plates which were friction-stir-lap- welded at the constant welding distance of 40 mm. The broken line represents the maximum tensile shear load of the adhesive-bonded (AB) aluminum alloy plate. The FSLWed plates exhibited the much higher tensile shear load than that of the adhesive-bonded aluminum alloy plate, except for the case of 2.0 mm. It was noteworthy that, at 1.8 mm, the tensile shear load (F) of the FSLWed plate reached a level about 41% greater than that of the adhesive-bonded aluminum alloy plate (about 5.03 kN). However, there was no special tendency in spite of the change in the tool plunge depth.

Fig. 5 Maximum tensile shear load of aluminum alloy plates friction-stir-lap-welded at constant welding distance of 40 mm
3.2 Influences of welding distance
3.2.1 Surface appearance
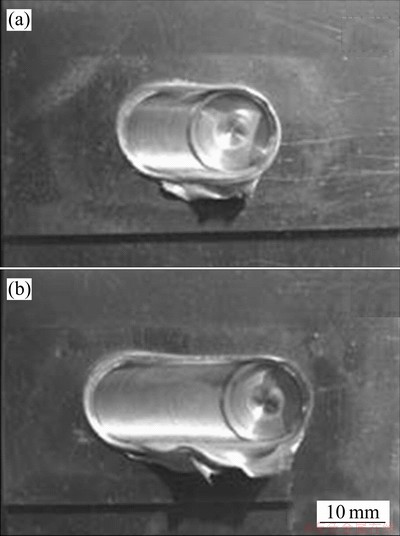
Figure 6 shows the influence of the welding distance on the surface appearances of the aluminum alloy plates which were friction-stir-lap-welded at the constant tool plunge depth of 1.8 mm. The surface appearance of the aluminum alloy plate which was friction-stir-lap-welded at the welding distance of 40 mm is shown in Fig. 2(b). At all the welding distances, no observable large defects were formed in and near the FSLWed zone, although the burr was formed on the retreating side (RS) of the FSLWed zone. The surface morphology of the FSLWed zone was relatively smooth under all the welding conditions.

Fig. 6 Surface appearances of aluminum alloy plates friction- stir-lap-welded at constant tool plunge depth of 1.8 mm under welding distances of 10 mm (a) and 20 mm (b)
3.2.2 Macro-structures
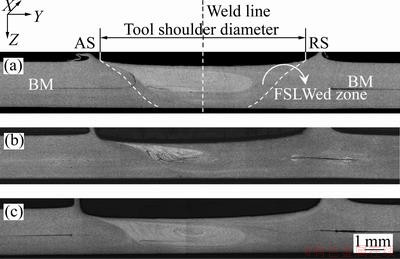
Figure 7 shows the influence of the welding distance on the optical macrographs of the cross-sections perpendicular to the tool traverse direction of the aluminum alloy plates which were friction-stir-lap-welded at the constant tool plunge depth of 1.8 mm. Defects such as voids, cracks and unbonded zones were not observed in and near the FSLWed zone, showing that defect-free welds were successfully obtained at all the welding distances.

Fig. 7 Optical macrographs of cross-section perpendicular to tool traverse direction of aluminum alloy plates friction- stir-butt-welded at constant tool plunge depth of 1.8 mm under welding distances of 10 mm (a) and 20 mm (b)
3.2.3 Hardness properties
Figure 8 shows the average Vickers micro-hardness of the BM and FSLWed zone on the cross-section perpendicular to the tool traverse direction of the aluminum alloy plates which were friction-stir-lap- welded at the constant tool plunge depth of 1.8 mm. At all the welding distances, the FSLWed zone exhibited more average hardness than the BM. In addition, the upper plate with the thickness of 1.4 mm exhibited a higher average hardness than that of the lower plate with the thickness of 1.0 mm, without a special tendency in spite of the change in the welding distance. It was noteworthy that, at 10 and 20 mm, the average hardness of the FSLWed zone in the upper plate reached a level about 10% greater than that of the BM (about 62HV0.1). It is believed that this increase of the average hardness led from the grain refinement in the FSLWed zone, as with other researches [4,10].

Fig. 8 Average Vickers micro-hardness of FSLWed zone on cross-section perpendicular to tool traverse direction of aluminum alloy plates friction-stir-butt-welded at constant tool plunge depth of 1.8 mm
3.2.4 Tensile shear load
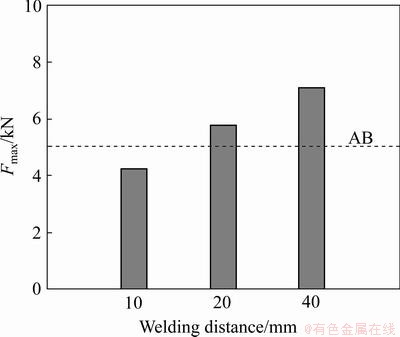
Figure 9 shows the influence of the welding distance on the maximum tensile shear load of the aluminum alloy plates which were friction-stir-lap- welded at the constant tool plunge depth of 1.8 mm.
The FSLWed plates exhibited much higher tensile shear load than that of the adhesive-bonded aluminum alloy plate, except for the case of 10 mm. It was noteworthy that, at 40 mm, the tensile shear load of the FSLWed plate reached a level about 41% greater than that of the adhesive-bonded aluminum alloy plate (about 5.03 kN). In addition, the tensile shear load of the FSLWed plate was increased with the increase of the welding distance. This result shows that the welding distance is a very important parameter in controlling the maximum tensile shear load of the FSLWed plate.

Fig. 9 Maximum tensile shear load of aluminum alloy plates friction-stir-butt-welded at constant tool plunge depth of 1.8 mm
4 Conclusions
1) Defect-free FSLWed zones were successfully obtained in all the tool plunge depths and the welding distances. And then, the FSLWed zones exhibited the relatively smooth surface morphologies.
2) Under all the FSLWed conditions, the FSLWed zone exhibits higher average hardness than the base metal. In addition, the upper plate exhibits a higher average hardness than that of the lower plate, although there is no special tendency in spite of the change in the tool plunge depth and the welding distance.
3) The maximum tensile shear load of the FSLWed plates exhibits much higher than that of the adhesive- bonded aluminum alloy plate. Especially, under the FSLW condition of the plunge depth of 1.8 mm and the welding distance of 40 mm, the tensile shear load of the FSLWed plate reaches a level about 41% greater than that of the adhesive-bonded aluminum alloy plate. In addition, the maximum tensile shear load of the FSLWed plate is increased with the increase of the welding distance.
Acknowledgements
This research was financially supported by the Ministry of Education, Science Technology (MEST) and National Research Foundation of Korea (NRF) through the Human Resource Training Project for Regional Innovation, and by the development program of local science park funded by the ULSAN Metropolitan City and the MEST (Ministry of Education, Science and Technology).
References
[1] THOMAS W M, NICHOLAS E D. Friction stir welding for the transportation industries [J]. Mater Design, 1997, 18(4-6): 269-273.
[2] SHIGEMATSU I, KWON Y J, SUZUKI K, IMAI T, SAITO N. Joining of 5083 and 6061 aluminum alloys by friction stir welding [J]. J Mater Sci Lett, 2003, 22(5): 353-356.
[3] SHIGEMATSU I, SUZUKI K, IMAI T, KWON Y J, SAITO N. Friction stir welding of recycled A6061 aluminum plates fabricated by hot-extrusion of machined chips [J]. J Mater Sci, 2005, 40(11): 2971-2974.
[4] Kwon Y J, Shim S B, Park D H. Friction stir welding of 5052 alumimum alloy plates [J]. Transactions of Nonferrous Metals Society of China, 2009, 19(s1): s23-s27.
[5] Kannan M B, Dietzel W, Zeng R, Zettler R, Santos J F D. A study on the SCC susceptibility of friction stir welded AZ31 Mg sheet [J]. Mater Sci Eng A, 2007, 460-461: 243-250.
[6] Darras B M, Khraisheh M K, Abu-Farha F K, Omar M A. Friction stir processing of commercial AZ31 magnesium alloy [J]. J Mater Proc Tech, 2007, 191(1-3): 77-81.
[7] Thomas W M, Nicholas D E, Needham J C, Murch M G, Templesmith P, Dawes C J. Friction stir butt welding: US 5460317[P]. 1995-10-24.
[8] NANDAN R, DEBROY T, BHADESSHIA H K D H. Recent advances in friction-stir welding�CProcess weldment structure and properties [J]. Prog Mater Sci, 2008, 53(6): 980-1023.
[9] KUMBHAR N T, SAHOO S K, SAMAJDAR I, DEY G K, BHANUMURTHY K. Microstructure and microtextural studies of friction stir welded aluminium alloy 5052 [J]. Mater Design, 2011, 32(3): 1675-1666.
[10] Kwon Y J, Shigematsu I, Saito N. Production of ultra-grained aluminum alloy using friction stir process [J]. Mater Trans, 2003, 44(7): 1343-1350.
(Edited by LI Xiang-qun)
Corresponding author: Yong-Jai KWON; Tel: +82-52-259-1294; E-mail: yongjaikwon@ulsan.ac.kr
DOI: 10.1016/S1003-6326(12)61775-0