
J. Cent. South Univ. (2018) 25: 2069-2075
DOI: https://doi.org/10.1007/s11771-018-3896-3

Fatigue life prediction of workpiece with 3D rough surface topography based on surface reconstruction technology
LI Guo-wen(�����)1, TANG Jin-yuan(�ƽ�Ԫ)1, ZHOU Wei(���)1, 2, LI Lin(����)1
1. State Key Laboratory of High Performance Complex Manufacturing, Central South University, Changsha 410083, China;
2. Hunan Provincial Key Laboratory of High Efficiency and Precision Machining of Difficult-to-cut Materials, Hunan University of Science and Technology, Xiangtan 411201, China
 Central South University Press and Springer-Verlag GmbH Germany, part of Springer Nature 2018
Abstract: The fatigue performance of a workpiece depends on its surface quality. In traditional fatigue life prediction, the effect of surface quality is commonly accounted for by using empirical correction factors, which is imprecise when safety is of great concern. For surface quality, the surface topography is an important parameter, which introduces stress concentration that reduces the fatigue life. It is not feasible to test the stress concentration of different surface topographies. On the one hand, it is time-consuming and high-cost, and on the other hand, it cannot reflect the general statistical characteristics. With the help of surface reconstruction technology and interpolation method, a more efficient and economic approach is proposed, where FE simulation of workpiece with the reconstructed surface topography is used as a foundation for fatigue life prediction. The relationship between surface roughness (Sa) and fatigue life of the workpiece is studied with the proposed approach.
Key words: fatigue life; stress concentration; surface reconstruction technology; surface topography
Cite this article as: LI Guo-wen, TANG Jin-yuan, ZHOU Wei, LI Lin. Fatigue life prediction of workpiece with 3D rough surface topography based on surface reconstruction technology [J]. Journal of Central South University, 2018, 25(9): 2069�C2075. DOI: https://doi.org/10.1007/s11771-018-3896-3.
1 Introduction
Fatigue crack failure of workpiece surface generally appears because of the stress concentration. Surface integrity affects the fatigue failure of a workpiece. In traditional prediction of fatigue life, the effect of surface quality is investigated by using empirical correction factors [1], which is imprecise when safety is of great concern. For surface quality, the surface topography is an important parameter, which introduces stress concentration that reduces the fatigue life. Besides, fatigue life differs significantly with surface topography [2, 3]. Therefore, accurate prediction of fatigue life considering workpiece surface topography is of great importance. In traditional engineering design, the fatigue data come from the sample test, but it is not feasible to test the stress concentration of different surface topographies. On one hand, it is time-consuming and high-cost, and on the other hand, it cannot reflect the general statistical characteristics. Therefore, with the help of surface reconstruction technology, FE simulation of workpiece with the reconstructed surface topography is used as a foundation for fatigue life prediction [4, 5].
There are two ways to obtain a 3D rough surface topography: one is to obtain the surface topography height sequence matrix Z(M, N) with measuring instruments such as white light interferometers, in this case, the precision will be improved and the time consumed will be increased while the sampling interval is decreased. The other is to get the surface topography height sequence matrix Z(M, N) [4] through the reconstruction method based on statistical distribution parameters and exponential autocorrelation function. With this method, the surface topography with specific parameters can be obtained efficiently. In recent years, research on the effects of surface topography has been increasingly conducted based on surface reconstruction technology. YANG et al [6] and PU et al [7] studied the contact performance of surface topography generated by surface reconstruction technology. In the study of surface topography considering the effect of stress concentration on the fatigue life, the theoretical stress concentration factor is introduced: Kt=smax/s0, where smax is the maximum stress and s0 is the nominal stress. NEUBER [8] and AROLA et al [9] treated surface topography as a series of microscopic notches and proposed expressions for the stress concentration factor imposed by statistical parameters of the surface topography. Statistical parameters can only describe the average characteristics of a surface topography so that a large volume of information about the surface topography will be lost. Therefore, geometric modeling based on statistical characterization parameters is considered inadequate, and consequently an increasing number of researchers have conducted geometric modeling analysis directly based on real surface topography [10�C12].  S et al [10] and SURARATCHAI et al [11] used the finite element method to calculate the stress concentration factor of 2D profiles from the measured 3D surface topography, and predicted the fatigue life of the workpiece through fatigue test.
  S et al [12] provided a geometric modeling analysis of the measured 3D surface topography to calculate the stress concentration factor.
Compared with the aforementioned researches, effects of the reconstructed surface topography on workpiece are found from FE simulation, which is more efficient and economic. The researches about the properties of rough surface and the characterization of surface topography we have done are the basis of this work [13�C15]. The layout of the paper is as follows: 1) The discrete points of the rough surface topography with specific parameters are first obtained by the surface reconstruction technology and the Bezier interpolation method is used to produce more data points between sampling points to improve the fitting precision. The parameters of the reconstructed surface topography are calculated. 2) All the data points are then imported into CATIA through point cloud technology to simulate the 3D rough surface of the workpiece. The finite element model is established to calculate the stress concentration factor and the fatigue notch factor, and the fatigue life is finally determined by the local stress�Cstrain method. 3) The relationship between surface roughness Sa and fatigue life of the workpiece is studied with the proposed approach.
2 Fatigue life prediction of workpiece with reconstructed surface topography
2.1 Reconstruction of 3D surface topography
Many researchers have characterized the engineering surface topography with the application of random process theory, which makes it possible to generate surface topography by random simulation. Here, the aim is to reconstruct a 3D surface topography: a (M, N) matrix of surface topography that follows a specified statistical distribution and a given (m, n) ACF can be carried out by the following transformation [4]:
 (1)
(1)
where ��kl is a coefficient to be determined in order to produce the desired ACF. Since ��ij is independent and has unit variance:
 (2)
(2)
Then
 (3)
(3)
Equation (3) represents a non-linear system of nm equations for the determination of the coefficient ��kl. During the solution, the NCGM was implemented to deal with the convergence and space problems [16].
2.2 Interpolation
There are no data points in the interval due to the existence of sampling interval, which affects the precision of point cloud fitting. Therefore, the height sequence matrix Z(M, N) needs interpolation management. The height sequence matrix Z(M, N) is divided into (M�C1)��(N�C1) regions with four adjacent points in X/Y directions taken as a region. Each region is interpolated with 12 points to generate a control matrix V4��4 with 16 control points, and the Bezier surface matrix is used to generate the height matrix. As such, the piecewise linear interpolation with singular points can be avoided. Specific steps are as follows:
1) Determination of tangent vector:
 (4)
(4)
where p is the discrete data point matrix on the curve, gradient is the central difference, and norm is the vector norm.
2) Determination of control points b and c between two discrete points on the curve:
 (5)
(5)
where a=�̡�norm(gradient(p)) is the control coefficient, and �� is just a constant whose value usually equals 1/2.
3) Four points in each region can build 6 lines, and calculation is made based on steps 1) and 2) to get 12 control points which are combined with the original 4 measuring points to constitute the control matrix V4��4, which provides direction information of interpolation points. With 4t+t2 (t��{0, 1, 2, ��}) points interpolated in each region, the control matrix V4��4 and the matrix form of Bezier surface are used to calculate the new height matrix Z(t+2, t+2) in each region. The interpolation of a region is illustrated in Figure 1.
 (6)
(6)
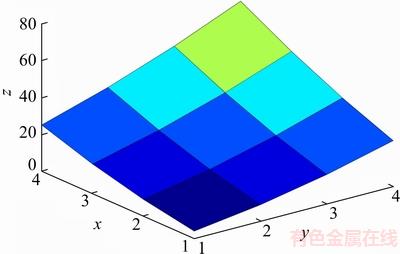
Figure 1 Schematic diagram of region with interpolation
where Z(i, j) is the height of point of the ith row and the jth column in region after interpolation, and B(x) is the Bernstein basis function.
4) Each small region after interpolation is spliced to form a new height matrix Z((M�C1)t+ M,(N�C1)t+N).
2.3 Fatigue life
The surface topography data points after interpolation are imported into 3D modeling software through point cloud technology to generate micro patch groups. 3D entities are first modeled and generated through surface joining and stretching operations, and then imported into finite element software. As the surface topography is small and complex, the tetrahedral mesh technique is adopted and the mesh density is controlled by the element size which is determined by the surface curvature. The mesh is shown in Figure 2. A small stress (s) is applied on both sides of the 3D model, fixed constraints are added at the bottom, and the calculation results are shown in Figure 3. From the finite element calculation results shown in Figure 3, it can be known that there exists obvious stress concentration in the valley location. After the stress results of the 3D surface topography are processed, the average stress of the effective valleys is calculated and taken as the maximum stress (smax). A small stress (s) is applied on both sides as the nominal stress (s0), and the stress concentration factor can be calculated from the formula (Kt=smax/s0). The fatigue stress concentration factor is calculated based on its relationship with the stress concentration factor (Kf=1+q(Kt�C1)), where Notch sensitivity (q) is calculated by the PETERSON [3] formula according to the value of the material parameter and the effective valley root radius (r).
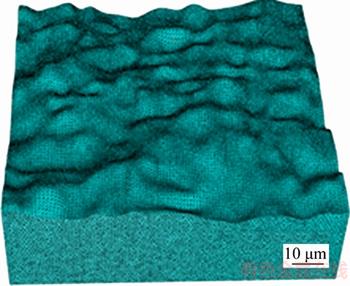
Figure 2 Finite element mesh
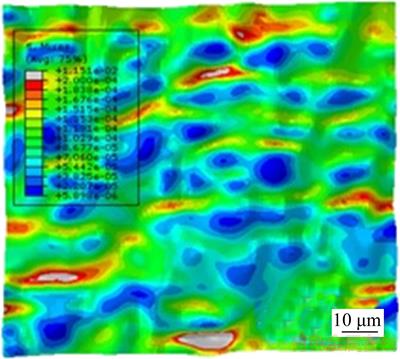
Figure 3 Stress nephogram
If the strain of component in smooth condition is e; the strain of component is calculated by the linear theory when the stress concentration of the surface topography is taken into account: e1=Kfe. According to the actual strain of the workpiece with surface topography, and assuming the load ratio is R=�C1, the local stress strain method is used to predict the fatigue life of the workpiece with surface topography based on Manson-Coffin equation:
 (7)
(7)
where ��e is the total strain, ��ee is the elastic strain, ��ep is the plastic strain, s��f is the fatigue strength coefficient, b is the fatigue strength index, Nf is the fatigue life of cycle counting, e��f is the fatigue ductility coefficient, and c is the fatigue ductility index. The core idea of this method is that the fatigue life is identical as long as the maximum local stress and strain are equal. The fatigue life of the workpiece with concentrated stress is considered equal to that of the smooth specimen with the same local stress and strain.
3 Relationship between surface roughness Sa and fatigue life
Surface topography height sequence matrices in grinding with specific roughness Sa are obtained through surface reconstruction technology, and the size of the reconstructed surface is 100 ��m��100 ��m, as shown in Figure 4. 17CrNiMo6 steel is selected as the element material. Our team is engaged in gear research, and 17CrNiMo6 steel is a commonly used high-performance gear material. On one hand, the material parameters are easy to obtain. On the other hand, the ultimate strength of the material is high, and the stress concentration effect of the surface topography is more obvious. The material parameters are shown in Table 1. The parameters are calculated by programming according to the reconstructed surface topography height sequence matrices, as shown in Table 2. Among those parameters, the effective valley root radius (r) plays an important role in calculating the notch sensitivity (q). In practice, it is difficult to measure the radius of valley. In Ref. [8], a graphical radius gage is used to estimate the radius, which is cumbersome and low in accuracy. In this article, the valley of the 3D surface topography is assumed to be spherical, and the three-point circle method is utilized to calculate the radius of valley. Nine points of matrix Z(i�C1:i+1, j�C1:j+1) including valley point Z(i, j) can construct four triangles through the valley point. As the distance between points and the height are known, three sides of the triangle can be calculated by the Pythagorean theorem, and the radius R can be calculated by the cosine theorem and triangle circumcircle radius formula, as shown in Figure 5.
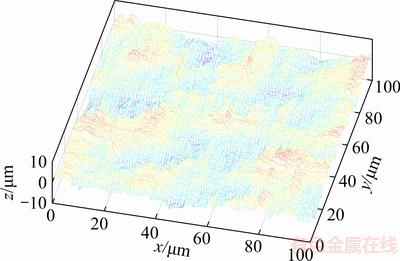
Figure 4 Reconstructed rough surface in grinding of 2 mm Sa
Table 1 Material characteristic parameters of 17CrNiMo6
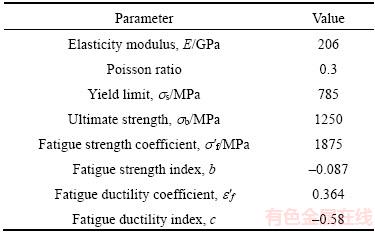
Table 2 Characteristic parameters of reconstructed rough surface of 17CrNiMo6 (��m)
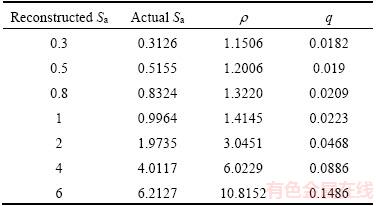
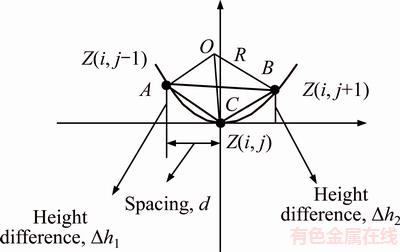
Figure 5 Calculation of valley root radius
The average value of four triangular circumradii is taken as the valley root radius. The effective valley root radius (r) is calculated by this method.
All the data points of the surface topography with specific roughness Sa are then imported into CATIA through point cloud technology to simulate the 3D rough surface of the workpiece, and the finite element models are established to calculate the stress concentration factor and the fatigue notch factor. The results are shown in Table 3. According to the results of the stress concentration factor and the fatigue stress concentration factor, the fatigue life of 17CrNiMo6 with different values of roughness Sa is predicted by the local stress�Cstrain method. The fatigue life prediction results are shown in Figure 6. It can be seen from the figure that the fatigue life of 17CrNiMo6 increases with the decrease of average roughness Sa, as the stress concentration becomes more obvious with the increase of roughness. Similar results have been reported [17]. When the strain is 0.002, the fatigue life at the roughness Sa of 0.8 mm is decreased by 5.81% compared to the result at the roughness Sa of 0.3 ��m; the fatigue life at the average roughness Sa of 0.5 ��m is decreased by 1.52% compared to the result at the roughness Sa of 0.3 ��m. By contrast, the decrease is not obvious because the depth, width and root radius of valley are so small that play a minor role in the effect of stress concentration when the roughness Sa is very small, so the influence on fatigue life becomes smaller when roughness Sa is less than 0.5 ��m. When the strain is 0.005, the fatigue life at the roughness Sa of 6 ��m is decreased by 62.44% compared to the result at the roughness Sa of 0.3 ��m; when the strain is 0.002, the fatigue life at the roughness Sa of 6 ��m is decreased by 89.45% compared to the result at the roughness Sa of 0.3 ��m. By contrast, the fatigue life drops more significantly in the high cycle fatigue range, and the effect of stress concentration is obvious in low stress and strain level. The influence of roughness Sa on the fatigue life in the high cycle fatigue range is greater than that in the low cycle fatigue range.
Table 3 Results of stress concentration factor and fatigue stress concentration factor
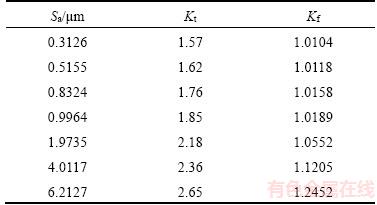
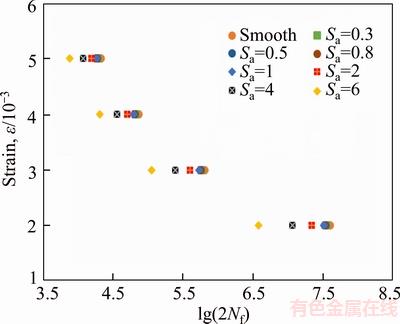
Figure 6 Fatigue life prediction of workpiece made of 17CrNiMo6 with different values of roughness Sa
4 Conclusions
1) The surface topography with specific parameters is obtained through surface reconstruction technology. Interpolation is performed before point cloud fitting to make the surface smoother and improve the fitting accuracy. The valley bottom of the 3D surface topography is assumed to be spherical, and the three-point circle method is used to calculate the radius of curvature.
2) An efficient and economic fatigue life prediction method of workpiece considering 3D rough surface topography is proposed based on surface reconstruction technology. The relationship between surface roughness Sa and fatigue life of the workpiece is studied with the proposed approach. For the workpiece made of 17CrNiMo6 material, numerical calculation shows that the fatigue life increases with the decrease of roughness Sa, but the influence on fatigue life becomes smaller when the roughness Sa is less than 0.5 ��m. The influence of roughness Sa on the fatigue life in the high cycle fatigue range is greater than that in the low cycle fatigue range.
References
[1] NOVOVIC D, DEWES R C, ASPINWALL D K, VOICE W, BOWEN P. The effect of machined topography and integrity on fatigue life [J]. International Journal of Machine Tools & Manufacture, 2004, 44(2, 3): 125�C134.
[2] TAYLOR D, CLANCY O M. The fatigue performance of machined surfaces [J]. Fatigue & Fracture of Engineering Materials & Structures, 1991, 14(2, 3): 329�C336.
[3] PETERSON R E. Stress concentration factors [M]. New York: John Wiley and Sons, 1974: 134�C246.
[4] BAKOLAS V. Numerical generation of arbitrarily oriented non-Gaussian three-dimensional rough surfaces [J]. Wear, 2003, 254: 546�C554.
[5] MANESH K K, RAMAMOORTHY B, SINGAPERUMAL M. Numerical generation of anisotropic 3D non-Gaussian engineering surfaces with specified 3D surface roughness parameters [J]. Wear, 2010. 268(11, 12): 1371�C1379.
[6] YANG Guo-qing, XIONG Mei-hua, HONG Jun, LIU Hui-jing, WANG Fei. Numerical characterization and contact performances for 3D rough surfaces [J]. Journal of Xi��an Jiaotong University, 2012, 46(11): 58�C63.
[7] PU Wei, ZHU Dong, WANG Jia-xu, WANG Q J. Rolling�Csliding contact fatigue of surfaces with sinusoidal roughness [J]. International Journal of Fatigue, 2016, 90: 57�C68.
[8] NEUBER H. Theory of notch stresses [M]. Berlin, Germany: Springer Verlag, 1958: 204�C210.
[9] AROLA D, WILLIAMS C L. Estimating the fatigue stress concentration factor of machined surfaces [J]. International Journal of Fatigue, 2002, 24(9): 923�C930.
[10]  S S K, SKALLERUD B, TVEITEN B W, HOLME B. Fatigue life prediction of machined components using finite element analysis of surface topography [J]. International Journal of Fatigue, 2005, 27(10): 1590�C1596.
[11] SURARATCHAI M, LIMIDO J, MABRU C, CHIERAGATTI R. Modelling the influence of machined surface roughness on the fatigue life of aluminium alloy [J]. International Journal of Fatigue, 2008, 30(12): 2119�C2126.
[12]  S S K, SKALLERUD B, TVEITEN B W. Surface roughness characterization for fatigue life predictions using finite element analysis [J]. International Journal of Fatigue, 2008, 30(12): 2200�C2209.
[13] CHEN Hai-feng, TANG Jin-yuan. A model for prediction of surface roughness in ultrasonic-assisted grinding [J]. The International Journal of Advanced Manufacturing Technology, 2014, 77(1�C4): 643�C651.
[14] CHEN Hai-feng, TANG Jin-yuan, ZHOU Wei. An experimental study of the effects of ultrasonic vibration on grinding surface roughness of C45 carbon steel [J]. The International Journal of Advanced Manufacturing Technology, 2013, 68(9�C12): 2095�C2098.
[15] ZHOU Wei, TANG Jin-yuan, HE Yan-fei, LIAO Dong-ri. Associated rules between microstructure characterization parameters and contact characteristic parameters of two cylinders [J]. Journal of Central South University, 2015, 22(11): 4228�C4234.
[16] SHEWCHUK J R. An introduction to the conjugate gradient method without the agonizing [M]// Pittsburgh: Carnegie Mellon University, 1994: 23�C68.
[17] DENG G, SUZUKI S, NAKANISHI T. Effects of surface roughness and abnormal surface layer on fatigue strength [J]. Applied Mechanics & Materials, 2011, 86: 867�C870.
(Edited by FANG Jing-hua)
���ĵ���
���ڱ����ع�����Ԥ�⿼����ά������ò�Ĺ�����ƣ������
ժҪ�������о�������ά������ò��Ӧ������ЧӦ�Թ���ƣ��������Ӱ�졣ͨ��ʵ����Բ�ͬ������ά����ò��Ӧ������Ӱ���Dz����ʵģ�һ������Ҫ������ʱ��ͳɱ�������һ���浥�������ı�����ò���ܷ�Ӧͳ����������ˣ��������һ�ָ����á�����Ч�ķ������ڱ����ع������Ͳ�ֵ�����������ؽ����ֵ�õ��Ĺ�����ά������ò��������Ԫ��������������������Ӧ����ͼ�����Ϊƣ������Ԥ��Ļ������о��˹�������ֲڶ�Sa�빤��ƣ������֮��Ĺ�ϵ��
�ؼ��ʣ�ƣ��������Ӧ�����У������ع�������������ò
Foundation item: Projects(51535012, U1604255) supported by the National Natural Science Foundation of China; Project(2016JC2001) supported by the Key Research and Development Project of Hunan Province, China
Received date: 2017-06-02; Accepted date: 2017-11-13
Corresponding author: TANG Jin-yuan, PhD, Professor; Tel: +86�C88877746; E-mail: jytangcsu@163.com