J. Cent. South Univ. (2012) 19: 402-407
DOI: 10.1007/s11771-012-1018-1
Estimation of deformed laser heat sources and thermal analysis on laser assisted turning of square member
KIM Jae-hyun, KIM Kwang-sun, CHOI Jun-young, LEE Choon-man
Department of Mechanical Design and Manufacturing Engineering, Changwon National University,Changwon 641-773, Korea
? Central South University Press and Springer-Verlag Berlin Heidelberg 2012
Abstract: Laser assisted machining (LAM) has difficulties in estimating temperature after applying a LAM process due to its very small heat input area, large energy and movement. In particular, in the case of laser assisted turning (LAT) process, it is more difficult to estimate the temperature after preheating because it has a shape of ellipse when a laser heat source is rotated. A prediction method and thermal analysis method for heat source shapes were proposed as a square shaped member was preheated. The temperature distribution was calculated according to the rotation of the member. Compared with the results of the former study, the maximum temperature of the calculation results, 1 407.1 °C, is 8.5 °C higher than that of the square member, which is 1 398.6 °C. In a LAT process for a square member, the maximum temperature is 1 850.8 °C. It is recognized that a laser power control process is required because square members show a maximum temperature that exceeds a melting temperature at around a vertex of the member according to the rotation.
Key words: laser assisted machining; laser assisted turning; laser preheating; laser power control
1 Introduction
Trends in global machine tool industry have been changed as compact, lightweight and high integration in its parts according to the developments of automobile, aircraft and semiconductor industries. In particular, according to the increase in small quantity batch production, the reduction of development cycle in new products and the customized production of special purpose parts, there is a need to develop a process that responds to such increase [1-2]. For adapting to these trends, the development of new process that replaces the conventional process has been actively conducted. Thus, laser assisted machining (LAM) was proposed for the purpose of achieving process integration [3-4].
Laser assisted machine is a method that applies a machining process after softening a workpiece in which a preheating process is locally applied to its machining section using laser beams [5]. As LAM is combined with a computer numerical control (CNC) lathe, it becomes laser assisted turning (LAT). Because LAT shows several advantages, such as high productivity, reduction of manufacturing cost, high quality and low heat affected zone (HAZ), studies on the LAT have been largely conducted [6-8].
DUMITRESCU et al [9] investigated the LAT on AISI D2 iron using high power diode laser (HPDL). TIAN and SHIN [10] researched the chip formation and destruction behavior in a cutting process of silicon nitrides using multiscale finite element method (FEM). Also, LEI et al [11] estimated the temperature of a chip formation region with the change of machining depth in LAT by applying a three-dimensional heat transfer simulation. LEI et al [12] verified a machining mechanism using scanning electron microscope (SEM) and performed a model of the behavior of silicon nitrides according to temperature as a mathematical way. ROZZI et al [13-14] investigated a thermal reaction for the irradiation of CO2 laser to rotate a workpiece using a three-dimensional thermal transfer analysis. AHN and LEE [15] estimated the final temperature distribution after applying a machining process for a large area with a moving heat source using FEM for blocks and round bars. According to these researches, it is very difficult to estimate the temperature after finishing a machining process due to its very small heat input area and large energy and movement.
There are certain limitations in researches that have been performed with focus only on the LAT of cylinder shapes. Therefore, studies on the LAT for complex geometries are required, such as square member, pentagon member, and spline shape member. However, the LAT for complex geometries is very difficult because the shape of a laser heat source can be varied according to the rotation of a workpiece.
In this work, a prediction method for heat source shapes was proposed as a square member shaped workpiece was processed using LAT. A thermal analysis method was also presented. The calculation results were compared with the results of the prior study of round bars [11].
2 Determination of analysis model
2.1 Determination of LAT conditions
Figure 1 shows workpieces which are round bar in former study (see Fig. 1(a)) and square member in this work (see Fig. 1(b)). A square member that has same cross-sectional areas was considered for comparing it with the analysis of round bars performed by ANH and LEE [15]. The material of this workpiece was SM45C. Table 1 gives the analysis condition.
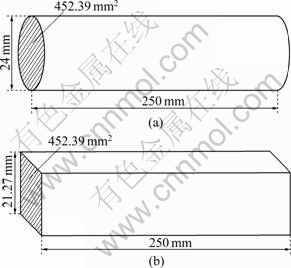
Fig. 1 Geometry information of workpieces: (a) Round bar used in former study; (b) Square member used in this work
Table 1 Conditions of analysis
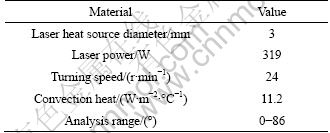
The thermal energy of this workpiece is transferred to the surface of the workpiece by the irradiation of laser beams and the equation of heat transfer can be defined as
 (1)
(1)
where k means heat conductivity of the solid, W/(mm・K); T means temperature, K; SE means energy source, W; ρ means density, kg/m3; cp means specific heat, J/(kg・K); t menas time, s.
The thermal energy radiated form of the workpiece caused by convection is expressed as [11]
 (2)
(2)
where h means convective heat transfer coefficient, W/(mm2・K); Ts means surface temperature, K; T∞ means the air temperature, K.
Figures 2 and 3 represent the thermal conductivity and specific heat of SM45C, respectively.

Fig. 2 Thermal conductivity of SM45C
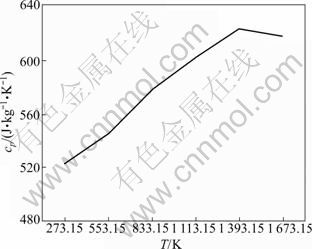
Fig. 3 Specific heat of SM45C
2.2 Heat source shape and moving distance according to rotation of workpiece
According to the rotation of workpiece in the LAT of square member, the shape of laser heat source is changed from a circle to an ellipse. As shown in Fig. 4, the rotation angle is determined by 0° at initial preheating and the shape of the laser heat source is presented as a circle.
As shown in Fig. 5, the shape of heat source becomes an ellipse as the length of heat source is deformed to the rotation-axis according to the rotation of the workpiece. Here, the length of major axis is determined as A and can be calculated by
 (3)
(3)
where r is the radius of the laser beam.

Fig. 4 Shape of heat source at initial heating

Fig. 5 Change in shape of heat source
As shown in Fig. 6, the center of laser heat source O is moved to the vertex of the workpiece C according to the rotation of the workpiece. The distance B, between the center of laser heat source O and the vertex of workpiece C can be calculated by
 (4)
(4)
where d is the length of the side of the square member.
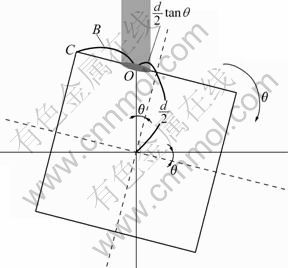
Fig. 6 Drawing to calculate distance B of heat source
As shown in Fig. 7, the shape of heat source is divided into A1 and A2 at vertex C, as the laser heat source approaches to a vertex of square member. The rotation angle θ can be obtained when the laser beam reaches the vertex of the square member:
 (6)
(6)
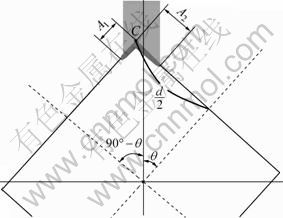
Fig. 7 Diagram of laser heat source irradiation around vertex of square member
3 Finite element analysis
3.1 Analysis by considering rotation
A commercial program of ANSYS Workbench V12 was used to implement a finite element analysis of the laser heat source according to the rotation. By applying the shape of laser heat source according to the rotation of workpiece, a three-dimensional (3D) model was generated, as shown in Fig. 8. For the square member, a total of 13 heat input regions were sequentially determined.

Fig. 8 3D model of square member
Figure 9 shows a finite element model that has 543 896 nodes and 132 794 elements. The mesh size of whole workpiece was determined by 1 mm. And the mesh size of laser heat input area was determined by a size of 0.5 mm in order to increase the accuracy of analysis.
Figure 10(a) shows the computed temperature distribution of square member. Figure 10(b) shows the maximum temperature with respect to the rotation angle. It is shown that the temperature rapidly increases from the initial heating to the rotation angle of 14° and smoothly decreases at the angles from 14° to 47°. It is considered that the energy density gradually decreases because the area of laser heat source is increased by changing to an ellipse according to the rotation of the member.

Fig. 9 Finite element model of square member
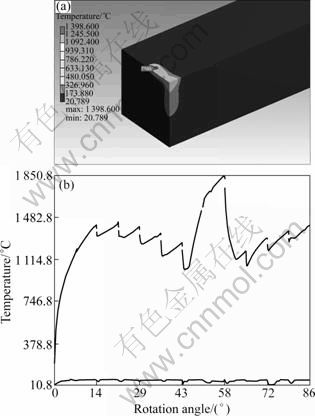
Fig. 10 Temperature distribution of square member
As the rotation is processed, the temperature is 1 850.8 °C at the rotation angle of about 57° and presents at the vertex of the workpiece. Figure 11 shows the temperature distribution at this rotation angle. It is considered that the energy density increases due to the fact that the energy is concentrated on the vertex, which has a small volume. The ellipse is gradually changed to a circle at the rotation angles from 60° to 86° which causes an increase in the temperature again. It is recognized that there are some ups and downs in the temperature during
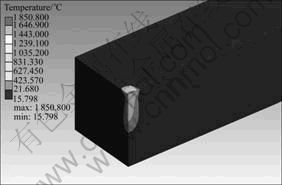
Fig. 11 Temperature distribution of square member angled at 57°
its analysis process because interrupt heating are applied for the analysis.
3.2 Comparison with prior analysis of round bar
Figure 12 shows the comparison of maximum temperature for the round bar by former analysis and for square member by this analysis. In the case of square member, it represents large changes in the temperature according to rotation angles, while the round bar shows no significant changes in the temperature after a specific rotation angle. Thus, it is necessary to control the laser power and energy density in the LAT of square member according to rotation angles.
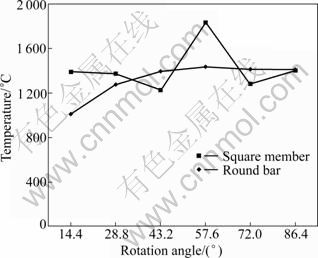
Fig. 12 Comparison of round bar and square member
Figure 13(a) represents the temperature distribution of the analysis for the round bar [11]. Figure 13(b) shows the maximum temperature with respect to the rotation angle. For comparing it with the results obtained in this work, the results are presented at the rotation angles from 0° to 86°. The maximum temperature is 1 407.1 °C and 8.5 °C higher than that of the square member, which is 1 398.6 °C. Because the results of conventional study agrees well with the results presented in this work, the validity of this work is also verified.
Figure 14 shows the temperature distribution of the round bar at the rotation angle of 57°. In the case of square member, the maximum temperature is 1 850.8 °C. In the case of round bar, it is 1 428.6 °C which is 422.2 °C lower than that of the square member.
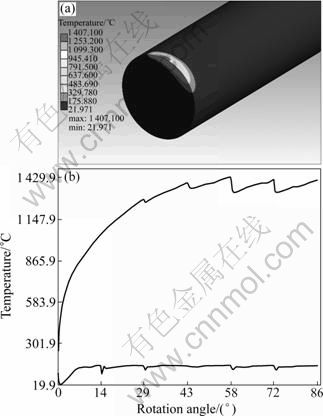
Fig. 13 Temperature distribution of round bar of former analysis
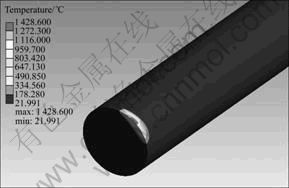
Fig. 14 Temperature distribution of round bar angled at 57°
3.3 Prevention of material melting by power control
In the case of SM45C used in this work, the melting point is 1 455 °C. In a LAT process for a square member, the temperature is 1 850.8 °C at the rotation angle of 57°, which may lead to a certain melting. Thus, the laser power control is to be performed for applying the preheating process to a vertex of the member.
Table 2 gives the results of the analysis at the angle around 57° after controlling the laser power levels as 210, 220 and 230 W while the laser power is maintained by 319 W except at angle around 57°.
Figure 15 shows the results of the analysis after performing a laser power control by 220 W. Because the melting point of SM45C is 1 384.6 °C, which is 70.4 °C lower than that of 1 455 °C, it is considered that there are no meltdowns due to the laser preheating.
Table 2 Result by laser power control

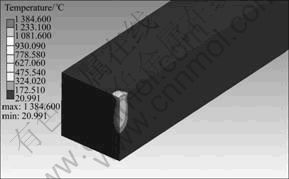
Fig. 15 Thermal distribution of square member by laser power control
4 Conclusions
1) In the LAT of square member, the shape of laser heat source is changed to an ellipse according to the rotation due to the elongation of shape along the rotation axis.
3) According to the increase in the length of major axis of ellipse, the surface temperature decreases. Whereas, the surface temperature increases according to the decrease in the length of major axis.
3) In the case of round bar, although it shows no changes in the temperature according to the rotation, a square member presents the maximum temperature that exceeds the melting temperature at around vertex. Thus, a laser power control is required for LAT of square member.
References
[1] KANG I S, KIM J H, HONG C S, KIM J S. Development and evaluation of tool dynamometer for measuring high frequency cutting forces in micro milling [J]. International Journal of Precision Engineering and Manufacturing, 2010, 11(6): 817-821. (in Korean)
[2] PARK J H, BAE H Y, KIM Y. Determination of tensile properties and residual stresses of Ni-Co thin films [J]. International Journal of Precision Engineering and Manufacturing, 2010, 11(5): 771-778. (in Korean)
[3] CHANG C W, KUO C P. Evaluation of surface roughness in laser-assisted machining of aluminum oxide ceramics with taguchi method [J]. International Journal of Machine Tools and Manufacture, 2007, 47(1): 141-147.
[4] JUNG J W, LEE C M. A study on the cutting tool and holder deformation prediction undergoing laser-assisted machining with moving heat sources [J]. Journal of the Korean Society for Precision Engineering, 2009, 26(9): 217-134. (in Korean)
[5] DUBEY A K, YADAVA V. Laser beam machining [J]. International Journal of Machine Tools and Manufacture, 2008, 48(6): 609-628.
[6] KIM K S, KIM J H, CHOI J Y, LEE C M. A review on research and development of laser assisted turning [J]. International Journal of Precision Engineering and Manufacturing, 2011, 12(4): 753-759. (in Korean)
[7] REBRO P A, SHIN Y C, INCROPERA F P. Design of operating conditions for crackfree laser-assisted machining of mullite [J]. International Journal of Machine Tools and Manufacture, 2004, 44(7): 677-694.
[8] KUAR A S, DOLOI B, BHATTACHARYYA B. Modelling and analysis of pulsed Nd:YAG laser machining characteristics during micro-drilling of zirconia (ZrO2) [J]. International Journal of Machine Tools & Manufacturing, 2006, 46(12): 1301-1310.
[9] DUMITRESCU P, KOSHY P, STENEKES J, ELBESTAWI M A. High-power diode laser assisted hard turning of AISI D2 tool steel [J]. International Journal of Machine Tools & Manufacturing, 2006, 46(15): 2009-2016.
[10] TIAN Y, SHIN Y C. Laser-assisted machining of damage-free silicon nitride part with complex geometric features via in-process control of laser power [J]. Journal of America Ceramic Society, 2006, 89(11): 3397-3405.
[11] LEI S, SHIN Y C, INCROPERA F P. Experimental investigation of thermo-mechanical characteristics in laser-assisted machining of silicon nitride ceramics [J]. Journal of Manufacturing Science and Engineering, 2001, 123(1): 639-646.
[12] LEI S, SHIN Y C, INCROPERA F P. Deformation mechanisms and constitutive modeling for silicon nitride undergoing laser-assisted machining [J]. International Journal of Machine Tools and Manufacturing, 2000, 40(15): 2213-2233.
[13] ROZZI J C, PFEFFERKORN F E, INCROPERA F P, SHIN Y C. Transient, three dimensional heat transfer model for the laser assisted machining of silicon nitride: I. Comparison of predictions with measured surface temperature histories [J]. International Journal of Heat and Mass Transfer, 2000, 43(8): 1409-1424.
[14] ROZZI J C, PFEFFERKORN F E, INCROPERA F P, SHIN Y C. Transient, three dimensional heat transfer model for the laser assisted machining of silicon nitride: II. Assessment of parametric effects [J]. International Journal of Heat and Mass Transfer, 2000, 43(8): 1424-1437.
[15] AHN S H, LEE C M. A study on large-area laser processing analysis in consideration of the moving heat source [J]. International Journal of Precision Engineering and Manufacturing, 2011, 12(2): 285-292. (in Korean)
(Edited by DENG Lü-xiang)
Foundation item: Project(70004782) supported by the Regional Strategic Technology Development Program of the Ministry of Knowledge Economy (MKE), Korea; Project(2011-0017407) supported by National Research Foundation (NRF) of Korea; Work financially supported by the Second Stage of Brain Korea 21 Projects
Received date: 2011-05-24; Accepted date: 2011-10-10
Corresponding author: LEE Choon-man, Professor, PhD; Tel: +82-55-213-3622; E-mail: cmlee@changwon.ac.kr