Trans. Nonferrous Met. Soc. China 24(2014) 1709-1716
Friction stir keyholeless spot welding of AZ31 Mg alloy-mild steel
Zhong-ke ZHANG1, Xi-jing WANG1, Pei-chung WANG2, Gang ZHAO1
1. State Key Laboratory of Gansu Advanced Nonferrous Metal Materials, Lanzhou University of Technology, Lanzhou 730050, China;
2. Manufacturing Systems Research Lab, General Motors Research and Development Center, 30500 Mound Road, Warren, MI, 48090, USA
Received 3 July 2013; accepted 18 November 2013
Abstract: Friction stir keyholeless spot welding (FSKSW) using a retractable pin for 1.0 mm thick galvanized mild steel and 3 mm thick AZ31B magnesium alloy in a lap configuration was investigated. The process variables were optimized in terms of the joint strength. The effects of the stacking sequence on joint formation and the joining mechanism of FSKSW AZ31B-to-mild steel joints were also analyzed. It shows that the process window and joint strength are strongly influenced by the stacking sequence of the workpieces. While the process window is narrow and unstable for FSKSW of a magnesium-to-steel stack-up, a desirable process was established for the steel-to-magnesium stacking sequence, a desirable process and higher strength joint can be got when the steel-to-magnesium stacking sequence. XRD phase and EPMA analyses of the FSKSW joint showed that the intermetallic compounds are formed at the steel-to-magnesium interface, and the element diffusion between the mild steel and AZ31B magnesium alloy revealed that the joining methods for FSKSW joints is the main mechanical joining along with certain metallurgical bonding.
Key words: friction stir keyholeless spot welding; dissimilar alloys; mechanical property
1 Introduction
Magnesium alloys have a low density and high specific strength and are being considered for automotive components. Currently, steel accounts for the majority of the vehicle structure. VALANT et al [1] pointed out that the joining of magnesium alloy and steel during assembly appeared to be a key to widen the application of magnesium for reducing mass in vehicle structures. Therefore, the development of reliable magnesium-to- steel joints is important.
As a solid-state welding technology, friction stir welding (FSW) process provides a potential method to weld the dissimilar materials. HE et al [2] studied the friction stir welding of dissimilar metals of copper and stainless steel and got the good lap joints. CHEN et al [3] investigated the interface characteristics of lap joints of TC1 Ti alloy and LF6 Al alloy by friction stir welding. Dissimilar friction stir welding between 5052 Al alloy and AZ31 Mg alloy with the plate thickness of 6 mm was investigated by YAN et al [4]. WANG et al [5] examined the flow pattern of the welded material by observing the microstructural distribution of friction stir welded joints between dissimilar 2024 and 1060 aluminum alloy.
Some have been done on the welding of the Mg alloys and steel and high quality joints were produced compared with fusion welding technologies by FSW. WATANABE et al [6] studied the FSW weldability of AZ31 magnesium alloy/SS400 steel, and reported that the rotation speed and the position of the pin axis had a significant effect on the strength and the microstructure of the joint. THOMAS et al [7] demonstrated the feasibility of FSW of steel, and confirmed that the mechanical properties of low carbon steel joints by FSW can compare well with properties of parent metal compared well with parent metal properties. CHEN and NAKATA [8] studied the effect of tool geometry on the microstructure and mechanical properties of Mg to steel FSW welded joints.
Currently, two different friction stir keyholeless spot welding (FSSW) techniques have been developed. The first was invented by Japan Mazda motor company, the basic principle was shown by MERZOUG et al [9].
FUJII et al [10] first fundamentally established the FSJ equipment, and investigated various properties of the friction spot joint. While this method left a keyhole on the spot weld after the welding was completed. It had the advantages of high welding speed and simple welding equipment and control system. In order to avoid the presence of the keyhole, GKSS of Germany invented the second method which was able to completely fill the keyhole [11]. It was referred to as the ��Refill�� FSSW process. The ��Refill�� FSSW process was performed using a three pieces tool system consisting of a clamp ring, outer shoulder and inner pin by LATHABAL [12]. Assuming no material loss, this process sequence left the hole completely ��refilled�� with minimal or no surface indentation. The stationary clamping ring held the upper and lower sheets firmly in contact during the process and prevented sheet lifting, separation, and expulsion and spitting of material. TIER et al [13] investigated the influence of refill FSSW parameters on the microstructure and shear strength of 5042 aluminium welds, and found that the most significant variables were plunge depth and tool rotational speed. This method fitted the light metals with high plastic and low melting point of extrusion weld metal, but was poor for high strength and high melting point steel to backfill the keyhole. So the new FSKSW process was developed. SHEN et al [14] investigated the microstructure and mechanical properties of 7075-T6 aluminum alloy joints by refill friction stir spot welding (RFSSW) and found that the hook played a crucial role in determining the mechanical properties. LI et al [15] investigated friction-stir welded defects and weld repair process of thick aluminum plates with telescopic stir-pin.
Although some studies have been done on FSW of Mg-to-steel, little work has been reported on FSSW of Mg-to-steel without a keyhole. Since the cosmetic appearance is critical for the exterior panels of vehicle structures, it is essential that friction stir keyholeless spot welding (FSKSW) of dissimilar materials can be obtained. The present study undertakes the task to experimentally develop a process to avoid leaving a keyhole in FSKSW of 3.0 mm thick AZ31B-1.0 mm thick galvanized mild steel.
2 Experimental
3.0 mm thick AZ31B sheet and 1.0 mm thick zinc coated mild steel (i.e., Q235) were used in this study. The chemical compositions and mechanical properties of these materials are listed in Tables 1 and 2, respectively.
The lap-shear joint configuration, as shown in Fig. 1, was selected for this study. The joints were fabricated from 200 mm��50 mm sheets. A spot weld was located in the center of an overlap distance of 50 mm. A fixture was used to ensure consistent weld placement.
Figure 2 shows the schematics of FSKSW process. At the start of welding, the rotating tool is moved downward, and the pin is plunged into the workpiece to a desired depth, as shown in Fig. 2(a). When the rotating pin abuts against the steel, frictional heat is generated which softens the steel. As the shoulder is moved downward, it will contact the surface of the surface of the steel workpiece at which point the pin is inserted into the materials, as shown in Fig. 2(b). After a short time of welding, the rotating tool moves forward and simultaneously the pin is retracted slowly, as shown in Fig. 2(c). In the process, as the rotating tool moves forward, a joint without keyhole is gradually developed. The keyhole is filled by the plastic flow of the materials, which is driven by the shoulder rotation. When the distance of the rotating tool forward reaches to half shoulder diameter, the tool is stopped, and the pin is retracted and extracted from the weld, as shown in Fig. 2(d).
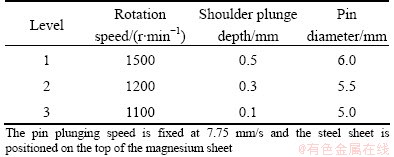
The design-of-experiment (DOE) on FSKSW of 3 mm thick AZ31-1 mm thick galvanized mild steel was conducted to optimize the process variables in terms of the joint strength. An orthogonal test matrix over a range of rotation speed, pin diameter, and shoulder plunge depth was designed. Table 3 lists the orthogonal factors-level of the process parameters. The experiments described in this study were performed using the tools made of WC-Co alloy by the powder metallurgy. The tools have a flat shoulder with a diameter of 18 mm and a cylindrical pin with the diameters of 5, 5.5 and 6.0 mm, respectively.
Table 1 Chemical compositions and mechanical properties of AZ31B magnesium alloys

Table 2 Chemical compositions and mechanical properties of mild steel (i.e. Q235)

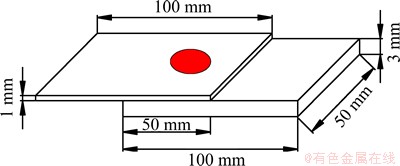
Fig. 1 Specimen geometry and dimensions of friction stir spot welded joint
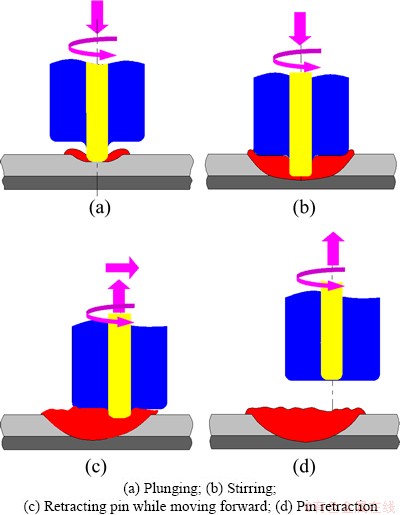
Fig. 2 Schematics of FSKSW process
Table 3 Experimental factors and levels
Quasi-static tests were performed by loading each specimen to failure in a WE-100 universal tensile tester according to the standard ASTM D1002-2001 for the determination of joint strength. To examine the microstructure of the welds, the specimens were etched first by 3% nitric acid solution to reveal the steel microstructure, and subsequently by 3% nitric acid aqueous solution to reveal the aluminum microstructure. The cross-section of the welded samples was examined by optical microscopy and scanning electron microscopy. The XJP-200-type inverted metallurgical microscope was used to obtain the micrographs. 6700F SEM was applied to observe the microstructure, and 1600 EPMA was applied to the composition analysis. XRD analysis was facilitated using D/Max-2400 X-ray powder diffraction.
3 Results and discussion
3.1 Friction stir keyholeless spot welded joints
To investigate weld formation in friction stir keyholeless welding (FSKSW) of 3 mm thick AZ31 Mg alloy-1 mm thick galvanized mild steel, a design-of- experiments (DOE) was performed , as listed in Table 3. For the purpose of comparison, friction stir spot welding (FSSW) of AZ31B Mg alloy-mild steel joints was also conducted. Lap joints were fabricated where the steel workpiece was placed on the top of the AZ31B Mg alloy workpiece. Figures 3(a) and (b) show the weld appearances of FSSW and FSKSW joints, respectively. While there is a keyhole on the FSSW sample, it is filled with metal for the FSKSW joint. To examine the weld quality, the cross-sections along the longitudinal direction (i.e. parallel to the long axis of the coupon) of FSSW and FSKSW joints were prepared, and the results are shown in Figs. 4(a) and (b), respectively. As shown in Fig. 4(a), a keyhole was formed on the top workpiece (steel) of FSSW joint. Careful examination of the photograph shows that a block of steel fragment is stuck down at the bottom of the weld. These results indicate that the steel workpiece is severely stirred by the pin during the process. As the pin rotates, it heats up the steel directly beneath it. As the pin continues to plunge down, it is essentially acting as a punch (note as the thinning of ��hook�� 1) whereby the steel fragment is caught beneath the pin, the fragment eventually yields (leaving hooks 1 and 2) and ends up in the bottom of the keyhole. The joining of AZ31B Mg alloy-steel is by the deformed steel hooks 1 and 2. Similar weld formation is also observed for FSKSW joints shown in Figs. 3(b) and 4(b) except that the keyhole is filled with mushy steel by the pin shoulder toward the end of the joining process. At the end of the FSKSW process, the pin starts to retract and move forward after the interruption. With the pin rotating and the pressing of the shoulder, the mushy metal backfills the keyhole, as shown in Fig. 4(b). Furthermore, there is a significant flow from the moving side to the keyhole side. As a result, although there is a mixing of the material, it is not the mixing of the steel and Mg. Rather the Mg is plasticized and flowing around the steel, it is the movement which causes the steel fragment to move off-center.
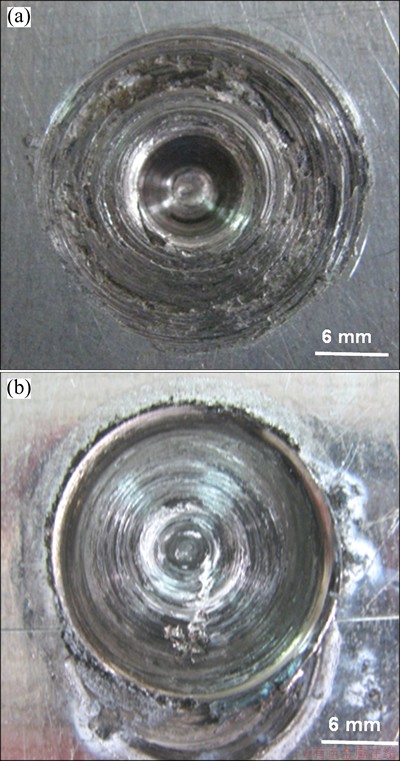
Fig. 3 SEM images of FSSW of 3.0 mm thick AZ31B Mg alloy-1.0 mm thick galvanized mild steel with a keyhole (a), and FSKSW of 3.0 mm thick AZ31B Mg alloy-1.0 mm thick mild steel without a keyhole (b)
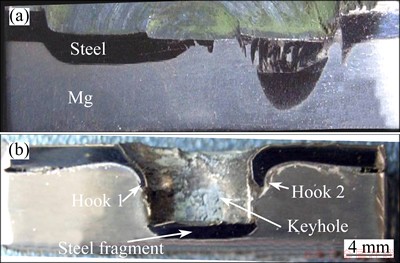
Fig. 4 SEM images of longitudinal section of FSSW (a) and FSKSW of 3 mm thick AZ31B-1mm thick mild steel (b)
3.2 Effect of stacking sequence on joint formation
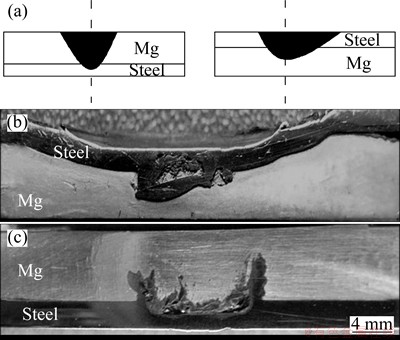
One of the critical variables in this study is the part stacking sequence, as shown in Fig. 5(a). Figures 5(b) and (c) show the effect of the part stacking sequence on the weld formation of FSKSW joints. As shown in Fig. 5(b), although it is difficult to stir the steel fully when the steel is placed on the top of the magnesium, a mechanical bond is formed at the interface. This mechanical bond is likely attributed to the characteristics of the steel and magnesium alloy. JANA et al [16] found the similar results on their study of dissimilar FSW of AZ31 to steel in a lap configuration. On the other hand, if the AZ31B is placed on the top of the steel, significant amount of the frictional heat is produced at the magnesium sheet. Since the AZ31B has better thermal conductivity and lower yield strength than the steel, the generated frictional heat softened and plasticized the magnesium workpiece. As the welding time increases, most of frictional heat dissipates to the magnesium instead of the steel. As a result, the temperature of the steel workpiece is still relatively low to get the steel plasticized. Consequently, the joint with poor quality is produced.
 0
0
Fig. 5 Schematic illustration of stacking sequence (a), effect of part stacking sequence on weld formation of FSKSW mild steel-AZ31B (b) and AZ31B-mild steel (c)
3.3 Process development
Extensive tests were performed to optimize the welding variables for FSKSW of 3.0 mm thick AZ31B-1.0 mm thick galvanized steel. A quadratic regression analysis of various variables was conducted. The peak load to fracture of the joints (i.e., joint strength) was the metric used for process optimization. As shown, nine experimental trials were pre-designed according to the mixed-level L9 (3��4) array, and the corresponding porosity ratio Xk was obtained and listed in Table 4, where Ki is the sum of output response Xk for certain factor at level i; ki is the mean value of Xk; R is the range of each factor, R=max{ki}�Cmin{ki}. R reflects the effect of each factor on the joint strength. When all joint attributes are considered (i.e., appearance, discontinuity, and strength), the optimal process window for FSKSW of 3.0 mm thick AZ31B and 1.0 mm thick steel is the combination of a rotation speed of 1200 r/min, a shoulder plunge depth of 0.3 mm and a pin diameter of 5.5 mm.
Table 4 Orthogonal design for process optimization
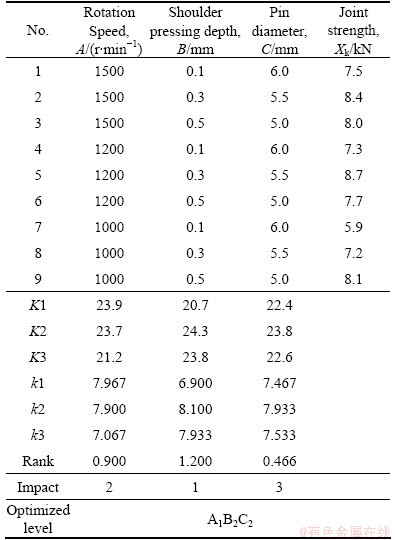
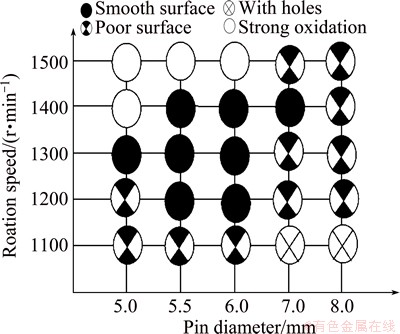
Fig. 6 Process window for FSKSW of 3.0 mm thick AZ31B- 1.0mm thick galvanized mild steel
A process window in a graphical representation of various combinations of the rotation speed and pin diameter that produce satisfactory friction stir keyholeless welds is shown in Fig. 6. A combination of a rotation speed in the range of 1200-1400 r/min, a pin diameter in the range of 5.5-7.0 mm, and a shoulder plunge depth of 0.3 mm produces sound FSKSW welds. However, when the rotational speed is less than 1200 r/min, a wormhole at the retreating side of the weld nugget is observed. LAKSHMINARAYANAN and BALASUBRAMANIAN [17] concluded that it was due to insufficient heat generation and insufficient metal transportation. This may be attributed to insufficient frictional heat and metal transportation. On the other hand, when the rotational speed is greater than 1500 r/min, the oxidation of the steel becomes apparent due to excessive frictional heat, and the magnesium powder stirred by the pin is burned out as the temperature exceeds approximately 550 ��C. As a result, little material is left to fill the keyhole, and consequently an apparent tunnel is left on the surface of the workpiece. Similarly, when the pin diameter is greater than 7.0 mm, the keyhole discrepancy is observed. This is likely caused by insufficient metal flow to refill the keyhole. When the pin diameter is less than 5.5 mm, the wormhole at the interface of the AZ31B and steel is observed, which is likely due to insufficient heat generation caused by inadequate flow of the AZ31B at the bottom side of the joint.
3.4 Effect of process variables on joint strength
Figure 7 shows the effect of the process variables on the strength of the FSKSW joints. It is found that the tool rotation speed essentially determines the frictional heat. When the bottom AZ31B is properly stirred, and the frictional heat is moderate, the weld surface appearance is sound. Furthermore, the pin diameter affects the materials flow during the stirring. The selection of the suitable pin diameter results in better material flow and hence produces joints with few discrepancies.
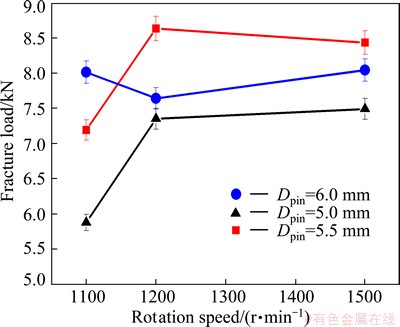
Fig. 7 Effect of process variables on strength of FSKSW of 3.0 mm thick AZ31B-1.0 mm thick galvanized mild steel
3.5 Microstructure of FSKSW weld
After the FSKSW process was optimized, the microstructure of the weld was examined. Figure 8 shows the microstructures of various locations in an optimized steel/Mg weld along the pin moving-forward direction, the process variables are rotation speed 1200 r/min, plunge depth 0.3 mm, pin diameter 5.0 mm and distance of tool forward 2.5 mm. As shown in Fig. 8(a), Zone A, located underneath the pin, exhibits elongated grains within the steel fragment directly beneath the full penetration of the pin. The deformed grains result from the high compressive stirring force. While the pin is stirring, significant frictional heat is generated, and consequently the dynamic recrystallization of the grains occurs at Zone B, as shown in Fig. 8(b). As the results of the stir force and high temperature, fine grains are generated at the boundary of the original grains. The stirring force is low as in Zones C and F, which refer to Figs. 8(c) and (f), respectively, the grain size is relatively uniform. However, significant overheating develops at Zone D which represents the AZ31B under the pin, as shown Fig. 8(d), and as a result the AZ31B is heated severely and likely becomes molten near the steel. Zone E represents the thermo-mechanical affected zone where dynamic recrystallization occurs under the stir force and high temperature, and consequently the magnesium grains near the steel become fine and uniform, as shown in Fig. 8(e). At Zone F, the AZ31B is mainly affected by the frictional heating under the shoulder and the grains of the AZ31B have grown homogeneous, as shown in Fig. 8(f). The mixture of the steel and AZ31B can be seen at the position of the pin insert, as shown in Fig. 8(g).
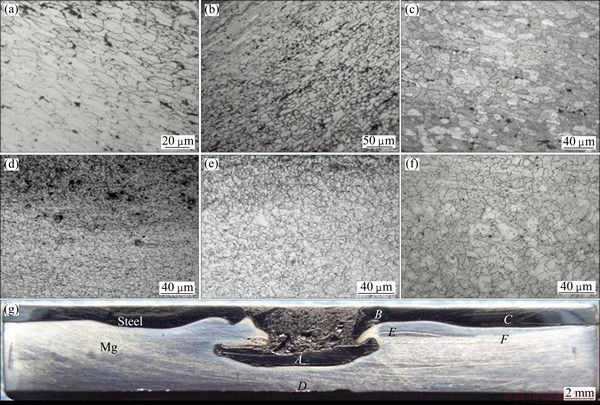
Fig. 8 Microstructures in a longitudinal section of FSKSW 1.0 mm thick galvanized mild steel-3 mm thick AZ31B at pin moving-forward stage: steel at Zones A (a), B (b), C (c), and AZ31B at Zones D (d), E (e), F (f), and macroscopic view (g)
3.6 Bond mechanism
To identify the bonding mechanism in FSKSW of 3 mm thick AZ31B and 1 mm thick steel, line scan analyses along the longitudinal sections of the joints shown in Fig. 9(a) are performed, and the results are shown. Figs. 9(b) and (c) which show the scan analysis results for Zones G and H, respectively. As shown in Fig. 9(b), the diffusion between the steel and AZ31B is apparent. Many islands consist of Fe with Mg elements, indicating that both Fe and Mg elements are stirred and mixed with each other, and form a mechanical bond. Furthermore, the diffusion of Al and O elements is observed in the weld nugget zone, and there is also some oxygen element dissolved in the weld zone. While the diffusion of O, Fe and Mg elements occurs at Zone G, it is not apparent at Zone H, as shown in Fig. 9(c). These results suggest that the mixing of the magnesium alloy and steel during FSKSW is different from that of FSSW which is formed only by the material flow around the cylindrical pin because of the movement and draw back of the pin. The material flow leads to the hook formation near the pin boundary. BADARINARAYAN et al [18] studied that the hook formation and top sheet thinning were the key geometric characteristics of the FSSW joint, and the geometry of the hook can be used as a basis to explain the failure mechanism observed in the spot welds. The aforementioned results indicate that while a mechanical mixture of the magnesium and steel is formed, there is a significant diffusion between the Mg and Fe in FSKSW joints.
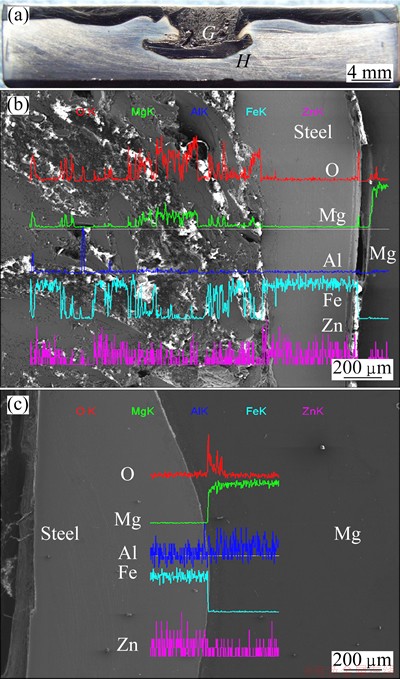
Fig. 9 SEM image of joint (a) and main element analysis in cross-section of FSKW 3.0 mm thick AZ31B and 1.0 mm thick steel at various stages around zones G (b), and H (c) during pin moving-forward stage
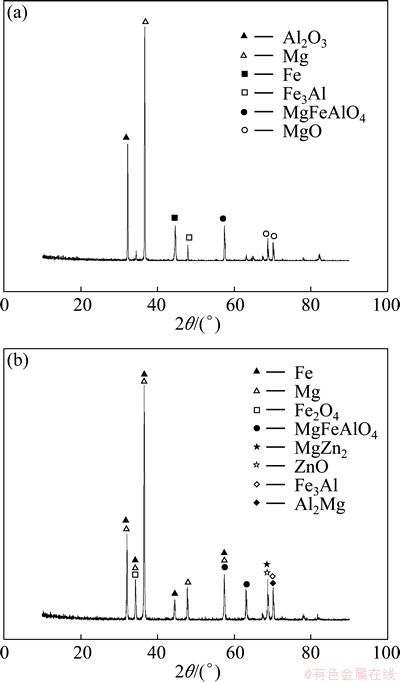
Fig. 10 XRD analysis along transverse (a) and longitudinal (b) cross-section of FSKSW 3 mm thick AZ31B sheet to 1.0 mm thick zinc-coated mild steel
3.7 Formation of intermetallic compounds
To identify the compounds formed in the layered structure, the cross sections along the transverse and longitudinal directions of the FSKSW joints are analyzed by XRD, and the results are shown in Figs. 10(a) and (b),
respectively. While the intermetallic compounds Fe3Al, and MgFeAlO4 are detected from the transverse cross- section, intermetallic compounds Fe3 Al, and MgFeAlO4, MgZn2 and Al2Mg are detected along the longitudinal cross-section. The intermetallic compounds are composed of Fe and Al elements, and Mg and Zn elements or Zn and Al elements. These occurred at the cross sections along the transverse and longitudinal sections, respectively. These results suggest that certain metallurgical reactions occur at the interface between the AZ31 and galvanized mild steel.
4 Conclusions
1) Friction stir keyholeless spot welding (FSKSW) of 3 mm thick AZ31B sheet to 1.0 mm thick zinc-coated mild steel (i.e., Q235) was developed using a special power unit with a retractable pin tool. To obtain a sound joint, it is necessary to place the steel workpiece on the top of the magnesium as the stacking sequence is suitable for metal plasticized and heat distribution.
2) The process variables of FSKSW were optimized in terms of the joint strength. Statistical analyses of the test results indicated that the pin diameter is found to be the most influential process parameter followed by the rotation speed and shoulder pressing depth in turn.
3) Interfacial phenomenon of FSKSW AZ31B- coated mild steel was analyzed. Both steel and AZ31 were stirred and fully mixed, resulting in the formation of thick intermetallic compounds at the steel-to- magnesium interface along with elemental diffusion.
4) The optimal process parameters for FSKSW of 3.0 mm thick AZ31B and 1.0 mm thick steel is the combination of a rotation speed of 1200 r/min, a shoulder plunge depth of 0.3 mm and a pin diameter of 5.5 mm.
References
[1] VALANT M, SOUNDARARAJAN M V, KOVACEVIC R. A novel tool design for friction stir spot welding [C]//ASM 7th International Conference on Trends in Welding Research. Pine Mountain, GA, 2005: 201-206.
[2] HE Di-qiu, XU Shao-hua, PENG Jian-hong, WANG Jian, HE Shu-jun. Microstructure of friction stir welding lap joint between pure copper and stainless steel [J]. The Chinese Journal of Nonferrous Metals, 2012, 22(9): 2608-2613. (in Chinese)
[3] CHEN Yu-hua, NI Quan, KE Li-ming. Interface characteristic of friction stir welding lap joints of Ti/Al dissimilar alloys [J]. Transactions of Nonferrous Metals Society of China, 2012, 22(2): 229-304.
[4] YAN Yong, ZHANG Da-tong, QIU Cheng, ZHANG Wen. Dissimilar friction stir welding between 5052 aluminum alloy and AZ31 magnesium alloy [J]. Transactions of Nonferrous Metals Society of China, 2010, 20: s619-s623.
[5] WANG Xi-jing, ZHANG Zhong-ke, LI Jing. Plastic flow pattern and its effect in friction stir welding of A2024 and A1060 [J]. Transactions of Nonferrous Metals Society of China, 2006, 16: s1336-s1341.
[6] WATANABE T, KAGIYA K, YANAGISAWA A, TANABE H. Solid state welding of steel and magnesium alloy using a rotating pin�Csolid state welding of dissimilar metals using a rotating pin [J]. Quart J Jpn Weld Soc, 2006, 24: 108-115.
[7] THOMAS W, THREADGILL P, NICHOLAS E. Feasibility of friction stir welding steel [J]. Science and Technology of Welding & Joining, 1999, 4: 365-372.
[8] CHEN Y, NAKATA K. Effect of tool geometry on microstructure and mechanical properties of friction stir lap welded magnesium alloy and steel [J]. Materials & Design, 2009, 30: 3913-3919.
[9] MERZOUG M, MAZARI M, BERRAHAL L, IMAD A. Parametric studies of the process of friction spot stir welding of aluminium 6060-T5 alloys [J]. Materials & Design, 2010, 31: 3023-3028.
[10] FUJII H, CUI L, TSUJI N, MAEDA M, NAKATA K, NOGI K. Friction stir welding of carbon steels [J]. Materials Science and Engineering A, 2006, 429: 50-57.
[11] SEDERSTROM J H. Spot friction welding of ultra high-strength automotive sheet steel [D]. Provo: Brigham Young University, 2007: 19-22.
[12] LATHABAL S. Friction stir spot welding supports light-weighting in the automotive industry [J]. Australasian Welding Journal, 2005, 50: 20-24.
[13] TIER M, ROSENDO T, dos SANTOS J, HUBER N, MAZZAFERRO J, MAZZAFERRO C, STROHAECKER T. The influence of refill fssw parameters on the microstructure and shear strength of 5042 aluminium welds [J]. Journal of Materials Processing Technology, 2013, 213: 997-1005.
[14] SHEN Zhi-kang, YANG Xin-qi, ZHANG Zhao-hua, CUI Lei, LI Tie-long. Microstructure and failure mechanisms of refill friction stir spot welded 7075-T6 aluminum alloy joints [J]. Materials & Design, 2013, 44: 476-486.
[15] LI Bo, SHEN Yi-fu, HU Wei-ye. Friction-stir welded defects and repairing weld process of thick aluminum plates with telescopic stir-pin [J]. The Chinese Journal of Nonferrous Metals, 2012, 22(1): 62-71. (in Chinese)
[16] JANA S, HOVANSKI Y, GRANT G J. Friction stir lap welding of magnesium alloy to steel: A preliminary investigation [J]. Metallurgical and Materials Transactions A, 2010, 41: 3173-3182.
[17] LAKSHMINARAYANAN A, BALASUBRAMANIAN V. Process parameters optimization for friction stir welding of RDE-40 aluminium alloy using Taguchi technique [J]. Transactions of Nonferrous Metals Society of China, 2008, 18: 548-554.
[18] BADARINARAYAN H, YANG Q, ZHU S. Effect of tool geometry on static strength of friction stir spot-welded aluminum alloy [J]. International Journal of Machine Tools and Manufacture, 2009, 49: 142-148.
þ������Ħ���㺸
���ҿ�1����ϣ��1��������2���� ��1
1. ����������ѧ ����ʡ��ɫ�����²���ʡ�����������ص�ʵ���ң����� 730050��
2. Manufacturing Systems Research Lab, General Motors Research and Development Center, 30500 Mound Road, Warren, MI, 48090, USA
ժ Ҫ�����ÿɻس���Ľ���Ħ���㺸װ�ã���1 mm���п�ְ��3 mm��AZ31þ�Ͻ����н���Ħ���㺸�����������Ż����Լ�������Ϊ����ָ����й����Ż����о����λ�õ�Ӱ�켰����Ħ���㺸�����ӻ�������������������ʽ�Խ�ͷ��ѧ�����кܴ�Ӱ�죬����þ�·�ʽ�������þ�ϸ��·�ʽ��XRD��EPMA��ɨ�����������þ�ֽ�ͷ�γ�Fe3Al �� MgFeAlO4�Ƚ����仯���ͬʱ��һ������ɢ��Ϊ����ͷ���ӷ�ʽ��Ҫ���Ի�е���Ϊ����ͬʱ����ұ���ϡ�
�ؼ��ʣ�����Ħ���㺸�����ֲ��ϣ���ѧ����
(Edited by Chao WANG)
Foundation item: Projects (10902047, 51265030) supported by the National Natural Science Foundation of China
Corresponding author: Zhong-ke ZHANG; Tel: +86-931-2974594; Fax: +86-931-2973892; E-mail: zhangzke@lut.cn
DOI: 10.1016/S1003-6326(14)63244-1