Elastic and plastic deformation behavior analysis in small punch test for mechanical properties evaluation
来源期刊:中南大学学报(英文版)2018年第4期
论文作者:凌祥 杨思晟 杜鹏
文章页码:747 - 753
Key words:small punch test; mechanical properties; elastic energy; fracture characteristic
Abstract: In order to estimate deformation and mechanical properties of material accurately, elastic and plastic deformation behavior of small punch test was discussed in this paper. A two-dimensional finite element model was established based upon the Gurson-Tvergaard-Needleman(GTN) equation. According to the integration of load–displacement curves with different displacements, the evolution of elastic energy was obtained. The results show that the elastic energy increases quickly in the initial region and tends to be an approximate constant during the plastic bending phase. Meanwhile, an obvious change of the slope of load–displacement curve can be found in the elastic-plastic transition region. The macroscopic deformation and fracture feature were also discussed in order to verify the deformation analysis. Finally, the yield strength, tensile strength and elongation of AISI304 were obtained based on the analysis of deformation energy and percent fracture deflection. The results have a good agreement with that of conventional tensile tests, which may provide a theoretical basis of small punch analysis.
Cite this article as: YANG Si-sheng, LING Xiang, DU Peng. Elastic and plastic deformation behavior analysis in small

J. Cent. South Univ. (2018) 25: 747-753
DOI: https://doi.org/10.1007/s11771-018-3779-7

YANG Si-sheng(杨思晟), LING Xiang(凌祥), DU Peng(杜鹏)
School of Mechanical and Power Engineering, Nanjing Tech University, Nanjing 211816, China
 Central South University Press and Springer-Verlag GmbH Germany, part of Springer Nature 2018
Abstract: In order to estimate deformation and mechanical properties of material accurately, elastic and plastic deformation behavior of small punch test was discussed in this paper. A two-dimensional finite element model was established based upon the Gurson-Tvergaard-Needleman(GTN) equation. According to the integration of load–displacement curves with different displacements, the evolution of elastic energy was obtained. The results show that the elastic energy increases quickly in the initial region and tends to be an approximate constant during the plastic bending phase. Meanwhile, an obvious change of the slope of load–displacement curve can be found in the elastic-plastic transition region. The macroscopic deformation and fracture feature were also discussed in order to verify the deformation analysis. Finally, the yield strength, tensile strength and elongation of AISI304 were obtained based on the analysis of deformation energy and percent fracture deflection. The results have a good agreement with that of conventional tensile tests, which may provide a theoretical basis of small punch analysis.
Key words: small punch test; mechanical properties; elastic energy; fracture characteristic
Cite this article as: YANG Si-sheng, LING Xiang, DU Peng. Elastic and plastic deformation behavior analysis in small
punch test for mechanical properties evaluation [J]. Journal of Central South University, 2018, 25(4): 747–753. DOI: https://doi.org/10.1007/s11771-018-3779-7.
1 Introduction
One of the greatest challenges to prevent the catastrophic failure in fossil fuel power plant is to obtain the accurate mechanical properties of operating structure components [1–3]. However, much volume of materials can not be easily extracted without compromising component integrity. To overcome the limitation of standardized test samples, safety assessment methods have changed from conventional methods to non-standard tests. Small punch test (SPT), as a new kind of small specimen technology, was proposed in the early 1980s. Significant researches have proved that it can be used to estimate the fracture properties of in-service material with miniature-sized specimens [4]. To extend the application areas of this method, various correlations have been established between fracture parameters obtained from standard tests and load-displacement (L-D) curves of small punch test [5–7].
Despite a lot of empirical relations are recommended, a general expression which is proved to be appropriate for a wide range of materials does not exist till now. For yield strength, two different calculating ways (two tangents method and offset method) can be found in the analysis of yield load which separates elastic and plastic zones [8]. Nevertheless, the evaluation of yield load mostly depends on the manual operation [9]. For the accuracy of calculation, precision is required in operation to avoid difference caused by different operators and methods. On the other hand, an approximate linear relationship between maximum load and tensile strength was proved by MILI KA et al [10]. Various formulations were also proposed in recent years for eliminating the influence of experimental conditions [8, 11, 12]. The different geometry parameters introduced in these correlations are another focus needed to be studied.
In order to overcome the defect in the vast majority theories, ISSELIN et al [13] demonstrated that the elastic energy was stored in the deformation specimen and it could be released during the unloading process. A proper elastic deformation analysis is a more solid basis of the accurate yield strength estimation. Meanwhile, finite element analysis has received an increasing amount of attention as an effect tool for solving some complicated analysis of nonlinear factors in the small punch test [14, 15]; Especially in the discussion of elastic-plastic damage behavior, the finite element analysis presents a significant advantage [16, 17]. However, few studies have focused on the deformation behavior which can provide a comprehensive analysis of small punch test for optimizing the mechanical strength evaluation approaches.
In this research, a combination of experimental and numerical analysis was used to investigate the elastic and plastic deformation behavior of AISI304 in small punch test. A finite element model was established based on the Gurson-Tvergaard- Needleman (GTN) equation. On the basis of energy model, the evolution of elastic energy was analyzed with different deformation deflections. Meanwhile, deformation energy and percent fracture deflection were taken into account in the analysis of small punch test. Finally, a theoretical basis was provided for reasonable mechanical properties analysis by small punch test.
2 Experimental procedure
The material analyzed in this paper was AISI304 stainless steel, which has been increasingly employed in fossil fuel power plant. Conventional mechanical properties of material are estimated by using the standard tensile tests [18], which are listed in Table 1.
As shown in the Figure 1, a self-designed experimental device including a specimen holder, a punch and a steel ball (2.4 mm in diameter) was fitted on INSTRON 5869 testing machine. Prior to experiment, the round thin disk was ground and the final dimension was d 10×(0.5±0.02) mm. Then, the specimen was placed between the holders. The investigation of small punch test was carried out with a drop rate of 0.5 mm/min. The deformation of specimen occurred in the center and load– displacement curve was recorded under the indentation of ball.
Table 1 Room temperature mechanical parameters of AISI304 stainless steel

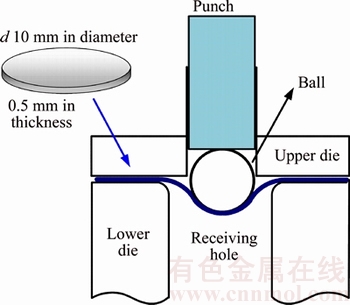
Figure 1 Schematic diagram of small punch test
3 Numerical simulation
To predict the deformation behavior accurately, a sufficiently fine finite element calculation of small punch test is necessary as it may ensure a good representation of deformation process. In previous researches, different models have been proposed to analyze small punch test [19–21]. In the ductile domain, the GTN model was recommended to estimate the elastic-plastic deformation and damage evolution process [22]. Therefore, a two-dimensional finite element model was established in this research based on the GTN constitutive equation by ABAQUS software as shown in Figure 2. Due to the symmetry of round specimen, one half of the model was established with CAX4R. The specimen was set as deformable and the ball was defined as rigid body. Meanwhile, the parameters of GTN model for AISI304 were defined. The values of q1, q2 and q3 are fixed to 1.5, 1.0 and 2.25, respectively. For AISI304, fc=0.0223, fF=0.152, and fN=0.004. Meanwhile, the values of εN and SN can be fixed to 0.3 and 0.1 [18].
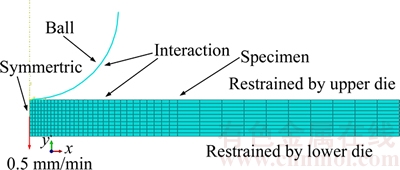
Figure 2 Finite element model of small punch specimen
4 Results and discussion
4.1 Energy model
As mentioned above, four stages can be found in the deformation of small punch specimen. When the sample is pressed by the ball, elastic energy increases and is stored with the growth of load. Once an unloading process happens, the elastic energy will be released with the rebound of specimen. Thus, the correlation between yield strength and elastic deformation energy can be calculated by the integration of load–displacement curves with unloading displacements [13]:
 (1)
(1)
where ESP is the elastic energy of small punch test; σs is yield strength; a is hole diameter of the lower die; t0 is thickness of specimen; E is elastic modulus; υ is Poisson ratio [23].
It is shown that the energy model is intended to provide an accurate estimation of yield strength. Therefore, the accuracy of elastic energy measurement is a key point in the study.
4.2 Deformation behavior of small punch test
In the small punch test, load–displacement curve is the most intuitive reflection of specimen deformation. Figure 3 shows a comparison of load–displacement curves of experiment and finite element simulation. Both sets of load–displacement curves exhibit the same trend and four distinct deformation phases (elastic deformation, plastic deformation, membrane stretching and plastic instability stages). Two experimental curves are almost entirely overlapped which proves the rationality and repeatability of the experiment in this paper. Meanwhile, it is worthy to note that the curves of experiment and simulation coincide in the low load region, whereas a clear difference was observed between the maximum load of simulation and experiment. The reason may be due to the necking and stress concentration happened in this phase. The similar conclusion can also be found in the discussion of previous researches [18].
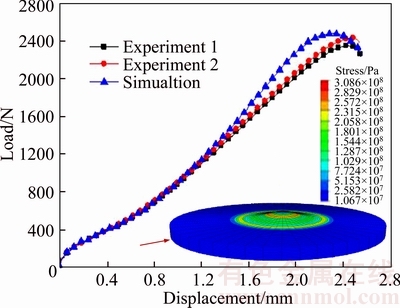
Figure 3 Comparison between experimental and numerical load–displacement curves
In the small punch test, the elastic and plastic phases of load–displacement curves are the focus of most concern. In the elastic zone, an approximate straight line can be found and the region is mainly controlled by the elastic properties of material. As shown in Figure 3, the deformation can only be found in the center region of specimen in this stage. Elastic deformation plays the key role and the void volume fraction remains unchanged.
Then, a transition can be found from elastic deformation to plastic deformation with different unloading displacements as shown in Figure 4. In this phase, the macroscopic deformation of specimen is gradually obvious and the void begins to nucleate along with crack initiation. It can be found that the plastic deformation mainly reflects in the annular Erichsen shape of disk [24]. With the increase of central deflection of annular zone in the specimen, the micro-crack and damage would gradually form and extend in this region [25]. Meanwhile, obvious increase of stress can also be found when displacement reaches 0.6–0.8 mm, which means the accumulation of damage [23].
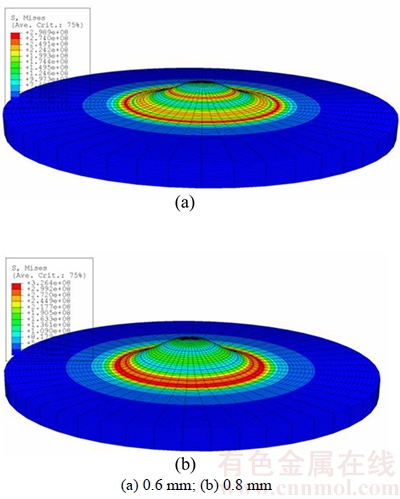
Figure 4 Plastic deformation of specimens in different unloading places:
4.3 Elastic energy and yield strength analysis
Reasonable calculation of unloading displacement is the premise of elastic energy. Based on the analysis of elastic deformation, several tests and simulations with different unloading places have been discussed in this paper. The energy is calculated by the integral of rebounding displacement and load in the elastic bending stage as shown in Figure 5. It can be clearly seen that values of elastic energy locate on the vicinity of 0.4 mJ. As a small-scale specimen technique, it should be noted that the small value of elastic energy in small punch test will produce a negative effect on analysis. Meanwhile, the deviation between each specimen will also affect the deformation process. Thus, some deviations can be found in the experiment results for the above reasons.
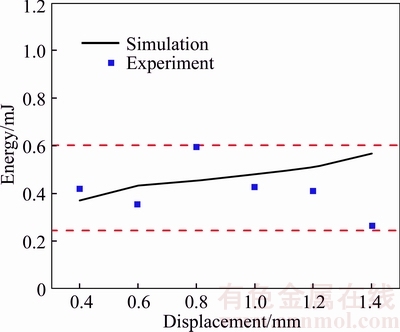
Figure 5 Comparison of energy–displacements (E–D) results of experiment and simulation
Different to experiment, the effect of specimen deviation does not exist in the finite element analysis. Therefore, the predicted energy– displacement data using simulation are compared to the experimental results in this study. It demonstrates that the evolution of elastic energy in finite element analysis is more obvious. Meanwhile, the results have shown that elastic energy of experiment agrees well with the values of simulation, which also proves the consistency of experiment and finite element simulation.
On the basis of previous discussion, the evolution of elastic energy is shown in Figure 6. In the initial phase, the elastic deformation energy increases quickly with the increase of deflection. Large elastic deformation plays the leading role in this region due to the smaller contact area between ball and the center of specimen. In Figure 6, a prominent change in slope of L–D curve is presented in the elastic-plastic transition region. Meanwhile, it can be found that the slope of energy–displacement curve decreases and elastic energy increases slowly with the increment of deflection. The reason is that the deformation behavior under multi-axial stress is relatively complex in the small punch test. Deformation localization within the specimen leads to complex stress state in different regions. Even the deformation of specimen turns into plastic bending phase, small amounts of elastic deformation still happens. Overall, the value of elastic energy is an approximately constant in the plastic deformation phase. On the other hand, the evolution of elastic energy has an obvious rapid growth in the membrane stretching phase. This is because that the elastic deformations occur at the edge of the deformation zone which is not considered in the mechanical properties estimation.
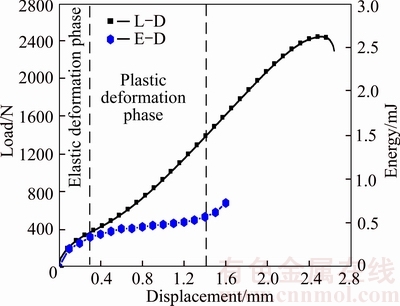
Figure 6 Comparison between load–displacement and energy–displacement curves
In the plastic phase, the elastic energy increases slowly, which is approximate to a constant. Thus, the unloading displacement from 0.6 mm to 1 mm was recommended in the estimation of yield strength. Then the whole elastic energy can be released with unloading. Once the elastic energy is obtained, yield strength of material can be analyzed by Eq.(1). In this paper, E is 1.99×10⁵ MPa and υ is 0.285. It should be noted that the elastic energy is small according to the complex non-linear relation of stress and strain in small punch test as mention above. Deviation may be found in the prediction of individual point. Thus, the mean value of yield strength with six unloading displacements (0.4, 0.6, 0.8, 1, 1.2 and 1.4 mm) is calculated to obtain an accurate result. The result of simulation is 313.8 MPa. It can be found that the predicted value of energy method is in well agreement with that of the conventional tests, which proves that deformation energy analysis in this paper can be used to analyze the mechanical strength properly.
4.4 Fracture analysis
With the future development of deformation, an apparent necking will happen in the specimen. At this region, maximum load and thickness reduction can be found along with serious damage. Finally, the bearing capacity of specimen will decrease and lead to the final failure of specimen.
Different to the elastic energy, the deformation energy at maximum load (Em) is easy to be obtained without controversy. Based on the load– displacement curves shown in Figure 3, Em is 2871.397 mJ and dm is 2.433 mm here. Similar to the elastic energy analysis, SINGH et al [26] provided the energy based empirical equation and the ultimate tensile strength could be calculated as:
 (2)
(2)
where Rm is ultimate tensile strength; dm is displacement corresponding to maximum load; t0 is thickness of specimen.
In addition to yield strength and ultimate tensile strength, elongation is another parameter which is studied by many researches. In this study, the percent fracture deflection (δf) was introduced as listed in Eq. (3) [27]:
 (3)
(3)
The percent fracture deflection can be a proper parameter to derive the elongation, thus:
A=0.338×δf–88.08=53.54% (4)
where A is elongation; df is fracture displacement (2.595 mm in this paper); t0 is thickness of specimen.
The results show that the predicted values have a well agreement with that of uniaxial tensile test (ultimate tensile strength is 668 MPa and elongation is 61.1%), which proves that small punch test can be used to describe the failure of material.
Finally, a typical ductile fracture characteristic along with obvious thickness reduction can be clearly seen in the Figure 7. In the process of deformation, micro-voids begin to increase and coalesce with the evolution of plastic damage. Micro-damage and crack gradually formed in this phase. The results implied that micro-damage is an inhomogeneous process in the small punch specimen.
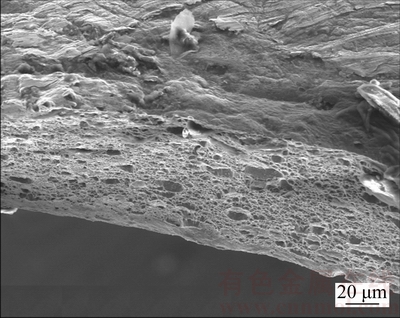
Figure 7 Scanning electron microscope fractograph of fracture specimen
5 Conclusions
The experiment and finite element simulation results of small punch test were used to analyze the elastic-plastic deformation behavior of AISI304. The deformation energy of small punch test was introduced and discussed. The main conclusions are listed as follow:
1) In the initial deformation phase, an approximate straight line can be found in the load–displacement curves and there is a rapid growth of elastic energy, which proves that the region is mainly controlled by the elastic properties of material.
2) In the elastic-plastic transition region, apparent change of the slope of load–displacement curve can be found. Then elastic energy grows slowly and can be regarded as an approximate constant in the plastic deformation region. Meanwhile, apparent macroscopic deformation is also obtained with annular Erichsen characteristic.
3) Based on the analysis of deformation energy, the yield strength and ultimate tensile strength of AISI304 is obtained. Meanwhile, percent fracture deflection is proved to be a proper parameter in the analysis of elongation. The results have a good agreement with that of the standard tensile test, which proves that small punch test is a proper method in the mechanical properties evaluation.
References
[1] TANG He-sheng, YIN Yao-bao, ZHANG Yang, LI Jing. Parametric analysis of thermal effect on hydrostatic slipper bearing capacity of axial piston pump [J]. Journal of Central South University, 2016, 23(2): 333–343.
[2] MANAHAN M P, ARGON A S, HARLING O K. The development of a miniaturized disk bend test for the determination of postirradiation mechanical properties [J]. Journal of Nuclear Materials, 1981, 104: 1545–1550.
[3] AMINI K, GHARAVI F. Influence of welding speed on corrosion behaviour of friction stir welded AA5086 aluminium alloy [J]. Journal of Central South University, 2016, 23(6): 1301–1311.
[4] BAIK J M, KAMEDA J, BUCK O. Small punch test evaluation of intergranular embrittlement of an alloy steel [J]. Scripta Metallurgica, 1983, 17(12): 1443–1447.
[5] BULLOCH J H. A study concerning material fracture toughness and some small punch test data for low alloy steels [J]. Engineering Failure Analysis, 2004, 11(4): 635–653.
[6] CHAKRABARTY J. A theory of stretch forming over hemispherical punch heads [J]. International Journal of Mechanical Sciences, 1970, 12(4): 315–325.
[7] LACALLE R,  LVAREZ J A, GUTI
 RREZ-SOLANA F. Analysis of key factors for the interpretation of small punch test results [J]. Fatigue & Fracture of Engineering Materials & Structure, 2008, 31(10): 841–849.
[8] GARC A T E, RODR
 GUEZ C, BELZUNCE F J, SU
 REZ C. Estimation of the mechanical properties of metallic materials by means of the small punch test [J]. Journal of Alloys and Compounds, 2014, 582: 708–717.
[9] MORENO M F. Application of small punch testing on the mechanical and microstructural characterizations of P91 steel at room temperature [J]. International Journal of Pressure Vessels and Piping, 2016, 142–143: 1–9.
[10] MILI KA K, DOBE
 F. Small punch testing of P91 steel [J]. International Journal of Pressure Vessels and Piping, 2006, 83(9): 625–634.
[11] CWA 15627: 2006 E. Small punch test method for metallic materials, Brussels: CEN [S].
[12] RODR GUEZ C, GARC
 A CABEZAS J, C
 RDENAS E, BELZUNCE F J, BETEG
 N C. Mechanical properties characterization of heat-affected zone using the small punch test [J]. Welding Journal, 2009, 88: 188–192.
[13] ISSELIN J, SHOJI T. Yield strength evaluation by small-punch test [J]. Journal of Testing and Evaluation, 2009, 37(6): 531–537.
[14] DYM
 EK P, MILI
 KA K. Creep small-punch testing and its numerical simulations [J]. Materials Science and Engineering A, 2009, 510–511: 444–449.
[15] CHANG Y S, KIM J M, CHOI J B, KIM Y J, KIM M C, LEE B S. Derivation of ductile fracture resistance by use of small punch specimens [J]. Engineering Fracture Mechanics, 2008, 75(11): 3413–3427.
[16] CUESTA I I, ALEGRE J M. Determination of the fracture toughness by applying a structural integrity approach to pre-cracked Small Punch Test specimens [J]. Engineering Fracture Mechanics, 2011, 78(2): 289–300.
[17] GUAN Kai-shu, XU Tong, ZHANG Xiao-cheng, WANG Zhi-wen. Effect of microdefects on load-deflection of small punch test by experimental investigation and finite element analysis [J]. International Journal of Pressure Vessels and Piping, 2013, 110: 14–16.
[18] ZHOU Zhi-xiang, LING Xiang. Ductile damage analysis for small punch specimens of type 304 stainless steel based on GTN model [J]. Journal of Testing and Evaluation, 2009, 37(6): 1–7.
[19] CAMPITELLI E N, SP TIG P, BONAD
 R, HOFFELNER W, VICTORIA M. Assessment of the constitutive properties from small ball punch test: Experiment and modeling [J]. Journal of Nuclear Materials, 2004, 335(3): 366–378.
[20] TURBA K, G LCIMEN B, LI Y Z, BlAGOEVA D, H
 HNER P, HURST R C. Introduction of a new notched specimen geometry to determine fracture properties by small punch testing [J]. Engineering Fracture Mechanics, 2011, 78(16): 2826–2833.
[21] SIAD L, OUALI M O, BENABBES A. Comparison of explicit and implicit finite element simulations of void growth and coalescence in porous ductile materials [J]. Materials and Design, 2008, 29(2): 319–329.
[22] ABENDROTH M, KUNA M. Determination of deformation and failure properties of ductile materials by means of the small punch test and neural networks [J]. Computational Materials Science, 2003, 28(3, 4): 633–644.
[23] YANG Zheng, WANG Ying, YANG Si-sheng, LING Xiang. Study on yield strength of Q345R by energy method of small punch test [J]. Journal of Plasticity Engineering, 2012, 19(6): 95–102. (in Chinese)
[24] GUAN Kai-shu, HUA Li, WANG Qiong-qi, ZOU Xiao-hui, SONG Ming. Assessment of toughness in long term service CrMo low alloy steel by fracture toughness and small punch test [J]. Nuclear Engineering and Design, 2011, 241(5): 1407–1413.
[25] WANG Zhao-xi, SHI Hui-ji, LU Jian, SHI Pan, MA Xian-feng. Small punch testing for assessing the fracture properties of the reactor vessel steel with different thicknesses [J]. Nuclear Engineering and Design, 2008, 238(12): 3186–3193.
[26] SINGH S P, BHATTACHARYA, SEHGAL D K. Evaluation of high temperature mechanical strength of Cr-Mo grade steel through small punch test technique [J]. Engineering Failure Analysis, 2014, 39: 207–220.
[27] YAO Yu-hong, WANG Zheng-pin, LIU Jiang-nan, SHANGGUAN Xiao-feng, ZHANG Lu, SHI Chong-zhe. Strength and plasticity of steel assessed by small punch test [J]. Foundry Technology, 2004, 25(3): 200–205. (in Chinese)
(Edited by HE Yun-bin)
中文导读
小冲孔试验弹塑性变形行为及力学性能评价方法研究
摘要:分析了小冲孔试验中AISI304不锈钢的弹塑性变形行为,建立了耦合Gurson-Tvergaard- Needleman (GTN)模型的数值分析模型,得到了变形过程中的材料弹性变形能演化过程,进而基于小冲孔试验实现了材料变形特性及力学性能的准确评价。结果表明:在变形初期,弹性能增长迅速。随着变形逐步进入塑性阶段,增长逐步放缓并在塑性阶段近似为一个恒定的值。同时,载荷–位移曲线的斜率也在弹塑性转变区域发生明显改变。以此为基础,结合宏观特性和断裂特征,建立了AISI304不锈钢变形能、变形载荷、位移与力学性能(屈服强度、抗拉强度、断后伸长率)之间的关系,为小冲孔试验技术合理评价材料力学性能提供依据。
关键词:小冲孔试验;力学性能;弹性能;断裂特性
Foundation item: Project(2012AA040105) supported by National High-technology Research and Development of China
Received date: 2016-09-07; Accepted date: 2016-12-14
Corresponding author: LING Xiang, PhD, Professor; Tel: +86–25–83243112; E-mail: xling@njtech.edu.cn; ORCID: 0000-0001-6499- 2158

