Trans. Nonferrous Met. Soc. China 23(2013) 2591-2597
Low cycle fatigue behavior of laser melting deposited TC18 titanium alloy
Zhen LI, Xiang-jun TIAN, Hai-bo TANG, Hua-ming WANG
Engineering Research Center of Ministry of Education on Laser Direct Manufacturing for Large Metallic Components, Beihang University, Beijing 100191, China
Received 27 August 2012; accepted 15 October 2012
Abstract: Low cycle fatigue (LCF) behavior of laser melting deposited (LMD) TC18 titanium alloy was studied at room temperature. Microstructure consisting of fine lamella-like primary �� phase and transformed �� matrix was obtained by double annealed treatment, and inhomogeneous grain boundary �� phase was detected. Fatigue fracture surfaces and longitudinal sections of LCF specimens were examined by optical microscopy and scanning electron microscopy. Results indicate that more than one crack initiation site can be detected on the LCF fracture surface. The fracture morphology of the secondary crack initiation site is different from that of the primary crack initiation site. When the crack grows along the grain boundary �� phase, continuous grain boundary �� phase leads to a straight propagating manner while discontinuous grain boundary �� phase gives rise to flexural propagating mode.
Key words: titanium alloy; low cycle fatigue; laser melting deposition
1 Introduction
TC18 is a high-alloyed ��+�� titanium alloy with the nominal composition of Ti-5Al-5Mo-5V-1Cr-1Fe (in mass fraction, %). It has high strength, high toughness, and excellent hardenability. Based on these properties, TC18 titanium alloy is widely used as structural material in fuselage and airplane undercarriages [1-3].
Laser melting deposition (LMD) is a rapid shaping technology for fabricating complex components from the computer-aided design (CAD) model. High power laser beam controlled by computer numerical control (CNC) motion system is used to melt the metal powders which are injected into the laser focal zone. Near-net-shaped metallic components with fully density are fabricated based on layer-by-layer materials melting and deposition process. Compared wtih traditional manufacturing processes, the LMD process reduces the working steps and the production time [4,5]. Because of its outstanding advantages, LMD is attractive for manufacturing complex aerospace structural components made of difficult-to-process materials, like TC18 titanium alloy.
Low-cycle fatigue (LCF) damage of TC18 aerospace components will occur during service process. Therefore, the study on high-stress, low cycle fatigue behavior of TC18 titanium alloy is very significant for the hope of improving the working potential. However, most of the studies now are focused on the effect of heat treatment on the microstructure and mechanical properties of TC18 [6-10], or the effect of microstructure on the fatigue properties of titanium alloys [11-15]. Few studies on LCF behavior of LMD TC18 titanium alloy are reported.
In the present study, LCF behavior of the LMD TC18 titanium alloy is investigated at room temperature. Fatigue fracture mechanism and the influence of microstructure on crack propagation are also discussed.
2 Experimental
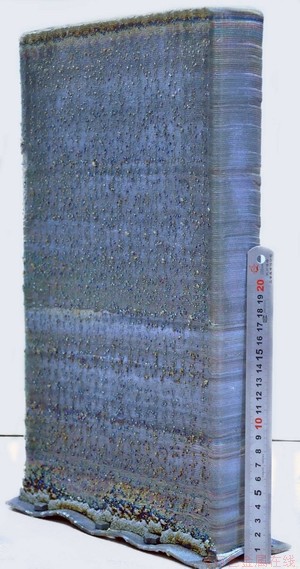
A thick plate-like sample of TC18 titanium alloy was fabricated by the LMD process with a geometric dimensions of 385 mm��235 mm��40 mm, as shown in Fig. 1. The plate was annealed at 750 ��C for 1 h followed by air cooling (AC) to relieve residual stress. The ��-transition temperature (T��) of the deposited TC18 alloy determined via the metallographic method was (880��5) ��C.
The deposited plate was double annealed with the system of (860 ��C, 2 h, FC)+(750 ��C, 2 h, AC) +(580 ��C, 4 h, AC) to optimize microstructure and property. All the heat treatment procedures were carried out in an electric-resistance furnace in ambient atmosphere. The tensile test results of the double annealed LMD TC18 are shown in Table 1.

Fig. 1 Photograph of LMD TC18 titanium alloy plate
Table 1 Tensile test results of LMD TC18 alloy

The LCF smooth-bar specimens were machined by electric discharge wire cutting from the plate-like sample and the long axes were perpendicular to the layer deposited orientation of the deposited plate. The shape and dimensions of the specimen are shown in Fig. 2. The axial length was 110 mm and the diameter of the gauge section was 6.35 mm. The surface of the sample was mechanically polished to avoid the effect of the surface condition on the fatigue behavior.

Fig. 2 Geometric shape and dimensions in mm of room temperature low-cycle fatigue specimen of LMD TC18
The LCF test was conducted according to the standard of GB/T 15248��2008, axial loading con stant-amplitude low-cycle fatigue testing method of metallic materials. The test was performed at room temperature using the MTS Landmark2 Servo-hydraulic fatigue testing machine which controlled axial strain of tension-compression mode. The nominal strain amplitude (����t/2) ranged from ��0.5% to ��1.0% with a strain ratio R=-1. The distance of the standard scale controlling strain was 25 mm. A triangle waveform was used and the strain rate was 0.006-0.008 s-1. The specimens were cycled to failure with a constant strain amplitude, or regarded as invalidation when the reduced value of the cyclic stress reached 20% of the stable stress.
To observe the microstructure of the heat treated specimens, the metallographic specimens were prepared by standard mechanical grinding and polishing procedures and were etched with a solution of 1 mL HF, 6 mL HNO3 and 50 mL H2O. The fracture surfaces of the fatigue specimens were ultrasonically cleaned in ethanol to eliminate contamination during observation. Microstructure was observed on a CamScan 3400 scanning electron microscope (SEM) and an Apollo 300 field emission SEM. To locate the fatigue crack initiation site and demonstrate the fatigue fracture mechanism, the fracture surfaces were examined using SEM. To observe the relationship between crack propagation and microstructure, the longitudinal sections of the specimen, which was invalidated but not broken, were examined with an Olympus BX51M optical microscope (OM).
3 Results and discussion
3.1 Microstructure
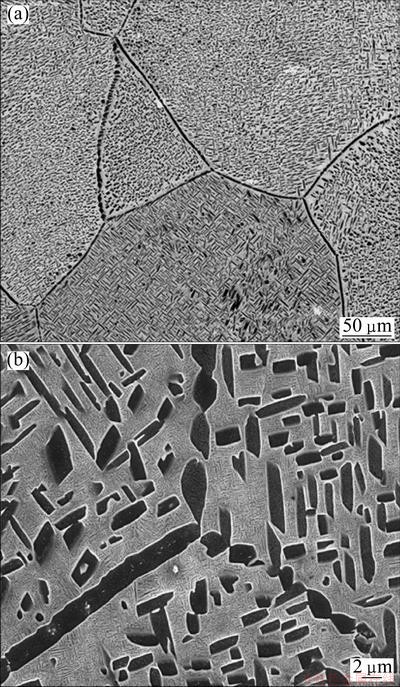
The microstructure of double annealed LMD TC18 titanium alloy consists of fine lamella-like primary �� phase and transformed �� matrix, as shown in Fig. 3. The primary �� lamellar has a small size with average width of 0.5-1.75 ��m. Moreover, there is a small amount of equiaxial primary �� phase dispersed in the matrix. The primary �� shows approximately two different directions. One is perpendicular to the grain boundary, and the other one is parallel to the grain boundary. The secondary �� phase detected in the �� matrix, which is precipitated at 580 ��C during aging, is ultra-fine, as shown in Fig. 3(b).
Inhomogeneous morphologies of grain boundary �� phase can be observed in Fig. 3. Some grain boundary �� phase is discontinuous and even dissolved completely while others is still continuous. There are denuded zones on either side of the boundary in which the primary �� phase is absent or of a lower volume fraction than in the grains [16].
3.2 LCF properties
The LCF strain amplitude (����/2)��natural life (2Nf) curve is shown in Fig. 4. The strain amplitude ranges from ��0.5% to ��1.0%. The ordinate represents strain amplitude while the abscissa represents fatigue life (the number of reversals to failure). The total strain consists of elastic strain and plastic strain. The three curves shown in Fig. 4 stand for different strain�Clife relations respectively. The fatigue life decreases distinctly with the increase of the strain amplitude. The relational expression to predict the LCF is ����t/2=0.0236��2Nf-0.1490+0.2174��2Nf-0.8562. MANSON [16] reported that if a material was subjected to a given strain range, ����, its life, Nf, depended on its ductility, D (related to reduction in area, Ar, by D=-ln(1-Ar)), its ultimate tensile strength, ��u, and elastic modulus, E. When the imposed strain was high (the order of 1% to 2%, or more, for most materials), the governing property was ductility; the higher the ductility is, the longer the life would be. Below this strain range, most materials benefited more from improved tensile strength than from increased ductility.

Fig. 3 SEM micrographs showing microstructure of double annealed LMD TC18 titanium alloy

Fig. 4 Curves of low cycle fatigue strain amplitude (����/2)��natural life (2Nf)
3.3 LCF fracture
The fatigue fracture surface is comprised of three morphologically distinct zones: the crack initiation zone, the crack propagation zone and the instant rupture zone. In the LCF, the crack initiation zone and the propagation zone occupy smaller area on the fracture surface [17].
3.3.1 Crack initiation
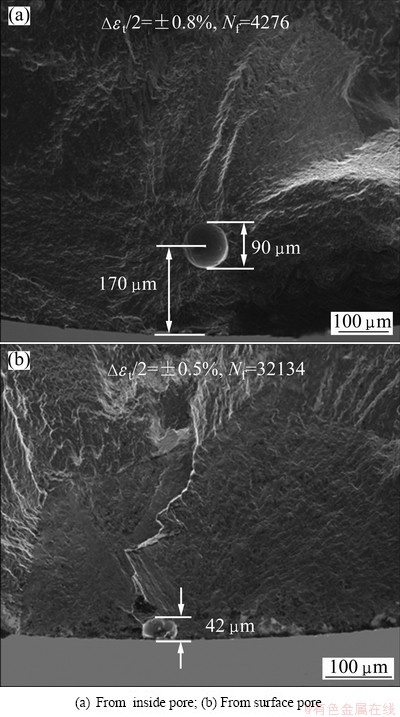
The fatigue cracks mostly initiate from the specimen surface or the defects inside of the specimen (i.e. pores). As shown in Fig. 5(a), the fatigue crack nucleates inside of the specimen and a pore is observed at the fatigue initiation site. The diameter of the pore is 90 ��m and the location is 170 ��m from the surface. As shown in Fig. 5(b), the crack is initiated on the specimen surface where a pore is detected with a diameter of 42 ��m. In this study, cracks of most of the specimens are initiated from pores. The pores have large influence on the fatigue behavior. The presence of the pores can give rise to great stress concentrations at the walls of the pores [18]. When the local microscopic stress becomes larger than the yield strength of the material, under cyclic fatigue loading, plastic deformation can occur locally and a fatigue crack can potentially be initiated [19]. Another factor that affects fatigue behavior is the pore location. It was reported that the effects will decrease when the pore transforms from subsurface to the interior [18,20].

Fig. 5 SEM micrographs of crack initiation region
3.3.2 Secondary crack initiation
Based on the high loading stress in LCF, more than one crack initiations can be observed on the fracture surface, which is different from that of high cycle fatigue. Two crack initiation sites can be observed in Fig. 6(a) in which both the cracks are initiated from the pores. This is because under cyclic loading, stress concentration can occur at walls of the two pores. However, different sizes and locations of the pores induce dis tinct degree of stress concentration [18]. The two crack initiation sites are under different levels of stress concentration and result in different initiating and propagating speeds of the macroscopic cracks. So, there are distinctions between primary and secondary crack origins.
One distinctive feature is the fracture morphologies. The primary crack origin site is flat and smooth with radial stripes found on it [21], as shown in Fig. 6(b). On the other hand, the second crack origin site is pre sented as a circular pit with dark color, and the cracks propagate to a small limited area, as shown in Fig. 6(c). The second crack origin has a lower micro-crack initiation speed with respect to primary crack. This will demand a longer time for the micro-cracks to link to a macroscopic crack. At the same time, the macroscopic crack of the primary crack origin has already initiated and begins to propagate under the cyclic strain. When the secondary crack propagates with a length on the order of a few grains, the primary crack has propagated rapidly to the expanding walls of the secondary crack and results in a circular propagation area centered by a pore.

Fig. 6 SEM micrographs showing fracture morphologies
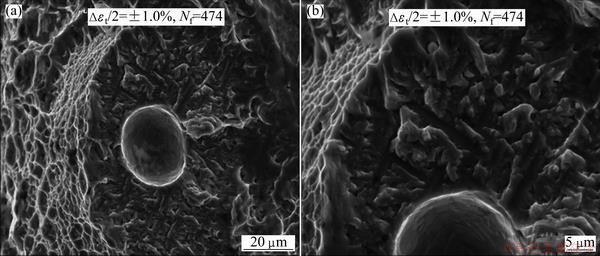
It was reported that during crack nucleation and micro-crack propagation, microstructurally-sensitive fatigue crack growth occurs when the reversed plastic zone is less than the size of material��s characteristic microstructures. The size decrease of reversed plastic zone of the crack tip is associated with the decrease of the stress intensity factor effective region [20,22]. If stress concentration in the secondary crack initia tion site is low enough, microstructurally-sensitive crack nucleation and propagation can be detected. At low magnification, the secondary crack initiation site which nucleates from a pore with a diameter of 28 ��m has obvious microstructure characteristics, as evident in Fig. 7(a). The area is limited to a circle with a diameter of about 90 ��m. As shown in Fig. 7(b), fine lamellar cleavage facets with the width of 1-2 ��m and tearing features are detected in the high magnified micrograph. The lamellar cleavage facets have two orientations which are perpendicular to each other. The size and morphology of the cleavage facets are the same with primary �� phase, as shown in Fig. 3. Therefore, the fracture consists of �� phase lamellar cleavage facets and tearing �� matrix between �� phase facets.
3.4 LCF specimen longitudinal section
The relationship between crack propagation and microstructure is detected by the longitudinal section of the specimen.
The crack propagating appearance of the lengthwise section observed by OM is shown in Fig. 8(a). The crack tends to change its propagation direction at the grain boundary and the large deflection of the crack path is corresponded to the large grain size. The deflection of the crack at the grain boundary is observed in the partial magnified micrograph, as shown in Fig. 8(b).

Fig. 7 SEM micrographs showing morphology of secondary crack initiation site

Fig. 8 OM (a) and SEM partial magnified (b) micrographs showing crack deflection at grain boundary

Fig. 9 OM (a) and SEM (b) micrographs showing crack propagating mode along grain boundary
At the same time, different morphologies of grain boundary �� phase induce distinguishing crack propagating modes when the crack grows along the grain boundary. The grain boundary �� phase of the double annealed TC18 alloy is inhomogeneous, as shown in Fig. 3. The crack tends to propagate in a straight manner along the continuous grain boundary �� phase (marked by arrowheads I (Fig. 9(a)) and II (Fig. 9(b))). On the other hand, when the grain boundary �� phase is discontinuous, the crack deflects slightly in the discontinuous area and results in flexural crack path (marked by arrowheads III (Fig. 9(a)) and IV (Fig. 9(b))). Figure 10 shows a schematic diagram showing the propagating mode of the crack, which grows along the grain boundary. In the continuous area, the crack is prone to propagate quickly in the denuded zones (non-segregation area) on either side of the grain boundary. However, in the discontinuous area, twisting expanding route increases the ratio of crack cutting through grain boundary �� phase. Thus, the discontinuous grain boundary improves propagation resistance and reduces propagation speed. Therefore, reducing the continuity of the grain boundary via heat treatment or reducing the defects inside of the specimen (i.e. pores) via improving the forming process could be a method to increase the fatigue life.

Fig. 10 Schematic diagram showing propagating mode of crack propagating along grain boundary
4 Conclusions
1) Microstructure of double annealed LMD TC18 titanium alloy consists of lamella-like primary �� phase and transformed �� matrix with ultra-fine secondary �� phase in it. There are continuous �� phase and discontinuous �� phase at grain boundaries.
2) The LCF curve of LMD TC18 is obtained and the relational expression to predict the LCF is ����t/2= 0.0236��2Nf-0.1490 + 0.2174��2Nf-0.8562.
3) More than one crack initiation sites can be detected on the LCF fracture surface and the morphology is different. The primary crack initiation site is flat, while the secondary crack initiation site is sunken. If stress concentration in the secondary crack initiation site is low enough, microstructurally sensitive crack nucleation and propagation can be detected which is characterized of �� lamellar cleavage facets and tearing �� matrix between �� facets.
4) When the crack grows along the grain boundary, continuous grain boundary �� phase leads to a straight propagating manner while discontinuous grain boundary �� phase gives rise to flexural propagating mode.
References
[1] HUANG Bo-yun, LI Cheng-gong, SHI Li-kai, QIU Guan-zhou, ZUO Tie-yong. China materials engineering canon: 4, Non-ferrous metal materials engineering [M]. Beijing: Chemical Industry Press, 2006: 623-626.
[2] ZHU Feng, JI Bo, ZHU Yi-fan. Research on heat treatment process of Ti-5Al-5Mo-5V-1Cr-1Fe alloy [J]. Shanghai Steel & Iron Research, 2006(3): 45-48. (in Chinese)
[3] LIU Cui-yun, LI Huan-xi, MA Chao-li. Fractograph and fatigue behavior of TC18 titaniu alloy lugs [J]. The Chinese Journal of Nonferrous Metals, 2010, 20(s1): s1050-s1054. (in Chinese)
[4] WANG Hua-ming, ZHANG Ling-yun, LI An, CAI Liang-xu, TANG Hai-bo, LV Xu-dong. Progress on rapid solidification laser processing for advanced materials and components [J]. World Science: Technology Research and Development, 2004, 26(3): 27-31. (in Chinese)
[5] LIU Dong, ZHANG Shu-quan, LI An, WANG Hua-ming. Microstructure and tensile properties of laser melting deposited TiC/TA15 titanium matrix composites [J]. Journal of Alloys and Compounds, 2009, 485: 156-162.
[6] ZHANG Yao-wu, ZENG Wei-dong, SHI Chun-ling, KANG Chao, PENG Wen-wen. Influence of vacuum stress relieving annealing on residual stress and microstructure properties of TC18 titanium alloy [J]. The Chinese Journal of Nonferrous Metals, 2011, 21(11): 2780-2785. (in Chinese)
[7] WANG Kun, MENG Mu, WANG Hua-ming. Effect of heat treatment and laser multi-track overlapping on microstructure of a laser melting deposition TC18 titanium alloy [J]. Infrared and Laser Engineering, 2010, 39(3): 521-525. (in Chinese)
[8] HAN Dong, ZHANG Peng-sheng, MAO Xiao-nan, LU Ya-feng, XI Zheng-ping, YANG Jian-chao. Effect of two typical heat treatments on microstructure and properties of TC18 titanium alloy [J]. Titanium Industry Progress, 2009, 26(6): 23-26. (in Chinese)
[9] GUAN Jie, LIU Jian-rong, LEI Jia-feng, LIU Yu-yin. The relationship of heat treatment-microstructures-mechanical properties of the TC18 titanium alloy [J]. Chinese Journal of Materials Research, 2009, 23(1): 77-82. (in Chinese)
[10] JIA Bai-fang, YANG Yi, ZHOU Wei, GE Peng, FENG Liang, YANG Guan-jun. Relationship between heat treatment process and room-temperature tensile properties of TC18 titanium alloy [J]. The Chinese Journal of Nonferrous Metals, 2010, 20(s1): s587-s592. (in Chinese)
[11] NAKAJIMA K, TERAO K, MIYATA T. The effect of microstructure on fatigue crack propagation of ��+�� titanium alloys in-situ observation of short fatigue crack growth [J]. Materials Science and Engineering A, 1998, 243: 176-181.
[12] TOKAJI K, BIAN Jian-chun, OGAWA T, NAKAJIMA M. The Microstructure dependence of fatigue behavior in Ti-15Mo-5Zr-3A1 alloy [J]. Materials Science and Engineering A, 1996, 213: 86�C92.
[13] LI Shi-kai, XIONG Bai-qing, HUI Song-xiao, YE Wen-jun, YU Yang. Effects of microstructure on fatigue crack growth behavior of Ti-6Al-2Zr-1Mo-1V ELI alloy [J]. Materials Characterization, 2008, 59: 397-401.
[14] SHI Cheng-long, WU Guo-qing, SHA Ai-xue, JIANG Hui-ren. Effect of microstructures on fatigue property of TC18 titanium alloy with equal strength [J]. Procedia Engineering, 2012, 27: 1209-1215.
[15] FENG Kang-tun, SHA Ai-xue, WANG Qing-ru. Effects of microstructure on low cycle fatigue property of TC18 titanium alloy under stress-controlled condition [J]. Journal of Materials Engineering, 2009(5): 53-56. (in Chinese)
[16] MANSON S S. Metal fatigue damage-mechanism, detection, avoidance and repair [M]. Philadelphia: American Society for Testing and Materials, 1971: 259.
[17] LUO Xi-yan, ZHAO Rong-guo, HE Wei, LI Hong-chao, LIU Xue-hui, TAN Dun-hou. Analysis on low cycle fatigue properties and fractography of TC25 titanium alloy [J]. Chinese Journal of Solid Mechanics, 2011, 32: 145-150.
[18] LIN C W, JU C P, CHERN LIN J H. A comparison of the fatigue behavior of cast Ti-7.5Mo with c.p. titanium, Ti-6Al-4V and Ti-13Nb-13Zr alloys [J]. Biomaterials, 2005, 26(16): 2899-2907.
[19] BROOKS C R, CHOUDHURY A. Metallurgical failure analysis [M]. New York: McGraw-Hill, 1993: 157.
[20] HE Rui-jun, WANG Hua-ming. HCF properties of laser deposited Ti-6Al-2Zr-Mo-V alloy [J]. Acta Aeronautica et Astronautica Sinica, 2010, 31(7): 1488-1493. (in Chinese)
[21] ZHANG Ying, ZHANG Yi-wen, ZHANG Na, LIU Ming-dong, LIU Jian-tao. Fracture character of low cycle fatigue of P/M superalloy FGH97 [J]. Acta Metallurgiga Sinica, 2010, 46(4): 444-450.
[22] YODER G R, COOLEY L A, CROOKER T W. Observations on microstructurally sensitive fatigue crack growth in a  Ti-6Al-4V alloy [J]. Metallurgical Transactions A, 1977, 8(11): 1737-1743.
�����ۻ�����TC18�ѺϽ�ĵ���ƣ����Ϊ
�� �棬���������������������
�������պ����ѧ �������������������ֱ����������������о����ģ����� 100191
ժ Ҫ���о������ۻ�����TC18�ѺϽ�����µ���ƣ����Ϊ��ͨ��˫���˻��ȴ����ƶȻ�õ�TC18�ѺϽ�����֯��ϸС��Ƭ��״���������ת��»�����ɣ��Ҿ��������ȡ����ù�ѧ������ɨ��������������˵���ƣ������ƣ�ͶϿ��Լ��ݽ��档����������ڵ���ƣ�ͶϿڿ��Թ۲쵽�������Դ��������Դ���������Դ�����в�ͬ�Ķ�����ò�����������ž��������չʱ�������ľ�����ർ��ƽֱ��������չģʽ�����������ľ�����ർ�����۵�������չ·����
�ؼ��ʣ��ѺϽ𣻵���ƣ�ͣ������ۻ�����
(Edited by Hua YANG)
Foundation item: Project (2011CB606305) supported by the National Basic Research Program of China; Project (IRT0805) supported by the Cheung Kong Scholars Innovation Research Team Program of Ministry of Education, China
Corresponding author: Xiang-jun TIAN; Tel: +86-10-82339691; E-mail: tianxj@buaa.edu.cn
DOI: 10.1016/S1003-6326(13)62772-7