Trans. Nonferrous Met. Soc. China 25(2015) 3694-3699
Tribological behaviors of Fe-Al-Cr-Nb alloyed layer deposited on 45 steel via double glow plasma surface metallurgy technique
Xi-xi LUO, Zheng-jun YAO, Ping-ze ZHANG, Yu CHEN, Hong-qin YANG, Xiao-feng WU, Ze-lei ZHANG, Yu-hua LIN, Shang-jun XU
College of Materials Science and Technology, Nanjing University of Aeronautics and Astronautics, Nanjing 211106, China
Received 28 December 2014; accepted 23 March 2015
Abstract: Double glow plasma surface metallurgy technique was used to fabricate a Fe-Al-Cr-Nb alloyed layer onto the surface of the 45 steel. The microstructures and composition of the Fe-Al-Cr-Nb alloyed layer were analyzed by scanning electronic microscopy, X-ray diffraction and energy dispersive spectroscopy. The results indicate that the 20 μm alloyed layer is homogeneous and compact. The alloyed elements exhibit a gradient distribution along the cross section. Microhardness and nanoindentation tests imply that the surface hardness of the alloyed layer reaches HV 580, which is almost 2.8 times that of the substrate. Compared with the substrate, the alloyed layer has a much smaller displacement and a larger elastic modulus. According to the friction and wear tests at room temperature, the Fe-Al-Cr-Nb alloyed layer has lower friction coefficient and less wear mass, implying that the Fe-Al-Cr-Nb alloyed layer can effectively improve the surface hardness and wear resistance of the substrate.
Key words: Fe-Al-Cr-Nb alloyed layer; double glow plasma surface metallurgy technique; tribological behavior
1 Introduction
45 steel is a common material for the manufacture of various components such as shafts, sleeves and gears. After quenching and tempering, 45 steel possesses good comprehensive mechanical properties [1,2]. It is easy for processing and its cost is low, but its hardness and wear resistance should be further improved [3,4]. Double glow plasma surface metallurgy technique is used to synthesize a Fe-Al-Cr-Nb alloyed layer on the surface of the 45 steel [5,6]. This alloyed layer has the properties of high hardness, high strength and excellent wear resistance. Therefore, it can dramatically enhance the surface mechanical properties and wear resistance of the 45 steel without decreasing its performance in the substrate, which is significant in the practical production [7].
Double glow plasma surface metallurgy technique is a novel surface modified technology that has the advantages of fast permeability, non-pollution and low energy consumption, which has broad development and application prospect [8-10]. This technique can be used to synthesize a Fe-Al-Cr-Nb alloyed layer on the surface of the 45 steel to improve its wear resistance.
In this work, the microstructures, phase composition, mechanical properties and wear resistance of the Fe-Al-Cr-Nb alloyed layer synthesized via double glow plasma surface metallurgy technique were investigated.
2 Experimental
In this experiment, the dimensions of the 45 steel samples were 15 mm × 15 mm × 5 mm, with the element composition of 0.42%-0.50% C, 0.17%-0.37% Si, 0.50%-0.80% Mn, ≤0.25% Cr (mass fraction) and Fe as the balance. Before coating, the surface of the samples was polished by 80-1000 grit SiC water proof abrasive paper. Subsequently, the samples were washed by ultrasonication before drying in oven. Fe-Al-Cr-Nb alloy (d100 mm × 2 mm, element composition: 20% Cr, 10% Al, 5% Nb, Fe as the balance) was used as the target.
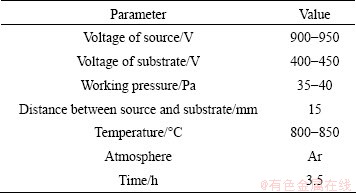
Double glow plasma surface metallurgy technique was a novel surface modified technology based on ion nitriding. The advantages of this technique were conserving alloyed elements, controllable composition and excellent binding force (metallurgical bonding). The principle and approaches of this technique were shown elsewhere [11,12]. The processing parameters were displayed in Table 1.
Table 1 Processing parameters of double glow plasma surface metallurgy technique in preparing Fe-Al-Cr-Nb alloyed layer
Scanning electronic microscopy (SEM, Quant 200), energy disperse spectroscopy (EDS) and X-ray diffraction (XRD, Bruker D8-ADVANCE) were carried out to characterize the surface and cross-section microstructures, composition distribution, phase composition of the Fe-Al-Cr-Nb alloyed layer synthesized via double glow plasma surface metallurgy technique. Micro Vickers hardness tester (HXS-100A) and nano indenter (DUH-W201) were employed to determine the hardness and tenacity of the alloyed layer. The tribological behavior of the Fe-Al-Cr-Nb alloyed layer was tested by a tribological testing machine (HT-500) in comparison with the 45 steel samples. During this test, the samples were sliding against a 3 mm diameter ball made of Si3N4. Dry wear tests were carried out at room temperature (20 °C) with the normal load of 3.3 N. The sliding speed of the counterpart ball was 560 r/min (revolutions per minute) with a turning radius of 3 mm for 20 min and repeated 3 times. Variations in the coefficient of friction were recorded during the sliding process. The mass loss of a sample was tested using an analytical balance with an accuracy of 10-4 g before and after the wear test. Morphologies of the worn surface were examined by scanning electron microscope (SEM) and micro-XAM surface mapping microscopy (SMM).
3 Results and discussion
3.1 Microstructures and compositions
Figure 1 shows the SEM images of the Fe-Al-Cr- Nb alloyed layer. The surface microstructure of the alloyed layer is shown in Fig. 1(a), which reveals that the surface of the alloyed layer is compact without any defects such as voids or cracks. The alloyed atoms stack on the surface of the substrate, exhibiting three dimensional crystal nuclei (small islands) which are produced during the initial stage. With the process of deposition and diffusion, the crystal nuclei continue to grow until connecting with each other. The coalescence of small islands occurs and their contact segments grow quickly, forming a large island, which finally become a consecutive and intact coating. Figure 1(b) is the cross- sectional SEM of the alloyed layer. It can be seen from Fig. 1(b) that the thickness of the alloyed layer is approximately 20 μm. The alloyed layer is composed of a deposited layer (15-18 μm) on the exterior surface and a diffused layer (2-5 μm) on the interior surface. There is no apparent boundary between these two layers. The alloyed layer connects with the substrate quite well, without defects such as voids and cracks.
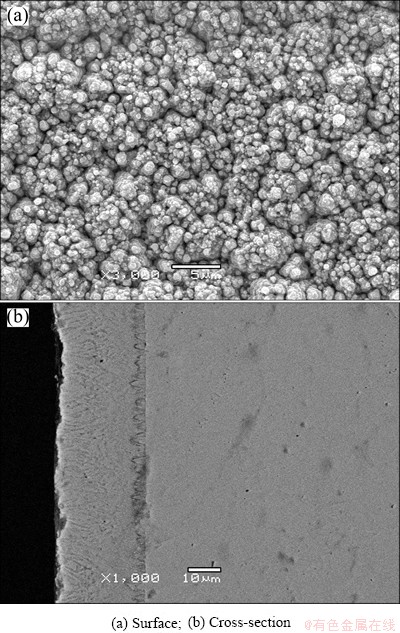
Fig. 1 SEM images of Fe-Al-Cr-Nb alloyed layer
Figure 2 shows the elemental composition distribution from the EDS analysis of the Fe-Al-Cr-Nb alloyed layer. As shown in Fig. 2, the Fe plot presents an upward trend while the Cr and Nb plots experience an opposite trend. Al depletion appears on the surface of the alloyed layer. At the site of 10 μm from the surface, the Al content reaches a peak at around 25% and then decreases with the increase of the distance from the surface. As the alloy atoms diffuse gradually from the exterior surface to the substrate, the adhesion between the alloyed layer and the substrate is excellent. The alloyed layer connects with the substrate by metallurgy bonding.
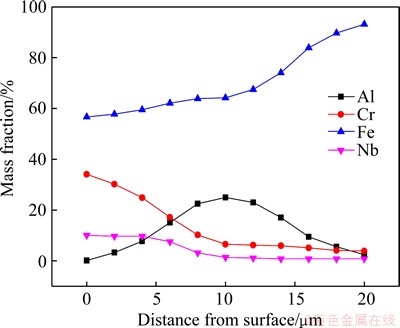
Fig. 2 Plots of elemental composition distribution
Figure 3 shows the XRD pattern of the Fe-Al-Cr- Nb alloyed layer. It illustrates that there are Fe3Al, FeAl, Fe2AlCr, Nb2C and Fe(Cr) solid solution. This result conforms well to the analysis of EDS tests. The formation of these metallic compounds is critical for the enhancement of mechanical properties, especially the hardness of the material.
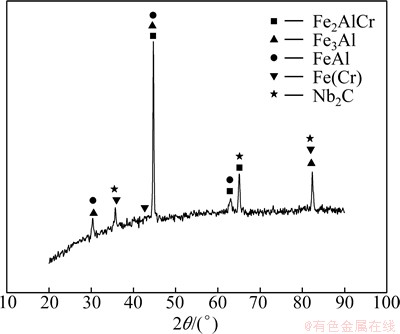
Fig. 3 XRD pattern of Fe-Al-Cr-Nb alloyed layer
3.2 Mechanical behavior
Figure 4 shows the indentation force-depth curve of the Fe-Al-Cr-Nb alloyed layer. It can be seen from Fig. 4 that the exterior surface hardness of the alloyed layer is HV 580.8, which approximately triples that of the substrate (HV 201.4). At the depth of 5-10 μm from the exterior surface, the hardness of the alloyed layer keeps over HV 500. From this point onwards, this figure decreases gradually with the increase of depth and then levels out at HV 200. This meets well to the phase composition shown in Fig. 3.
Figure 5 shows the load-displacement curves of the Fe-Al-Cr-Nb alloyed layer and the substrate. The offset of the displacement and the elastic modulus can be used to determine the hardness and the tenacity of a material. The less the offset is, the larger the hardness is. The larger the elastic modulus is, the better the tenacity is. Table 2 shows the hardness and the elastic modulus of the alloyed layer and the substrate during loading and unloading processes. According to the data shown in Table 2, the hardness and tenacity of the Fe-Al-Cr-Nb alloyed layer are better than those of the substrate.
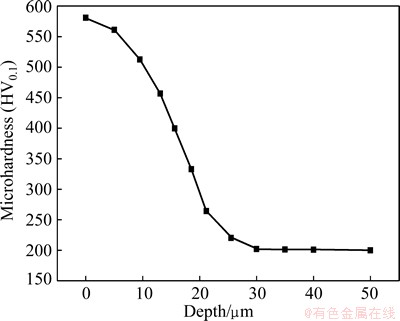
Fig. 4 Microhardness variation along cross-section of Fe-Al- Cr-Nb alloyed layer
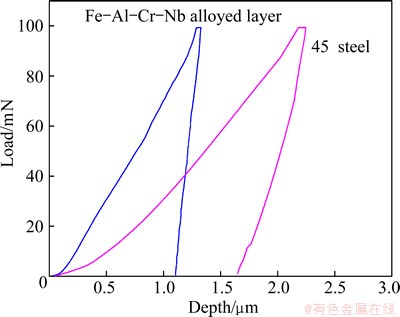
Fig. 5 Loading-unloading curves of substrate and Fe-Al- Cr-Nb alloyed layer
Table 2 Hardness and elastic modulus of substrate and alloyed layer

3.3 Tribological behavior
Ball-on-disk wear tests were carried out against a Si3N4 ball at room temperature. Figure 6(a) shows changes in the friction coefficients of the 45 steel and the Fe-Al-Cr-Nb alloyed layer with respect to the sliding time. From the curves shown in Fig. 6(a), two different stages, i.e., the running-in and steady stages, can be clearly observed. The friction coefficient increases rapidly over the running-in stage, due to the serious abrasive wear. In this initial stage, the samples suffer plastic deformation in the form of ploughing and cutting on the contact area of the Si3N4 and the counterface. Then, the friction coefficients of these two samples remain stable at the steady stage owing to combined effect of oxidative wear and delamination wear. For 45 steel, the delamination wear is the dominate effect during the steady stage (from 2-20 min), which causes friction coefficient fluctuating dramatically from 0.32 to 0.39 with an average value of 0.35. For Fe-Al-Cr-Nb alloyed layer, from 1-2.5 min, the oxidative wear plays a crucial role in facilitating oxides formed on the worn surface. The existence of Al, Cr and Nb oxides has a lubricating effect during the wear process and this oxidation film has strong adhesive force with substrate, which can reduce the friction coefficient to some extent. Afterwards, the curve shows a slight increase from 2.5-20 min as the delamination wear becomes the main mechanism, because the oxide film thickens over time that blocks dislocation and forms high stress and strain under the film, inducing the film spalling to be debris with lubricating effect. Under the combined effects, the friction coefficient reveals a smooth fluctuation keeping at approximately 0.25 [13,14]. Comparing the curves in Fig. 6(a), it is clearly that the friction coefficient of the Fe-Al-Cr-Nb alloyed layer is lower than that of the 45 steel. This result indicates that the Fe-Al-Cr-Nb alloyed layer possesses a better anti-friction performance.
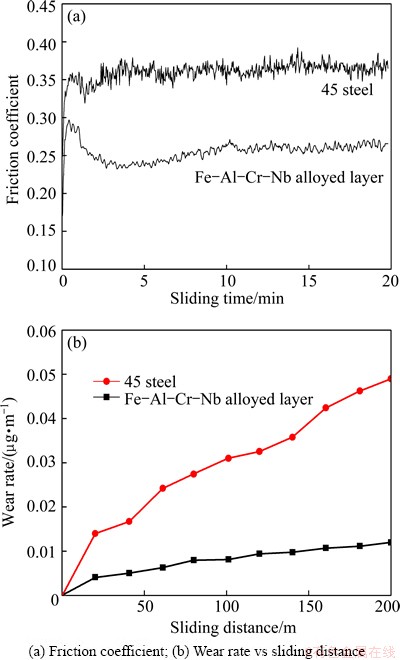
Fig. 6 Tribological behavior of alloyed layer and 45 steel
To investigate the tribological behaviors more accurately, the relationship between the wear rate and sliding distance is shown in Fig. 6(b). In general, the wear rate increases with the sliding distance, and the Fe-Al-Cr-Nb alloyed layer exhibits lower wear rate than the substrate. Additionally, the trend of wear rate is consistent with that of the friction coefficient in Fig. 6(a). Table 3 describes the wear masses in wear process of the Fe-Al-Cr-Nb alloyed layer and the 45 steel during the ball-on-disk wear tests. It can be seen that the wear mass of the Fe-Al-Cr-Nb alloyed layer is 2.6 mg, whereas that of the 45 steel is 10.4 mg. The wear mass of the 45 steel is much larger than that of the Fe-Al-Cr-Nb alloyed layer, which implies that the deposition of the Fe-Al-Cr-Nb alloyed layer can effectively improve the wear resistance of the substrate.
Table 3 Wear masses of Fe-Al-Cr-Nb alloyed layer and 45 steel

In order to better understand the wear behavior, the morphologies for the wear tracks of the Fe-Al-Cr-Nb alloyed layer and the 45 steel were characterized via SMM and SEM. Figure 7 shows the 3D surface profiles and the SEM images of the 45 steel and the Fe-Al-Cr-Nb alloyed layer, which reveal that the width of the wear track of the 45 steel (Figs. 7(a) and (b)) almost doubles that of the Fe-Al-Cr-Nb alloyed layer (Figs. 7(c) and (d)). In addition, the 45 steel exhibits a deeper wear track. The images of the 45 steel (Figs. 7(a) and (b)) show a severe abrasive wear surface with a deep and coarse wear track. As for the Fe-Al-Cr-Nb alloyed layer (Figs. 7(c) and (d)), the track is smoother. It is obvious that the morphologies have close relationship with the wear mechanism. Combining the analysis of the friction coefficient above, the samples mainly suffer continuous surface plastic deformation and induce oxide film spalling from the interface during the final stage of wear process. The Fe-Al-Cr-Nb alloyed layer exhibits great capacity of resistance of plastic deformation due to high hardness and tenacity and the oxide film with lubricating effect. Therefore, the Fe-Al-Cr-Nb alloyed layer shows greater wear resistance than the 45 steel with shallow and superficial wear tracks.
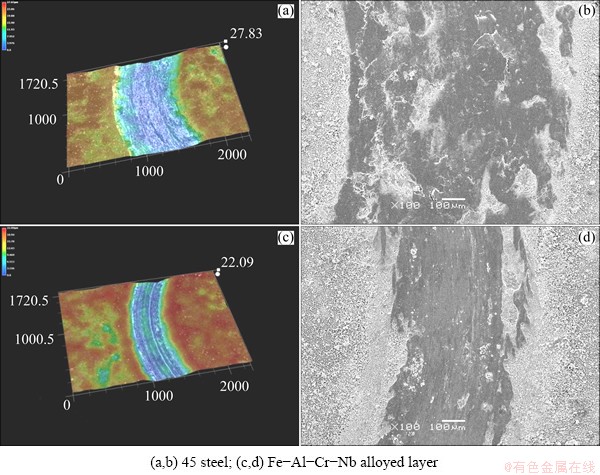
Fig. 7 3D surface profiles and SEM images
According to all of the experiments done in this work, it can be concluded that the excellent wear resistance of the Fe-Al-Cr-Nb alloyed layer is related to its microstructure and phase composition. The surface of the Fe-Al-Cr-Nb alloyed layer is consecutive and compact without any defects (Fig. 1(a)). The thickness of this alloyed layer is homogeneous (Fig. 1(b)). After double glow plasma surface treatment, the hardness of the 45 steel sample increases due to the production of the Fe-Al-Cr-Nb alloyed layer that prevents from dislocation movements during the tests. It is widely accepted that wear resistance is not an inherent material feature, but it depends on the mechanical properties of a metal, especially the surface hardness. According to the Archard’s wear equation (V=kWx/H, where V is the total wear volume, k is the wear coefficient, W is the applied normal load, x is the total sliding distance, and H refers to the surface hardness of the tested material) [15], the wear volume of a metal is proportional to the normal load and sliding distance while it is inversely proportional to the hardness of the tested material. It can be clearly calculated from the equation that the lower the hardness is, the larger the wear volume is, which displays the wider and deeper wear track in the 3D surface profile (Figs. 7(a), (c)). According to the XRD pattern shown in Fig. 3, there are several phases such as Fe3Al, FeAl, Fe2AlCr and Nb2C in the Fe-Al-Cr-Nb alloyed layer, which can effectively improve the surface hardness of the 45 steel. Figure 6 shows that the friction coefficient of the Fe-Al-Cr-Nb alloyed layer is lower than that of the 45 steel, whereas Fig. 7 illustrates that the wear track of the Fe-Al-Cr-Nb alloyed layer is much narrower. All of these results further prove that the formation of the Fe-Al-Cr-Nb alloyed layer on the surface of the 45 steel has effectively improved its wear resistance. The enhancement of the tribological behavior can be also ascribed to the excellent cohesion between the Fe-Al-Cr-Nb alloyed layer and the substrate [16]. During the process of double glow plasma surface metallurgy technique, the alloyed atoms will diffuse from the alloyed layer into the substrate, the cohesion between the Fe-Al-Cr-Nb alloyed layer and the substrate is definitely strong. In summary, the formation of Fe3Al, FeAl, Fe2AlCr and Nb2C enhances the wear resistance of the substrate, and the strong cohesion between the Fe-Al-Cr-Nb alloyed layer and the substrate prevents the occurrence of plastic deformation, resulting in less actual contact area of the alloyed layer against the Si3N4 ball during the tests.
4 Conclusions
1) A Fe-Al-Cr-Nb alloyed layer was synthesized on the surface of the 45 steel via double glow plasma surface metallurgy technique. The alloyed layer consisted of a deposited layer (15-18 μm) and a diffused layer (2-5 μm), which was successive, compact and homogeneous. The alloyed layer connected with the substrate by metallurgical bonding, which exhibited excellent cohesion between the Fe-Al-Cr-Nb alloyed layer and the substrate.
2) The proportions of Cr and Nb decreased gradually with the increase of the depth in the alloyed layer, while Fe experienced an opposite trend. Al accumulated at the place of 5-10 μm from the surface of the alloyed layer. The special element distribution in the alloyed layer formed several metallic compounds that effectively improved the surface hardness of the substrate.
3) Tribological properties of the 45 steel were dramatically improved after depositing a Fe-Al-Cr-Nb alloyed layer on its surface. And this is because the high hardness of the Fe-Al-Cr-Nb alloyed layer and its strong cohesion with the substrate reduced plastic deformation of the friction surface, which could decrease the wear mass during wear testing.
References
[1] CHENG H, HUANG X, WANG H. Calculation of the residual stress of a 45 steel cylinder with a non-linear surface heat-transfer coefficient including phase transformation during quenching [J]. Journal of Materials Processing Technology, 1999, 89-90: 339-343.
[2] LIU H, WANG C, ZHANG X, JIANG Y, CAI C, TANG S. Improving the corrosion resistance and mechanical property of 45 steel surface by laser cladding with Ni60CuMoW alloy powder [J]. Surface and Coatings Technology, 2013, 228(S): s296-s300.
[3] CAI W, MENG F, GAO X, HU J. Effect of QPQ nitriding time on wear and corrosion behavior of 45 carbon steel [J]. Applied Surface Science, 2012, 261: 411-414.
[4] ZHAO W L, HUANG H, WANG Z L. Investigation about electro-deposition properties of special nickel electroplating coating for 45# steel with different surface roughnesses [J]. Advanced Materials Research, 2011, 146-147: 962-965.
[5] XU Z. Method and apparatus for introducing normally solid material into substrate surfaces: WIPO Patent, 1984004761 [P]. 1984-12-06.
[6] SENESI G S, ALOIA E D, GRISTINA R, FAVIA P, AGOSTINO R D. Surface characterization of plasma deposited nano-structured fluorocarbon coatings for promoting in vitro cell growth [J]. Surface Science, 2007, 601(4): 1019-1025.
[7] ZHU X, YAO Z, GU X, CONG W, ZHANG P. Microstructure and corrosion resistance of Fe-Al intermetallic coating on 45 steel synthesized by double glow plasma surface alloying technology [J]. Transactions of Nonferrous Metals Society of China, 2009, 19(1): 143-148.
[8] QIN L, YANG K, LIU C, TANG B. Enhanced plasma boriding with molybdenum using double glow plasma surface alloying technique [J]. Materials Letters, 2012, 82: 127-129.
[9] HUANG J, ZHANG P Z, WU H Y, BAO W J. Investigation of W-Mo alloyed layer synthesised by double glow plasma surface metallurgy [J]. Surface Engineering, 2011, 27(2): 113-117.
[10] WEI D B, ZHANG P Z, YAO Z J, LIANG W P, MIAO Q, XU Z. Oxidation of double-glow plasma chromising coating on TC4 titanium alloys [J]. Corrosion Science, 2013, 66: 43-50.
[11] PARK D, KOLIVAND M, KAHRAMAN A. An approximate method to predict surface wear of hypoid gears using surface interpolation [J]. Mechanism and Machine Theory, 2014, 71: 64-78.
[12] QIN X, KE P, WANG A, KIM K H. Microstructure, mechanical and tribological behaviors of MoS2-Ti composite coatings deposited by a hybrid HIPIMS method [J]. Surface and Coatings Technology, 2013, 228: 275-281.
[13] WANG Y, ZHANG P, WU H, WEI D, WEI X, ZHOU P. Tribological properties of double-glow plasma surface niobizing on low-carbon steel [J]. Tribology Transactions, 2014, 57(5): 786-792.
[14] LUO X X, YAO Z J, ZHANG P Z, MIAO Q, LIANG W P, WEI D B, CHEN Y. A study on high temperature oxidation behavior of double glow plasma surface metallurgy Fe-Al-Cr alloyed layer on Q235 steel [J]. Applied Surface Science, 2014, 305: 259-266.
[15] CHALLEN J M, OXLEY P L B, HOCKENHULL B S. Prediction of Archard’s wear coefficient for metallic sliding friction assuming a low cycle fatigue wear mechanism [J]. Wear, 1986, 111(3): 275-288.
[16] TACIKOWSKI M,  T. Structure of the Al-Ni intermetallic layers produced on nickel alloy by duplex treatment [J]. Intermetallics, 2006, 14(2): 123-129.
采用双辉等离子表面冶金技术在45钢表面制备Fe-Al-Cr-Nb合金层的摩擦性能
罗西希,姚正军,张平则,陈 煜,杨红勤,吴小凤,张泽磊,林玉划,徐尚君
南京航空航天大学 材料科学与技术学院,南京 211106
摘 要:采用双辉等离子表面冶金技术在45钢基体表面制备Fe-Al-Cr-Nb合金层。利用扫描电镜、能谱仪和X射线衍射仪对该合金层的显微组织和物相组成进行表征。结果表明,该合金层表面形貌完整且致密;厚度约为20 μm;各合金元素含量沿截面方向呈梯度分布。显微硬度和纳米压痕实验表明,Fe-Al-Cr-Nb合金层的表面硬度为HV 580,约为基体45钢的2.8倍;与基体相比,该合金层具有较小的位移偏移量和较大的弹性模量。通过室温摩擦磨损实验表明,Fe-Al-Cr-Nb合金层的摩擦因数低且磨损量小,说明该合金层可显著提高基体的表面硬度和耐磨性。
关键词:Fe-Al-Cr-Nb合金层;双辉等离子体表面冶金技术;摩擦性能
(Edited by Yun-bin HE)
Foundation item: Project (51371097) supported by the National Natural Science Foundation of China; Project supported by the Priority Academic Program Development of Jiangsu Higher Education Institutions, China
Corresponding author: Zheng-jun YAO; Tel: +86-25-84891921; E-mail: yaozj@nuaa.edu.cn; luoxixi1989@hotmail.com
DOI: 10.1016/S1003-6326(15)64010-9