Trans. Nonferrous Met. Soc. China 23(2013) 1349-1355
Hot deformation behavior of novel imitation-gold copper alloy
An-yin ZHU1, Jing-lin CHEN1, Zhou LI1,2, Li-yang LUO1, Qian LEI1, Liang ZHANG1, Wan ZHANG1
1. School of Materials Science and Engineering, Central South University, Changsha 410083, China;
2. Key Laboratory of Nonferrous Metal Materials Science and Engineering of Ministry of Education, Changsha 410083, China
Received 29 February 2012; accepted 28 May 2012
Abstract: The hot deformation behavior of a novel imitation-gold copper alloy was investigated with Gleeble-1500 thermo-mechanical simulator in the temperature range of 650-770 ��C and strain rate range of 0.001-1.0 s-1. The hot deformation constitutive equation was established and the thermal activation energy was obtained to be 249.60 kJ/mol. The processing map at a strain of 1.2 was developed. And there are two optimal regions in processing map, namely 650-680 ��C, 0.001-0.01 s-1 and 740-770 ��C, 0.01-0.1 s-1. Optical microscopy was employed to investigate the microstructure evolution of the alloy in the process of deformation. Recrystallized grains and twin crystals were found in microstructures of the hot deformed alloy.
Key words: imitation-gold alloy; hot compression deformation; constitutive equation; processing map
1 Introduction
Copper and copper-matrix alloys are widely used in many fields because of their beautiful colors, high strength and corrosion resistance. With the increase of gold price, golden-colored copper alloys, such as Cu-Zn alloys [1], Cu-Al alloys and Cu-Ni alloys [2-4] were developed, which have different K-gold color. Among those alloys, the golden-colored alloys with 24K-gold color are popular in consumers. In order to obtain 24K-gold colored copper alloy, zinc element should be added. However, dezincification in brass may change the color of the imitation-gold alloy [5]. The novel imitation-gold alloy investigated has an excellent anti-tarnish property and a lower corrosion rate than currency coinage materials of H7211 alloy [6].
Hot deformation is a complex process with work hardening and softening. The understanding of hot deformation behaviors of metals is very important for the design of metal forming processes, such as hot-rolling and forging and extrusion. The hot deformation behavior of materials under processing is generally characterized by constitutive model and processing map. Many constitutive models have been proposed or modified to describe the strain rate, strain and temperature-dependent flow behavior of metals and alloys. The Arrhenius equation, as a typical phenomenological model, is widely used to illustrate the hot workability of many materials. LEI et al [7] revised the model to describe the flow behaviors of Cu-Ni-Si alloy by compensation of strain and strain rate. And a new constitutive equation coupling flow stress with strain, strain rate and deformation temperature was developed by XIAO et al [8] on the basis of the Arrhenius-type equation to investigate the hot workability of H62 brass, in which the Zener�C Hollomon parameter was modified by considering the compensation of the strain rate. The processing map based on the dynamic material model (DMM) was first developed by PRASAD [9]. Actually, a processing map is plotted on the basis of the power dissipation map which represents the response of material to the applied strain rate at a constant temperature. A power dissipation map combined with an instability map is a processing map.
Although the alloy has an excellent workability, it is necessary to study the hot deformation behavior to guide the hot-rolling process of the big ingot. And the researches on flow behavior and microstructure evolution of Cu-Zn alloy during the hot deformation are rare. In this work, the hot deformation behavior of the investigated alloy was characterized using the analysis of stress��strain curves, constitutive equation and processing map at first.
2 Experimental
The chemical compositions of the investigated alloy are shown in Table 1. The alloy was prepared by induction melting and mold casting. The specimens with 8 mm in diameter and 15 mm in height were cut from the cast alloy. The specimens were hot-compression deformed at the temperatures from 650 to 770 ��C and the strain rates from 0.001 to 1 s-1 on the Gleeble-1500 thermo-mechanical simulator. Before compression tests, the specimens were held for 2 min at testing temperatures. In order to reduce the friction coefficient during the hot compression, graphite powder was applied to contacting surfaces of specimens. After being deformed to a true stain of 1.2, all specimens were quenched into water to preserve the microstructures developed during hot compression, and the samples were cut along the longitudinal axis and mechanically polished, then, chemical etching. Microstructures were observed using a Leica DM ILM HC optical microscope.
Table 1 Compositions of designed alloy (mass fraction, %)

3 Results and discussion
3.1 Microstructure of as-cast alloy
The initial microstructure of the as-cast alloy investigated is shown in Fig. 1. It shows that the average grain size is about 500 ��m. Dendrites are prominent in microstructure.
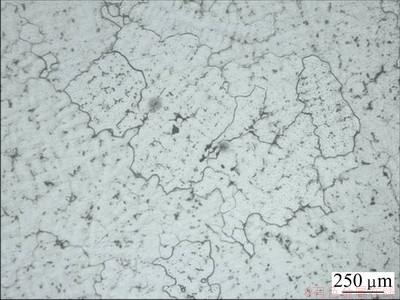
Fig. 1 Initial microstructure of as-cast alloy at hot-compression tests
3.2 Stress��strain curves
Figure 2 shows the flow curves obtained from the hot-compression tests of the alloy under different deformation conditions. According to the flow curves, work hardening and dynamic restoration take place during the hot deformation and a balance was attained with the increase of strain. At high temperatures (710-770 ��C) and low strain rates (0.001-0.01 s-1), the flow stress increases with strain up to a maximum value and then decreases until attaining a steady state. Such behaviors indicate that dynamic recrystallization (DRX) plays a main role in dynamic restoration process [10]. Under other conditions, the flow curves are neither typical dynamic recovery (DRV) or DRX. So, both of DRV and DRX take place in dynamic restoration process. In addition, peak and steady-state stresses are raised with increasing strain rate and decreasing temperature.
3.3 Constitutive equation
As well established in Ref. [11], an extended form of the hot working constitutive equation is expressed as
 (1)
(1)
where  is the strain rate; ��p is the peak stress; Q is an activation energy; T is the thermodynamics temperature; A, �� and n are constants independent of temperature. In order to obtain the values of A, n and Q, �� should be calculated.
Equation (1) can be expressed by the following equation [7]:
 (2)
(2)
��=��/n1 (3)
The value of �� is calculated as 0.0069.
To calculated Q, Eq. (1) can be expressed as
 (4)
(4)
where n is the average slope of the line of  versus ln[sinh(����p)] plotted in Fig. 3(a) and S is the average slope of the line of ln[sinh(����p)] versus 1/T plotted in Fig. 3(b). The values of n and S are 6.650 and 4.5005, respectively. The average value of apparent activation energy (Q) for hot deformation is calculated as 249.60 kJ/mol.
The effects of the temperature and strain rate on the deformation behaviors can be represented by Zener- Hollomon parameter, Z [12-15]:
 (5)
(5)
Taking the logarithm of both sides of Eq. (5) gives
 (6)
(6)
Figure 4 plots the logarithm of Zener-Hollomon parameter Z as a function of ln[sinh(����p)]. The experimental data show a linear relationship with a slope of 6.665. The value of n is determined as 6.665.
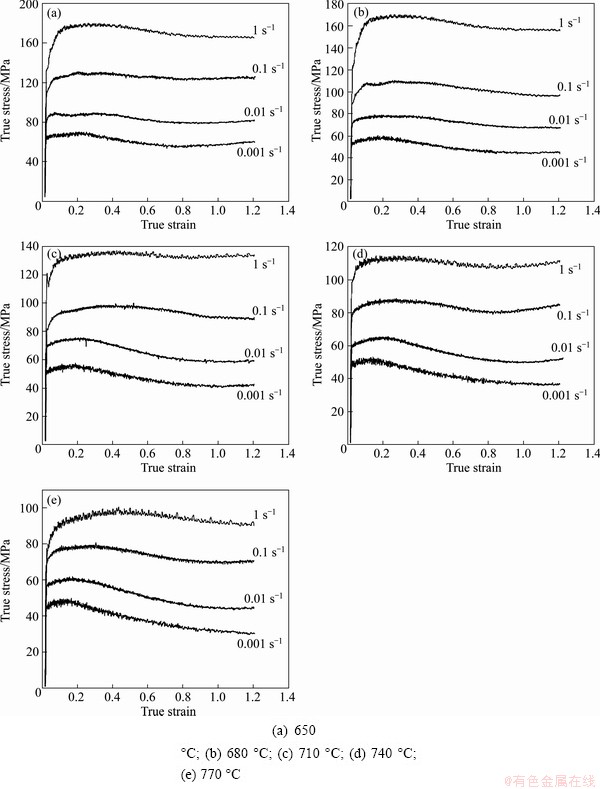
Fig. 2 True stress��true strain curves of alloy at different temperatures
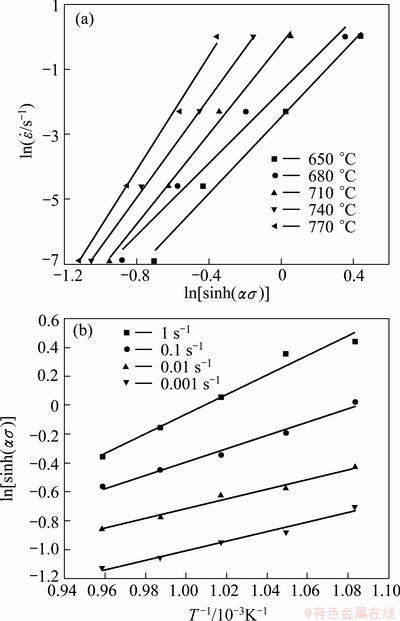
Fig. 3 Curves of  ��ln[sinh(����)] (a) and ln[sinh(����)]��T-1(b)
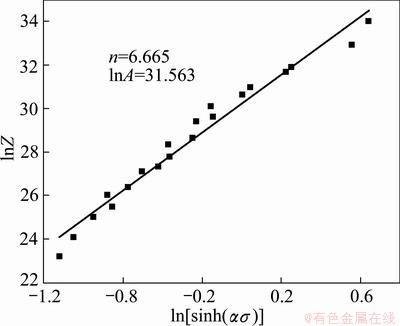
Fig. 4 Curve of lnZ��ln[sinh(����p)]
Taking the values of A, Q, n, �� into Eq. (1), the flow stress constitutive equation for alloy can be described by the Arrhenius equation which is ameliorated by hyperbolic sine function and parameter Z. And the equation obtained is as follows:

 (7)
(7)
3.4 Processing map
At a constant temperature, the instantaneous response (��) of the workpiece material to the applied strain rate ( ) for creating a large plastic strain is given by the dynamic constitutive equation [10,16]:
 (8)
(8)
where K and m are constants. The instantaneous total power P consists of two complementary functions G and J as [17]: G represents the power dissipation through plastic deformation, most of which converts into viscoplastic heats; J represents the power dissipation via microstructure transition, such as dynamic recovery, dynamic recrystallization, superplastic flow and phase transformations. During the hot deformation, P can be written as follows:
 (9)
(9)
The dissipation of power between G and J is defined by a power partitioning factor which is known as the strain rate sensitivity of flow stress, m:
 (10)
(10)
From Eqs. (9)-(11), one can get
 (11)
(11)
The value of J reaches its maximum (Jmax) when m=1, and the workpiece acts as a linear dissipater. The dimensionless efficiency of power dissipation, ��, is written as
 (12)
(12)
Hence, �� is an important parameter determining the extent of power dissipation due to the microstructural transition during the hot deformation. The power dissipation map of this alloy developed at a true strain of 1.2 is shown in Fig. 5 in which the contour number represents the constant efficiency of power dissipation (��).
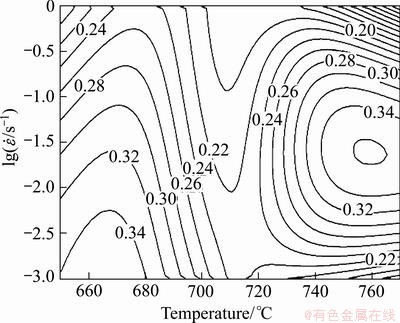
Fig. 5 Power dissipation map for alloy obtained at true strain of 1.2
Developed by PRASAD [9], the stable flow is ensured when the following inequality is satisfied:
 (13)
(13)
The variation of �� with temperature and stain rate is plotted in an instability map, and the instability regions are characterized by negative ��.
The processing map of this alloy at the true strain of 1.2 is shown in Fig. 6, where the shaded areas represent the instability regions while the white area represents the safe region. There are two instability regions in the processing map, which are located in the positions of top left corner (650-670 ��C, 0.1-1 s-1) and top right corner (740-770 ��C, 0.32-1 s-1). According to the viewpoints of PRASAD et al [17], the most favorable conditions for processing materials are those which provide the highest J dissipated in the most efficient way (the highest ��) and lie within the safe regions. From the processing map, it can be seen that the optimal processing conditions of this alloy are in zone I (650-680 ��C, 0.001-0.01 s-1) and zone II (740-770 ��C, 0.01-0.1 s-1) in Fig. 6 with the highest �� of 0.36. For the metals with a low stacking fault energy, the maximum efficiency of power dissipation (��) for dynamic recrystallization is about 0.35 [18].
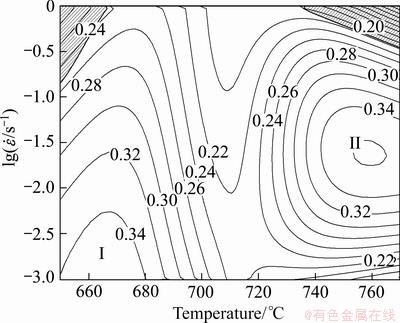
Fig. 6 Processing map for alloy obtained at true strain of 1.2
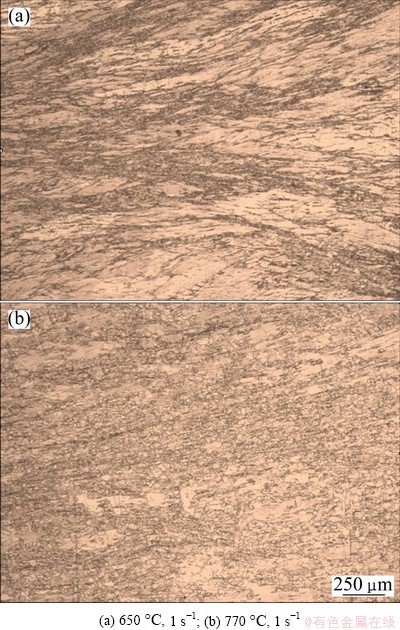
Fig. 7 Microstructures of alloy samples deformed at true strain of 1.2 under different temperatures and strain rates
3.5 Microstructures of deformed alloy samples
Figure 7 shows the microstructures obtained from instability regions in the processing map. The grains are elongated and shear bands oriented about 45�� with respect to the compression axis are found in Fig. 7(a). Shear bands and recrystallized grains can be observed in Fig. 7(b).
Figure 8 shows the microstructures obtained from the different safe regions of the processing map.

Fig. 8 Microstructures of alloy samples deformed at true strain of 1.2 under different temperatures and strain rates
Figure 8(a) shows the microstructure of the alloy deformed at 710 ��C and 1 s-1 and the efficiency of power dissipation (��) is about 0.20 in this condition. The grains are elongated and recrystallized grains only exist in the grain boundary. Microstructures of specimens deformed at 650 ��C, 0.001 s-1 and 770 ��C, 0.01 s-1 are shown in Figs. 7(b) and (c), respectively, which represent the microstructures of the specimens deformed under the two favorable processing conditions with a peak efficiency of 0.34. The recrystallization is predominant and the grains are uniform and fine. The microstructure of the specimen deformed at 770 ��C and 0.001 s-1 is shown in Fig. 8(d). The grains in Fig. 8(d) are uniform and larger than those in Figs. 8(b) and (c). Twins are observed in Fig. 8(d) and twinning boundaries are straight, which illustrates that grain growth happens. According to the processing map in Fig. 6, the efficiency of power dissipation (��) is about 0.20. This indicates that �� decreases with grain growth. This regularity was also found in other alloys [19-21].
4 Conclusions
1) There is a balance between work hardening and dynamic restoration process during hot deformation. DRV and limited DRX take place at low temperatures and high strain rates. DRX plays a main role in dynamic restoration process at high temperatures and low strain rates.
2) The thermal activation energy is 249.60 kJ/mol and the flow stress constitutive equation is as  =5.101��1013[sinh(0.0069��)]6.665exp[-249.60��103/(RT)].
3) According to the processing map established, the efficiency of power dissipation is influenced by deforming temperature and strain rate. Two optimal regions with a peak efficiency of 0.34 are 650-680 ��C, 0.001-0.01 s-1 and 740-770 ��C, 0.01-0.1 s-1.
References
[1] SARVGHAD MOGHADDAM M, PARVIZI R, HADDAD- SABZEVAR M, DAVOODI, A. Microstructural and mechanical properties of friction stir welded Cu-30Zn brass alloy at various feed speeds: Influence of stir bands [J]. Material Design, 2011, 32: 2749-2755.
[2] PRINZ B, ROCKEL M, RUDOLPH G, HEUBNER U. Use of a gold-coloured copper alloy for the production of fittings and the like: Germany, DE3235833 (A1) [P]. 1982-09-28.
[3] SONG J Y, HONG S L. Design and characterization of new Cu alloys to substitute Cu-25%Ni for coinage applications [J]. Material Design, 2011, 32: 1790-1795.
[4] PRINNZ B, ROCKEL M, RUDOLPH G, HEUBNER U, ZOEBE H. Gold coloured alloy for coins: Germany, DE3116125 (A1) [P]. 1982-11-25
[5] GADEN H, KALSER H, KAESCHE H. A morphological study of dezincification of brass [J]. Corrosion Science, 1990, 30: 737-739.
[6] CHEN Jing-lin, LI Zhou, ZHU An-yin, LUO Li-yang, LIANG Jun. Corrosion behavior of novel imitation-gold copper alloy with rare earth in 3.5% NaCl solution [J]. Material Design, 2012, 34: 618-623.
[7] LEI Qian, LI Zhou, WANG Jing, LI Si, ZHANG Liang, DONG Qi-yi. High-temperature deformation behavior of Cu-6.0Ni-1.0Si- 0.5Al-0.15Mg-0.1Cr alloy [J]. Journal of Material Science, doi: 10.1007/s10853-012-6511-2.
[8] XIAO Yan-hong, GUO Cheng, GUO Xiao-yan. Constitutive modeling of hot deformation behavior of H62 brass [J]. Materials Science and Engineering A, 2011, 528: 6510-6518.
[9] PRASAD Y V R K. Author��s reply: Dynamic materials model: Basis and principles [J]. Metallurgical and Material Transactions A, 1996, 27: 235-236.
[10] CAI Da-yong, XIONG Liang-yin, LIU Wen-chang, SUI Gui-dong, YAO Mei. Characterization of hot deformation behavior of a Ni-base superalloy using processing map [J]. Material Design, 2009, 30: 921-925.
[11] SELLARS C M, MCTEGART W J. On the mechanism of hot deformation [J]. Acta Metallurgica, 1966, 14: 1136-1138.
[12] ZHANG L, LI Z, LEI Q, QIU W T, LUO H T. Hot deformation behavior of Cu-8.0Ni-1.8Si-0.15Mg alloy [J]. Materials Science and Engineering A, 2011, 528: 1641-1647.
[13] PRASAD Y V R K, RAO K P. Processing maps and rate controlling mechanisms of hot deformation of electrolytic tough pitch copper in the temperature range 300-950 ��C [J]. Materials Science and Engineering A, 2005, 391: 141-150.
[14] WEI Xiu-yu, ZHENG Zi-qiao, FU Xin, CHEN Qiu-ni. Flow stress of 2197 Al-Li alloy during hot compression deformation [J]. Transactions of Nonferrous Metals Society of China, 2007, 17(1): 280-284.
[15] LI Y S, ZHANG Y, TAO N R, LU K. Effect of the Zener-Hollomon parameter on the microstructures and mechanical properties of Cu subjected to plastic deformation [J]. Acta Materialia, 2009, 57(3): 761-772.
[16] NARAYANA MURTY S V S, NAGESWARA RAO B. On the flow localization concepts in the processing maps of titanium alloy Ti-24Al-20Nb [J]. Journal of Materials Processing Technology, 2000, 104(1-2): 103-109.
[17] PRASAD Y V R K, GEGEL H L, DORAIVELU S M, DORAIVELU S M, MALAS J C, MORGAN J T, LARK K A, BARKER D R. Modeling of dynamic material behavior in hot deformation: Forging of Ti-6242 [J]. Metallurgical Transactions A, 1984, 15: 1883-1885.
[18] PRASAD Y V R K, SESHACHARYULU T. Modelling of hot deformation for microstructural control [J]. International Materials Reviews, 1998, 43(6): 243-258.
[19] SUI Feng-li, XU Li-xia, CHEN Li-qing, LIU Xiang-hua. Processing map for hot working of Inconel 718 alloy [J]. Journal of Materials Processing Technology, 2011, 211(3): 433-440.
[20] CHAKAVARTTY J K, PRASAD Y V R K, ASUNDI M K. Processing map for hot working of alpha-zirconium [J]. Metallurgical Transactions A, 1991, 22: 829-836.
[21] NARAYANA MURTY S V S, NAGESWARA RAO B, KASHYAP B P. On the hot working characteristics of 2014Al-20vol% Al2O3 metal matrix composite [J]. Journal of Materials Processing Technology, 2005, 166: 279-285.
���ͷ½�ͭ�Ͻ���ȱ�����Ϊ
�찲ӡ1���¾���1���� ��1,2��������1���� ǰ1���� ��1���� ��1
1. ���ϴ�ѧ ���Ͽ�ѧ�빤��ѧԺ����ɳ 410083��
2. ��ɫ�������Ͽ�ѧ�빤�̽������ص�ʵ���ң���ɳ 410083
ժ Ҫ����Gleeble-1500��ģ����ϣ����õ�����ѹ��ʵ�飬�о�һ�����͵ķ½�ͭ�Ͻ��ڱ����¶�650~770 ��C����������0.001~1 s-1�����µ��ȼӹ���Ϊ��ͨ�������ȼӹ��������̵ó��ȼ�����Ϊ 249.60 kJ/mol��ͨ�������Ͻ�����Ӧ��1.2�µļӹ�ͼ���ó�650~680 ��C��0.001~0.01 s-1��740~770 ��C��0.01~0.1 s-1�ǺϽ��ȼӹ�����ѹ���������ͨ�����������۲�Ͻ�����ѹ�������е���֯�仯���ٽᾧ��֯���Ͼ���֯��
�ؼ��ʣ��½�Ͻ���ѹ�����������̣��ӹ�ͼ
(Edited by Xiang-qun LI)
Foundation item: Project (11JJ2025) supported by Natural Science Foundation of Hunan Province, China; Project (y2010-01-004) supported by the Nonferrous Metals Science Foundation of HNG-CSU, China
Corresponding author: Zhou LI; Tel: +86-731-88830264; Fax: +86-731-88876692; E-mail: lizhou6931@163.com
DOI: 10.1016/S1003-6326(13)62603-5