Trans. Nonferrous Met. Soc. China 25(2015) 1114-1121
Size effects on deformation behavior of C5210 phosphor bronze thin sheet
Jin-dong OUYANG, Ming-he CHEN, Ning WANG, Qin-chai ZHANG, Hui WANG
College of Mechanical and Electrical Engineering, Nanjing University of Aeronautics and Astronautics, Nanjing 210016, China
Received 27 May 2014; accepted 10 September 2014
Abstract: To investigate the effects of thickness and grain size on mechanical and deformation properties of C5210 phosphor bronze thin sheets, samples with different grain sizes were obtained through annealing heat treatment at different temperatures; and then tensile tests of samples with different thicknesses and grain sizes were conducted at room temperature. The results show that yield strength increases with decreasing thickness from 800 to 50 μm, but work hardening exponent and total elongation decrease, and a modified model was proposed to describe the relation between yield strength and thickness; yield strength decreases as the grain size increases, but work hardening exponent shows an increasing trend, total elongation increases to a peak and then decreases. Fracture morphology of tensile specimens was observed by SEM, which indicates that all tensile specimens are ductile fracture. The dimple intensity increases as the specimen thickness increases but reduces with the specimen grain size increasing.
Key words: size effect; mechanical property; deformation property; fracture morphology; phosphor bronze alloy
1 Introduction
With the development of micro-electromechanical system, micro-forming has become one of the suitable methods to fabricate micro-parts due to the advantages of high productivity, low cost, and excellent mechanical properties [1-3]. However, investigations show that when the feature size is reduced from macro-scale to micro-scale, the size effect occurs because the plastic deformation behavior is determined by only a few grains located in the deformation regions [4-6]. There are two different types of size effects in sheet metal micro-forming: grain size effects and feature size effects (specimen size effects) [7].
To investigate the size effects in micro-forming, some researches have been conducted. GEIGER et al [8] presented micro-forming and conducted a detailed review of micro-forming technology. GUO et al [9] studied flow stress and tribology size effects in scaled- down cylinder compression test, which indicates that flow stress decreases with decreasing specimen diameter from 8 to 1 mm, and friction factor increases obviously with decreasing the specimen diameter in the case of lubricating with castor oil. However, tribology size effect is not found in the case without lubrication. WANG et al [10] also studied the specimen size effects on flow stress of micro rod, and found that flow stress decreased with decreasing billet dimensions. CHEN and NGAN [11] studied the couple effects of specimen size and grain size on tensile strength of Ag micro-wires, which verified the existence of strengthening effect when the ratio of the specimen diameter to grain size is less than 3. SUZUKI et al [12] conducted a series of tensile tests on polycrystalline pure aluminum foils whose microstructure keeps the same with different thicknesses, and found that with reduction of foil thickness, an increase in yield strength was observed with tensile tests. TSAI and CHANG [13] used compression experiment to study grain size effects on deformation twinning in Mg-Al-Zn alloy, and they revealed that large grains are easier to be twinned than small grains. LLOYD and COURT [14] also studied the influence of grain size on Al-Mg alloys [14].
Prior studies mainly focused on size effects on mechanical properties of brass, stainless steel, Al-Mg alloys and pure aluminum. However, the phosphor bronze alloy has rarely been studied. To optimize the deformation technology of phosphor bronze, it is very important to systematically study their size effects on the deformation and fracture behaviors in micro forming. In this work, C5210 phosphor bronze thin sheets were taken as the experiment materials. Tensile tests of thin sheets were conducted to study the specimen thickness and grain size effects on mechanical properties and deformation properties in micro forming, and SEM tests were conducted to observe the fracture morphology.
2 Experimental
C5210 phosphor bronze thin sheets with different thicknesses were selected as the testing materials which have been widely applied in MEMS devices. The chemical compositions of material are shown in Table 1. The tensile tests were conducted on a RG2000-2A microcomputer controlled electron universal testing machine. All the tests were conducted at room temperature with strain rate of 0.001 s-1. The tensile specimen dimensions are shown in Fig. 1. All the tensile samples were cut from thin sheets by high precision electric discharge machining (EDM).
Table 1 Chemical compositions of C5210 thin sheet (mass fraction, %).

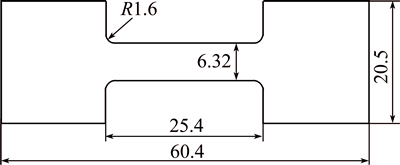
Fig. 1 Dimensions of tensile test specimen (unit: mm)
The first group of tensile tests was conducted on specimens with the thicknesses of 50, 100, 250, 500, and 800 μm, whose hardness of the state is same, to investigate the influence of thickness on mechanical and deformation properties.
In the second group, three kinds of thicknesses samples were used, respectively 50, 100, and 250 μm. The thin sheet specimens with different grain sizes were obtained by annealing heat treatment at different temperatures ranging from 300 to 700 °C with the same holding time of 60 min. Annealing heat treatment experiment was conducted in vacuum conditions to void oxidation. To acquire the microstructure, annealed specimens were etched with a solution of 1.5 g FeCl3, 1 mL HCl and 48 mL C2H5OH for 15 s. The microstructures of annealed specimens were observed by multiplication microscope GX 71 and the average grain size was measured by the linear intercept and planimetric methods according to the standard of ASTM E112-10. The microstructures of annealed specimens are shown in Fig. 2, and the results show that there are only two or three grains in the cross-section of thickness direction when the annealing temperature went up to 600 °C. Average grain size of annealed specimens is shown in Table 2 and results show that grain size increases with annealing temperature increasing.
3 Results and discussion
3.1 Effects of specimen thickness on thin sheet properties
Figure 3 shows the true stress-true strain relationship of specimens with different thicknesses. Results show that the true stress-true strain curves vary greatly with different sheet thicknesses. The yield strength decreases as the thickness increases, but the total elongation increases with thickness increasing. The relation between yield strength and thickness can be acquired by coding with the tensile data, which is shown in Fig. 4. Results show that the yield strength of specimen with 50 μm in thickness is 13% higher than that of specimen with 800 μm in thickness.
Yield strength increasing with decreasing thickness is similar to the relation between yield strength and grain size which is represented by the Hall-Petch model [15]. After modifying the Hall-Petch equation σ0.2=σ0+kd-0.5, the relation between yield strength and thickness can be described as follows:
σ0.2=σ0+kt-0.5 (1)
where σ0.2 is yield strength; t is the thickness of specimen; σ0 and k are constant. The formula shown in Eq. (2) can be acquired by fitting the relationship between yield strength and thickness:
σ0.2=579.28+594.09t-0.5 (2)
Figure 5 shows that the experimental data are close to the calculated curve, which means that the calculated values match the experimental data well, which also suggests that the relation between yield strength and thickness can be predicted by the modified model. Some researches showed that the yield strength increasing with decreasing thickness also existed in the tensile tests on other metal foils [16,17].
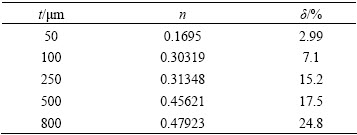
The work hardening exponent n and total elongation δ of specimens with different thicknesses can be acquired by further dealing with the data of tensile test, as shown in Table 3. Results show that work hardening exponent n increases as the thickness increases. Since the number of grain increases with thickness increasing, the number of grain involved in the plastic deformation increases, leading to the intergranular constraints becoming larger, and alloy work hardening ability is improved.
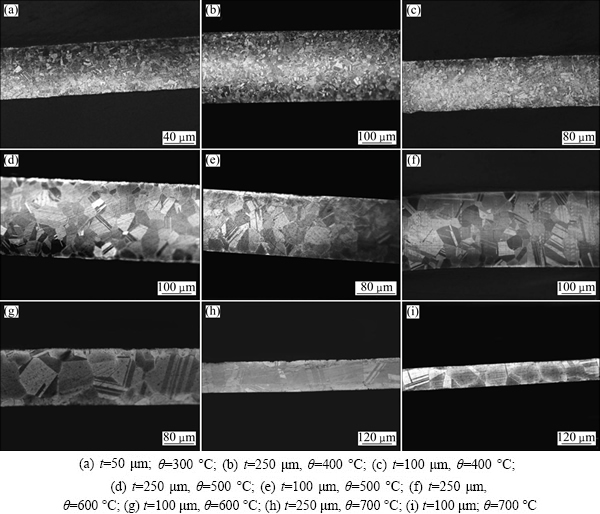
Fig. 2 Microstructures of phosphor bronze thin sheets annealed at different temperatures with different thicknesses
Table 2 Average grain size (d) of C5210 thin sheet annealed at different temperatures with three kinds of thicknesses
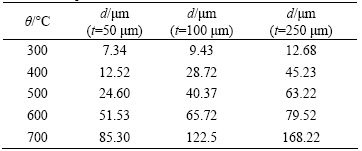
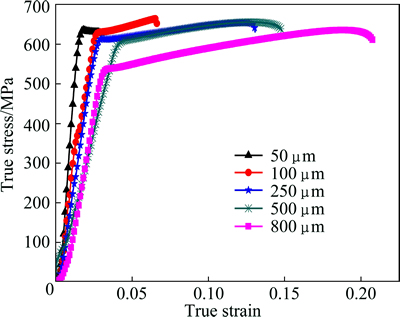
Fig. 3 Curves of true stress-true strain of specimens with different thicknesses
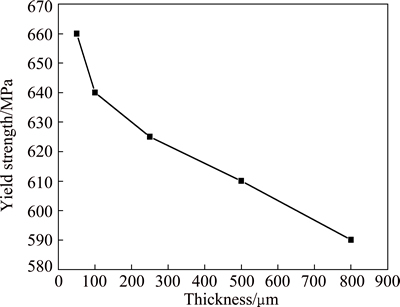
Fig. 4 Effects of thickness on yield strength of specimens
The total elongation is one of the important parameters to measure plastic of material. Table 3 shows the total elongation with different thicknesses of samples. The elongation of samples with 800 μm in thickness is 8 times those with 50 μm in thickness. This is because that the grain number in the thickness direction decreases as the thickness decreases, leading to the intergranular constraints decreasing. And the inhomogeneity increases during the deformation process, which lowers the material plasticity and total elongation.
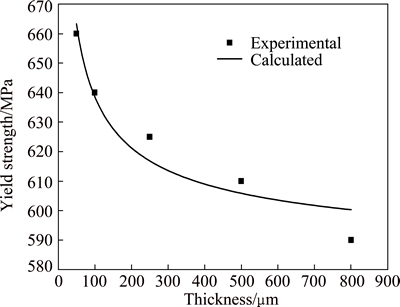
Fig. 5 Effect of thickness on yield strength of specimens between experimental and calculated results
Table 3 Deformation properties of specimens with different thicknesses
3.2 Effects of grain size on thin sheet properties
In the second group tests, true stress-true strain curves of the annealed specimen are shown in Fig. 6. Results show that at the same strain, the flow stress decreases with the increase of grain size. The relation between yield strength and grain size of specimens with different thicknesses is shown in Fig. 7, which can be acquired by further coding with the true stress-true strain curves in Figs. 6. Figure 7 shows that the grain size has significant influences on the yield strength, which decreases with grain size increasing. And the yield strength of specimens with the largest grain size decreases notably compared with those with the smallest grain size. For those samples of 50 μm in thickness, yield strength of samples with grain size of 7.3 μm is 150% higher than that of samples with grain size of 85 μm.
As for specimens having the same thickness but with various grain sizes, yield strength decreases with grain size increasing. On one hand, it can be explained by the surface grain weakening model [18]. According to the surface layer theory, with the increase of grain size while keeping the sheet thickness constant at the same time, the share ratio of surface grains increases, which results in the decrease of yield stress. On the other hand, it can also be explained by the Hall-Petch model:
σ0.2=σ0+kd-0.5 (3)
where d is the grain diameter of specimen.
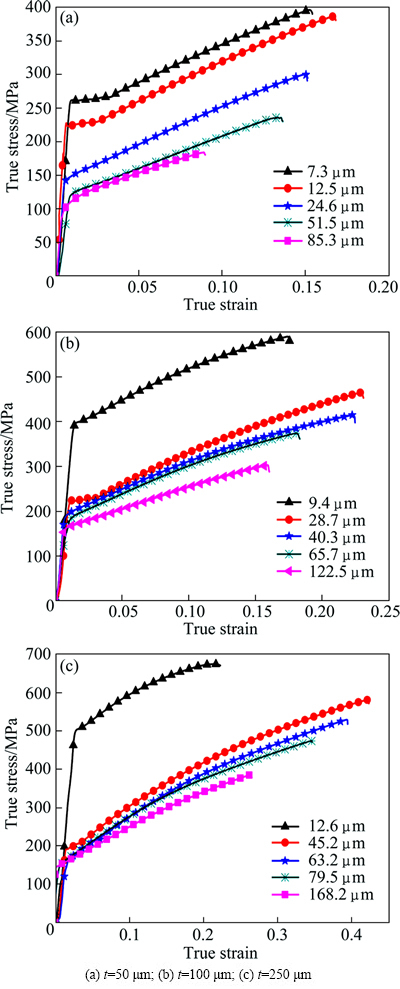
Fig. 6 Curves of true stress-true strain with different grain sizes
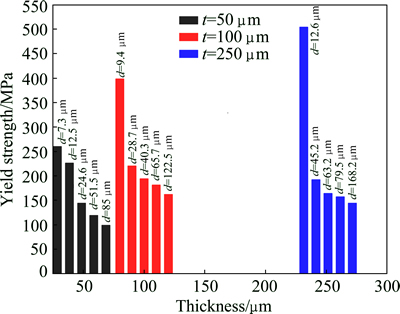
Fig. 7 Effects of grain size on yield strength of specimens
The formulas shown in Eq. (4) (t=50 μm), Eq. (5) (t=100 μm), Eq. (6) (t=250 μm) can be obtained by fitting the relationship between yield strength and grain size:
σ0.2=28.379+645.168d-0.5 (4)
σ0.2=53.454+1033.541d-0.5 (5)
σ0.2=-56.049+1930.562d-0.5 (6)
Figure 8 shows that the calculated values match the experimental data very well, which verifies that the results of experiment can be predicted from Hall-Petch model. This suggests that the strengthening of grain size still meets with Hall-Petch model for the phosphor bronze in thickness of 50-250 μm.
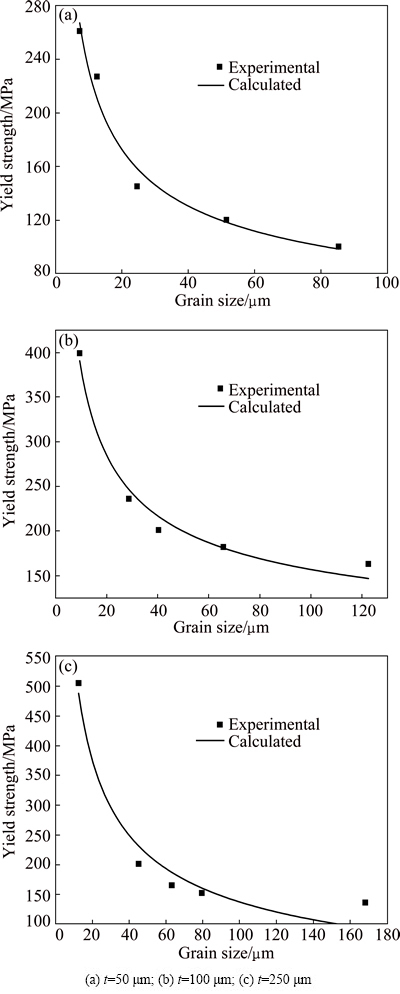
Fig. 8 Effects of grain size on yield strength between experimental and calculated results
Deformation properties of annealed specimens were acquired after further processing of tensile test data. Table 4 shows that work hardening exponent increases with grain size increasing. This is because dislocation accumulates easily at grain internal as grain size increases, which leads to work hardening exponent increasing. And dislocation disappears easily at grain boundary when the grain size decreases, resulting in greater share ratio of grain boundary to grain internal.
Table 4 Deformation properties of annealed specimen
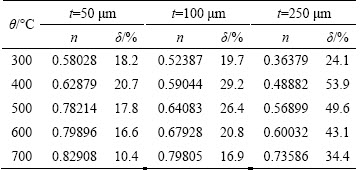
Figure 9 shows the effects of total elongation on the grain size, which is obtained from Table 4. It shows an increasing trend in elongation at first then decreases as the grain grows. For the sheet of 100 μm in thickness, the elongation is 19% when the grain size is 9.4 μm. It reaches the maximum of 29.2% as the grain grows up to 28.7 μm but then declines with the growth of grain. This is because dynamic recovery is more sufficient when annealing temperature is raised from 300 to 400 °C, recrystallization also begins to happen, and the cold work hardening is eliminated totally, which contributes to better plastic performance and the elongation increases. However, grain size will become larger after recrystallization when annealing temperature continues to rise, great difference in deformation between the grain internal and grain boundary exists, and the deformation tends to be uneven, leading to stress concentration, producing cracks and decreasing the elongation.
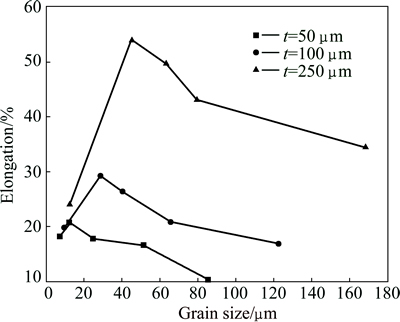
Fig. 9 Effects of grain size on elongation
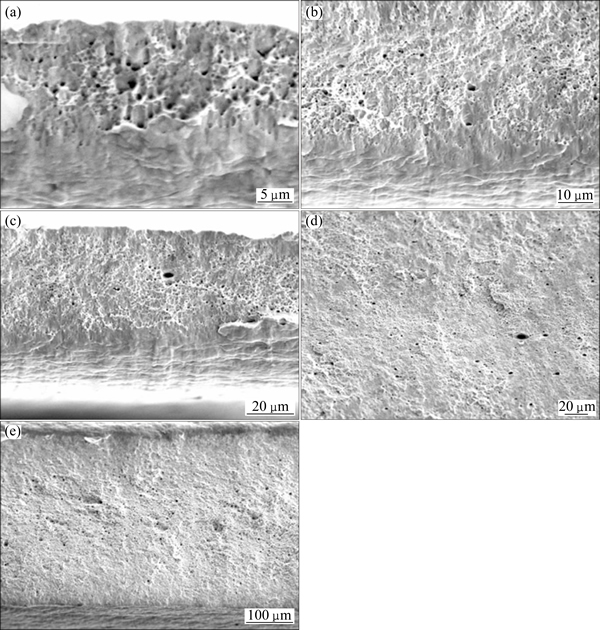
Fig. 10 Fracture morphologies of tensile specimens with thicknesses of 50 μm (a), 100 μm (b), 250 μm (c), 500 μm (d) and 800 μm (e)
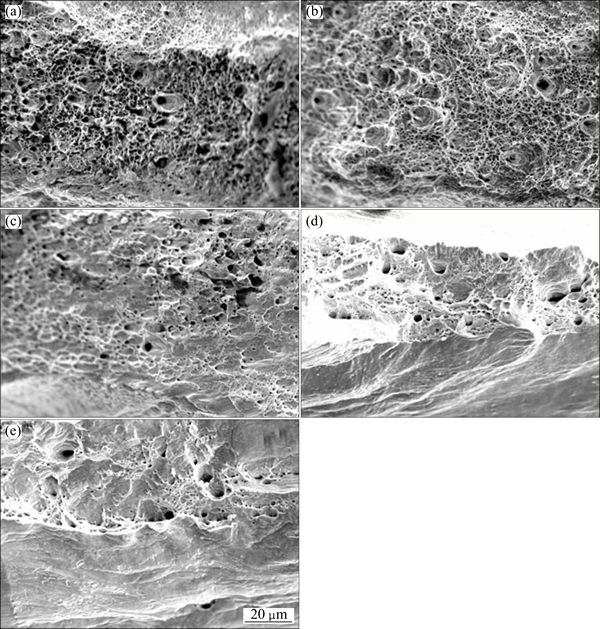
Fig. 11 Fracture morphologies for samples of 250 μm in thickness with average grain sizes of 12.68 μm (a), 45.23 μm (b), 63.22 μm (c), 79.52 μm (d) and 168.22 μm (e)
3.3 Fracture analysis
To investigate the fracture mechanism of micro tensile of C5210 phosphor bronze thin sheet, the fracture morphology of specimens was observed by SEM. Figure 10 shows the fracture photographs of the tensile test samples with the thicknesses of 50, 100, 250, 500 and 800 μm. Figure 11 shows the fracture morphologies of specimens under the thickness of 250 μm with different grain sizes. There are lots of dimples seen from the fracture morphology and obvious plastic deformation happens during the fracture process, which demonstrate that the fracture mode of all samples is micro porous polymerized ductile fracture. Dimples are the main micro feature of metal plastic fracture, and dimples are produced in the process of plastic deformation in micro area, which go through the procedures of the nucleation, growing, polymerization, connecting with each other and fracture finally, leaving marks on the fracture surface.
Figure 10 shows that dimples of fracture samples with thicknesses of 100, 250, 500 and 800 μm are more like parabola form, small and shallow, and have heavy intensity, which are typical shear dimples. This is because in the process of forming micro holes, the shear stress plays a dominative role in plastic deformation that makes the micro holes have the greater growth rate in the direction of shear stress, elongating the micro holes, thus forming a parabolic dimple [19]. Materials of fracture morphology with parabolic form dimples possess good plasticity, which is in accordance with the necking phenomenon in the macroscopic fracture, as shown in Fig. 12. The dimples of fracture samples with thickness of 50 μm are approximate circular, and the number of dimples is smaller than those of samples with thicknesses of 250, 500 and 800 μm formed under normal stress tensile demonstrating that strengthening ability of material is improved, but plasticity is decreased, which is identical with the phenomenon of no apparent necking and flat fracture surface in macro factures (Fig. 12).
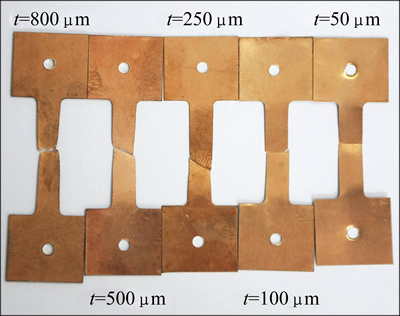
Fig. 12 Fracture samples of different thicknesses
Figure 11 shows that with the increase of the grain size, the dimple intensity decreases, but the size of the dimples and the depth of micro holes increase. This reflects that material matrix strengthening is improved, namely working hardening exponent increases, which agrees with the results obtained from tensile test.
4 Conclusions
1) Yield strength decreases as the thickness increases from 50 to 800 μm, but work hardening exponent and elongation increase. A modified model according to the Hall-Petch model is proposed to describe the relation between yield strength and thickness.
2) With the increase of the grain size, yield strength decreases but work hardening exponent increases, and elongation increases to a peak then decreases as the grain size increases.
3) The fracture mode of all tensile samples is ductile fracture, and dimple is the main feature of fracture morphology. The samples with thicknesses of 100, 250, 500 and 800 μm possess heavier dimple intensity, and dimples are more like parabola form than that with thickness of 50 μm. And the size of fracture dimples grows with the increase of grain size while its number reduces obviously.
References
[1] ENGLE U, ECKSTEIN R. Microforming-From basic research to its realization [J]. Journal of Materials Processing Technology, 2002, 125-126: 35-44.
[2] QIN Li-yuan, LIAN Jian-she, JIANG Qing. Effect of grain size on corrosion behavior of electrodeposited bulk nanocrystalline Ni [J]. Transactions of Nonferrous Metals Society of China, 2010, 20(1): 82-89.
[3] XU Jie, WANG Chun-ju, GUO Bin, SHAN De-bin, SUGIYAMA Y, ONO S. Surface finish of micro punch with ion beam irradiation [J]. Transactions of Nonferrous Metals Society of China, 2009, 19(S2): s526-s530.
[4] GAU J T, PRINCIPE C, WANG J W. An experimental study on size effects on flow stress and formability of aluminum and brass for microforming [J]. Journal of Materials Processing Technology, 2007, 184: 42-46.
[5] VOLLERTSEN F, HU Z, NIEHOFF H S, THEILER C. State of the art in micro forming and investigations into micro deep drawing [J]. Journal of Materials Processing Technology, 2004, 151: 70-79.
[6] CHEN Yan-fen, XIAO Shu-long, TIAN Jing, XU Li-jun, CHEN Yu-long. Effect of particle size distribution on properties of zirconia ceramic mould for TiAl investment casting [J]. Transactions of Nonferrous Metals Society of China, 2011, 21(S2): s342-s347.
[7] MAHABUNPHACHAI S, KOC M. Investigation of size effects on material behavior of thin sheet metals using hydraulic bulge testing at micro/meso-scales [J]. International Journal of Machine Tools and Manufacture, 2008, 48: 1014-1029.
[8] GEIGER M, KLEINER M, ECKSTEIN R, TIESIER N, ENGEL U. Microforming [J]. CIRP Annals―Manufacturing Technology, 2001, 50: 445-462.
[9] GUO Bin, GONG Feng, WANG Chun-ju, SHAN De-bin. Flow stress and tribology size effects in scaled down cylinder compression [J]. Transactions of Nonferrous Metals Society of China, 2009, 19(S2): s516-s520.
[10] WANG Chun-ju, GUO Bin, SHAN De-bin, SUN Li-ning. Effects of specimen size on flow stress of micro rod specimen [J]. Transactions of Nonferrous Metals Society of China, 2009, 19(S2): s511-s515.
[11] CHEN X X, NGAN A H W. Specimen size and grain size effects on tensile strength of Ag microwires [J]. Scripta Materialia, 2011, 64: 717-720.
[12] SUZUKI K, MATSUKI Y, MASAKI K. Tensile and microbend tests of pure aluminum foils with different thickness [J]. Materials Science and Engineering A, 2009, 513-514: 77-82.
[13] TSAI M S, CHANG C P. Grain size effect on deformation in Mg-Al-Zn alloy [J]. Materials Science and Technology, 2013, 29: 759-763.
[14] LLOYD D J, COURT S A. Influence of grain size on tensile properties of Al-Mg alloys [J]. Materials Science and Technology, 2003, 19: 1349-1354.
[15] LIU W H, WU Y, HE J Y, NIEH T G, LU Z P. Grain growth and the Hall-Petch relationship in a high-entropy FeCrNiCoMn alloy [J]. Scripta Materialia, 2013, 68: 526-529.
[16] LEE H J, ZHANG P, BRAVMAN J. Tensile failure by grain thinning in micromachined aluminum thin films [J]. Journal of Applied Physics, 2003, 93: 1443-1451.
[17] DENIS Y W, SPAEPEN F. The yield strength of thin copper films on Kapton [J]. Journal of Applied Physics, 2003, 95: 2991-2997.
[18] ECKSTEIN R, GEIGER M, ENGEL U. Specific characteristics of micro-sheet metal working [C]//Proceedings of Sheet Metal. Braunschweig, Germany, 1999: 529-536.
[19] MICHEL J F, PICARD P. Size effects on the constitutive behavior for brass in sheet metal forming [J]. Journal of Materials Processing Technology, 2003, 141: 439-446.
C5210磷青铜薄板成形行为的尺度效应
欧阳金栋,陈明和,王 宁,张钦差,王 辉
南京航空航天大学 机电工程学院 南京 210016
摘 要:为研究厚度、晶粒尺寸对C5210磷青铜薄板力学性能和成形性能的影响,通过不同温度退火热处理得到不同晶粒尺寸的试样,然后在常温下对具有不同厚度和晶粒尺寸的试样进行单向拉伸试验。结果表明:当厚度在50 ~800 μm范围内,材料的屈服强度随着厚度的减小而增大,而加工硬化指数和伸长率随着厚度的减小而减小,提出了描述屈服强度随厚度减小而增大关系的修正模型;材料的屈服强度随着晶粒尺寸的增大而减小,但加工硬化指数随着晶粒尺寸的增大而增大,伸长率则随着晶粒尺寸的增大先增大到一个峰值后再减小。通过扫描电镜观察拉伸试样的断口形貌发现所有试样断裂方式均为韧性断裂,并且随着厚度的增大断口韧窝的密集度增大,而晶粒尺寸越大的试样断口韧窝密集度越小。
关键词:尺度效应;力学性能;成形性能;断口形貌;磷青铜合金
(Edited by Xiang-qun LI)
Corresponding author: Jin-dong OUYANG; Tel: +86-15850508586; E-mail: ouyangjindong1989@163.com
DOI: 10.1016/S1003-6326(15)63705-0