����ͷ�����κ��ղ����Խ���Ħ����Al-Cu��ͷ����֯����ѧ���ܵ�Ӱ��
��Դ�ڿ����й���ɫ����ѧ��(Ӣ�İ�)2016���4��
�������ߣ�M. FELIX XAVIER MUTHU V. JAYABALAN
����ҳ�룺984 - 993
�ؼ��ʣ�����ͭ������Ħ����������ͷ���Σ����ṹ����ѧ����
Key words��aluminium; copper; friction stir welding; pin profile; microstructure; mechanical properties
ժ Ҫ���ڽ���Ħ�����У�����ͷ�����ζԲ������кܴ��Ӱ�죬�ر��ǶԾ��в�ͬ����ǿ�ȵ����ʲ��ϡ����� ��ͭ�����ʺ��ӹ����У���������Ϊ�����Ѷ�����˽�ʾ������Ϊ����ѧ�����൱��Ҫ��ѡ����3�ֲ�ͬ���εĽ���ͷ�����ƽ���ͷ(WPP)��ƽ�ν���ͷ(PTP)�����ν���ͷ(TTP)���о�����ͷ�����ζԲ������ṹ����Ӳ�Ⱥ��������ܵ�Ӱ�졣���ù�ѧ������ɨ�����������X-���������EDS�������ϵ�����֯������3�ֲ�ͬ���εĽ���ͷ�У�PTP����ͷ�ܲ�����ȱ�ݽ����������õ���ѧ�������õĽ�ͷ��������ǿ��Ϊ101 MPa������ǿ��Ϊ106 MPa������Ч��Ϊ68%��Ȼ�����������еIJ�ͬ���εĽ���ͷ������Ӳ�����ߴ�����ͬ��������ѭ�������ƣ��������ͭ�����IJ����ȷֲ��������Ľ�ͷ���ܹ�������ȱ�ݽ��������γɺ���ɢǿ����
Abstract: In friction stir welding (FSW), pin profile has more influence on material flow especially in welding of dissimilar materials with different yield strengths. In the dissimilar welding of aluminium and copper, the material flow behaviour is complex to understand and thus a study is needed to reveal the mechanism of flow behaviour and the resultant mechanical properties. Three pin profiles, whorl pin profile (WPP), plain taper pin profile (PTP) and taper treaded pin profile (TTP) were chosen. The effects of pin profile on the microstructure, microhardness and tensile properties were studied. Optical microscope, scanning electron microscope, X-ray diffraction and EDS analysis were used to characterize the microstructural features. Among the three pin profiles, PTP profile results in defect-free stir zone and maximum joint properties of yield strength of 101 MPa, tensile strength of 116 MPa and joint efficiency of 68% compared with the other pin profiles. However, the microhardness plots are more or less identical for all the pin profiles but follows fluctuating trend. This is attributed to the heterogeneous distribution of hard Cu particle. The superior joint properties are mainly attributed to the defect-free stir zone formation and dispersion strengthening.
Trans. Nonferrous Met. Soc. China 26(2016) 984-993
M. FELIX XAVIER MUTHU1, V. JAYABALAN2
1. Department of Mechanical Engineering, St Xavier��s Catholic College of Engineering, Chunkankadai 629 003, Tamil Nadu, India;
2. Department of Manufacturing Engineering, College of Engineering Guindy, Anna University, Chennai 600 025, Tamil Nadu, India
Received 30 April 2015; accepted 28 September 2015
Abstract: In friction stir welding (FSW), pin profile has more influence on material flow especially in welding of dissimilar materials with different yield strengths. In the dissimilar welding of aluminium and copper, the material flow behaviour is complex to understand and thus a study is needed to reveal the mechanism of flow behaviour and the resultant mechanical properties. Three pin profiles, whorl pin profile (WPP), plain taper pin profile (PTP) and taper treaded pin profile (TTP) were chosen. The effects of pin profile on the microstructure, microhardness and tensile properties were studied. Optical microscope, scanning electron microscope, X-ray diffraction and EDS analysis were used to characterize the microstructural features. Among the three pin profiles, PTP profile results in defect-free stir zone and maximum joint properties of yield strength of 101 MPa, tensile strength of 116 MPa and joint efficiency of 68% compared with the other pin profiles. However, the microhardness plots are more or less identical for all the pin profiles but follows fluctuating trend. This is attributed to the heterogeneous distribution of hard Cu particle. The superior joint properties are mainly attributed to the defect-free stir zone formation and dispersion strengthening.
Key words: aluminium; copper; friction stir welding; pin profile; microstructure; mechanical properties
1 Introduction
Al and Cu are good electrical conductive materials which are found in the electrical power transmission units of various fields like automobiles, air craft structures, ship building, etc [1]. Joining of these two materials discover the combined benefits of both materials. Mechanical joining techniques like bolted joints cannot provide long time stable Al-Cu joint [2]. Other joining technique like fusion welding of Al-Cu limits the quality joining due to the formation of micro cracks, alloy segregation, porosity, etc [3,4].
Friction stir welding is the solid state welding technique which can join any combination of dissimilar materials which are highly incompatible like Al and Cu. Joining below the melting point limits the materials to metallurgically react. Thus, the joining can be achieved without any solidification defects and weld region with the minimum amount of intermetallic formation. However, the weld region of FSW joints results in defects due to the improper selection of tool geometry and process parameters. The defect formation lacks both mechanical and electrical performances of the joint.
Among the tool parameters, pin profile plays a vital role in determining the material flow path and therefore controls the weld travel speed. The size, shape, and pattern of the stir zone are based on the tool pin profile [5]. Pin profile also plays a significant role in the heat generation. VIJAY and KUMAR [6] revealed that variation in the degree of taper in the taper pin profile varies the material flow pattern and heat generation in the weld region. Tool pin profile just affected not only the temperatures, but also the micro-hardness at both sides of the weld. Since the hardness and yield strength of the aluminium and copper greatly differ, it is difficult to contribute both the materials from each side to form the defect-free weld region. The pin profile should be able to transport the material from advancing side and retreating side to form the stir zone. ZETTLER et al [7] revealed that the pin profile had a serious influence on the material flow behaviour and conveyance between advancing side and retreating side. Similarly, the same effect of various shoulder profiles and pin profiles was also studied by MOHANTY et al [8] and WU et al [9]. COLEGROVE and SHERCLIEF [10] found the influence of pin profile on the material flow behaviour and strain distribution using FLUENT software. The unconventional pin geometries like trivex and triflute were used for the investigation. Entrapment of material is of more triflute pin compared with trivex pin due to the high tool force. RAMANJANEYULU et al [11] revealed that change in pin profiles alters the tensile strength of the joints and higher yielded tensile strength, which was attributed to the formation of low TMAZ width.
Thus, it is known from the literature that the pin profile has crucial role in determining the material flow and joint properties. The material flow behaviour and the joint properties prediction of dissimilar material were not clearly revealed. Hence, in this investigation, three pin profiles namely WPP, PTP and TTP profiles were chosen and the effects of these pin profile on mechanical properties and microstructural characterization were studied. The tensile properties and micro hardness of friction stir welded Al-Cu joints were evaluated and correlated with the material flow behaviour observed from the macrostructure and microstructure.
Table 1 Chemical compositions of parent metals (mass fraction , %)

Table 2 FSW parameters and tool dimensions used in this study


Fig. 1 Photographs of different tool pin profiles

Fig. 2 Dimensions of different pin profiles (unit: mm; Pitch of thread is 1.5 mm)
2 Experimental
Pure grade AA1100 H14 aluminium and commercial pure copper material were used as the parent materials. The parent metals were tested with the vacuum spectrometer for its chemical composition (Table 1). Joint configuration of 100 mm �� 100 mm �� 6 mm was used for the joint fabrication. Three pin profiles namely WPP, PTP, TTP were made using high speed steel material. In order to reduce the tool wear, the tool was hardened using induction furnace. The joints were fabricated under the same welding conditions except the pin profiles. The process parameters used for the investigation are shown in Table 2. The photographs of the tools and the dimensions of tools are shown in Figs. 1 and 2, respectively. The joint was made along the direction which is perpendicular to the rolling direction.
The specimens were machined from the joint for microstructural analysis in which the specimen comprised of base material, HAZ, TMAZ and weld region. The material flow patterns, grain size and orientations were analyzed using optical microscope. The cross sectional surface was flattened and then polished by water emery sheets with grit size ranging from 800 to 2500 ��m. The polished specimens should be chemically etched to reveal the microstructure. Special care should be taken in such a way that the etchant of Al should not corrode the Cu material. Aluminium material was chemically etched by modified Kellers reagent composed of 1.5 mL HF, 1.5 mL HCl, 2.5 mL HNO3 and 95 mL H2O. Copper side was chemically etched by solution made of 25 mL HCl, 2.5 g FeCl3 and 50 mL H2O. Scanning electron microscope (SEM) was used to analyze the fractograph of tensile tested samples. SEM was also used to characterize the availability and distribution of intermetallic compounds. The transmission electron microscope (TEM) was employed to characterize the stir zone. The phases present in the parent material and the weld region is predicted by XRD analysis. The diffraction peaks were interpreted using JCPDS software.
The tensile test samples were extracted from the weld joint along the transverse direction. The sample preparation and testing were carried out as per the ASTM E8 M-04 guidelines. The microhardness values were measured along the mid thickness region across the transverse cross section of the joint. An indenting load of 50 g was applied for the dwell time of 15 s using Vickers microhardness tester.
3 Results and discussion
3.1 Macrostructure and microstructure
In friction stir welding, the heat is generated by the frictional force created between the tool and workpiece interface and due to the shearing of the dissimilar materials. The heat generated is less than the melting temperature of the materials. But in dissimilar concerns, there may be a possibility of localised melting. Nearly 80% of heat is generated at the shoulder workpiece interface and nearly 20% of heat is generated at the interface of pin workpieces. The heat generated due to shearing, i.e., plastic deformation is also strongly influenced by the pin profile. As FSW is a less heat input welding process, the bonding strength of the dissimilar material should be taken care of. Because at low temperature, the metallurgical reaction between the dissimilar materials was low, the mechanical bonding like material interlocking acts as a factor deciding the joint strength. The material flow pattern decided by the pin profile improves the material interlocking.
In fusion welding, the joining of materials is achieved by melting into a single liquid phase and followed by solidification. Contradictory to this fact, in FSW, the joining of materials is achieved by mutual sharing of materials between the advancing side and the retreating side. Thus, the material flow is solely responsible for the joining of materials. As the rotating tool advances along the weld line, the material from the advancing side is excavated towards the retreating side at the front end of the tool pin. At the rear end, the material is transported from the retreating side to the advancing side. The extrusion of materials around the tool pin is consolidated by the axial force at the tool rear end. If the amount of material excavate is equal to or more than the material deposit at the advancing side, then it results in defect-free stir zone. During the excavation of the material, a vacant space is created at the advancing side and the material from the retreating side should fill it. This filling of material is governed by the pin profile. The ratio of the static volume to dynamic volume of the tool pin decides the amount of plasticized material forming the stir zone. In addition, the flow path of plasticized material from the leading edge to the trailing edge of the rotating tool is decided by the tool pin profile.
Table 3 shows the cross sectional macrostructure of the three pin profiles observed by the optical microscope. The stir zone of WPP shows more mixed Al and Cu materials than the other two pin profiles. The whorl profile shows partial ring-like material flow. The macrostructure of PTP shows fine Cu particles of varied sizes in the stir zone. Unlike the other pin profile, no distinct material flow is observed. Taper pin profile shows that bulk of Cu particle is excavated from the advancing side and gets stirred in the stir zone. The Cu material did not break up and the continuous deformed Cu materials could be seen in the stir zone.
Table 3 Macrostructure observation
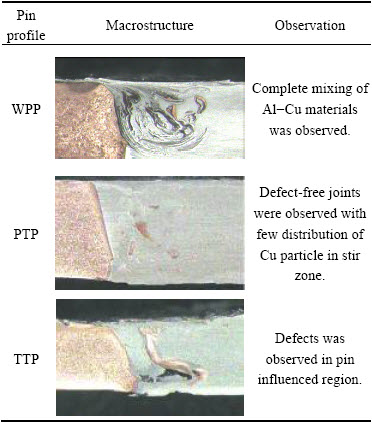
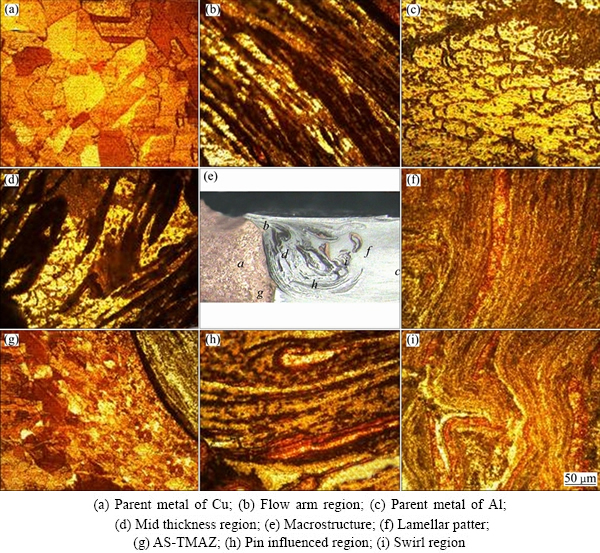
Fig. 3 Optical microstructures of whorl pin profile (WPP)
Figure 3 shows the optical microstructure of the whorl pin profile. The optical macrostructure and the respective microstructure of the specific regions were shown. Figure 3(a) shows the HAZ microstructure of Cu side which shows coarser grains. In the shoulder influenced region, the material flows downwards (Fig. 3(b)). The base material of Al shows elongated grains oriented towards the rolling direction (Fig. 3(c)). Figure 3(d) shows the mid-thickness region and the material flow is bit complex to understand. The lamellar-like flow pattern is observed in Region f (Fig. 3(f)). Alternate stacking of Al and Cu is observed in which Al has major occupancy in the stir zone. Region g shows the interface microstructure. Herewith the grain size increases from the stir zone boundary to the HAZ region (Fig. 3(g)). Figures 3(h,i) depict the swirl zone which shows small circular kind of flow which is strongly influenced by the pin action.
Unlike previous case, PTP pin shows no distinct vertical flow pattern (Figs. 4(a)-(c)). The microstructure shows fine recrystallized equiaxed grains. But the grain size at the centre of the shoulder influenced region is smaller compared with the outer region. Figure 4(d) shows the HAZ region which shows the coarser grains but it is smaller than WPP pin. Figure 4(f) shows the stir zone microstructure, showing deformed Cu particle oriented vertical towards the pin influenced region. Region g shows the interface microstructure and the interface thickness is lower than the WPP pin (Fig. 4(g)). The non-profile PTP does not make the materials flow in complex or circular pattern. Figures 4(h) shows the pin influenced region and Fig. 4(i) shows the HAZ region.
Figure 5(a) shows the interface microstructure in the shoulder influenced region. Vertical flow was observed for both the stir zone and TMAZ region. Like WPP, the shoulder influenced region has distribution of Cu material (Fig. 5(b)). Figure 5(c) shows the Al side TMAZ region in which the grains are lineate towards the stir zone. Figure 5(d) shows the interface microstructure. The gradient increment of microstructure was observed and the maximum grain size was observed in the HAZ region. Figure 5(g) shows the AS-HAZ which is characterized by the presence of coarse grains. Figure 5(h) shows the defect formation in the pin influenced region. Figure 5(i) shows the TMAZ region, in which the lineated grains have wider width.
The distribution of Cu particles is further analyzed exhaustively using scanning electron microscope (Fig. 6). WPP severely deformed the Cu particle in the stir zone and the amount of deformed Cu material was higher than those of PTP and TTP pins. PTP shows reinforcement of fine Cu particles in the stir zone to form a composite-like structure. TTP shows deformed bulk Cu particle and fine Cu particles.

Fig. 4 Optical microstructure of plain taper pin profile (PTP)

Fig. 5 Optical microstructure of taper threaded pin profile (PTP)
Whorl tool pin profile produces good material stirring quality and the mixing of dissimilar plasticized metals during welding. This results in a low displaced volume due to the lower transverse force created by the pin design [12]. The plain taper cylindrical tool pin profile provides a path for the flow of the plasticized material from the leading edge to the trailing edge of the tool pin. The stirred metal matrix composites were forced down along the plain tapering of tool and deposited in the stir zone. COLEGROVE and SHERCLIFF [13] used metal insert technique to study the material flow behaviour of different tool designs. Computational fluid dynamics were also used to model the flow behaviour and validated with copper inserts positioned along the weld center line. This was suggested that profiled unthreaded tools could likewise be utilized for FSW and for better tool fatigue strength over threaded pin profiles. The improved properties are lack of thread. Threads in the threaded cylindrical tool act as a path shower to flow the material from shoulder influenced region to pin influenced region. The dome shape at the bottom of the pin profile enables material flow to avoid the root defect. In addition, during plunging action, the tool wear was greatly reduced because of the less stress concentration at the bottom edge of the pin. Three types of material flow are contributed to form the stir zone. The first one is shoulder driven flow, the second one is pin driven flow and the third one is shoulder�Cpin interaction flow. Based on the above said flows the stir zone can be categorized as upper shoulder influence region, lower pin influenced region and mid thickness region. Shoulder driven flow transports the bulk amount of material and axial force supports the flow to consolidate against the advancing side parent material. Pin driven flow transports material layer by layer and finally consolidates. This mechanism forms the onion-ring formation which was investigated by many researchers [14,15]. In the shoulder-pin interaction flow, the regular individual flow driven by shoulder and pin mixes. In dissimilar welding, the mid thickness is obtained from complex flow of materials. The mechanical mixing has both advantages and adverse effect on the joint properties. The mechanical interlocking at the mid thickness region improves the tensile strength.
In this study, all the three pin profiles have profile angle with respect to the tool centre axis. The profile angle improves the vertical flow of the material in the three cases. But the thread and flute profiles over the pin give the pulsating action for the material flow. Due to this, the straining of the material is high so that a bulk of Cu material is taken from the advancing side by TTP profile. Since the material transport is bulk, it is difficult to further break up and distribute it over the stir zone. The dynamic to static volume ratio for WPP is higher compared with its counterparts. Thus, a relatively high pulsating action is created, which transports high amount of Cu material from the advancing side. The three flutes help more in aiding mechanical interlocking compared with other two pin profiles.

Fig. 6 SEM images of different pin profiles
From the literatures [1,4], it is referred that Al-Cu possibly results in various phases with respect to temperature and composition. The mechanical properties, electrical properties and the corrosion properties of Al-Cu joint depend on the intermetallic phases at the Al-Cu interface. Thus, it is necessary to understand the intermetallic formations from the Al-Cu binary phase diagram (Fig. 7). The phases likely to form are shown as follows: ��-Al2Cu, ��-AlCu, ��2-Al3Cu4, ��-Al2Cu3, ��1-Al4Cu9, ��2-AlCu7. The defect free joints were further characterized using TEM, EDS and XRD and the results are shown in Fig. 8. From the TEM image, the Cu particle is located near the grain boundary and it is hindered by many dislocations (Fig. 8(a)). EDS mapping of Cu-rich Al4Cu9 intermetallic phase and Al-rich Al2Cu phase are shown in Figs. 8(b) and (c), respectively. From the EDS mapping, the compositions of Al4Cu9 and Al2Cu are shown in Table 4. Among the various phases from Al-Cu phase diagram, the phases present in Al-Cu FSW joint are confirmed by the XRD analysis and the phases are as follows: Al, Cu, AlCu, Al2Cu and Al4Cu9 (Fig. 8(d)).
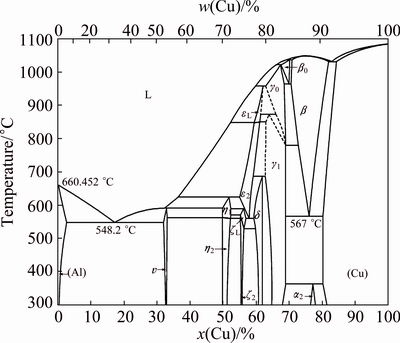
Fig. 7 Al-Cu binary phase diagram
3.2 Tensile properties
Figures 9 and 10 show the tensile properties of the joints fabricated with different pin profiles. Joints were fabricated with WPP pin which resulted in the yield strength of 62 MPa, tensile strength of 69 MPa and joint efficiency of 43 %. Joints fabricated with PTP pin result in yield strength of 101 MPa, tensile strength of 116 MPa and joint efficiency of 68 %. Joints fabricated with WPP result in yield strength of 50 MPa, tensile strength of 51 MPa and joint efficiency of 32%. Joints fabricated with PTP pin result in high tensile properties.
The degree of ductility can be measured by tensile fracture surface of the dissimilar joints. The WPP pin shows small cleavage-like facets in the fractographs (Fig. 11(a)). Few elongated dimples along with flat featureless surface are observed for the joints made with PTP pin (Fig. 11(b)). The fracture surface of TTP pin has high degree of up and down so that it will not be seen clearly in the SEM image (Fig. 11(c)). Similar to PTP pin, the fractograph shows flat featureless surface.
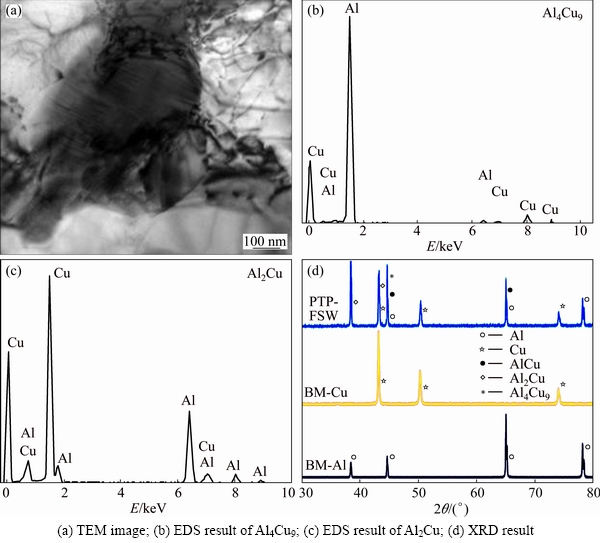
Fig. 8 TEM analysis of PTP profile
Table 4 EDS data

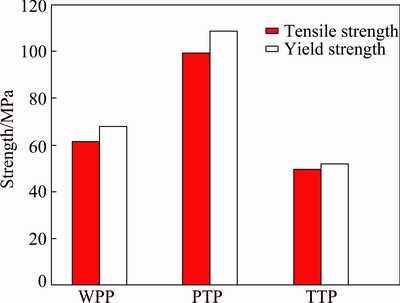
Fig. 9 Effect of pin profile on tensile properties
ELANGOVAN et al [16] reported distant effect on the mechanical properties of the weld with different tool pin profiles. The mechanical properties of the joints mainly rely upon the volume of deformed material created by the stirring action of the tool pin. The more material the tool stirs, the better the quality of the joints. However, for the joining of dissimilar materials like aluminium and copper, the dynamic to static volume ratio does not play role in deciding mechanical properties. If the amount of material stirring and mixing of material is improved, bulk amount of Cu particle contributes to form the stir zone. Thus, due to the diffusion of Cu and Al, a large amount of intermetallics phases like Al2Cu and Al4Cu9 are formed at the interface and in the stir zone. The higher strength is attributed to the lower intermetallic phases. The reason for the higher bond strength of the lower intermetallic layer thickness is not certain but may be related to a defect content in a smaller volume of intermetallics.

Fig. 10 Effect of pin profile on joint efficiency
The reason behind the higher bond quality for the thin intermetallic layer is identified that there is lower defect content in a smaller volume of intermetallic. Thus, the tensile fracture happened at the interface. The same reason was reported by many researchers [17-19]. The tensile fracture follows the path which has soft or defective region along the weld joints. For the TTP joints, the fracture falls in the defective stir region. The micro cracks formed at the matrix and the intermetallics acted as the fracture initiation site and the fracture fell in the weld region.
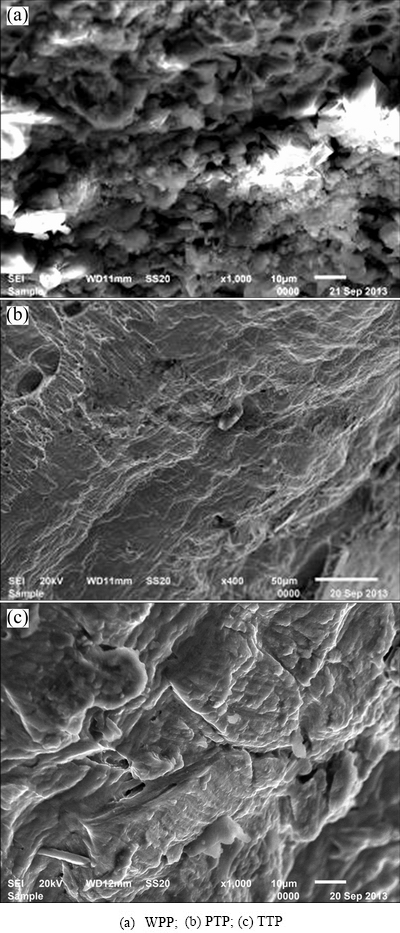
Fig. 11 Fractographs for different pin profiles

Fig. 12 Effect of pin profile on microhardness
3.3 Microhardness
The effect of pin profile on microhardness is shown in Fig. 12. All the samples have variation along the distance from the weld center line. The maximum variation of hardness values was observed in the stir zone which contained high and low values. The softest region is identified as the TMAZ region where lower values were seen when compared with the respective materials. The microhardness values did not have appreciable variation for the joints produced by three pin profiles because all the three joints exhibit both lower and higher microhardness values for the same region.
Unlike tensile strength, hardness mainly depends on the intermetallic formation in the weld region [20,21]. The Cu particle transported from the advancing side is diffused with Al, which results in hard brittle intermetallics in the weld region. If the Cu particle is in the near nano level, then it completely forms intermetallics. If the Cu particles are in near micron size, then the outer boundary forms intermetallics. Thus, all the three pin profiles show more or less similar hardness along the weld joints. In addition, the fine recrystallized grains in the stir zone increase the hardness because of the improved boundary energy. Due to the above reason, the hardness is far higher than the base material. Since the formation and distribution are heterogeneous in the stir zone, both peak and valley in hardness plot were observed in the weld region.
4 Conclusions
1) Of the three pin profiles, the joints fabricated using plain taper pin profile result in better mechanical properties. Joints fabricated with PTP result in yield strength of 101 MPa, tensile strength of 116 MPa and joint efficiency of 68%.
2) The microhardness mapping for the three pin profile results in almost same hardness. Among the various regions, Al side TMAZ region is identified as the weakest region. Both higher and lower hardness values are observed in the stir zone. This is attributed to the heterogeneous distribution of Cu particles and formation of intermetallic.
3) The mechanical properties of FSW Al-Cu joints are significantly affected by the material flow decided by the pin profiles. The material flow decides the defect-free stir zone and intermetallic phase formation.
4) Rather than mechanical interlocking, less flow of Cu to form composite-like stir zone is preferred for making sound joints.
References
[1] TOBIAS S, PETER P, WAYNE C. Electrical performance of laser braze-welded aluminium-copper interconnects [J]. Journal of Manufacturing Processes, 2014, 16: 183-189.
[2] MILENKO BRAUNOVIC. Reliability of power connections [J]. Journal of Zhejiang University (Science A), 2007, 8: 343-356.
[3] LIU L, WANG H, SONG G, YE J. Microstructure characteristics and mechanical properties of laser weld bonding of magnesium alloy to aluminum alloy [J]. Journal of Materials Science, 2007, 42: 565-572.
[4] LIU H J, SHEN J J, ZHOU L, ZHAO Y Q, LIU C, KUANG L Y. Microstructural characterization and mechanical properties of friction stir welded joints of aluminium alloy to copper [J]. Science and Technology of Welding & Joining, 2010, 16: 92-99.
[5] RAVINDRA THUBE S. Effect of tool pin profile and welding parameters on friction stir processing zone, tensile properties and micro-hardness of AA5083 joints produced by friction stir welding [J]. International Journal of Engineering and Advanced Technology, 2014, 3: 35-40.
[6] VIJAY S G, KUMAR A. Heat generation model for taper cylindrical pin profile in FSW [J]. Journal of Materials Research and Technology, 2013, 2(4): 370-375.
[7] ZETTLER R, DONATH T, DOS SANTOS J F, BECKMAN F, LOHWASSER D. Validation of marker material flow in 4mm thick friction stir welded Al2024-T351 through computer microtomography and dedicated metallographic techniques [J].Advanced Engineering Materials, 2006, 8: 487-490.
[8] MOHANTY H K, MAHAPATRA M M, KUMAR P, BISWAS P , MANDAL N R. Effect of tool shoulder and pin probe profiles on friction stirred aluminum welds��A comparative study [J]. The Journal of Marine Science and Application, 2012, 11: 200-207.
[9] WU Chuan-song, ZHANG Wen-bin, SHI Lei, CHEN Mao-ai. Visualization and simulation of plastic material flow in friction stir welding of 2024 aluminium alloy plates [J]. Transactions of Nonferrous Metals Society of China, 2012, 22: 1445-1451.
[10] COLEGROVE P A, SHERCLIFF H R. Development of trivex friction stir welding tool, part 2-Three-dimensional flow modeling [J]. Science and Technology of Welding and Joining, 2004, 9: 483-492.
[11] RAMANJANEYULU K, MADHUSUDHAN REDDY G, VENUGOPAL RAO A, MARKANDEYA R, Structure property correlation of AA2014 friction stir welds: role of tool pin profile [J]. Journal of Materials Engineering and Performance, 2013, 22: 2224-2240.
[12] THOMAS W M, NICHOLAS E D. Friction stir welding for the transportation industries [J]. Materials & Design, 1997, 18: 269-273.
[13] COLEGROVE P A, SHERCLIF H R. 3-dimensional CDF modelling of flow round a threated friction stir welding tool profile [J]. Journal of Material Processing Technology, 2005, 169: 320-327.
[14] MUTHUKUMARAN S, MUKHERJEE S K. Two modes of metal flow phenomenon in friction stir welding process [J]. Science and Technology of Welding & Joining, 2006, 11: 337-340.
[15] KRISHNAN K N. On the formation of onion rings in friction stir welds [J]. Materials Science and Engineering A, 2002, 327: 246-251.
[16] ELANGOVAN K, BALASUBRAMANIAN V, VALLIAPPAN M. Influences of tool pin profile and axial force on the formation of friction stir processing zone in AA6061 aluminium alloy [J]. International Journal of Advanced Manufacturing Technology, 2008, 38: 285-295.
[17] RATTANA, BORRISUTTHEKUL, TAISEI, YACHI, YUKIO, MIYASHITA, YOSHIHARU, MUTOH. Suppression of intermetallic reaction layer formation by controlling heat flow in dissimilar joining of steel and aluminium alloy [J]. Material Science and Engineering A, 2007, 467: 108-113
[18] KIM Y G, FUJII H, TSUMURA T, KOMAZAKI T, NAKATA K. Three defect types in friction stir welding of aluminum die casting alloy [J]. Materials Science and Engineering A, 2006, 415: 250-254.
[19] VENKATESWARAN P, REYNOLDS A P. Factors affecting the properties of friction stir welds between aluminum and magnesium alloys [J]. Materials Science and Engineering A, 2012, 545: 26-37.
[20] NAOTSUGU YAMAMOTO, JINSUN LIAO, SHUHEI WATANABE, KAZUHIRO NAKATA. Effect of intermetallic compound layer on tensile strength of dissimilar friction stir weld of a high strength Mg Alloy and Al alloy [J]. Materials Transactions, 2009, 50: 2833-2838.
[21] LI Xia-wei, ZHANG Da-tong, QIU Cheng, ZHANG Wen. Microstructure and mechanical properties of dissimilar pure copper/1350 aluminum alloy butt joints by friction stir welding [J]. Transactions of Nonferrous Metals Society of China, 2012, 22: 1298-1306.
M. FELIX XAVIER MUTHU1, V. JAYABALAN2
1. Department of Mechanical Engineering, St Xavier��s Catholic College of Engineering, Chunkankadai 629 003, Tamil Nadu, India;
2. Department of Manufacturing Engineering, College of Engineering Guindy, Anna University, Chennai 600 025, Tamil Nadu, India
ժ Ҫ���ڽ���Ħ�����У�����ͷ�����ζԲ������кܴ��Ӱ�죬�ر��ǶԾ��в�ͬ����ǿ�ȵ����ʲ��ϡ����� ��ͭ�����ʺ��ӹ����У���������Ϊ�����Ѷ�����˽�ʾ������Ϊ����ѧ�����൱��Ҫ��ѡ����3�ֲ�ͬ���εĽ���ͷ�����ƽ���ͷ(WPP)��ƽ�ν���ͷ(PTP)�����ν���ͷ(TTP)���о�����ͷ�����ζԲ������ṹ����Ӳ�Ⱥ��������ܵ�Ӱ�졣���ù�ѧ������ɨ�����������X-���������EDS�������ϵ�����֯������3�ֲ�ͬ���εĽ���ͷ�У�PTP����ͷ�ܲ�����ȱ�ݽ����������õ���ѧ�������õĽ�ͷ��������ǿ��Ϊ101 MPa������ǿ��Ϊ106 MPa������Ч��Ϊ68%��Ȼ�����������еIJ�ͬ���εĽ���ͷ������Ӳ�����ߴ�����ͬ��������ѭ�������ƣ��������ͭ�����IJ����ȷֲ��������Ľ�ͷ���ܹ�������ȱ�ݽ��������γɺ���ɢǿ����
�ؼ��ʣ�����ͭ������Ħ����������ͷ���Σ����ṹ����ѧ����
(Edited by Xiang-qun LI)
Corresponding author: M. FELIX XAVIER MUTHU; Tel: +91-8903455836; Fax: +91-46952259604; E-mail: umailfelix@gmail.com
DOI: 10.1016/S1003-6326(16)64195-X

