Ultrahigh performance of Ti-based glassy alloy tube sensor for Coriolis mass flowmeter
MA Chao-li(马朝利)1, A. INOUE2, ZHANG Tao (张 涛)1
1.School of Materials Science and Engineering, Beijing University of Aeronautics and Astronautics,
Beijing 100083, China;
2.Institute for Materials Research, Tohoku University, Sendai 980-8577, Japan
Abstract: Bulk metallic glasses (BMGs) have potential applications for both structural and functional components owing to their good mechanical properties. With the aim of demonstrating great engineering value of BMGs, a direct melt-forming technique based on suction casting for the production of glassy alloy tubes was developed. The fabrication, structure, geometry, properties and sensor performance of the tubes were examined. The results show that the Coriolis mass flowmeters using the Ti-based glassy alloy sensor tube exhibit excellent measurement sensitivity, viz. 28.5 times higher than that of the conventional flowmeter manufactured using stainless steel (SUS316) tube.
Key words: glassy alloy tube; sensor; performance; Coriolis mass flowmeter
1 Introduction
Bulk metallic glasses (BMGs) are new advanced materials having unique combinations of good mechanical, chemical and magnetic properties[1-5], though their properties are dependent on alloy component and composition[5, 6]. BMGs have a supercooled liquid which has high thermal stability against crystallization resulting from novel dense-random-packed atomic configurations[4, 5]. BMGs have usually been synthesized by simple liquid-to-solid cooling. The direct fabrication process from molten alloys into net or near-net shaped parts enables significant reduction of the cost and energy of fabrication. The beneficial combination of a simple fabrication process and useful engineering properties gives BMGs great potential as high performance materials in structural and functional applications. We have recently found that the use of Ti-based glassy alloy tubes as the sensing tube for Coriolis mass flowmeter (CMF) enhances remarkably the measurement sensitivity.
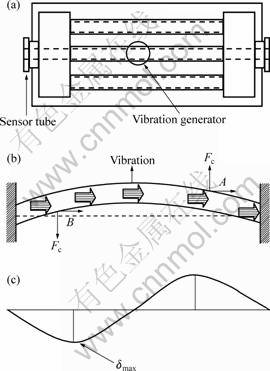
The CMF is a unique flowmeter that can directly measure the mass flow rate of fluid[7]. The measurements by a CMF are independent of temperature as well as the kind of liquid. These attributes permit broad application of the CMF, especially when using a glassy alloy tube, in areas such as the semiconductor industry, biomedical technology and medical science. Fig.1(a) shows a schematic illustration of the CMF[7]. The flowmeter consists of a sensor tube through which a fluid to be measured flows, and a vibration generator which gives a primary flexural vibration to the sensor tube. When the sensor tube is vibrated, as shown in Fig.1(b), the mass of fluid at “A” strikes against the tube wall at “A”, resulting in the generation of a Coriolis force (Fc) upward. While the mass of fluid at “B” strikes against the tube wall at “B”, a downward force, Fc is generated. Such Coriolis forces with opposite direction are proportional to the mass of the liquid, and they cause a sine wave shaped elastic deformation of the sensor tube as shown in Fig.1(c). By measuring the maximum elastic deformation δmax(amplitude of elastic deformation) of the sensor tube, one can calculate the Coriolis force Fc and, consequently, determine the mass of the measured fluid. The measurement sensitivity of the CMF is mainly determined by δmax of the sensor tube. The larger the δmax, the higher is the measurement sensitivity. δmax can be expressed by the following relation:
 (1)
(1)

Fig.1 Plane view of Coriolis mass flowmeter consisting sensor tube and vibration generator (a), schematic graph showing generation of Coriolis force (Fc) when sensor tube is vibrated (b) and Elastic deformation of sensor tube caused by Fc (c)
where Fc is the Coriolis force, E is the elastic modulus, d1 and d2 are the inner and outer diameters respectively, and l is the length of the sensor tube. Eqn.(1) indicates that δmax is inversely proportional to the elastic modulus. It means that a higher sensitivity of flowmeter can be obtained by using a sensor tube with a lower elastic modulus.
Metallic glasses are well known to possess lower elastic modulus, larger elastic elongation and higher strength compared to their conventional crystalline counterparts[5, 8]. If the two types of alloys are loaded to the same tensile or compressive stress, a much larger elastic strain is expected to generate in the glassy alloy. This feature renders the glassy alloy capable of “amplifying” of elastic strain and hence satisfies one of the main requirements for a high-sensitivity sensor tube. Although the relationship between δmax and strength for the tube material is not explicitly expressed by Eqn.(1), the much higher strength of a glassy alloy allows the sensor tube to have a smaller wall thickness than would be possible with conventional crystalline alloys; this gives a large δmax, greatly improving the performance of the CMF.
At present almost all sensor tubes are made of stainless steel (SUS316). The elastic modulus of the stainless steel is approximately 200 GPa, which is considerably higher than that of most metallic glasses, including Fe-, Ni-, Ti-, Zr-, Pd- and Mg-based glasses[5]. In this study, a Ti-based glassy alloy with nominal composition of Ti50Cu25Ni15Zr5Sn5(mole fraction), known to be a good glass former[9], was used to produce glassy alloy tubes with various inner and outer diameters.
2 Experimental
The high-purity elemental powders Ti, Cu, Ni, Zr, and Sn were used as the starting materials. Alloy ingots with designed compositions were prepared by the conventional arc-melting method under a purified Ar atmosphere. The glassy alloy tube was produced by a suction casting method[10]. The structure of the cast tube was examined by X-ray diffractometry (XRD) and optical microscopy (OM). The glassy nature of the cast tubes was also investigated at a heating rate of 0.67 K/s with a differential scanning calorimeter (DSC). Elastic moduli of alloy tubes were measured by an acoustic method. Compression tests were conducted on cast alloy tubes and SUS316 tubes with outer diameter of 6 mm at an initial strain rate of 4×10⁻⁴ s-1 in ambient atmosphere by using an Instron type machine. The gauge dimension of the samples used for the compression test was 6 mm in outer diameter and 15 mm in length. The hardness of 2 mm (in diameter) glassy alloy tubes was examined with a Vickers’s tester. An electromagnetic flowmeter (EF), which has high measurement precision, was used as a reference flowmeter to check the measurement precision of studied alloy tubes.
3 Results and discussion
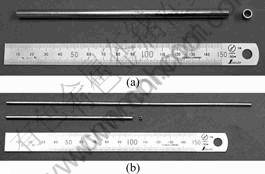
The Ti-based Ti50Cu25Ni15Zr5Sn5 glassy alloy tubes with outer diameters of 6 and 2 mm were produced by a suction casting method developed by INOUE et al[10]. The outer shapes of the cast alloy tubes are shown in Fig.2. The wall thickness of the cast alloy tube is affected by temperature, time, pressure, cooling rate and solidification mode during suction of the alloy melt. In this study, the suction temperature, time and pressure

Fig.2 Appearance of Ti-based glassy tubes with outer diameters of 6 mm (a) and 2 mm (b) produced by suction casting
were 1 447 K, 0.2 s and 0.1 MPa, respectively. Under such conditions, the thickness was about 0.8 mm for the 6 mm tube and about 0.2 mm for the 2 mm tube.
The X-ray diffraction (XRD) and optical microscopy (OM) examinations indicate that the 2 mm cast alloy tube consists of a single glassy phase and the 6 mm tube has a crystalline structure. The yield strength under a uniaxial compressive load is 800 MPa for the 6 mm Ti-based alloy tube and 230 MPa for the SUS316 tube. The wall thickness of the 2 mm Ti-based glassy alloy tube is too small (approximately 0.2 mm in thickness) to measure its yield strength by the conventional compression test. The Vickers hardness of the 2 mm glassy alloy tube is 650. Considering that the hardness (HV) and yield strength (σ) for glassy alloys follow usually an empirical relation of HV=3σ, the yield strength of the 2 mm glassy alloy tube is estimated to be about 2.160 GPa, which is nearly the same as that (2.070 GPa) for the melt-spun Ti50Cu25Ni15Zr5Sn5 glassy alloy ribbon. The elastic moduli of all the alloy tubes were measured by an acoustic method. The values were 85 GPa for the 6 mm Ti-based alloy tube, 82 GPa for the 2 mm Ti-based glassy alloy tube and 221 GPa for the 6 mm SUS316 alloy tube.
To evaluate the sensor performance of the glassy alloy tube, the measurement precision and sensitivity of the CMF using the Ti-based glassy alloy tube were examined in comparison with that of the CMF using the SUS316 sensor tube. For descriptions hereafter, the CMFs using the Ti-based alloy tubes of 2 mm and 6 mm in outer diameter are referred to as CMF-T2 and CMF-T6, respectively, and the one using the 6 mm SUS316 tube is denoted by CMF-S6.
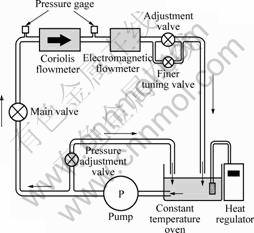
As a reference flowmeter to evaluate the sensitivity, we selected a high-precision electromagnetic flowmeter (EF). Fig.3 shows a schematic illustration of the method to evaluate the precision of various CMFs. The EF was connected in series with the CMF. Distilled water was used as the test fluid. The mass flowrate (Q) of distilled water was simultaneously measured by the CMF and the EF. If the flowrate measured by the CMF has a good linear correlation with that measured by EF, it is concluded that the measurement precision of CMF is comparable to that of EF. The data obtained thus are summarized in Fig.4. The black and the hollow circles represent the flowrate (Q) of water measured by the CMF-T2 and CMF-T6, respectively, while the hollow triangles represent that measured by the CMF-S6. The linear correlation coefficients of the data measured by each CMF are evaluated to be 0.9997 for CMF-T2, 0.995 for CMF-T6 and 0.997 for CMF-S6. It is concluded that the measurement precision decreases in the order of CMF-T2 > CMF-S6 > CMF-T6. That is, the glassy alloy tube (CMF-T2) possesses the highest performance among the sensor tubes examined in this study.

Fig.3 Apparatus for studying measurement precision of various Coriolis mass flowmeters

Fig.4 Illustration of linear correlation of experimental data measured by CMFs using various sensor tubes
As mentioned above, the amplitude of elastic deformation (δmax) for the sensor tube is a dominant factor for the measurement sensitivity of the CMF; the larger the δmax, the higher is the measurement sensitivity. To obtain a better quantitative understanding, a simple calculation is given here. The material and geometric parameters for the sensor tubes are listed in Table 1. Based on Eqn.(1), the elastic deformation ratios of the Ti-based alloy tubes (2 mm and 6 mm) to the SUS316 tube (6 mm), δmax-T(2 or 6)/δmax-SUS316, are calculated and listed in Table 1. It is noted that the value of δmax-T2/δmax-SUS316 is as high as 33, indicating that the sensitivity of CMF could be greatly improved by the use of the Ti-based glassy alloy tube sensor.
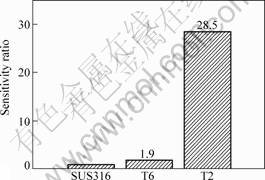
Fig.5 shows the measurement sensitivity of the CMFs using the Ti-based glassy tubes in comparison with those using the Ti-based crystalline and SUS316
Table 1 Materials and geometric parameters of various sensor tubes


Fig.5 Sensitivity ratios of Ti-based glassy tube to SUS316 tube
tubes. Although the sensitivity of the 6 mm Ti-based crystalline tube is about 2 times higher than that of the SUS316 tube, it is noted that the sensitivity of the 2 mm Ti-based glassy alloy tube increases by 28.5 times as compared with that of the stainless steel tube. The increasing ratio of the sensitivity for the glassy alloy tube agrees rather well with the value (about 33.0 times) expected from Eqn.(1).
In summary, with the aim of opening up a new application field for glassy alloys, we have developed a Ti-based glassy alloy sensor tube, which can be used for a Coriolis mass flowmeter. The glassy alloy tube with an outer diameter of 2 mm was produced by a suction casting method. Compared with the conventional process to produce stainless steel tubes, the suction casting process is much simpler and can substantially reduce the process cost. The Ti-based glassy alloy tube exhibits good mechanical properties, i.e., high strength and low elastic modulus. In addition, the Coriolis mass flowmeter using this glassy alloy tube exhibits significant improvement of measurement precision and measurement sensitivity as compared with that using the conventional stainless steel (SUS316) tube. The measurement sensitivity of the Coriolis mass flowmeter is 28.5 times higher than that of the conventional one, demonstrating that the Ti-based glassy alloy tube has great potential as ultrahigh performance sensor material.
References
[1] MASUMOTO T, MADDIN R. Structural stability and mechanical properties of amorphous metals[J]. Materials Science and Engineering, 1975, 19: 1-24.
[2] KIMURA H, MASUMOTO T. Strength, ductility and toughness―A study in model mechanics[A]. LUBORSKY F E. Amorphous Metallic Alloys[C]. London, 1983: 187-230.
[3] INOUE A, ZHANG A, MOSUMOTO T. Al-La-Ni amorphous alloys with a wide supercooled liquid region[J]. Mater Trans, JIM, 1989, 30: 965-972.
[4] JOHNSON W L. Bulk glass-forming metallic alloys: Science and technology[J]. MRS Bulletin, 1999, 24: 42-56.
[5] INOUE A. Stabilization of metallic supercooled liquid and bulk amorphous alloys[J]. Acta Mater, 2000, 28: 279-306.
[6] YOKOYAMA Y, YAMONO K, FUKAURA K, SUNADA H, INOUE A. Nanocrystaline Zr-based bulk glassy alloys with high flexural strength[J]. Mater Trans, JIM, 1999, 40: 1015-1018.
[7] OHNISHI K, TOMIKAWA Y. Coriolis flowmeter[P]. US: 6 684 716 B2, 2004.
[8] MA C L, INOUE A. Microstructure and mechanical properties of Cr, Mo, Fe, Ta modified Pd-Ni-Cu-P glassy alloys prepared by copper-mold casting[J]. Mater Trans, 2003, 44: 188-196.
[9] ZHANG T, INOUE A. Thermal and mechanical properties of ti-ni-cu-sn amorphous alloys with a wide supercooled liquid region before crystallization[J]. Mater Trans, JIM, 1998, 39: 1001-1006.
[10] INOUE A, MAKABE E. Production of glassy metal and apparatus[P]. Japan: P2000-271730A, 2000.
(Edited by YANG You-ping)
Foundation item: Project supported by the New Energy and Industrial Technology Development Organization (NEDO) of Japan
Corresponding author: MA Chao-li; Tel: +86-10-82316192; E-mail: clma2001@hotmail.com