
Influence of drawing process parameters on
forming of micro copper tube with straight grooves
TANG Yong, OU Dong-sheng, WAN Zhen-ping, LU Long-sheng, LIAN Bin
Key Laboratory of Surface Functional Structure Manufacturing of Guangdong Higher Education Institutes,
South China University of Technology, Guangzhou 510640, China
Received 19 October 2010; accepted 30 March 2011
Abstract: Using high-speed oil-filled spinning method, high quality micro copper tube with straight grooves (MCTSG) with an outer diameter of 6 mm was obtained. Then, MCTSG with an outer diameter of 3-6 mm was fabricated successfully by multi-pass drawing processing method. The influence of drawing parameters on the forming of micro straight grooves was investigated based on the forming mechanism. The results show that the values of groove depth and width decrease, while the wall thickness increases as the drawing diameter decreases. At the same time, the groove depth and width increase, while the wall thickness decreases as the die angle increases. The drawing force increases as the reduction increases. Excessive copper tube reduction may results in groove folding and segmental teeth. The drawing force decreases firstly and then increases with the increases in die angle. When the die angle α is 16°, the drawing force is the smallest, indicating 16° is the optimal angle.
Key words: micro-groove; drawing; drawing parameter; drawing force; heat pipe
1 Introduction
Recently, with the trend of electronics processors towards higher performance and smaller packaging, the heat dissipation from these devices is growing and the heat flux is greater than ever, which threatens the life and reliability of today’s powerful microprocessors and semiconductors [1-2]. Micro heat pipe with high thermal conductivity, good isotherm performance, rapid heat response, small size and simple construction has already become the promising heat conduction components applied in electronic products [3-5]. Heat transfer performance of micro heat pipe depends mainly on wick structure in the inner surface of the pipe. The groove wick is widely applied to micro heat pipe. Micro heat pipe with groove wick conforms the miniaturization tendency of electronic device [6]. And micro grooves can be manufactured by ploughing and spin forming [7-8]. But due to the limitation of machining tool, only the heat pipe larger than 6 mm in diameter can be manufactured and it is difficult to manufacture heat pipe under 4 mm in diameter .
Tube drawing is a manufacturing process in which the cross sectional area of a tube is reduced by pulling it through a drawing die [9]. Due to versatility and good mechanical properties of the parts, drawing process is one of the most used metal-forming processes in the industrial field. The materials traditionally used in manufacturing processes are steels, aluminum and copper alloys [10-11]. Therefore, the tube drawing can be used to produce micro copper tube with straight grooves (MCTSG) with outer diameter of 6 mm even less than 4 mm. Recently, DECASTRO et al [12] found that the yield strength and shear strength increase with increasing die angle during the single pass or mul-tiple pass drawing, while the elongation decreases when α increases. VEGA et al [13] researched the effect of the drawing process parameters on the copper-wire, then optimized the die design to obtain the copper wire with a best quality. MALBERG et al [14] concluded that the reduction and die angle influence the drawing stress and the powder compaction of the single filament superconducting wire during multi-step drawing. HERINGHAUS et al [15] investigated the microstructure change of Cu-20%Nb in the process of drawing through optical and electron microscopy. However, there are few literatures about the effect of process parameters on the MCTSG forming during drawing. MCTSG with outer diameter of 3-6 mm is obtained using a combined method of high-speed oil-filled spinning and multi-pass drawing in this work. The forming process and mechanism of micro straight grooves are investigated. The influence of forming process parameters on drawing quality is also investigated. At the same time, the influence of the reduction and die angle on drawing force is analyzed also.
2 Experimental
2.1 High-speed oil-filled spinning and multi-pass drawing composite machining method
Micro copper tube with straight grooves(MCTSG) was manufactured by high-speed oil-filled spinning firstly. During the machining process, the combined action of drawing and extrusion was applied by multi-tooth tool, spinning balls and axial drawing force, as local plastic deformation took place on the tube’s inner surface. The forming process could be divided into two steps. First, the inner grooves began to form due to multi-tooth tool extrusion, and then, under the drawing and spinning force the grooves continued to grow. Fins and micro grooves developed after the metal uplifted by extrusion. It was uplifted continuously during the relative motion of workpiece and multi-tooth tool [16]. The high- speed oil-filled spinning process is shown in Fig. 1. The drawing process of MCTSG is shown in Fig. 2. MCTSG with an outer diameter of 6 mm was obtained by high-speed oil-filled spinning method firstly. After that, multi-pass drawing processing method was used to manufacture MCTSG with an outer diameter of less than 6 mm. The multi-pass drawing process of MCTSG was different from the smooth wall tube. It had to not only ensure the quality of final product, such as wall thickness, surface quality and property of material’s tissue, but also make sure that the multi-fin structure inside the tube was not destroyed.
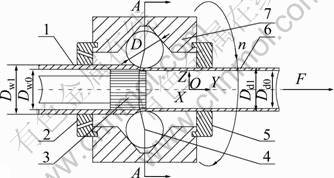
Fig. 1 Schematic diagram of experimental setup of high-speed oil-filled spinning process: 1―Raw copper tube; 2―Radius reduction die; 3―Multi-tooth tool; 4―Steel ball; 5―Radius regulation die; 6―MCTSG; 7―Spinning body
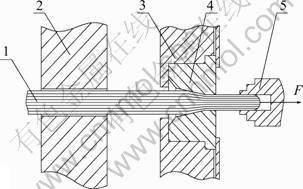
Fig. 2 Schematic diagram of experimental setup of multi-pass drawing process: 1―MCTSG; 2―Guiding device; 3―Fixture; 4―Drawing die; 5―Chuck jaw
In this multi-pass drawing experiment, MCTSG with outer diameter of 6 mm and 18 straight grooves was used. The diameter of the copper tube was reduced gradually, first from 6 mm to 5 mm and then to 4 mm and finally to 3 mm.
2.2 Experimental devices and conditions
Figure 3 shows the photos of axially micro straight grooved copper tube (the outer diameter is 6.0 mm and the number of straight grooves is 18) and multi-tooth tool.
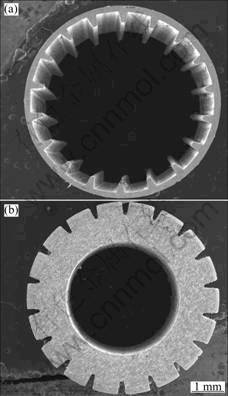
Fig. 3 Photos of axially inner grooved copper tubes (a) and multi-tooth tool (b)
The groove parameters of MCTSG manufactured by high speed oil-filled spinning method are listed in Table 1, where t is the wall thickness; h is the groove depth; w is the groove width; D is the drawing diameter.
Figures 4(a) and (b) indicate the photos of drawing die and the sketch of drawing die, respectively.
Table 1 Parameters of MCTSG


Fig. 4 Picture of drawing die (a) and sketch of drawing die (b): Ⅰ―Reducing; Ⅱ―Calibrating; Ⅲ―Receding
In this work, the drawing die is divided into three zones: reducing, calibrating and receding. The die angle α was respectively set at 8°, 12°, 16°, 20°, and 24°. All the experiments were done at the C6132A lathe with the drawing speed of 40 mm/s under good lubrication condition. The lubricant was given at the reducing area of the drawing die in order to reduce the friction in the drawing process. Also, the lubricant could take the heat generated from the friction and the deformation of the metal away and keep the copper tube from scratching. As shown in Fig. 2, firstly, the drawing die was fastened onto the fixture, then the head of MCTSG which had been forged to a smaller diameter was clamped by chuck jaws, and passed through the drawing die with increasing the drawing force. The deformed metal flowed along axial and radial directions. The plastic deformation along axial direction prolonged the copper tube. Meanwhile, the plastic deformation in radial direction formed teeth and grooves. The outer diameter of the copper tube reduced gradually as the clamping device moved forward, until the end of the reducing zone. Finally, the wall metal of MCTSG could be smoothly extruded and its outer diameter was reduced to the size of calibrating zone.
3 Results and discussion
Figure 5 shows the cross-sectional SEM images of MCTSG during multi-pass drawing. Figure 5(a) shows the images of MCTSG with an outer diameter of 6 mm and grooves number of 18. After the first drawing pass, the outer diameter is reduced to 5 mm, as shown in Fig. 5(b). Also, Fig. 5(b) shows that the groove width is changed more than the tooth thickness. It means that the dimensions of the inner grooves are reduced significantly. MCTSG after the second drawing pass is shown in Fig. 5(c). The outer diameter reduces from 5 mm to 4 mm, the wall thickness of copper tube becomes big and there is an arch effect in the inner grooves. If the arch effect is too large, the radial dimension of MCTSG will become uneven, then, the drawing force will increase, and the surface quality of the straight grooves after multi-pass drawing will be affected. The diameter of MCTSG becomes small after the third drawing pass. As illuminated in Fig. 5(d), the outer diameter is 3 mm. and MCTSG has reached a relatively ideal structure. Therefore, during the multi-pass drawing process, the wall thickness, the groove width, the teeth height and the radial structure of the tube change significantly.
3.1 Effects of drawing diameter
The wall thickness of the MCTSG will be increased when the other characterization parameters are changed significantly during the multi-pass drawing process. The relationship between drawing diameter and geometric parameters of MCTSG is shown in Fig. 6. The structure parameters of the straight grooves copper tube before drawing are listed in Table 1. In the drawing process, the copper tube will deform because of the restriction effect of the drawing die under the drawing force.
The plastic deformation decreases gradually in radial from outer to inner surface while prolonging the copper tube in axial direction. The tube drawing is a three-dimensional stress process, which includes axial stress, radial stress, and tangential stress. The axial stress is tensile stress while the radial stress and tangential stress are compression stress. We can see that the wall thickness t, the groove depth h and the groove width w will change significantly as the drawing diameter D changes. The groove depth and width decrease with decreasing the drawing diameter, and the wall thickness increases with the decreasing drawing diameter. The radial stress of the copper tube causes the increase of the wall thickness t and the decrease of the groove depth h. The tangential stress of the copper tube causes the decrease of the groove width w.
3.2 Effect of die angle
The drawing die is the key part in the drawing process. Die angle is the most important geometric parameter of the drawing die, and it will affect the stress in the multi-pass drawing process. The stress in the drawing process will affect the metal flow which may lead to different microstructures during the drawing process. The experiment shows how the die angle α affects the groove structure of copper tube during drawing. Figure 7 shows the relationship between the die angle and geometric parameters of MCTSG.
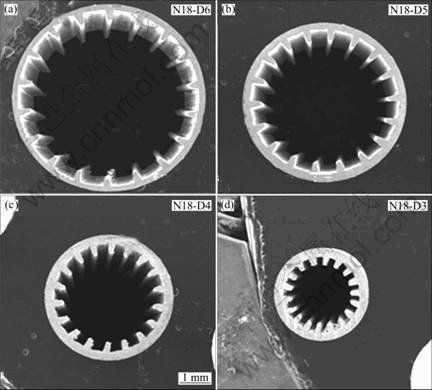
Fig. 5 SEM images of cross-section of micro straight grooves with groove number of 18 during multi-pass drawing: (a) Outer diameter of 6 mm; (b) Outer diameter of 5 mm; (c) Outer diameter of 4 mm; (d) Outer diameter of 3 mm
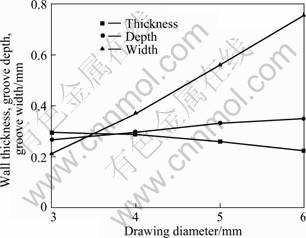
Fig. 6 Relationship between drawing diameter and geometric parameters of MCTSG
Within the die angle range in this experiment, the wall thickness decreases as the die angle increases. In the reducing area of the drawing die in the drawing process, the larger the die angle α, the smaller the radial force is. Furthermore, the radial stress and radial strain will be smaller, which means that the radial metal flow will be less and slower. So, the increase rate of the wall thickness t will be smaller. However, the groove depth h and the groove width w increase with increasing the die angle α. It is a direct proportion relationship, which is opposite to the relationship between the wall thickness t and the die angle α.
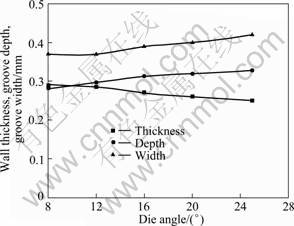
Fig. 7 Relationship between die angle and geometric parameters of MCTSG
3.3 Effects of drawing force
The deformation extent of MCTSG in the multi-pass drawing process affects the drawing force directly. And the deformation extent can be represented by the reduction in cross-sectional area. Define ψ as the reduction and describe it as:
 (1)
(1)
where Di and D0 represent the diameters of copper tube before the drawing process and after, respectively. Figure 8 shows the relationship between the drawing force F and reduction ψ. As shown in the figure, the drawing force increases as the reduction ψ increases. If the reduction ψ is too large, the metal grain will slip continuously, which will lead to the increase of the stress of the plastic deformation resistance. So the work hardening effect will be greater. And then the grooves produced in the multi-pass drawing will be broken.
Figure 9 shows the SEM images of copper tube in axial section. Figure 9(a) shows the groove surface in axial section of copper tube with reduction of 36%, drawn from diameter of 5 mm to 4 mm. Figure 9(b) shows the grooves surface in axial section of copper tube with reduction of 43.8%, drawn from diameter of 4 mm to 3 mm. It is found that the copper tube with diameter of 4 mm has continuous and complete grooves, but the one with diameter of 3 mm has broken and folded grooves.
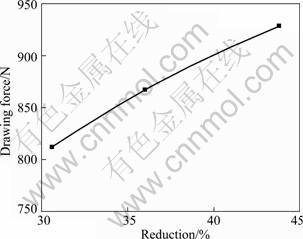
Fig. 8 Relationship between reduction and drawing force
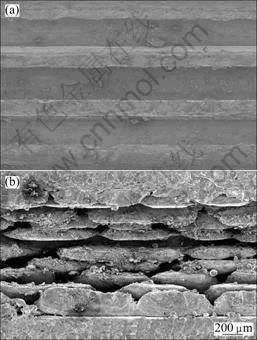
Fig. 9 SEM images of MCTSG in axial section during multi-pass drawing: (a) Copper tube with diameter of 4 mm; (b) Copper tube with diameter of 3 mm
Therefore, continuous grooves with different depth-width ratios can be gotten by selecting proper reduction ψ in the drawing. But if the reduction ψ goes extravagantly, it will result in the drawing force significantly increasing and grooves folding. Thus, not only the strength but also the ductility of copper tube should be considered when choosing proper reduction ψ.
The main effect of die angle on the drawing force is that when different die angles are used, the arc length of the copper tube contacted with the die is different; consequently, the friction is different. The smaller the die angle α is, the longer the arc length contacts. So the area of the copper tube contacted with the die is larger, and the friction and the drawing force are larger. To decrease the contact area between the copper tube and the die, the die angle α should be increased. But if the die angle α exceeds too much, the streamline of the metal in the deformation area would be turned sharply, which leads to the increase of the strain in the deformation area. At the same time, the drawing force will also increase. Therefore, there should be a best die angle α to make the drawing force F to achieve the smallest value. As shown in Fig. 10, the drawing force decreases firstly and then increases as the die angle α increases. When the die angle α is 16°, the drawing force F has the smallest value.
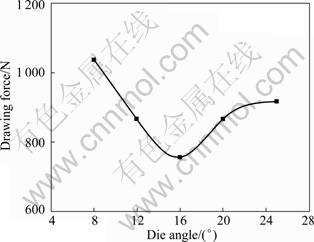
Fig. 10 Relationship between die angle and drawing force
4 Conclusions
1) MCTSG with an outer diameter of 3-6 mm was achieved by high-speed oil-filled spinning and multi-pass drawing composite processing. During the multi-pass drawing, the values of groove depth and width decrease with decreasing the drawing diameter D, while the wall thickness increases as D decreases.
2) The Die angle is the most important parameter. The die angle will affect the stress in the multi-pass drawing process. The groove depth and width increase with increasing the die angle while the value of wall thickness decreases as α increases.
3) The reduction and die angle are the two most important parameters, which influence the drawing force during drawing. The drawing force increases as the reduction increases. Large copper tube reduction results in folding grooves and segmental teeth. The drawing force decreases firstly and then increases as the die angle increases. When the die angle α is 16°, the drawing force has the smallest value.
References
[1] AMON C H, MURTHY J, YAO S C, NARUMANCHI S, WU C, HSIEH C. MEMS-enabled thermal management of high-heat-flux devices EDIFICE: Embedded droplet impingement for integrated cooling of electronics [J]. Experimental Thermal and Fluid Science, 2001, 25(5): 231-242.
[2] MCGLEN R J, JACHUCK R, LIN S. Integrated thermal management techniques for high power electronic devices [J]. Applied Thermal Engineering, 2004, 24(8-9): 1143-1156.
[3] COTTER T P. Principles and prospects of micro heat pipe[C]// Proceedings of the 5th International Heat Pipe Conference. Tsukuba, Japan, 1984: 328-334.
[4] VASILIEV L L. Micro and miniature heat pipes―Electronic component coolers [J]. Applied Thermal Engineering, 2008, 28(4): 266-273.
[5] ITOH A, POLASEK F. Development and application of micro heat pipes[C]//Proceedings of the 7th International Heat Pipe Conference. Minsk, Belarus (CIS), 1990: 295-310.
[6] SUNG J K, JOUNG K S, KYU H D. Analytical and experimental investigation on the operational characteristics and the thermal optimization of a miniature heat pipe with a grooved wick structure [J]. International Journal of Heat and Mass Transfer, 2003, 46: 2051-2063.
[7] TANG Yong, CHI Yong, CHEN Jin-chang, DENG Xue-xiong, LIU Lin, LIU Xiao-kang, WAN Zhen-ping. Experimental study of oil-filled high-speed spin forming micro-groove fin-inside tubes [J]. International Journal of Machine Tool & Manufacture, 2007, 47(7-8): 1059-1068.
[8] LI Yong, TANG Yong, XIAO Bo Wu, LI Xi-bing, ZENG Zhi-xing. Manufacturing of inner micro grooves of copper heat pipe via high-speed oil-filled spinning [J]. Journal of South China University of Technology: Natural Science Edition, 2007, 35(3): 1-5. (in Chinese)
[9] DENG Jian-xin, YANG Xue-feng, WANG Jing-hai. Wear mechanisms of Al2O3/TiC/Mo/Ni ceramic wire-drawing dies [J]. Materials Science and Engineering A, 2006, 424(1-2): 347-354.
[10] SAWAMIPHAKDI K, LAHOTI G D, GUNASEKERA J S, KARTIK R. Development of utility programs for a cold drawing process [J]. Journal of Materials Processing Technology, 1998, 166(3): 345-358.
[11] SADOK L, KUSIAK J, PACKO M, RUMINSKI M. State of strain in the tube sinking process [J]. Journal of Materials Processing Technology, 1996, 60(1-4): 161-166.
[12] DECASTRO A, CAMPOS H B, CETLIN P R. Influence of die semi-angle on mechanical properties of single and multiple pass drawn copper [J]. Journal of Materials Processing Technology, 1996, 60(1-4): 179-182.
[13] VEGA G, HADDI A, IMAD A. Investigation of process parameters effect on the copper-wire drawing [J]. Materials & Design, 2009, 3308-3312.
[14] MALBERG M, BECH J, BAY N,SKOV-HANSEN P, CUALBU G. Influence of process parameters in drawing of superconducting wire [J]. IEEE Transactions on Applied Superconductivity: Part 2, 1999, 9(2): 2577-2580.
[15] HERINGHAUS F, RAABE D, GOTTSTEIN G. On the correlation of microstructure and electromagnetic properties of heavily cold worked Cu-20wt% Nb wires [J]. Acta Metallurgica Et Materialia, 1995, 43(4): 1467-1476.
[16] LI Yong, XIAO Hui, LIAN Bin, TANG Yong, ZENG Zhi-xin. Forming method of axial micro grooves inside copper heat pipe [J]. Transactions of Nonferrous Metals Society of China, 2008, 18(5): 1229-1233.
拉拔工艺参数对微型直齿沟槽铜管成形的影响
汤 勇, 欧栋生, 万珍平, 陆龙生, 练 彬
华南理工大学 表面功能结构先进制造广东普通高校重点实验室,广州 510640
摘 要:利用高速充液旋压技术加工出直径为6 mm的沟槽管;然后,采用多级拉拔成形方法加工出直径为3~6 mm的微型直齿沟槽铜管。在分析其加工成形机理的基础上,重点研究拉拔工艺参数对沟槽管成形的影响规律。结果表明:在微型直齿沟槽铜管成形过程中,随着拉拔成形直径的缩小,壁厚增加,槽深和槽宽均减小;同时,壁厚随着拉拔模具角的增加而减小,而槽深和槽宽随着拉拔模具角的增加而增加;随着拉拔级次压缩率的增大,拉拔力增大,过大的拉拔级次压缩率会导致微型直齿沟槽铜管拉拔成形轴向沟槽产生断裂。随着拉拔模具角的增大,拉拔力先减小后增大,并且存在一个最小值区域。当拉拔模具角α=16°时,拉拔力最小,此为最佳拉拔模具角。
关键词:微沟槽;拉拔;拉拔参数;拉拔力;热管
(Edited by YANG Hua)
Foundation item: Project (U0834002) supported by the Joint Funds of NSFC-Guangdong of China; Project (2009ZM0121) supported by the Fundamental Research Funds for the Central Universities, China; Projects (LYM09024) supported by Training Program for Excellent Young Teachers with Innovation of Guangdong University, China
Corresponding author: TANG Yong; Tel/Fax: +86-20-87114634; E-mail: ytang@scut.edu.cn
DOI: 10.1016/S1003-6326(11)61006-6