
Effects of zonal heat treatment on residual stresses and
mechanical properties of electron beam welded TC4 alloy plates
HU Mei-juan(������), LIU Jin-he(�����)
School of Materials Science and Engineering, Northwestern Polytechnical University, Xi��an 710072, China
Received 26 March 2008; accepted 24 June 2008
Abstract: Zonal heat treatment(ZHT) was conducted in situ to 14.5 mm-thick TC4 alloy plates by means of defocused electron beam after welding. The effects of ZHT on residual stresses, microstructures and mechanical properties of electron beam welded joints were investigated. Experimental results show residual stresses after welding are mostly relieved through ZHT, and the maximum values of longitudinal tensile stress and transverse compressive stress reduce by 76% and 65%, respectively. The tensile strength and ductility of welded joint after ZHT at slow scanning velocity are improved because of the reduction of residual stress and the microstructural changes of the base and weld metal. ZHT at fast scanning velocity is detrimental to the ductility of welded joint, which is resulted from insufficiently coarsened alpha phase in the fusion zone and the appearance of martensite in the base metal. ��
Key words: electron beam welding; zonal heat treatment; residual stress; microstructure; mechanical property��
1 Introduction
Favored for its high specific strength, wide operating temperature range, excellent corrosion resistance and fabrication characteristics, Ti-6Al-4V alloy has established its suitability as a major structural material in aerospace industries[1-3]. Electron beam welding(EBW) is the preferred joining technique for these components that demand maximum weld quality and high reliability in service[4]. But the ductility and toughness within the weld and heat-affected zone become degraded with the increase of material thickness owing to the high cooling rates that induce the production of martensite[5-6].
The physical and technical principles involved in electron beam provide further potential for the fulfillment of more demanding tasks in addition to welding[7-8]. So electron beam welding and zonal heat treatment (EBW&ZHT) integrated processing technology, in which ZHT is carried out right after welding in the vacuum chamber utilizing defocused electron beam to reduce residual stress and improve the mechanical properties of joints, may provide further advanced applications of EBW. EBW&ZHT has been effectively used for improving the microstructure and properties of electron beam welded joints of steel and VT23 alloy[9-13]. The maximum value of longitudinal tensile stress of 2.5 mm-thick BT20 alloy plate after EBW was reduced by 50% through ZHT[14]. But its application to 12.5 mm-thick TC4 alloy plate showed that the residual tensile stress only shifted from the weld centerline to near heat-affected zone after ZHT, and the maximum value was even higher than that in as-welded condition[15]. So, it deserves further more investigations about the application of this integrated processing technique to thick plate of titanium alloy.
In this work, two cases of EBW&ZHT were carried out to 14.5 mm-thick TC4 alloy plates. Residual stresses after EBW and EBW&ZHT were measured respectively using the hole-drilling method. The microstructural changes after ZHT, and its influences on the mechanical properties of electron beam welded joints were examined and discussed.
2 Experimental
Three rectangular TC4 alloy plates in hot rolled and annealed state with dimensions of 120 mm��120 mm�� 14.5 mm were utilized in the present investigation. The nominal chemical compositions were Al 5.82%, V 3.99%, C 1.81%, O 0.063%, N 0.032%, H 0.000 7%, Fe��0.05%, Ti bal (in mass fraction).
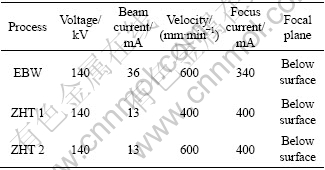
EBW and EBW&ZHT were performed in ZD150-15A electron beam welding machine. Bead-on-plate EBW was carried out autogenously on the specimen. As for EBW&ZHT, the same parameters were chosen for welding and ZHT was performed right after electron beam had returned to the starting location. The electron beam spot with frequency of 200 Hz was adopted to scan the weld zone. The width of scanning zone, taken weld center line as symmetry axis, was 20 mm, and the scanning time was 3 min. All the remaining parameters of EBW and ZHT are listed in Table 1. The difference of two cases of EBW&ZHT was the scanning velocity.
Table 1 Parameters of EBW and ZHT
The hole-drilling method is a practical cost-effective straight-forward and least destructive technique of gathering residual stresses. Its principle is the deduction of the in-plane stress field from relaxations recorded by strain-gage rosettes during the drilling of a shallow blind hole[16-17]. Because the fusion zone and heat affected zone of electron beam welding are very narrow and zonal heat treatment mainly aims at the zone extended a distance of 10 mm away from the weld centerline in this research, the measurements were made at five locations: the center of the fusion zone, 2.8, 5.0, 12.0 and 18.0 mm away from the weld centerline.
Three-element BE120-2CA-1K strain-gage rosettes were installed on the test parts at the points where residual stresses were to be determined. The same kind of gage for temperature compensation was installed in the far field of the plate. The depth and diameter of the drilled hole were 4.5 mm and 2.0 mm, respectively. A CM-1A-10 static strain indicator was connected with the gage grids of rosette to measure the relieved strains. The mechanical properties used in the computations of the relieved residual stresses were 172 GPa for elastic modulus and 0.3 for Poisson ratio. The full-depth calibration coefficients A and B were recalibrated corresponding to the case of blind hole. And the values used in this work were -7.454��10-13 m2/N and -1.967 ��10-12 m2/N.
The metallographic samples of welded joints were sectioned from EBW and EBW&ZHT specimens. After grinding and polishing, the samples were etched by a corrosive solution (V(HF)?V(HNO3)?V(H2O)=1?3?7) for the observation of microstructure by scanning electron microscope. Rectangular tensile specimens with a width of 10 mm were made in accordance with GB2651��81. A special care was taken to have the weld zone located at the centre of the gauge length of 25 mm. Mechanical properties were determined at room temperature using a displacement rate of 2 mm/min in a CSS universal testing machine. All testing results stated were based on a statistical sample of three specimens. The fractured surfaces of tensile specimens were also observed with scanning electron microscope.
3 Results and discussion
3.1 Distribution of residual stresses
Fig.1 shows the variations of the longitudinal and transverse residual stresses for the plates after EBW and EBW&ZHT 1, with distance away from the weld centerline.
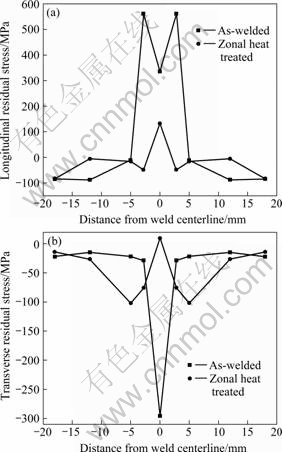
Fig.1 Plots of residual stresses with distance away from weld centerline: (a) Longitudinal residual stress; (b) Transverse residual stress
The maximum longitudinal tensile stress after welding is approximately 553 MPa, which exists immediately adjacent to the weld and probably within it. With increasing the distance from weld centerline, the magnitude of longitudinal tensile stress decreases sharply, passing through zero at 5 mm away from the centerline and leading to the maximum compressive stress of 86 MPa at 12 mm away from the centerline. A longitudinal tensile stress of 326 MPa is determined at the weld centerline. This value is smaller than that expected from the previous investigations and it is likely owing to the abrasion to erase the convex weld metal for the installation of the strain-gage rosette on the weld zone. The transverse stress after welding is wholly compressive, which is because the specimen investigated is thick and the cooling rates of the top and bottom surfaces are more rapid than those of the center part of the plate. The largest transverse compressive stress approaching 285 MPa exists right at the weld centerline. With a rapid decay, the magnitude reaches a value of 18 MPa at 2.8 mm away from the weld centerline and maintains to the edge of the plate.
Residual stresses are mostly relieved after ZHT. The half-width of longitudinal tensile residual stress distributed zone reduces from 5 mm in as-welded condition to 2 mm. The maximal value of longitudinal tensile stress exists in the weld centerline after ZHT and is about 131 MPa, which reduces by 76% compared with the maximum after welding. Due to the change of cooling condition after ZHT, the transverse stress occurring immediately near the weld centerline changes to tensile with a highest value of only 12 MPa. The peak transverse compressive stress in this case occurs at 5 mm away from the weld because of the self-equilibrium of internal stress, reaching the approximate value of 100 MPa, which reduces by 65% compared with that in as-welded condition. It is worth noting that the longitudinal and transverse residual stresses in the zone without undergoing ZHT have negligible variation compared with those measured in welding condition.
3.2 Microstructural observations
Fig.2(a) shows the microstructure of the base metal in as-received condition. It consists of lamellae-like alpha and beta phases which are aligned along the rolling direction. The changes of microstructure in titanium alloy depend primarily on three different parameters: the initial microstructure, the reached maximum temperature and the subsequent cooling rate between this temperature and room temperature[18]. So, the microstructure of weld metal consists predominantly of long fine acicular martensite dispersed in the large columnar prior-beta grains because of the maximum temperature far above the beta-transus temperature of TC4 alloy during EBW and the rapid solidification rate after EBW (Fig.3(a)).
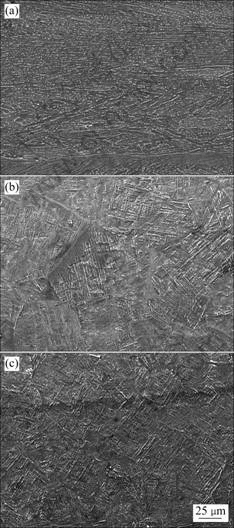
Fig.2 SEM images of base metal: (a) As-received; (b) After ZHT1; (c) After ZHT 2
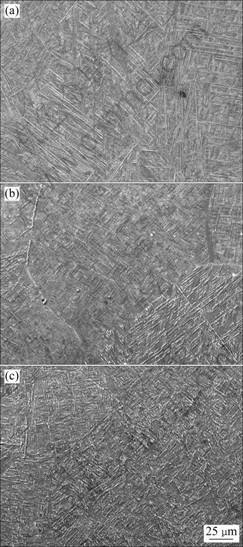
Fig.3 SEM images of weld metal: (a) As-received; (b) After ZHT1; (c) After ZHT 2
The top surfaces of plates after two cases of ZHT remain unmelted and present a brilliant silver color.
Equiaxed prior-beta grains are seen in the microstructure of the base metal undergoing ZHT 1. But its size is much smaller compared with that in the fusion zone after EBW (Fig.2(b)). All these suggest the maximum temperature during ZHT 1 slightly exceeds the beta-transus temperature. The maximum temperature primarily controls the prior-beta grain size while the cooling rate determines the nature of the beta transformation products formed during cooling[18]. Continuous grain boundary diffusional alpha phase, which also grows into grain from the grain boundary with zigzag appearance, is observed because of the slow cooling rate (Fig.2(b)). The microstructure of the base metal after ZHT 2, which consists of primary alpha phase, martensite and a small quantity of metastable beta phase (Fig.2(c)), is similar to that seen in the heat-affected zone, indicating that the thermal cycle does not produce a temperature higher than the beta-transus temperature. The cooling rate in the alpha+beta region after ZHT 2 is fast concluded from the appearance of martensite transformed by beta phase in this region.
The size and the morphology of the prior-beta grain in the fusion zone remain unaltered after ZHT 1 because of the short dwelling time above the beta-transus temperature. The articulation and aspect-ratio of acicular martensite in the prior beta grain are reduced as compared with those in the as-welded condition. Intragranular alpha phase is seen to be thicker and more conspicuously developed in ZHT 1 because of the decomposition of martensite to alpha and beta phase. At the same time, discontinuous diffusional alpha phase emerges in the prior-beta grain boundary. The microstructure of the weld metal is a mixture of diffusional alpha phases and martensite after ZHT 1 (Fig.3(b)). And the martensite volume fraction increases with increasing the depth. The microstructure of the weld metal after ZHT 2 shows that grain boundary as well as the intragranular alpha phase is not sufficiently coarsened as that after ZHT 1 (Fig.3(c)).
3.3 Mechanical properties
The results of the tensile tests for the base metal, welded joints under different conditions are summarized in Table 2.
Table 2 Tensile properties of TC4 alloy base metal and welded joints at different conditions
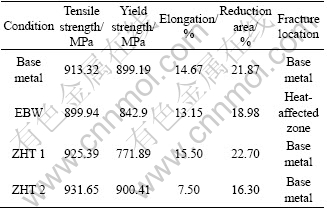
Reduction in strength and ductility of electron beam welded joints can be attributed to the prominent increase of grain size in the fusion zone[19-20]. Improvement in ductility and reduction in yield strength observed after ZHT 1 is mainly due to the decomposition of martensite and the coarsening of alpha phase, making the intragranular slip easily. In addition, the yield point will locally be reached earlier because of the decrease of residual tensile stress after ZHT 1, thus leading to an overall reduction in yield strength. The highest tensile strength of welded joint after ZHT 2 is associated with the presence of fine martensitic structure in weld and base metal. The poor ductility, showing a reduction of about 49% in elongation and 25% in reduction area as compared with those of base metal, is resulted from the facts that the microstructure of the fusion zone has not sufficiently coarsened and the acicular martensite has appeared in the base metal.
The as-welded tensile specimens fail by shear at 45 �� in the heat-affected zone. Specimens after ZHT exhibit cup and cone fracture surface and fail in the base metal zone. The results from corresponding SEM observations of the tensile fracture surfaces are shown in Fig.4. The fractograph of the base metal shows that rather large dimples are coalesced by smaller dimples (Fig.4(a)). The as-welded specimens are typical shear fracture and show uniform and shallow ductile dimples (Fig.4(b)). All specimens after ZHT fail in the base metal zone and show different fracture modes. It is observed the fractographs of the tensile specimens after ZHT 1 are similar to the base metals but with smaller dimples, by ductile transgranular fracture (Fig.4(c)). The specimens
after ZHT 2 fail by quasi-cleavage fracture. The petal-like cleavage faces and the tearing ridges are observed in the fracture surface[21] (Fig.4(d)).
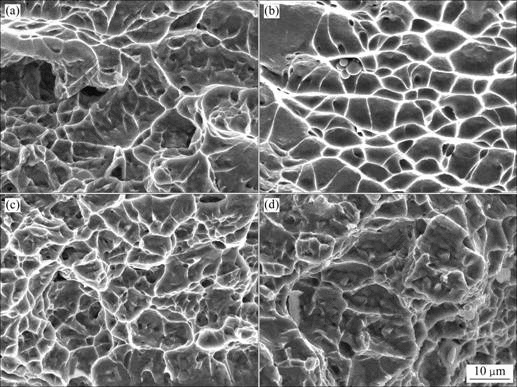
Fig.4 SEM images obtained from tensile specimens: (a) Base metal; (b) EBW; (c) ZHT 1; (d) ZHT 2
4 Conclusions
1) Residual stresses after EBW are mostly relieved after ZHT. The half-width of longitudinal tensile residual stress distributed zone reduces from 5 mm in as-welded condition to 2 mm, and the maximum values of longitudinal tensile and transverse compressive residual stresses reduce by 76% and 65%, respectively.
2) The yield strength of welded joint is reduced while the tensile strength and the ductility are improved because of the relief of residual stress and the microstructural changes of the base and weld metal after ZHT at slow scanning velocity, and the fracture mode of tensile specimen is ductile transgranular fracture.
3) ZHT at fast scanning velocity is detrimental to the ductility of welded joints, which is resulted from insufficiently coarsened alpha phase in the fusion zone and the appearance of martensite in the base metal. The tensile specimens fail by quasi-cleavage fracture.
Acknowledgement
The authors wish to express their gratitude to the Key Laboratory of High Energy Density Beam Processing Technology, Beijing Aeronautical Manufacturing Technology Research Institute, China, for the experimental assistance.
References
[1] MAZUMDER J, STEEN W M. Microstructure and mechanical properties of laser welded titanium 6Al-4V [J]. Metall Trans A, 1982, 13A(5): 865-871.
[2] THOMAS G, RAMACHNDRA V, GANESHAN R, VASUDEVAN R. Effect of pre- and post-weld heat treatments on the mechanical properties of electron beam welded Ti-6Al-4V alloy [J]. J Mater Sci, 1993, 28(18): 4892-4899.
[3] CASALINO G, CURCIO F, MINUTOLO F, CAPECE M. Investigation on Ti6Al4V laser welding using statistical and Taguchi approaches [J]. J Mater Process Technol, 2005, 167(2/3): 422-428.
[4] HU Mei-juan, LIU Jin-he. Numerical simulation for electron beam welding of 12 mm-thickness titanium alloy plate [J]. Chinese Journal of Nonferrous Metals, 2007, 17(10): 1622-1626. (in Chinese)
[5] BORGGREEN K, WILSON I. Use of postweld heat treatments to improve ductility in thin sheets of Ti-6Al-4V [J]. Weld J, 1980, 59(1): 1s-9s.
[6] MURTHY K K, SUNDARESAN S. Fracture toughness of Ti-6Al-4V after welding and postweld heat treatment [J]. Weld J, 1997, 76(2): 81s-91s.
[7] DONG C, WU A, HAO S, ZOU J, LIU Z, ZHONG P, ZHANG A, XU T, CHEN J, XU J, LIU Q, ZHOU Z. Surface treatment by high current pulsed electron beam [J]. Surf Coat Technol, 2003, 163/164(1): 620-624.
[8] CHULKOV E I, GERASIMENKO A V, MATSNEV V N, PEKIN-YU I, LYSENKOV-YU T. Soldering of the heat-exchanging units by scanning electron beam [J]. Svar Proizv, 2003(2): 46-48.
[9] YEVGRAFOV N N, LYSENKOV-YU T, FEOKTISTOVA-YU M, MASHKOVA M A, KHOKHLOVA V V. Properties and structure of welded joints from high-strength steel after zonal heat treatment by electron beam [J]. Metalloved Term Obrab Met, 1991(3): 7-8.
[10] LYASOTSKAYA V S, KNYAZEVA S I, LYSENKOV-YU T. Mechanical properties of alloy type VT23 welded joints after repeated electron beam heating [J]. Metalloved Term Obrab Met, 1995(9): 5-7.
[11] SEBASTIANO T, FABIO N, MARCELLO D M. Electron beam welding and post-weld treatments of steels [J]. J Mater Sci Lett, 1996, 15(10): 827-830.
[12] HUANG C C, PAN Y C, CHUANG T H. Effects of post-weld heat treatments on the residual stress and mechanical properties of electron beam welded SAE 4130 steel plates [J]. J Mater Eng Perform, 1997, 6(1): 61-68.
[13] CHEN F R, HUO L X, ZHANG Y F, ZHANG L, LIU F J, CHEN G. Effects of electron beam local post-weld heat-treatment on the microstructure and properties of 30CrMnSiNi2A steel welded joints [J]. J Mater Process Technol, 2002, 129(1/3): 412-417.
[14] CHEN Fu-rong, HUO Li-xing, ZHANG Yu-feng, LIU Fang-jun, CHEN Gang. Calculation of residual stresses for titanium alloy after electron beam heat treatment [J]. Heat Treat Met, 2004, 29(1): 72-76. (in Chinese)
[15] FU Peng-fei, LIU Fang-jun, FU Gang, MAO Zhi-yong. Study of electron beam post-weld local heat treatment for TC4 titanium alloy and residual stress measurement of weld [J]. Nuclear Techniques, 2006, 29(2): 136-139. (in Chinese)
[16] HAUPT C W, ASTRONAUTICS L M, CO D. Residual stress measurement of titanium weld certification rings [C]// 32nd AIAA/ASME/SAE/ASEE Joint Propulsion Conference. Lake Buena Vista, FL: American Institute of Aeronautics and Astronautics. 1996, 7: 1-10.
[17] STONE H J, WITHERS P J, HOLDEN T M, ROBERTS S M, REED R C. Comparison of three different techniques for measuring the residual stresses in an electron beam-welded plate of Waspaloy [J]. Metall Mat Trans A, 1999, 30A(7): 1797-1808.
[18] PETERS M, WILLIAMS J C. Microstructure and Mechanical properties of a welded (��+��) Ti alloy [J]. Metall Trans A, 1884, 15A(8): 1589-1596.
[19] MOHANDAS T, BANERJEE D, KUTUMBA V V. Observations on impact toughness of electron beam welds of an ��+�� titanium alloy [J]. Mater Sci Eng A, 1998, 254A(1/2): 147-154.
[20] MOHANDAS T, BANERJEE D, KUTUMBA V V. Elevated temperature properties of electron beam welds of an ��+�� titanium alloy [J]. Mater Sci Eng A, 1999, 269A(1/2): 217-224.
[21] LIN F S, STARKE E A, CHAKRABORTTY S B, GYSLER A. Effect of microstructure on the deformation modes and mechanical properties of Ti-6Al-2Nb-1Ta-0.8Mo (Part I): Widmanstaetten structures [J]. Metall Trans A, 1984, 15A(6): 1229-1246.
Corresponding author: HU Mei-juan; Tel: +86-13720722565; E-mail: hu-mj@hotmail.com
DOI: 10.1016/S1003-6326(08)60272-1
(Edited by YANG Hua)