7085���Ͻ�˫�����Ħ�������ذ������֯�ݱ����
��Դ�ڿ����й���ɫ����ѧ��(Ӣ�İ�)2015���10��
�������ߣ���Τ�� �����
����ҳ�룺3212 - 3222
Key words��double-side friction stir weld; 7085 Al alloy; microstructure
ժ Ҫ�����õ��ӱ�ɢ�����似��(EBSD)���о�7085-T7452���Ͻ�˫�����Ħ��������֯�ݱ���ɡ���������������7085-T7452���Ͻ�ĸ�ģ�˫�����Ħ������ľ�����������ϸ��������Ĵ�ǶȾ������������300 r/min����ת�ٶ�ʱ�ϸ�(75%����)��������ת�ٶ����ߵ�950 r/min�����͡���-��Ӱ������������������Ӱ�������ֵ���ִ�����ƽ���ߴ�ֱ���7.3��15.7 ��m���Ҵ�ǶȾ�����������ֱ�Ϊ43%��30%����ĸ����ȣ�˫�����Ħ�����캸����(100)��(110)��(111)��ͼ��ǿ�Ƚ��ͣ����ذ������ڽϴ�IJ��졣
Abstract: Themicrostructure evolution in the weld zone of double-side friction stir welded (DS-FSWed) 7085-T7452 Al alloy was investigated by the electron backscatter diffraction method. The results indicate that DS-FSW process results in substantial grain refinement. The misorientation angle distribution shows a very high volume fraction of high angle grain boundary (HAGB) (above 75%) under DS-FSW condition at rotational rate of 300 r/min. The fraction of HAGB rapidly decreases with increasing the rotational rate from 300 to 950 r/min, and the obvious growth of grain in the weld nugget zone (WNZ) is presented. The average grain sizes in the elongated grains of thermal-mechanical affected zone (TMAZ) and partially equiaxed and coarser grains of thermal affected zone (HAZ) are 7.3 and 15.7 ��m with the fractions of HAGBs less than 43% and 30%, respectively. The intensities of (100), (110) and (111) pole figures in the WNZ obviously decrease when compared with those in the BM and present significantly difference along the thickness direction of plate.
Trans. Nonferrous Met. Soc. China 25(2015) 3212-3222
Wei-feng XU, Jin-he LIU
State Key Laboratory of Solidification Processing, Shaanxi Key Laboratory of Friction Welding Technologies, Northwestern Polytechnical University, Xi��an 710072, China
Received 17 December 2014; accepted 17 March 2015
Abstract: The microstructure evolution in the weld zone of double-side friction stir welded (DS-FSWed) 7085-T7452 Al alloy was investigated by the electron backscatter diffraction method. The results indicate that DS-FSW process results in substantial grain refinement. The misorientation angle distribution shows a very high volume fraction of high angle grain boundary (HAGB) (above 75%) under DS-FSW condition at rotational rate of 300 r/min. The fraction of HAGB rapidly decreases with increasing the rotational rate from 300 to 950 r/min, and the obvious growth of grain in the weld nugget zone (WNZ) is presented. The average grain sizes in the elongated grains of thermal-mechanical affected zone (TMAZ) and partially equiaxed and coarser grains of thermal affected zone (HAZ) are 7.3 and 15.7 ��m with the fractions of HAGBs less than 43% and 30%, respectively. The intensities of (100), (110) and (111) pole figures in the WNZ obviously decrease when compared with those in the BM and present significantly difference along the thickness direction of plate.
Key words: double-side friction stir weld; 7085 Al alloy; microstructure
1 Introduction
7085 Al alloy has been developed by Alcoa in 2003 as a new generation high strength thick plate alloy. This alloy is a precipitation hardened wrought material based on Al-Zn system, and is one of the strongest Al alloys used in many aircraft structural components due to higher Zn content along with lower Cu content than those in other 7xxx Al alloys, which gave 7085 Al alloy unique properties, i.e., its high fracture toughness and slow quench sensitivity [1,2]. However, this alloy is relatively difficult to be welded using conventional fusion welding techniques because of its Cu content, which leads to an extremely sensitive to weld crack and liquation crack in the heat affected zone (HAZ) and severely degrades the mechanical properties within the joint [3,4].
Friction stir welding (FSW), which is a solid state joining method and has no material melting phenomenon during the welding process, has been considered to be a promising way to weld Al alloys, while preserving the advantageous microstructure [5,6]. Unlike other conventional welding methods, FSW is a complicated thermal-mechanical process. Frictional heat is generated between the welding tool and the material of workpieces. This heat causes the workpieces to soften without reaching the melting point and allows the tool to traverse along the weld line. The resultant plasticized material is transferred around the stir tool and forged together by the intimate contact of the stir tool [7]. Obviously, the mechanical force of the welding tool, which could affect the microstructure and determine the properties of the joint, plays an indispensable and non-substitutable role during the whole FSW process.
For the Al alloy thick plate, FSW results in a complex thermo-mechanical processing of the material, characterized by high local strains and temperatures, the FSWed joint along the thickness direction experiences uniform thermal-mechanical coupling using larger size welding tool. Various microstructures are resulted along the thickness direction, which have been found in the FSWed Al alloy thick plate joint. So, the mechanical properties of joint present large differences [8-11]. Meanwhile, the length of tool is slightly short than the thickness of workpiece, and the weld root is easy to form flaw due to the lack of thermal-mechanical effect. Therefore, using the relatively small size of welding tool, the new FSW approach here is defined as double-side friction stir welding (DS-FSW), intending to induce the serration of the geometric discontinuities and to induce a significant microstructure homogeneity in the weld nugget zone (WNZ), through decreasing the temperature gradient and improving uneven plastic deformation along the thickness direction [12]. Thus, a systematical investigation of the effect of thermal cycle and mechanical stirring along the thickness direction on the microstructural evolution of DS-FSW 7085-T7452 joints under different FSW parameters is of critical importance to optimize the mechanical behavior of the joints. However, no literature on the FSWed 7085 Al alloy joint is reported in open.
In the present work, 7085-T7452 Al alloy plates with 12 mm in thickness were friction stir welded under various rotational rates, which is the main factor for the influence of weld quality according to the previous research. The temperature measurement and microstructure observation of WNZ, thermal-mechanical affected zone (TMAZ), thermal affected zone (HAZ) and base material (BM) were investigated. The aim is to understand the effect of DS-FSW process on the microstructures of FSWed 7085-T7452 Al alloy joint.
2 Experimental
2.1 Material and FSW configurations
The 7085-T7451 Al alloy forging was divided into 200 mm �� 100 mm �� 12 mm plates for FSWed sheets using an electrical discharge machine (EDM). A FSW tool with a shoulder of 16 mm in diameter, a conical threaded pin of 7 mm in root diameter, 4 mm in tip diameter and 6.2 mm in length was used. The rotating tool was titled 2.5��. The FSW process was conducted along the extrusion direction on a commercial FSW machine at different rotational rates of 300 and 950 r/min with a constant welding speed of 60 mm/min. The stir pin was penetrated into the joint with full length in the welding experiments. The schematic diagram of the DS-FSW process is shown in Fig. 1. The first FSW (bottom) is followed by a second one carried out along the opposite free-surface (top), using the same welding parameters. With this respect, tool configurations were used, pin�Cpin reversing the advancing side (AS) into the retreating side (RS) at the second FSW carried out along the opposite free-surface. That is, the AS in the first FSW for the whole joint was turned into the RS during the second FSW process.
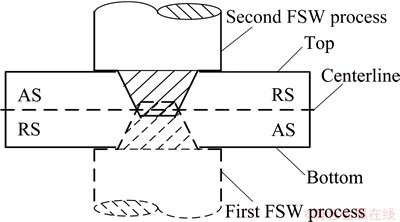
Fig. 1 Schematic diagram of DS-FSW configuration
2.2 Temperature measurement
The temperature evolution within the weld was recorded by the thermocouples (K-type with an outer diameter of 1 mm) embedded in the regions adjacent to the rotating pin. In detail, the principle and method of temperature measurement were reported in Ref. [11]. To avoid the destruction of thermocouple by the tool during welding, the positions of small blind holes with a diameter of 1.5 mm were designed. The depth of blind hole drilled in the cross-section of the workpiece is 25 mm. Firstly, the distances from the weld line to blind holes are 3.5, 7.5 and 14 mm and that from the bottom surface is 2 mm in order to determine the variation with width. Secondly, three distances from blind holes to the bottom surface (2, 6 and 10 mm) were used to measure the temperature field at different plate thicknesses. Figure 2 shows the positions of blind holes drilled in the cross-section of workpiece.
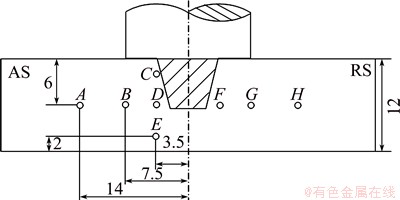
Fig. 2 Arrangement of blind holes for measuring temperatures (unit: mm)
2.3 Microstructural characterization
The microstructural observation and analysis were conducted by electron backscatter diffraction (EBSD). The metallographic specimens were cross-sectioned perpendicular to the FSW direction. The EBSD specimens were machined on the cross-sectional plane, mechanically ground with progressive grades of emery papers of 240, 400, 600, 800, 1200 and 1500 grit, and polished with 1 ��m diamond paste on velvet cloth to mirror surface, and finally electrolytically polished at an electric voltage of 22 V in a solution of 10 mL perchloric acid and 90 mL ethanol. EBSD was performed using an Oxford HKL Channel 5 system on an LEO Supra 35 FEG scanning electron microscope. A step size of 0.6 ��m was used for scanning the base material while a step size of 0.4 ��m was used for analysis in the weld.
3 Results and discussion
3.1 Temperature curve of FSW process
Figure 3 shows the temperature curves at different rotational rates of 300 and 950 r/min and a constant weld speed of 60 mm/min. The letters d and D are introduced to refer the distance from the surface and the weld line to blind holes, respectively. It can be seen that the peak temperature decreases with the increase of d and D. The peak temperature increases with the increase of rotational rate from 300 to 950 r/min, and the peak temperatures are ~392 and ~486 ��C, respectively. Moreover, the peak temperature on the advancing side (AS) is higher than that on the retreating side (RS). Similar results were reported by XU et al [11]. For example, the peak temperatures measured at Points D (d=6 mm and D=-3.5 mm), B (d=6 mm and D=-7.5 mm) and E (d=6 mm and D=-14 mm) on the AS are ~261, ~309 and ~362 ��C, respectively. However, the peak temperatures measured at Points F (d=6 mm and D=3.5 mm), G (d=6 mm and D=7.5 mm) and H (d=6 mm and D=14 mm) on the RS are ~253, ~297 and ~347 ��C, respectively, at rotational rate of 300 r/min. It is caused by the fact that the tangential velocity vector direction is the same as the forward velocity vector on the AS, but the corresponding direction is in contrast to the forward velocity vector on the RS. The highest temperature measured at d=2 mm and D=3.5 mm is ~392 ��C, which is obviously lower by ~54 ��C compared with that (~446 ��C) of signal side FSWed 2219-T62 Al alloy with 12 mm in thickness using the same rotational rate and welding speed [13]. That is because the weld of DS-FSW experiences lower thermal cycle, and which is contribute to obtain higher quality weld. The peak temperatures at Points C, D and E along the thickness direction at rotational rate of 300 r/min are ~392, ~362 and ~292 ��C, respectively, while at rotational rate of 950 r/min are ~486, ~391 and ~368 ��C, respectively. This is attributed to the fact that the friction heat of tool grows with increasing the rotational rate during FSW [11]. It is indicated that the peak temperature gradients through the thickness are more than 30 ��C and 80 ��C for the rotational rates of 300 and 950 r/min, respectively, and the first weld experiences about 300 and 370 ��C thermal cycle, respectively, when second weld occurs. So the large plastic softening material will form at rotational rate of 950 r/min and it is easily to present the flaw on the weld.
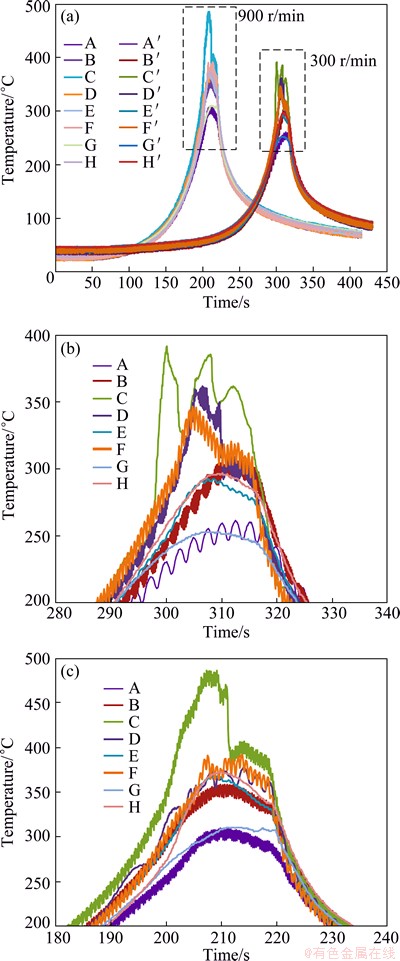
Fig. 3 Temperature curves as function of time for different depths below tool and different lateral distances from weld line (a) at rotational rates of 300 r/min (b) and 950 r/min (c) and constant weld speed of 60 mm/min

Fig. 4 EBSD map (a) and misorientation angle distribution (b) of BM for 7085-T7452 Al alloy
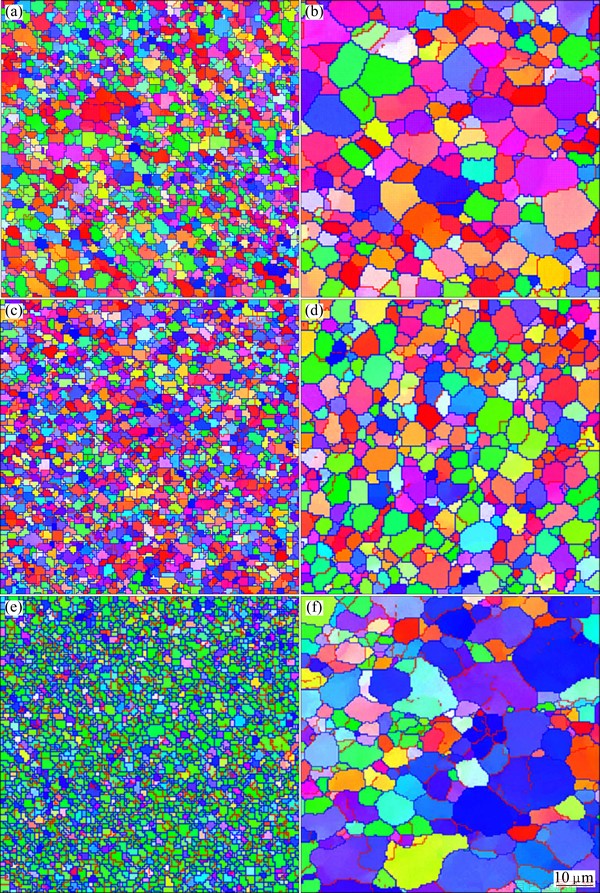
Fig. 5 EBSD maps at top (a, b), middle (c, d) and bottom (e, f) of WNZ of FSWed joint obtained at rotational rates of 300 r/min (a, c, e) and 950 r/min (b, d, f)
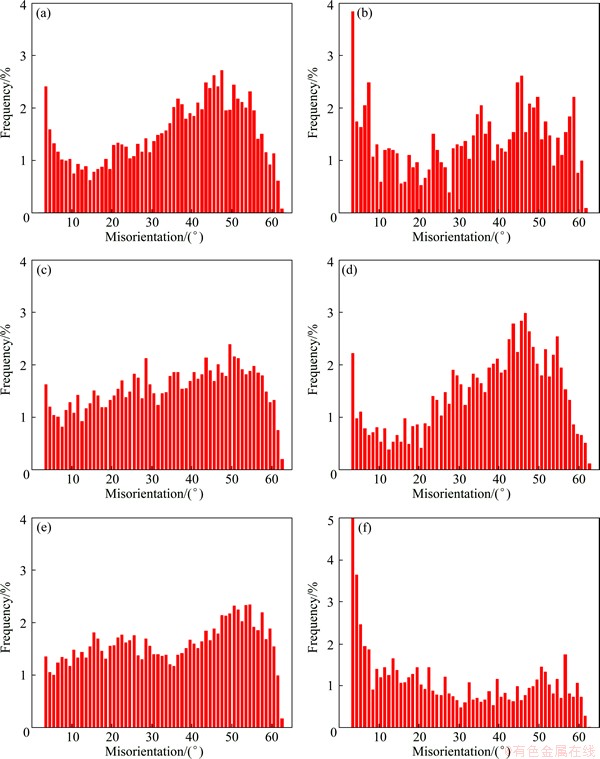
Fig. 6 Misorientation angle distribution at top (a, b), middle (c, d) and bottom (e, f) of WNZ of FSWed joint obtained at rotational rates of 300 r/min (a, c, e) and 950 r/min (b, d, f)
3.2 Microstructure characteristics
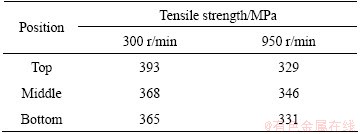
Figure 4 shows the EBSD, grain boundary misorientation map and misorientation angle distribution of BM for 7085-T7452 Al alloy. Figure 5 shows the cross-sectional microstructural characteristics observed by EBSD at top, middle and bottom of WNZs of DS-FSW 7085-T7452 Al alloy joints along the thickness direction at rotational rates of 300 (Figs. 5(a), (c) and (e)) and 950 r/min (Figs. 5(b), (d) and (f)). Figure 6 shows the corresponding misorientation angle distribution for Fig. 5. The microstructure in WNZ is known to exhibit fine grains due to dynamic recrystallization. The average grain size, estimated by EBSD, is 10.5 ��m for the unwelded BM. The average grain sizes at top, middle, and bottom of WNZs are refined to 2.2, 1.1 and 1.3 ��m, and 5.6, 4.6 and 6.6 ��m after welding at rotational rates of 300 and 950 r/min, respectively. The high angle boundaries (HAGBs) identified by angle of misorientation over 15�� are depicted as blue lines, while the low angle boundaries (LAGBs) are presented by red lines. Considering all grain boundary misorientation angles greater than 2��, the fraction of HAGBs in the BM is 28.1%. The fractions of boundaries for the top, middle, and bottom of WNZs are 75.9%, 77.4% and 77.9% at rotational rate of 300 r/min and 61.9%, 75.4% and 42.2% at rotational rate of 950 r/min, respectively. The tensile strengths of slices of FSWed joint along the thickness direction at rotational rates of 300 and 950 r/min are presented in Table 1. Higher tensile strength is obtained at rotational rate of 300 r/min. The tensile strength of bottom slice of FSWed joint at rotational rate of 950 r/min is low. The tensile testing results are consistent with the results of grain size and misorientation angle distribution.
Table 1 Tensile strength of slices of FSWed joint obtained at rotational rates of 300 and 950 r/min
The cumulative frequency versus grain size plot (Fig. 7) shows the grain size distribution for BM and various positions of WNZ (top, middle and bottom) of DS-FSW joints at different rotational rates of 300 and 950 r/min. It is clear that for BM, about 80% of grain sizes are smaller than 20 ��m, about 12% of grains are larger than 35 ��m, and about 2% and 11% of grains are smaller than 1 and 2 ��m, respectivly. The cumulative frequency distribution of grain size for DS-FSW joints are also shown in Fig. 7. For more clarity by reducing the grain size scale, it is included as an insert in Fig. 7. In this case, the largest grain sizes are found to be 9.6, 4.8 and 6.2 ��m for the top, middle and bottom of joints at rotational rate of 300 r/min, and those values are 20.6, 14.4 and 42.5 ��m at rotational rate of 950 r/min, respectively. Also, it can be seen that about 13%, 52%, 47% and 8%, 4%, 15% of grains are less than 1 ��m in size for the top, middle and bottom of WNZ at 300 and 950 r/min, respectively, and about 50%, 91%, 86% and 18%, 15%, 24 % of grains are less than 2 ��m in size for the top, middle and bottom of WNZ at 300 and 950 r/min, respectively. The results confirm that the grain refinment is presented after the DS-FSW process and the grain sizes are uniform along the thickness direction of plate, in particular at rotational rate of 950 r/min.
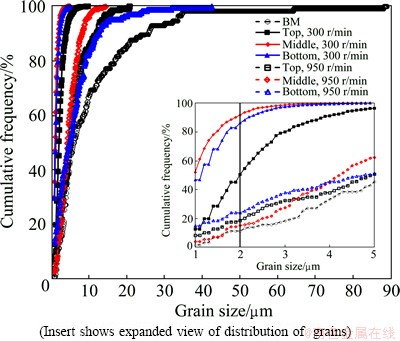
Fig. 7 Distribution of grains in DS-FSW joints at different rotational rates
The grain size was predominantly controlled by two key thermal-mechanical parameters in FSW, strain rate  (s-1) and peak temperature T (K). The changes in the temperature (frictional and deformation heat) and strain rate (tool rotational rate) exhibit an opposite influence on the grain size, namely, lower temperatures and higher strain rates result in finer grains. Such an effect can be incorporated via the Zener-Hollomon parameter Z (s-1), defined as
 (1)
(1)
where R is the gas constant and Q is the activation energy. As a result, a higher Z value represents a higher strain rate and a lower temperature, thus corresponding to finer grains. Similar observations have been reported for signal side FSWed 2219 Al alloy [14] and for ultrasonic spot welded AZ31-H24 Mg alloy [15].
In Fig. 3, the peak temperature is 392 ��C at rotational rate of 300 r/min, and the value is 486 ��C at rotational rate of 950 r/min. So the grain size presents obviously coarse with the increase of rotational rate. Meanwhile, there is long time to growth at higher rotational rate of 950 r/min. The peak temperature of Point E is 292 and 368 ��C for rotational rates of 300 and 950 r/min, respectively. That is, the first side weld experiences 292 and 368 ��C when the second FSWing occurs. The material of first side weld experiences the thermal cycles with the peak temperatures between 200 and 410 ��C, which could result in over-aging and the coarsening of the grain size. Therefore, the grain size at the bottom of WNZ (first side weld) is larger than that at the top (second side weld), as shown in Figs. 5(b) and (f).
During the FSW process, different recrystallization mechanisms have been reported [16-18], including dynamic recovery (DRV), continuous dynamic recrystallization (CDRX), discontinuous dynamic recrystallization (DDRX), geometric dynamic recrystallization (GDRX) and particle-stimulated nucleation (PSN). In order to rationalize the mechanism of grain refinement in this research, the EBSD maps of base material and top, middle, bottom of WNZs along the thickness direction are analyzed. The analyses of the EBSD data show that the area fraction of the lowest high-angle grain boundary (HAGB) for the WNZ is 42.2% in the bottom after welding at rotational rate of 950 r/min (Fig. 6(f)), which is higher than that for the base metal (28.1%). This phenomenon of increased misorientation spread is often associated with CDRX [16]. FONDA et al [19] attributed the observed grain refinement ahead of the tool to continuous dynamic recrystallization (CDRX) [17], during which the evolution of the grain structure involves recovery to the subgrain boundaries, eventually developing high-angle boundaries closer to the tool. The CDRX process consists of a continuous introduction of strain into the structure coupled with rapid recovery of that strain to the grain/subgrain walls, and the migration of the grain/ subgrain boundaries maintains the equiaxed shape. The development of these subgrains generating the fine, equiaxed grain structure observed closest to the tool appears to occur by the same process. Continued deformation of the subgrain and the recovery of that deformation to the subgrain boundaries gradually increase the misorientation of those boundaries, resulting in a gradual rotation of the subgrain while maintaining a consistent size and shape. The increasing misorientation of the subgrain boundaries eventually transforms the subgrains into individual grain when the misorientation exceeds 15��. The grain boundaries continue to increase in misorientation until achieving a distribution typical of high-angle grain boundary structures [20].
During the FSW process, a large number of dislocations are produced inside the deformed grains and become heavily tangled. The dislocations with opposite Burger vectors react with each other on the same glide or slip plane and the climb or cross slip between different slip planes. These types of dislocation reactions create more regular dislocation cell boundaries, leading to the formation of subgrains. With further straining, a fraction of subgrains with LAGBs gradually transform into new grains with HAGBs. Obviously, the rate of dislocation climb or cross slip increases with increasing the temperature, which largely reduces the driving force. This is why the relative frequency of the LAGBs at higher temperature and higher rotational rate of 950 r/min is larger than that at lower temperature and lower rotational rate of 300 r/min. Figure 6 shows that the fraction of HAGBs (77.9%) for the bottom of WNZs at rotational rate of 300 r/min is higher than that (42.2%) at 950 r/min. Meanwhile, it is found that the effect of temperature on the fraction of boundaries is more obvious than that of strain rate, and due to at lower strain rate and lower rotational rate, there is sufficient time for the dislocation glide, climb or cross slip. This process can largely reduce the dislocation density around the subgrain boundaries, so that the driving force for the subgrain growth decreases. Thus, the total relative frequency is higher for the LAGBs but lower for the HAGBs. At higher strain rate and higher rotational rate, there is no time for the dislocation motion, meaning that there are more dislocations accumulated around the subgrain boundaries. Therefore, the driving force increases and more HAGBs form by the continuous transformation of LAGBs. However, the bottom of WNZ experiences higher strain rate and higher temperature from both the first and the second welding at rotational rate of 950 r/min, and lower fraction of HAGBs is obtained.
The cross-sectional microstructural characteristics observed by EBSD in TMAZ of DS-FSW 7085-T7452 Al alloy joint at rotational rate of 950 r/min are shown in Fig. 8. The grains in the TMAZ become further elongated due to the plastic shear stress along the plastic flow of material. The average grain size of TMAZ is found to be 7.3 ��m with the fraction of HAGBs less than 42.9%, which is due to the fact that TMAE experiences relatively lower temperature and strain compared with the stir zone. This region does not undergo recrystallization due to insufficient strain and high rate of DRV. The dislocations generated during the deformation arrange themselves into low angle subgrain boundaries through DRV, giving rise to a high fraction of low angle boundaries in this region [21].
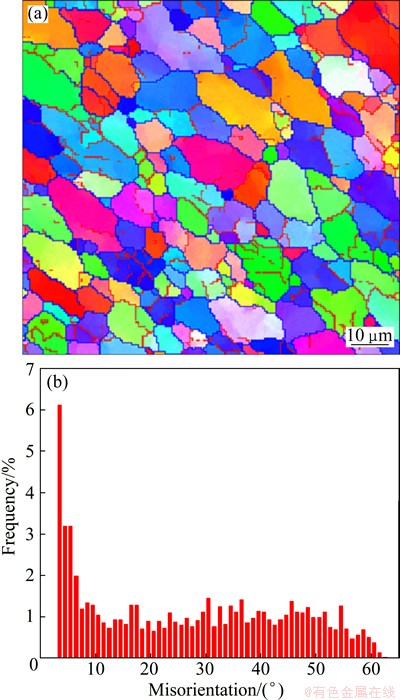
Fig. 8 EBSD map (a) and misorientation angle distribution (b) in top of TMAZ at rotational rate of 950 r/min
Figure 9 shows the cross-sectional microstructural characteristics observed by EBSD in HAZ of DS-FSW 7085-T7452 Al alloy joint at rotational rate of 950 r/min. The average grain size is 15.7 ��m and the fraction of HAGBs is only 30.1%. The grains in the HAZ become partially equiaxed and coarser due to the thermal effects. This is because that the BM microstructure, consisting of large elongated and pancake-shaped grains, grows easily along the short direction by the driving force of higher temperature. Moreover, due to very high rotational rate, the temperature increases and the rapid grain growth in the unstable microstructure presents. So, the equaliaxed and coarser grains form in the HAZ.
Figure 10 shows the (100), (110) and (111) pole figures of BM of 7085-T7452 Al alloy. The texture of the BM presents strong (100) and (111) preferred orientations (Table 2). The (110) pole figure is gradually weaker compared with the others in the base material. Figures 11 and 12 show the (100), (110) and (111) pole figures of the WNZ of DS-FSWed joint at rotational rates of 300 and 950 r/min, respectively. The pole figures of the WNZ are quite different from that of the BM and present significant difference along the thickness direction of plate, which are consistent with the EBSD maps and misorientation angle distribution, as shown in Figs. 5 and 6. Compared with the BM (Fig. 10), the intensities of (100), (110) and (111) in the WNZ obviously decrease, but the intensity increase from the top to the bottom. The intensity of pole figure at the bottom of WNZ at rotational rate of 300 r/min is weaker than that at 950 r/min (Tables 3 and 4). During FSW, the tool pin and shoulder surface creates the frictional force that causes the shear stress, and generates severe shear around the tool. The material of WNZ presents the plastic deformation and makes the intensity of pole figure decrease. For different positions of WNZ along the thickness direction of plate, the material experiences various thermal cycles and plastic deformation, resulting in the form of different intensities of pole figures at rotational rate of 950 r/min, and the material of WNZ undergoes the higher temperature and larger mechanical stirring force, so the grain size presents significant growth, in particular for the bottom of WNZ (first welding, Fig. 5(f)). The intensities of pole figures form under this condition.
Table 2 Maximum values of intensity of (100), (110) and (111) of base materials

Table 3 Maximum values of intensity of (100), (110) and (111) in different positions of WNZ at rotational rate of 300 r/min

Table 4 Maximum values of intensity of (100), (110) and (111) in different positions of WNZ at rotational rate of 950 r/min

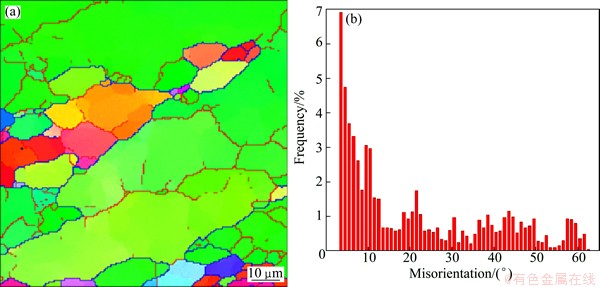
Fig. 9 EBSD map (a) and misorientation angle distribution (b) at top of HAZ at rotational rate of 950 r/min
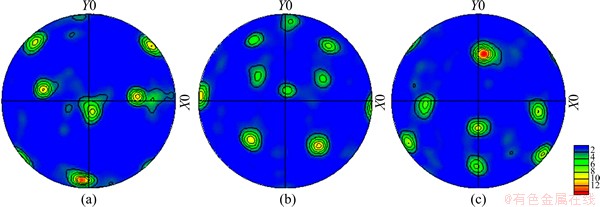
Fig. 10 (100) (a), (110) (b) and (111) (c) pole figures for base materials of 7085-T7452 Al alloy
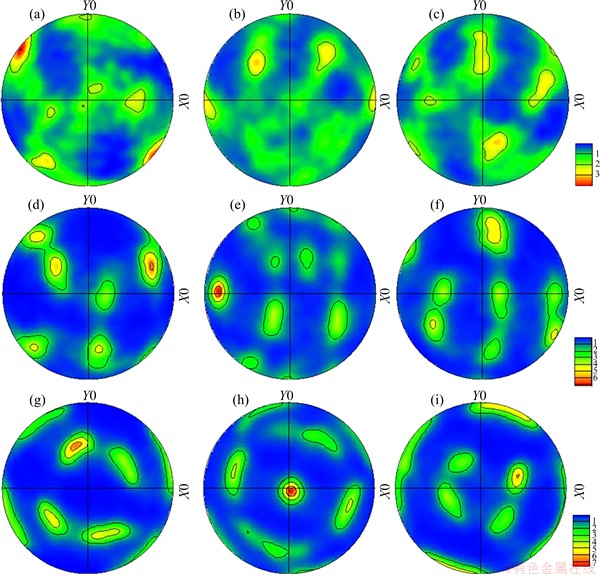
Fig. 11 (100) (a, d, g), (110) (b, e, h) and (111) (c, f, i) pole figures measured at top (a-c), middle (d-f) and bottom (g-i) of WNZ at rotational rate of 300 r/min during DS-FSWing process
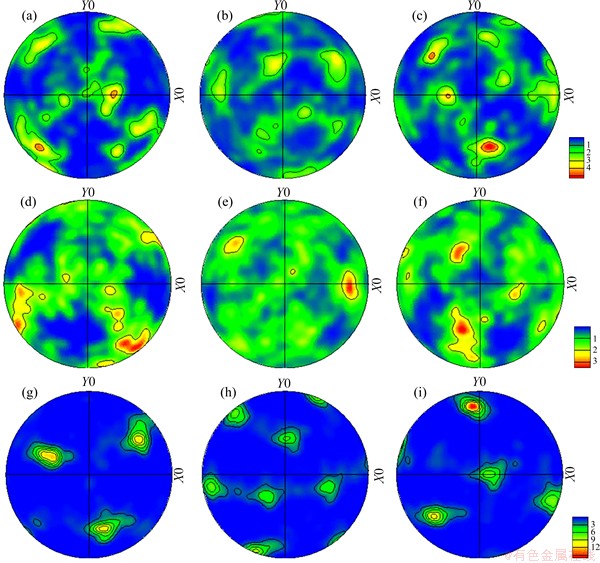
Fig. 12 (100) (a, d, g), (110) (b, e, h) and (111) (c, f, i) pole figures measured at top (a-c), middle (d-f) and bottom (g-i) of WNZ at rotational rate of 950 r/min during DS-FSWing process
4 Conclusions
1) The DS-FSW process results in substantial grain refinement of 7085-T7452 Al alloy with 50%, 91% and 86% of the grain size less than 2 ��m and the average grain sizes are 2.2, 1.1 and 1.3 ��m for the top, middle and bottom of WNZ, respectively.
2) The fraction of HAGBs rapidly decreases with increasing the rotational rate from 300 to 950 r/min. The grain at rotational rate of 950 r/min in the WNZ presents obvious growth and generates uneven grain size along the thickness direction of plate.
3) The grains in the TMAZ become further elongated and in the HAZ become partially equiaxed and coarser. The average grain sizes are found to be 7.3 and 15.7 ��m with the volume fractions of HAGBs less than 43% and 30% in the TMAZ and HAZ, respectively.
4) The intensities of (100), (110) and (111) in the WNZ obviously decrease compared with those in the BM. Moreover, the intensities of WNZ present significant difference along the thickness direction of plate and increase from the top to the bottom.
References
[1] SHUEY R, BARLAT F, KARABIN M, CHAKRABARTI D. Experimental and analytical investigations on plane strain toughness for 7085 aluminum alloy [J]. Metallurgical and Materials Transactionetall A, 2009, 40(2): 365-376.
[2] KARABIN M, BARLAT F, SHUEY R. Finite element modeling of plane strain toughness for 7085 aluminum alloy [J]. Metallurgical and Materials Transactionetall A, 2009, 40(2): 354-364.
[3] FU R D, SUN Z Q, SUN R C, LI Y, LIU H J, LIU L. Improvement of weld temperature distribution and mechanical properties of 7050 aluminum alloy butt joints by submerged friction stir welding [J]. Materials & Design, 2011, 32(10): 4825-4831.
[4] RAJAKUMAR S, MURALIDHARAN C, BALASUBRAMANIAN V. Influence of friction stir welding process and tool parameters on strength properties of AA7075-T6 aluminum alloy joints [J]. Materials & Design, 2011, 32(2): 535-549.
[5] MISHRA R S, MA Z Y. Friction stir welding and processing [J]. Materials Science and Engineering R, 2005, 50(1-2): 1-78.
[6] PEEL M, STEUWER A, PREUSS M, WITHERS P J. Microstructure, mechanical properties and residual stresses as a function of welding speed in aluminium AA5083 friction stir welds [J]. Acta Materialia, 2003, 51(16): 4791-4801.
[7] RADISAVLJEVIC I, ZIVKOVIC A, RADOVIC N, GRABULOV V. Influence of FSW parameters on formation quality and mechanical properties of Al 2024-T351 butt welded joints. [J]. Transactions of Nonferrous Metals Society of China, 2013, 23(12): 3525-3539.
[8] ZADPOOR A A, SINKE J, BENEDICTUS R. Global and local mechanical properties and microstructure of friction stir welds with dissimilar materials and/or thicknesses [J]. Metallurgical and Materials Transactionetall A, 2010, 41(13): 3365-3378.
[9] LI B, SHEN Y F, HU W Y. The study on defects in aluminum 2219-T6 thick butt friction stir welds with the application of multiple non-destructive testing methods [J]. Materials & Design, 2011, 32(4): 2073-2084.
[10] LI B, SHEN Y F, HU W Y. The investigation of abnormal particle- coarsening phenomena in friction stir repair weld of 2219-T6 aluminum alloy [J]. Materials & Design, 2011, 32(7): 3796-3802.
[11] XU W F, LIU J H, LUAN G H, DONG C L. Temperature evolution, microstructure and mechanical properties of friction stir welded thick 2219-O aluminum alloy joints [J]. Materials & Design, 2009, 30(6): 1886-1893.
[12] CABIBBO M, FORCELLESE A, MEHTEDI M E, SIMONCINI M. Double side friction stir welding of AA6082 sheets: Microstructure and nanoindentation characterization [J]. Materials Science and Engineering A, 2014, 590: 209-217.
[13] XU W F, LIU J H, ZHU H Q. Analysis of residual stresses in thick aluminum friction stir welded butt joints [J]. Materials & Design, 2011, 32(4): 2000-2005.
[14] XU W F, LIU J H, CHEN D L, LUAN G H, YAO J S. Improvements of strength and elongation in aluminum alloy joints via rapid cooling during friction stir welding [J]. Materials Science and Engineering A, 2012, 548: 89-98.
[15] PATEL V K, BHOLE S D, CHEN D L. Influence of ultrasonic spot welding on microstructure in a magnesium alloy [J]. Scripta Materialia, 2011, 65(10): 911-914.
[16] FOBDA R W, KNIPLING K E, BINGERT J F. Microstructural evolution ahead of the tool in aluminum friction stir welds [J]. Scripta Materialia, 2007, 58(5): 343-348.
[17] SU J Q, NELSON T W, MISHRA R, MAHONEY M. Microstructural investigation of friction stir welded 7050-T651 aluminium [J]. Acta Materialia, 2003, 51(3): 713-729.
[18] SU J Q, NELSON T W, STERLING C J. Microstructure evolution during FSW/FSP of high strength aluminum alloys [J]. Materials Science and Engineering A, 2005, 405(1-2): 277-286.
[19] FONDA R W, BINGERT J F, COLLIGAN K J. Development of grain structure during friction stir welding [J]. Scripta Materialia, 2004, 51(3): 243-248.
[20] FONDA R W, KNIPLING K E, BINGERT J F. Microstructural evolution ahead of the tool in aluminum friction stir welds [J]. Scripta Materialia, 2007, 58(5): 343-348.
[21] DEVINDER Y, RANJIT B. Effect of friction stir processing on microstructure and mechanical properties of aluminium [J]. Materials Science and Engineering A, 2012, 539: 85-92.
��Τ�棬�����
������ҵ��ѧ ���̼��������ص�ʵ���� ����ʡĦ�����Ӽ���ʵ���ң����� 710072
ժ Ҫ�����õ��ӱ�ɢ�����似��(EBSD)���о�7085-T7452���Ͻ�˫�����Ħ��������֯�ݱ���ɡ���������������7085-T7452���Ͻ�ĸ�ģ�˫�����Ħ������ľ�����������ϸ��������Ĵ�ǶȾ������������300 r/min����ת�ٶ�ʱ�ϸ�(75%����)��������ת�ٶ����ߵ�950 r/min�����͡���-��Ӱ������������������Ӱ�������ֵ���ִ�����ƽ���ߴ�ֱ���7.3��15.7 ��m���Ҵ�ǶȾ�����������ֱ�Ϊ43%��30%����ĸ����ȣ�˫�����Ħ�����캸����(100)��(110)��(111)��ͼ��ǿ�Ƚ��ͣ����ذ������ڽϴ�IJ��졣
�ؼ��ʣ�˫�����Ħ�����ӣ�7085���Ͻ�����֯
(Edited by Mu-lan QIN)
Foundation item: Project (51405392) supported by the National Natural Science Foundation of China; Project (20136102120022) supported by the Research Fund for the Doctoral Program of Higher Education of China; Project (2013JQ6001) supported by the Natural Science Foundation of Shaanxi Province, China; Project (3102015ZY023) supported by the Fundamental Research Funds for the Central Universities, China
Corresponding author: Wei-feng XU; Tel: +86-29-88492624; Fax: +86-29-88492624; E-mail: xwf1982@nwpu.edu.cn
DOI: 10.1016/S1003-6326(15)63954-1

