
Numerical simulation of upsetting-extruding process of dispersion strengthened copper welding electrode
WANG Meng-jun(王孟君)1, ZHANG Ying-chun(张迎春)1,
HUANG Dian-yuan(黄电源)1, LIU Xin-yu(刘心宇)2
1. School of Materials Science and Engineering, Central South University, Changsha 410083, China;
2. Department of Information Material Science and Engineering, Guilin University of Electronic Technology,
Guilin 541004, China
Received 1 December 2006; accepted 2 April 2007
Abstract: The simulation of the upsetting-extruding process of dispersion strengthened copper welding electrode was carried out using Deform-2D finite element analysis software, and the characteristics of metal flow and the effect of different friction factors were analysed. The results show that the whole forming process consists of a forward extrusion and a backward extrusion. When the friction factor of the female die is 0.4, it is advantageous to the forward extrusion forming of the electrode work nose part, while the friction factor of the male die is only 0.1, it would be benefit to the backward extrusion forming of the electrode fit-up hole part. Addition of a scoop channel with 1.5 mm in depth and 4 mm in diameter at the bottom of the female die can avoid folds at the work nose. The rise in temperature is about 60 ℃ during the forming process.
Key words: dispersion strengthened copper; welding electrode; upsetting-extruding; finite element analysis; friction factor
1 Introduction
Dispersion strengthened copper(DSC) is a kind of promising material developed in recent years. Due to its outstanding properties of high strength, high electric conductivity and anti-high temperature softening, it is an ideal material to produce the welding electrode[1?4]. Usually, DSC welding electrode is hard to be formed through a one-off process for the high strength and low plasticity of the material. So far the main manufacture craft is forming the work nose part first, and then machining out the fit-up hole on the back of the electrode. Like this, it has not only wasted much material, but also intro duced more working procedure, so that increased the cost and decreased production efficiency.If the welding electrode is formed directly from the stock by a one-off process, it will save much cost and the production efficiency can also be improved. However, there is still no published paper on this, in Ref.[5] the formation of its work nose was just only studied.
With the development of finite element method and the mature of finite element analysis software, finite element analysis gradually becomes an important method in research on plastic forming process[6?9]. In this study, Deform-2D was used to simulate the one-off upsetting-extruding process of dispersion strengthened copper welding electrode, and the law of metal flow during the forming process was studied, as well as the distributions of the stress, the strain and the temperature in the plastic zone were calculated quantitatively, in order to provide reasonable craft parameters for the actual production.
With the development of finite element method and the mature of finite element analysis software, finite element analysis gradually becomes an important method in research on plastic forming process[6-9]. In this study, Deform-2D was used to simulate the one-off upsetting-extruding process of dispersion strengthened copper welding electrode, and the law of metal flow during the forming process was studied, as well as the distributions of the stress, the strain and the temperature in the plastic zone were calculated quantitatively, in order to provide reasonable craft parameters for the actual production.
2 Finite element model
Fig.1 shows the structure of one kind of DSC welding electrode, and due to its axial geometrical symmetry, all of models of the workpiece and two dies used in the simulation were constructed by selecting their central longitudinal sections. As shown in Fig.2, the geometry model of workpiece is taken as 16 mm in diameter and 14.5 mm in height, and geometry models of two dies were constructed by following the shape and dimension of the electrode. The workpiece and two dies were considered as plastic body and rigid body, respectively. The number of elements of the work piece was set as 1 000 in order to gain the satisfactory results.
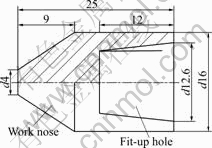
Fig.1 Structure of welding electrode
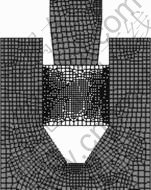
Fig.2 Geometry model and initial mesh
Due to the inevitability of some partial finite deformation occurring always in the work piece, it is difficult to adapt those remarkable changes of the deforming pattern with the initial mesh during simulating process[10]. Along with the forming process, the initial mesh may be distorted seriously, and if continuously taking it as the reference configuration, it will cause the insufficient in analysis precision or even lead the simulation to breaking. Therefore, the interference depth of remesh criteria was just set to 0.01 mm for guaranteeing the continuity and the precision of the simulation.
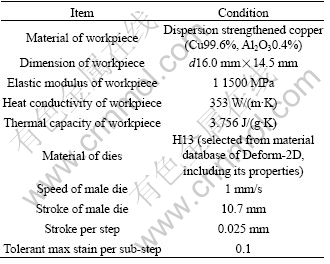
Considering the changes of temperature, the simulation was carried on by coupling with the calculation of the heat transfer in order to inspect temperature changing during the forming process. The initial temperature of the stock and the preheat temperature of dies were set as 300 ℃ and 200 ℃, respectively. The coefficient of heat transfer between the workpiece and dies was taken as 0.1[5]. The relation of friction between the workpiece and dies follows the model of constant friction factor[11]: F=fk, where F is the friction force, f is the friction factor, and k is the shear yield stress of the material. In this study, f was taken as 0.1, 0.4 and 0.7, respectively. Other parameters are shown in Table 1.
Table 1 Conditions for numerical simulation of upsetting- extruding
The constitutive equation of DSC adopted in the simulation is[12]:  where A= 776.646 4, n=-0.075 1, m=0.03, b=0.001 7, and T is the thermodynamic temperature.
3 Results analysis
3.1 Effect of friction factor
3.1.1 Friction factor of female die
Fig.3 shows the flow nets of the work nose part in the last step of simulation, in which friction factor are taken as 0.1, 0.4, and 0.7, respectively.

Fig.3 Effect of different friction factors on metal flow in work nose part: (a) f=0.1; (b) f=0.4; (c) f=0.7
When the friction factor of the workpiece and dies is 0.1, the flow speed of the surface layer of the work nose part is far more than that of the central part, therefore, it first reaches the bottom of the female die, and then continues to flow to the centre till the space has been filled up. When the forming process finishes, it can be seen from Fig.3(a) that there is a serious fold in the tip of the work nose part. Fig.3(b) shows that, if the friction factor is increased to 0.4, the difference of the metal flow speed between the surface layer and the central part of the work piece will decrease much, i.e. the metal flows quite evenly. Under this condition, there is no fold in the tip, but it has left a space at the bottom of the female die.As the friction factor is increased to 0.7, the bottom of the female die has approximately been filled up, which is shown in Fig.3(c), however, the surface layer has been distorted seriously due to the restraint of large frictional resistance.
This non-uniformity of deformation has caused non-uniform distribution of the equivalent stress, which can be found in Fig.4. Fig.4(a) shows the equivalent stress distribution of the last step of the simulation under the friction factor of 0.7, and it indicates that there is a rather big low-stress zone in central part. Fig.4(b) shows the curve of the equivalent stress distribution on x-x section in Fig.4(a). The lowest value in the curve is 36.5 MPa, and values of the left and the right peaks are 255.5 and 251.0 MPa, respectively; and that of the left and the right ends are 159.3 and 131.0 MPa, respectively; its gradient is rather big. Thus, it is obvious that the equivalent stress on this section is very non-uniform.
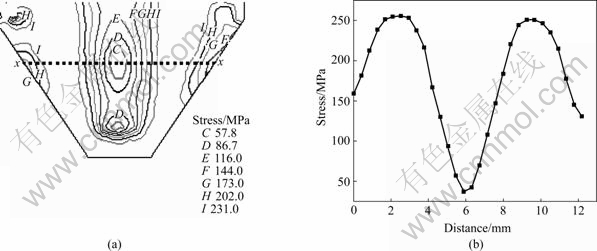
Fig.4 Equivalent stress distribution in work nose part when f=0.7: (a) Equivalent stress distribution; (b) Equivalent stress distribution on x-x section
Besides, as shown in Fig.4(a), the equivalent stress distribution in the surface layer of the work nose part is also non-uniform. For example, the lowest value in the upper-half right part is below 144.0 MPa, while that in the lower-half right part is above 231.0 MPa. Therefore, the surface of the work nose part is easy to sprout cracks during the forming process for the relative low plasticity of DSC material[13-14].
3.1.2 Friction factor of male die
Fig.5 shows flow nets of the last step of simulations in the fit-up hole part, in which friction factors are taken as 0.1, 0.4, and 0.7, respectively. Fig.6 shows the corresponding equivalent strain distributions in Fig.5.
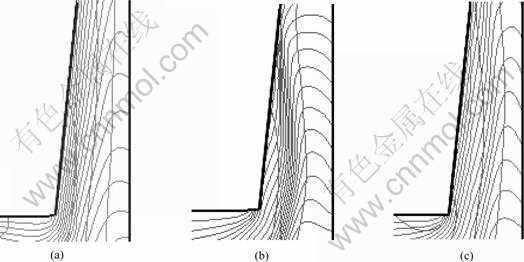
Fig.5 Metal flow in fit-up hole part with different friction factors: (a) f=0.1; (b) f=0.4; (c) f=0.7
From Fig.5 and Fig.6 it can be known that, compared with the side closed to the female die, the metal flow along the side closed to the male die is lagged behind, due to the fact that its mobile route is longer and the friction resistance is bigger. It also can be seen that, the bigger the friction factor of the male die is, the smaller the deformation zone and the deformation degree approaching the male die is.For example, the maximum equivalent strain value nearby the corner of the male die is above 1.86, 1.71-1.86, below 1.57 for f=0.1, 0.4, 0.7, respectively.
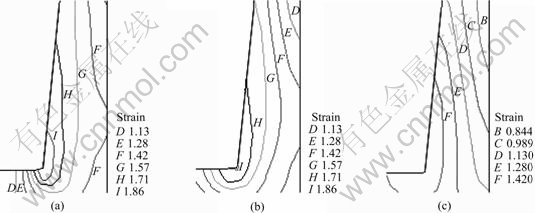
Fig.6 Equivalent strain distribution in fit-up hole part with different friction factors: (a) f=0.1; (b) f=0.4; (c) f=0.7
With a big friction factor, the intense friction force can strongly hinder the metal flow of the surface layer and cause the metal flow non-homogeneous on the cross section. This kind of non-uniformity may cause the inner surface of the fit-up hole non-smooth[15], thus affect its dimension precision. In addition, it will cause additional stress to be existed in the work piece, leading to a decrease of service life of the spot wielding electrode. So that, reducing the friction factor of the male die and keeping the friction factor of the female die slightly bigger than the male die will be advantageous to the uniform flowing on the cross section of the fit-up hole part.The suitable friction factor of the male die is 0.1
3.2 Improved models and result analysis of new simulation
After above simulations, it can be seen that forming of the electrode work nose part is rather difficult, therefore, in this paper, the structure of female die has been improved through adding a scoop channel of 1.5 mm in depth and 4 mm in diameter at the bottom of the female die, in order to let the tip portion of the work nose part where the fold is easily produced to be flown into, and then removes this portion in the following machining. Correspondingly, the stock was increased 0.5 mm in height, and the number of elements of the finite element model was increased to 1 100. The stroke of the male die was adjusted to 11 mm. The improved model is shown in Fig.7. In the new simulation, the friction factor between the female die and the work piece was taken as 0.4, and that of the male die was taken as 0.1, other parameters are the same as before.
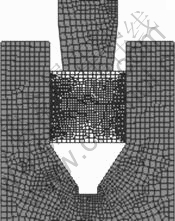
Fig.7 Improved finite element models
3.2.1 Metal flow in electrode work nose part
Fig.8 shows the flow net, the equivalent strain distribution and the equivalent stress distribution of the electrode work nose part in the last step of the simulation.

Fig.8 Metal flow (a), equivalent strain distribution (b) and equivalent stress distribution (c) in electrode work nose part
As shown in Fig.8(a), the metal flows evenly, i.e. the difference of the metal flow speed between the central part and the surface layer is not big. In Fig.8(b), the equivalent strain isolines distribute approximately along the horizontal direction, and the transition of the strain field is gentle for that the difference value between isolines is 0.17, the portion where the fold appeared is located in the scoop channel. Compared with Fig.4(a), it can be seen that the equivalent stress distribution is improved obviously (Fig.8(c)). The area of low stress region is reduced obviously and the equivalent stress distribution of the surface layer is also more homogeneous than the former, where the stress level is at about 236.0 MPa.
3.2.2 Law of metal flow in electrode fit-up hole part
Fig.9 shows the flow nets and the equivalent strain distribution and the equivalent stress distribution of the electrode fit-up hole in the last step of the simulation.
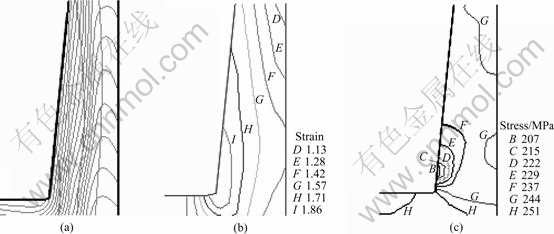
Fig.9 Metal flow (a), equivalent strain distribution (b) and equivalent stress distribution (c) in electrode fit-up hole part
As set before, the friction factor of the male die is bigger than that of the female die, thus it hinders the surface layer metal of the fit-up hole part to flow, but it is advantageous to metal flow of the inner surface layer of the fit-up hole part. Therefore, compared with Fig.5 and Fig.6, in Figs.9(a) and (b), the condition of metal flow and the deformation degree of the metal nearby the male die are close to that of in which friction factors of both the male die and the female die were taken as 0.1, but obviously better than the others. The area of the zone nearby the corner of the male die is bigger than that of Fig.6(a), i.e. the metal flow in this zone has been improved a certain degree just like the before-mentioned expectation in this article.
Fig.9(c) indicates that distribution of the equivalent stress in the range of 215-251 MPa in this part is considerable homogeneous, which is not strongly affected by the non-homogeneous equivalent strain distribution. This must be mainly attributed to the increase of temperature during the forming process, which caused the material softening.
Fig.10 shows the temperature distribution of this part. From it we can know that, by the time of the forming is finished, the temperature of the work piece has risen obviously, values in the range of 358-365 ℃, and the temperature distribution is homogeneous for that the difference value between isolines is only 1 ℃. As shown in Fig.11, the general trend of resistance to deformation in the work piece is reducing gradually along with the increase of temperature. From this phenomenon, it can be seen that increasing a certain temperature will be advantageous to the formation of the fit-up hole part.
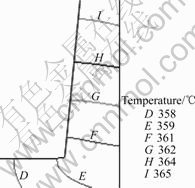
Fig.10 Temperature distribution in fit-up hole part
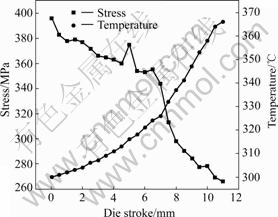
Fig.11 Variations of maximal stress and highest temperature in workpiece
4 Conclusions
1) The early stage of the forming process is basically the forward extrusion process and mainly forms the work nose. By the time of the formation of the work nose is approximately finished, the backward extrusion of the formation of the fit-up hole part starts regularly till the whole forming process is finished.<0}
2) {Dispersion strengthened copper welding electrode is rather difficult to be formed with upsetting- extruding technology, and it needs to add a scoop channel of about 1.5 mm in depth and 4.0 mm in diameter at the bottom of the female die to hold the portion where is easy to appear folds, and then machine it away while the formation is finished.<0}
3)For guaranteeing the uniformity of metal flow in the work piece, the friction factor of the female die should slightly bigger than that of the male die, and is suitable at about 0.4 while the latter should be smaller than 0.1.<0}
4) The rise in temperature is not big during the whole forming process, and the mean value is about 360 ℃ when it ends. At this temperature, the resistance to deformation in the majority of internal region of the workpiece is at an approximately same level.
References
[1] WANG Meng-jun, LOU Yan, ZHANG Hui, PENG Da-shu. A study of aluminium oxide dispersion strengthened copper electrodes [J]. Mining and Metallurgical Engineering, 2000, 20(2): 54-56. (in Chinese)
[2] WANG Meng-jun, YANG Sheng, LIU Xin-yu, ZHANG Li-yong, ZHANG Ya-ming. Dispersion strengthened copper electrode behavior during spot welding of aluminum-coated steel [J]. Transactions of Metal Heat Treatment, 2004, 20(6): 4-7. (in Chinese)
[3] LOU Yan, ZOU Xiang-jun, PENG Da-shu, WANG Meng-jun. Deformation analysis of Cu-Al2O3 materials [J]. Materials for Mechanical Engineering, 2003, 27(9): 24-26. (in Chinese)
[4] WANG Meng-jun, ZHANG Li-yong, LIU Xin-yu. Study on WC dispersion-strengthened copper [J]. Rare Metals, 2004, 23(2): 120-125.
[5] LOU Yan, PENG Da-shu, WANG Meng-jun. A numerical analysis of the aluminum oxide dispersion strengthened copper press-extrution process [J]. Metal Forming Technology, 2001, 19(4): 21-27. (in Chinese)
[6] LIU Xiao-bo, TAN Jian-ping, YI You-ping. Stress field analysis of extra-height forging die using finite element method [J]. Journal of Central South University of Technology, 1999, 6(1): 59-62.
[7] LIU Lang-fei, PENG Da-shu, JIN Xiang-yun. FEM simulation of extrusion of 3003 alloy tubes [J]. Trans Nonferrous Met Soc China, 2000, 10(5): 656-659.
[8] LIU Fang, SHAN De-bin, LI Yan. Experimental study and numerical simulation of isothermal closed die forging for aluminium alloy rotor [J]. Trans Nonferrous Met Soc China, 2005, 15(S2): 136-141.
[9] MORI K, OSAKADA K. Analysis of the forming process of sintered powder metals by a rigid-plastic finite-element method [J]. International Journal of Mechanical Sciences, 1987, 29(4): 229-238.
[10] THOMAS O P. Remeshing in analysis of large plastic deformations [J]. Computers & Structures, 1998, 67(4): 279-288.
[11] WANG Da-nian. The Principle of Metal Plastic Forming (recension) [M]. Beijing: China Machine Press, 1986. (in Chinese)
[12] LOU Yan, WANG Meng-jun, PENG Da-shu. Constitutive equation for hot deformation of aluminum oxide dispersion strengthened copper [J]. Journal of Central South University of Technology: Natural Science, 2000, 31(2): 167-169. (in Chinese)
[13] CHENG Jian-yi, WANG Ming-pu, LI Zhou, WANG Yan-hui, XIAO Cong-wen, HONG Bin. Fabrication and properties of low oxygen grade Al2O3 dispersion strengthened copper alloy [J]. Trans Nonferrous Met Soc China, 2004, 14(1): 121-126.
[14] ZHU Jian-hua, LIU Lei, SHEN Bin, HU Wen-bin. Mechanical properties of Cu/SiCp composites fabricated by composite electroforming [J]. Materials Letters, 2007, 61(13): 2804-2809.
[15] LI Hu-xing. Friction and Lubrication in Shaping Process [M]. Beijing: Metallurgical Industry Press, 1993. (in Chinese)
Corresponding author: WANG Meng-jun; Tel: +86-731-8836408; E-mail: wmj1965@yahoo.com.cn
(Edited by YANG Hua)