Press cutting of thin-walled round pipe for producing curvilinear end
来源期刊:中南大学学报(英文版)2012年第2期
论文作者:温彤 陈霞
文章页码:304 - 311
Key words:pipe; press cutting; vector analysis; finite element method
Abstract:
In order to obtain a basic understanding of the unwanted distortions in the pipe wall during the press cutting process, the deformation of a thin-walled round pipe to form a curvilinear end was numerically and experimentally studied. Vector analysis was used to study the relationship between the punch shape and the collapse of the cut-end. Stamping experiments on AISI 1020 steel pipe were conducted using different angles α and β defining the shape of the punch. The elasto-plastic finite element method that allows consideration of a ductile fracture was also employed to study the process. The results show that the deformation of the pipe end after press cutting is influenced mostly by the shape of the punch. A satisfactory quality of the curvilinear end of the pipe can be obtained if the appropriate geometric parameters of the punch are chosen. The pipe-wall collapse in the upper part of the section is decreased when α and β increase. The recommended values for α and β lie within 30°-50°. The hole on the underside of the punch has less influence on the quality of the cut-end, and the wall distortion and the generation of burr on the cut-end can be satisfactorily simulated using the fracture criterion of Brozzo or the normalized criterion of Cockcroft and Latham.
J. Cent. South Univ. (2012) 19: 304-311
DOI: 10.1007/s11771-012-1005-6![]()
WEN Tong(温彤), CHEN Xia(陈霞)
College of Materials Science and Engineering, Chongqing University, Chongqing 400044, China
? Central South University Press and Springer-Verlag Berlin Heidelberg 2012
Abstract: In order to obtain a basic understanding of the unwanted distortions in the pipe wall during the press cutting process, the deformation of a thin-walled round pipe to form a curvilinear end was numerically and experimentally studied. Vector analysis was used to study the relationship between the punch shape and the collapse of the cut-end. Stamping experiments on AISI 1020 steel pipe were conducted using different angles α and β defining the shape of the punch. The elasto-plastic finite element method that allows consideration of a ductile fracture was also employed to study the process. The results show that the deformation of the pipe end after press cutting is influenced mostly by the shape of the punch. A satisfactory quality of the curvilinear end of the pipe can be obtained if the appropriate geometric parameters of the punch are chosen. The pipe-wall collapse in the upper part of the section is decreased when α and β increase. The recommended values for α and β lie within 30°-50°. The hole on the underside of the punch has less influence on the quality of the cut-end, and the wall distortion and the generation of burr on the cut-end can be satisfactorily simulated using the fracture criterion of Brozzo or the normalized criterion of Cockcroft and Latham.
Key words: pipe; press cutting; vector analysis; finite element method
1 Introduction
Plastic forming of metal has the characteristics of high efficiency, high reproducibility and low energy consumption, which are suitable especially for massive production. However, it is difficult to directly apply the traditional stamping technology of sheet metal to the forming of pipes, because a collapse or a tear of the pipe wall, which leads to a poor quality of the final product, usually occurs during the single-stage stamping process due to the hollow shape of the pipe. Over the decades, a number of research and development studies have been conducted on plastic forming of pipe, e.g., pipe bending, bulging and inversion [1-3]. WEN [4] summarized the stamping technologies for commonly used thin-walled pipes. GOODARZI et al [5] studied the procedure of tube shear bending using an elasto-plastic 3D FEM to analyze the forming process.
Figure 1 shows a typical pipe joint widely used in the manufacturing of bicycles, motorcycles and furniture. The joint is made by cutting a thin-walled round pipe, forming a curvilinear or arc-shaped end, and then grafting the end with another pipe by welding. Machining, such as circular milling, can guarantee the quality of the shape of the pipe end, but the efficiency is low and the cost is high. Press cutting can meet the demands of higher efficiency and lower cost in the
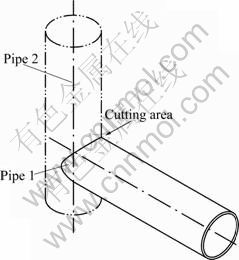
Fig. 1 A typical pipe joint
production of such tube ends. However, this technology requires additional attention to avoid defects in the section.
Theoretically, the press cutting of a pipe is a complex, non-linear physical process that involves large plastic deformation and fracture of the material. KASUGA et al [6] studied the flat deformation in the press cutting of a square pipe and discussed the effects of the cutting parameters, such as the top-angle of the punch, the wall thickness, the side-length and the material of the pipe on the distortion of the cross-section and the surface inclination of the cut-end relative to the axis. However, researches in the field of pipe stamping are still lacking, and the effects of the key technical parameters, such as the shape of the punch and the shape of the die on the cutting process, are not clear.
In this work, the deformation of a thin-walled round pipe was investigated during the press cutting process for producing a curvilinear end using numerical and experimental methods. The effects of some key geometric parameters, such as the shape of the punch and tool clearance on the cutting force and the quality of the cut-end were examined.
2 Press cutting technology of thin-walled round pipes for producing curvilinear ends
Figure 2 shows a typical press cutting process of a pipe used to produce a curvilinear end. The punch is a column with a sharpened head used to pierce through the pipe wall and complete the cutting (see Fig. 3). The diameter D of the punch is equal to that of the other pipe to be welded with the pipe being cut. The die consists of two parts, the upper part and the lower part, which tightly grasp the pipe before cutting.
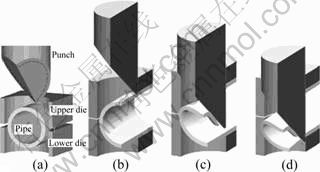
Fig. 2 Cutting process of round pipe to form curvilinear end: (a) Before; (b) Start; (c) In process; (d) After
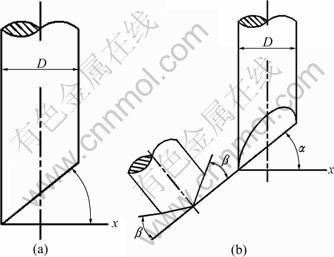
Fig. 3 Geometry of punch for cutting curvilinear pipe end: (a) Type A; (b) Type B
The punch is the key in accomplishing pipe cutting and has a great influence on the final quality. In Fig. 3, the type A punch is made by cutting a column into a bevel, and the type B punch is made by cutting a column into two intersectant bevels. The column surface, together with the area outside the dashed line on the bottom- surface of the punch, as shown in Fig. 2(a), constitutes the cutting blade, namely, the working area of the punch. During the cutting process, the column surface comes in close contact against the pipe wall and slides downwards. In Fig. 3(a), the angle α is the intersecting angle between the bevel and the x-axis. In Fig. 3(b), α is the intersecting angle of the crossing line of the two intersectant bevels and the x-axis, and β represents the intersecting angle of the two intersectant bevels. The shape of the punch is determined mostly by the angles α and β, which theoretically are between 0 and 90°.
In Fig. 2, the upper half of the pipe section is cut first by the punch. The sharpened head of the punch penetrates the top wall from outside and then an incision is made. The fracture of the material near the incision is made by the cutting blade of the punch. The upper and the lower dies do not directly participate in the cutting but constrain the distortion of the section. Accomplishing the cutting in this stage relies on the rigidity of the pipe wall. A collapse or a depression of the cut-end towards the pipe axis would occur if the pressure of the punch exceeds the rigidity limits of the pipe wall (see Fig. 4). The incision is gradually enlarged with the downward movement of the punch. Pipe end-cut away from the body to form a chip has been squashed downwards and backwards by the bottom surface of the punch. When the incision extends to both of the lateral sides of the section, the cutting length of the punch taking the material apart reaches the maximum, but the direction of the cutting force is not responsible for the collapse of the wall. From that moment on, the collapse will not be the main defect but the tear of the wall material will be.
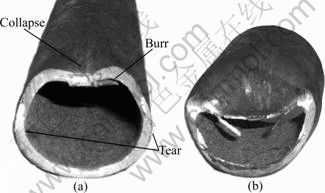
Fig. 4 Cross-sections of thin-walled round pipe after cutting: (a) Collapsed cut-end; (b) Separated chip
The material fracture within the lower section is accomplished by the shear force between the punch blade and the lower die, as in the traditional stamping of flat sheets. The direction of the cutting force points outwards during this stage, and thus, a collapse does not occur because of the support of the lower die. In the meantime, the punch tip touches the bottom from inside and forms a new incision. When this new incision meets the shear areas in both of the lateral sides of the section, the chip separates from the pipe body. If these shearing areas do not meet correctly, tearing of the wall material will occur, resulting in a rough section (Fig. 4).
Compared with the traditional stamping of sheet metal, press cutting of the pipe end is more complex. During the process, elastic and plastic deformations of the material are combined with ductile fracture. At the same time, the location of the shear and the thickness continue to change with the movement of the punch. There are two kinds of fracture modes of the pipe material: the facture mode based on the shear force leading to a smooth breakage surface, and the fracture mode based on the tensile force leading to a rough breakage surface.
3 Vector analysis on effect of punch geometric parameters on pipe-wall deformation
The collapse happens in the cutting of upper-half section of the pipe wall, and the subsequent welding process and the external appearance of the pipe joint are affected mostly by such a defect. In this work, the difference concerning the pipe-wall thickness is ignored, and only the outer-surface diameter of the pipe, d, is concerned. The effects of friction on the deformation are also considered to be negligible.
The coordinate system for the analysis is constructed, as shown in Fig. 5, and the geometric relationship of the punch and the pipe is given in Fig. 6. The punch moves downwards along its axis during the cutting process. WEN and WANG [7] discussed the cutting force when the punch is perpendicular to the pipe axis. And now, a more general condition in which the punch axis rotates by an angle θ from the vertical is considered. To avoid the collision of the pipe and the punch, the angle α must be larger than θ, which means α′=α-θ>0°. If θ=0°, the punch axis is perpendicular to the pipe axis.
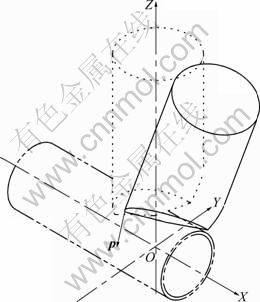
Fig. 5 Coordinates for analysis of pipe end cutting
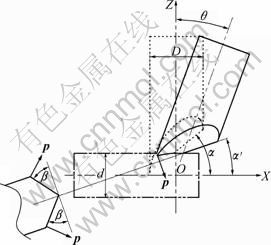
Fig. 6 Geometric relationship of punch and pipe in cutting process
Assuming p is the instantaneous cutting force that the punch exerts on the pipe wall, which changes with the position depending on where the punch contacts and cuts the pipe wall. There are two p symmetrically located in and perpendicular to the bottom-surface of the punch (Fig. 6). The projection of the vector p to the pipe section (the ZOY plane in Fig. 7) is pOYZ. From the geometric relationship, we find
![]() (1)
(1)
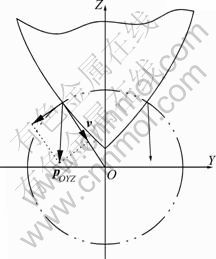
Fig. 7 Cutting force in radial direction of pipe section at height Z
The direction of pOYZ is crucial to the deformation of the pipe wall. There will be no collapse of the pipe wall if pOYZ points out of the circle of the pipe section. Assuming v is the directional vector along the radius of the pipe section, as shown in Fig. 7, then [7]
![]() (2)
(2)
where a is the height of the point on the pipe wall on the ZOY plane to which the force pOYZ is exerted; v represents the direction to which the pipe wall collapses predominantly. To decrease the level of the collapse, the component of pOYZ along v should be as small as possible. Consequently, the angle between pOYZ and v should be as large as possible, that is to say, the dot product k between pOYZ and v should be minimized:
![]() (3)
(3)
From Eq. (3), we find that
1) k decreases with the increase of α, which means that the collapse of pipe wall would be less if α is larger. If α becomes too large, however, the punch will be weak, and at the same time, the cutting length increases;
2) The effect of β on pipe-wall deformation is complex. When cutting both of the lateral sides of the pipe section, or a is nearly zero, k=|p|sinβ, which means increasing β will worsen the collapse. In practice, however, most of the collapse occurs near the top of the section at a≈d/2, where the cutting begins. Then, k= |p|cos(α-β)cosβ, which means the collapse is less when β is larger. Therefore, in Fig. 3, punch type B outperforms punch type A in cutting.
In general, the punch becomes sharper as α and β increase and it becomes easier to pierce the top of the pipe wall, causing less deformation in the pipe section. Nevertheless, α and β cannot be too large without sacrificing the punch life. Thus, the wall collapse at the top of the pipe section is difficult to avoid.
4 Experimental and numerical studies
4.1 Experimental conditions
The experiment was conducted on a crank press with a 40 t capacity. The cutting set-up is shown in Fig. 8. The punches with different shapes and with a common diameter of 30 mm, as listed in Table 1, were used. More than five pieces of pipe were cut with each punch. The diameter d and the thickness t of the pipe were 25 mm and 2 mm, respectively. The material of the pipe is AISI 1020.
4.2 FEM model
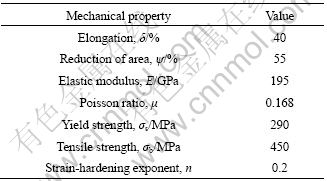
The commercial FEM program Deform-3D? was employed in this work. The punch and the die are assumed to be rigid. The diameter D of the punch, the outer diameter d and the thickness t of the pipe are identical to those used in the experiment. AISI 1020 steel is considered to be elasto-plastic. Its mechanical parameters are listed in Table 2.
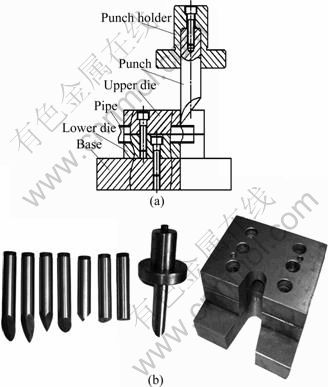
Fig. 8 Experimental set-up for pipe press cutting: (a) Sketch of pipe cutting setup; (b) Punch samples and die
Table 1 Geometric parameters of punches
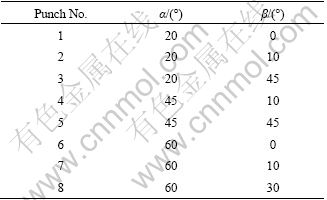
Table 2 Mechanical properties of AISI 1020 steel
As HUSSON et al [8] pointed out in their studies, plastic deformation and ductile fracture must be simultaneously taken into account in the numerical simulation of the material separation during stamping, and for this reason, the selection of fracture criteria and the relevant parameters is crucial. The fracture criteria of Freudenthal, Cockcroft and Latham, McClintock, Ayada, Rice and Tracey and Brozzo are regularly used, most of which are based on stress or strain, using valve control and ignoring the influence of temperature or the strain ratio [9]. These criteria were compared by conducting tensile testing of AISI 1020 pipes at room temperature and by FEM [9]. The threshold values for each criterion are listed in Table 3.
Table 3 Ductile fracture threshold values of AISI 1020 steel
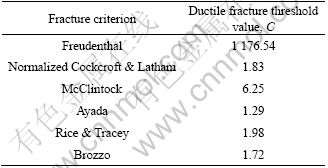
The pipe was meshed into about 75 000 tetrahedron elements. An element elimination method was used to simulate the rupture of the material, that is, the relevant element was removed when the fracture constant reached the threshold value.
Figure 9 shows the theoretical cut sections of a pipe simulated using the above six fracture criteria and with the punch angles of α=β=45° and the clearance δ between the punch and the die is 5% of the wall thickness t. The wall deformation and the formation of burr on the cut-end simulated under the criterion of either Brozzo or Normalized Cockcroft and Latham were found to agree with the experimental results much better than those under other criteria. Therefore, these two criteria were used in the subsequent investigation.
5 Results and discussion
5.1 Effect of angles α and β on collapse
The collapse of a pipe end after cutting can be characterized by the maximum depth h of the top wall depression towards the axis, as shown in Fig. 10.
Figures 11 (a)-(h) show the experimental and numerical results of pipe cutting, performed with the different punches listed in Table 1. In each group, the left pictures are the experimental results and the right pictures are the FEM simulation results. Figure 12 shows the dependence of h on the angles α and β. Generally, h decreases with the increase of α and β, coinciding with the above analysis. Figure 13 shows the theoretical maximum cutting force Fmax with different punches. The experimental and the numerical results are in agreement with each other. It is also found that:
1) For the same α, Fmax is smaller when β≠0? than that when β=0?;
2) Fmax decreases when α increases, but Fmax fluctuates when α is within 45°-55?.
With the increase of α and β, the punch becomes weaker and the cutting length increases. The recommended values of α and β are between 30° and 50?, respectively.
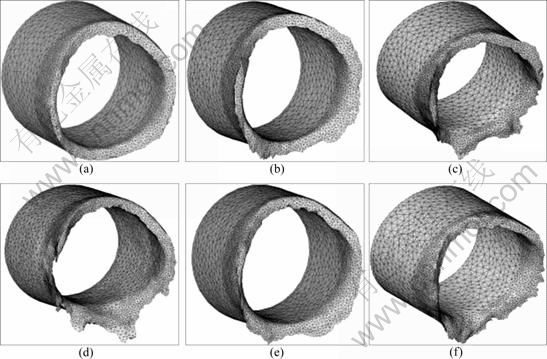
Fig. 9 Cut-sections simulated under different fracture criteria: (a) Normalized Cockcroft & Latham; (b) Brozzo; (c) McClintock; (d) Rice & Tracey; (e) Freudenthal; (f) Ayada
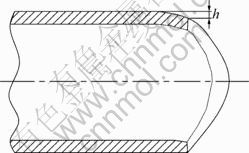
Fig. 10 Depth of pipe-wall depression after cutting
5.2 Effects of clearance between punch and die on pipe-wall collapse
The fracture modes during the cutting process are different for the upper-half section and the lower-half section of the pipe, and the clearance δ between the punch and the die affects only the quality of the lower-half section and has no effect on the wall collapse in the upper-half section.
Figure 14 presents the simulated results on the cutting with different δ when α=β=45?. Figures 15 and 16 show the relationships of h versus δ and Fmax versus δ, respectively, using the same punch. Fmax increases either δ is too large or too small. The recommended value for δ is 5% to 15% of the pipe-wall thickness t.
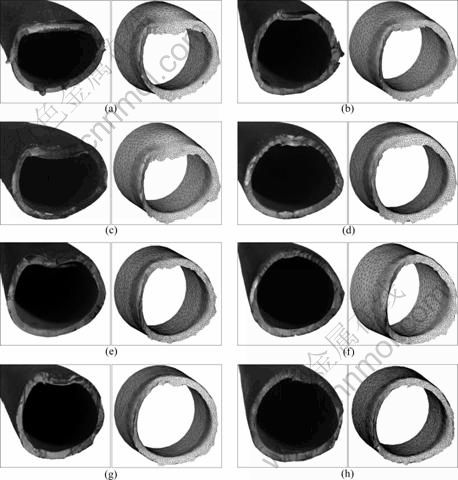
Fig. 11 Experimental and numerical results of pipe cutting using different punches: (a) α=20°, β=0°; (b) α=60°, β=0°; (c) α=20°, β=10°; (d) α=20°, β=45°; (e) α=45°, β=10°; (f) α=45°, β=45°; (g) α=60°, β=10°; (h) α=60°, β=30°

Fig. 12 Experimental and FEM simulation results of wall collapse with different punches: (a) Experiment; (b) FEM
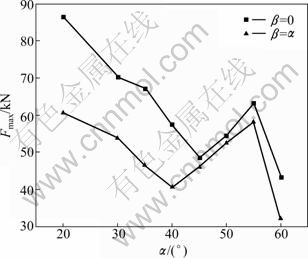
Fig. 13 Theoretical maximum cutting force Fmax with different punches
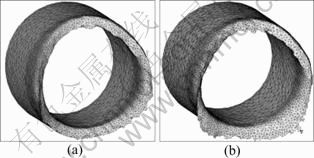
Fig. 14 Cut-end with different clearance values between punch and die: (a) δ=5% t; (b) δ=30% t
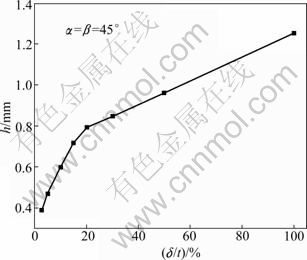
Fig. 15 Wall collapse h vs clearance δ
5.3 Effects of center hole of hollow punch on pipe- wall deformation
The central area of the punch bottom, i.e., the bottom-surface of the punch within the dashed line in Fig. 2, does not directly participate in cutting. For this reason, a hollow punch is sometimes utilized to minimize the refined machining work of the punch. Figure 17 presents the FEM results on the deformation of a pipe cut with different hollow punches. The diameter D of the punch is 30 mm, and the outer-diameter d of the pipe is 25 mm. Figure 18 shows the relationship between the hole diameter d1 of the hollow punch and Fmax when α=β=45?. There is no obvious difference in the distortion of the pipe wall whether there is a hole or not. However, Fmax and the shape of the chips are different under these two conditions. Considering the cutting force, punch durability and stiffness, the recommended value for d1 is about 20%-50% of the punch diameter D.
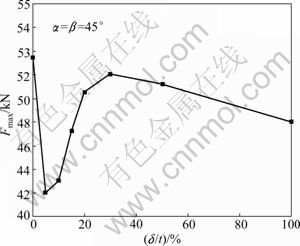
Fig. 16 Maximum cutting force Fmax vs clearance δ
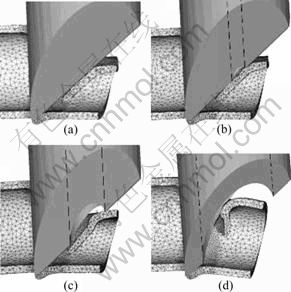
Fig. 17 Deformation of pipe while being cut with different diameters of punch hole: (a) d1=0 mm; (b) d1=4 mm; (c) d1= 10 mm; (d) d1=20 mm
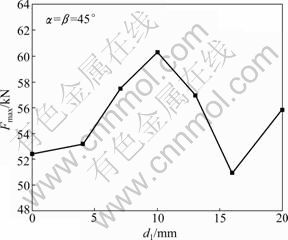
Fig.18 Relationship between maximum cutting force Fmax and d1
6 Conclusions
1) The deformation of the pipe wall during press cutting is different from that of the sheet metal during stamping. A number of factors in the process, including the shapes of the punch and the die, the holding force and the positioning conditions, have influence on the cutting quality. Among these factors, the punch shape has the greatest influence. A good cut-section can be obtained if the proper technical parameters are chosen.
2) The amount of collapse of the pipe wall near the top of the cut-section and the maximum cutting force Fmax will both decrease when the angles α and β of the punch are increased. Considering the cutting quality and durability of the punch, the recommended values for α and β are 30°-50°. It is also recommended that the clearance δ between the punch and the die is 5%-15% of the thickness t.
3) The hole under the punch has less influence on the quality of the cut-section.
4) The wall distortion and the generation of burr on the cut-section can be accurately simulated using the fracture criterion of Brozzo or the normalized criterion of Cockcroft and Latham.
References
[1] Alves M L, Almeida B P P, Rosa P A R, Martins P A F. End forming of thin-walled tubes [J]. Journal of Material Processing Technology, 2006, 177: 183-187.
[2] Zhao G Y, Liu Y L, Yang H, Lu C H, Gu R J. Three- dimensional finite-elements modeling and simulation of rotary-draw bending process for thin-walled rectangular tube [J]. Materials Science and Engineering A, 2009, 499: 257-261.
[3] Sun Zhi-chao, Yang He. Free deformation mechanism and change of forming mode in tube inversion under conical die [J]. Journal of Material Processing Technology, 2006, 177: 171-174.
[4] WEN Tong. Stamping technology of pipe [J]. Metal forming Technology, 1998, 2(16): 33-35. (in Chinese)
[5] GOODARZI M, KUBOKI T, MURATA M. Deformation analysis for the shear bending process of circular tubes [J]. Journal of Material Processing Technology, 2005, 162/163: 492-497.
[6] KASUGA Y, MACHIDA T, KATO N. Effect of cutting conditions on press cutting of a square pipe [J]. Journal of Material Processing Technology, 2003, 143: 716-722.
[7] WEN Tong, WANG Xiao-pei. Geometric parameters analysis of the punch in stamping die of thin wall pipe with arc shaped end [J]. Journal of Chongqing University: Natural Science Edition, 1999, 1(22): 13-17. (in Chinese)
[8] HUSSON C, CORREIA J P M, DARIDON L, AHZI S. Finite elements simulations of thin copper sheets blanking: Study of blanking parameters on sheared edge quality [J]. Journal of Material Processing Technology, 2008, 199: 74-83.
[9] PU Shi-hong, WEN Tong, WU Wei. Theoretical and experimental research on choosing criterion and critical value of ductile fracture [J]. Hot Working Technology, 2009, 3(38): 18-21. (in Chinese)
(Edited by HE Yun-bin)
Foundation item: Project(CDJZR10110029) supported by the Fundamental Research Funds for the Central Universities in China
Received date: 2011-02-09; Accepted date: 2011-06-15
Corresponding author: WEN Tong, PhD; Tel: +86-23-65112879; E-mail: wentong@cqu.edu.cn

