
Semisolid joining of aluminum A356 alloy by
partial remelting and mechanical stirring
S. M. J. ALVANI1, H. AASHURI1, A. KOKABI1, R. BEYGI1
Materials Science and Engineering Department, Sharif University of Technology, Azadi Ave., Tehran, Iran
Received 13 May 2010; accepted 25 June 2010
Abstract: A method to reach the globular weld structure of A356 aluminum alloy using stirring the localized semisolid zone during butt-joining is developed. Since the heat conductivity of this alloy is very high, the accurate controlling of temperature during joining must be considered. A gas heating system was used to heat up the nitrogen gas up to the required temperature. A dried and free oxygen gas was prepared when a stream of nitrogen gas could pass closely around a hot element. Hot and pure nitrogen gas flow through a precise ceramic nozzle was used to create a localized semisolid pool. At this stage a fine stirrer was introduced into the weld seam in order to mix the two sides into a single uniform joint. Substrates were moved in direction of joint line by a small trolley to avoid the deviation of nozzle from the joint line and its distance and angle from the substrate. A fixture system was used to hold two substrates together on the trolley. A narrow hot plate was located on the trolley to heat up the joint line due to high heat conductivity of aluminum. Effect of gas temperature was investigated on the microstructure and mechanical properties of weld seam. Results showed that increase in temperature promoted the final welding properties, and also at liquid fractions less than 50% joining was not fully practical. The best mechanical properties were achieved with liquid fraction of about 70%.
Key words: semisolid joining; A356; localized stirring; shear punch; semi-solid holding; thermal treatment
1 Introduction
Aluminium based alloys can be welded by conventional fusion welding. The tungsten inert-gas welding process and friction stir welding process have been ordinarily used to weld aluminium alloys. The key to high strength welds in welding of alloys resides ultimately in metallurgical aspects of the welded region. For processes involving fusion of the base metal, liquid metal solidifies as heat is extracted via the weld pool walls. Also, the morphology of the growing solid/liquid interface is typically dendritic and the natural progression of solidification often leads to internal structural defects, such as entrained non-metallic particles or shrinkage porosities, which combine to yield a weld metal of relatively poor mechanical properties inferior to casting microstructures[1].
Friction stir welding (FSW) has also been introduced as one of the most significant achievements in the field of joining of aluminum alloys in the recent years. Yet, the rapid development and the speedy introduction of FSW to the industry in less than 5 years after its invention as well as the confidentiality surrounding its research did not allow for a complete characterization of the process. Indeed, FSW surpasses fusion welding processes by the produced weld quality represented in the lack of solidification cracks, liquation and porosity[2]. However, in the recent few years, there have been some reports regarding some negative influence on its strength[3].
In this work, a method has been used to stir the weld pool in a semi-solid state while in FSW stirring is carried out in a fully solid state.
Semisolid joining is a relatively new method that is started since 2002 and particularly for aluminium alloys semisolid joining is not studied in details very much. Various semi-solid processes have been demonstrated to achieve the globular microstructure. In a partial- remelting condition, dendrites tend to transform into a rosettes and/or spherical particles if the alloy is stirred vigorously[4].
On the other hand, WANG[5] have recently shown another alternative to achieve the globular structure is semisolid thermal transformation, and it relies on the ripening of a more or less dendritic structure when it is heated and held in the semisolid temperature range for a certain period of time. Semisolid joining of alloys offers the potential of avoiding many of the problems mentioned above, since the solidification and heat transfer processes are basically different from those of typical welding. These studies have so far been carried out on Sn-Pb alloys[5]. MENDEZ et al[6] used Sn-5%Pb (mass fraction) slurries as filler and applied it on the joint groove to join bars of Sn-15%Pb model alloy. The same model alloy was used by SHALCHI et al[7], but mechanical stirrer was applied to achieve the globular microstructure of the joint. NARIMANNEZHAD et al[8] used mechanical stirrer on the seam weld to joint bars of zinc AG40A die cast alloy.
2 Experimental
2.1 Gas preparation and heating
The schematic diagram of the gas preparation system is shown in Fig.1. In the experiments, nitrogen gas passed through a flow meter, moisture trap prior to the final heating. The moisture trap consisting of silica gel was used for the removal of trace moisture in the gas. The oxygen-removal furnace was filled with the copper turnings and operated at 650 ��C. In this method, based on the thermodynamic estimation, the oxygen partial pressure of nitrogen gas could be reduced to 10-6 Pa.
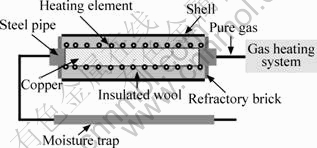
Fig.1 Schematic diagram of gas preparation system
Nitrogen gas has harmful effect on the aluminum melt, when the aluminum nitride is formed, therefore it is not recommended to be used for the protection. On the other hand, it is reported that[9] aluminum nitride can not be formed bellow 700 ��C, even for a long time application.
A gas heating system used in this work was the same as reported in the previous work[8]. In this apparatus gas temperature could increase up to 1 200 ��C. A thyristor drive unit of ��1 ��C accuracy was used to control the temperature in the experiments. The gas nozzle was also heated up by a supplementary element avoiding gas heat lost. A hot plate or bar was located on the trolley to heat up whole substrates or around the joint line due to high heat conductivity of aluminum.
2.2 Welding procedure
A356 as-cast alloy samples (10 mm��20 mm��80mm) were prepared for square butt welding tests. The contents of alloying elements in sample satisfied the ASM[10]. A hot plate was used under the samples to compensate the heat loss. The hot plate was 2 cm wide and 10 cm long, which only heated the weld seam. A thyristor drive unit of ��1 ��C accuracy was applied to control the temperature of weld seam in the experiments.
Each pairs of the plates were fixed on the hot plate by sample holders (equipped with nonconducting heat material) provided in an automatic movable carriage under the stationary gas nozzle with speed of 3 cm/min. The heating system was set at desired temperature and it was also controlled by a thyristor drive unit of ��1 ��C accuracy. To decrease the fluctuation of the temperature, the system was held for 2 h with a desired gas flow rate. Nitrogen gas flow through a precise ceramic nozzle was used as an inert atmosphere to create a localized semisolid pool. The gas flow rate for semisolid welding was 5.5 dm3/min.
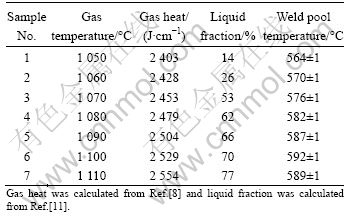
The gas nozzle with 2 mm in diameter, 30�� in vertical angle and 2 mm in distance from the weld samples provided best heat intensity as well as the welding facilities in the tests. To start welding, as the weld seam was heated up, the mushy state of the alloy was realized by instability of the surface that was distinguished by tip of a fine stirrer tool. At this stage the stirrer (titanium nitride coated drill with 1.5 mm in diameter) was introduced into the weld seam in order to mix the two sides into a single uniform joint. Temperature of the weld pool was measured occasionally during welding process with soaking a thermocouple into the weld pool. It was seen during the experiments that the process is very sensitive to clamping and alignment of the joint, since stirring action could displace the substrates. Pairs of as-cast plates were joined at different temperatures in semi-solid state. Welding parameters are shown in Table 1.
Table 1 Semi-solid stir welding parameters
2.3 Metallography and image analysis
Transverse cross sections were cut from the weld, polished and then electroetched for 20 s with 20 A direct current. Electroetching was done with a solution of 7.5 mL HBF4 and 75 mL hydrogen peroxide in 217 mL water ionization. The samples were also macroetched with a solution of 15 mL HF, 15 mL HNO3 and 25 mL HCl in 25 mL H2O for 5 s. The structural details were imaged by optical and scanning electron microscopy (SEM, Vega Tescan). Microanalysis was also carried out by EDS method. Selected weld microstructures were analyzed with image analyzer software (Clemex).
2.4 Mechanical tests
Brinell hardness tests were accomplished on transverse sections. Multiple measurements were taken through 60 mm of the sample cross-section using a load of 306.25 N and a 2.5 mm ball applied for 30 s (Instron Wolpert). Tensile tests were performed on a STM-150 testing machine at room temperature (Santam machine). In accordance with the ASTM E8 standard for tensile tests, specimens were prepared with a diameter of 6 mm and a gauge length of 30 mm.
Shear punch test (SPT) is a small-specimen testing method (SSTM) in which the results are exhibited through the load�Cdisplacement diagrams similar to those acquired from uniaxial tensile test[12]. SPT is based on exerting shear force on a slice of material via a punch with an appropriate diameter. Through this process, the small zone between punch and die experiences shear force. As demonstrated in Ref.[12], shear force can be converted to an equivalent shear stress using ��y,max=(Py,max-F)/��Rt, where R, Py,max, F, t and ��y,max represent punch radius, yield or maximum force in load�Cdisplacement diagram, frictional force, slice thickness, and yield or maximum shear stress, respectively[12]. The equivalent effective tensile stress using ��y,u=cy,max?��y,max, where cy,max is the conversion coefficient for yield or maximum strength[13]. The fracture shear strain in SPT may be calculated through ��f=Df/W, where W, Df and ��f represent clearance between punch and die, punch displacement to fracture and fracture shear strain (shear elongation), respectively[14]. To convert ��f to fracture tensile strength a linear equation (��f=cf?��f) can be used[15]. Shear punch tests have been performed on the different zones of welded specimens. A Hounsfield H10KS tensile machine was used for the shear punch tests. The attachment for shear punch test is shown in Fig.2. The setup used to obtain SPT curves for correlation with tensile tests consists of a flat end punch of 2.99 mm in diameter and a die of 3.01 mm in diameter (W=10 ?m) with a constant cross-head speed of 0.1 mm/min. Test specimens (1 000 ?m in thickness) from each welded plate were tested.
3 Results and discussion
As may be seen from Table 1, there are seven series of samples which were tested under different temperatures of gas. The results of tests showed that, very weak junctions were made when the temperature of gas was less than 1 060 ��C (samples 1 and 2), therefore the results of these two series of samples were disregarded.
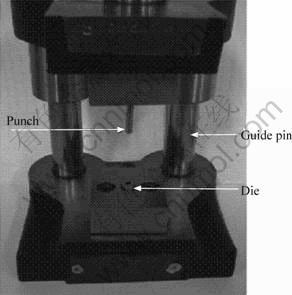
Fig.2 Shear punch used under testing machine
Considering the tensile properties of base metal shown in Table 2 and its SPT results, conversion coefficients for yield strength (cy), ultimate strength (cmax), and elongation (cf) are calculated as 0.909, 1.126 and 0.173, respectively. Fig.3 shows the typical load-displacement curve for weld metal and parameters measuring manner. In order to evaluate the role of the welding parameters, the values of tensile strength, yield stress and elongation in the fully penetrated welds (samples 3-7) were plotted as shown in Fig.4.
Table 2 Tensile properties of as-cast A356 alloy (base metal)

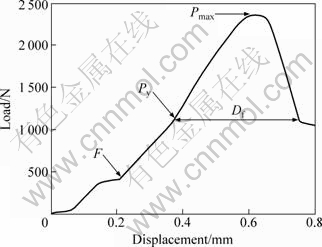
Fig.3 A typical load�Cdisplacement curve for WMZ
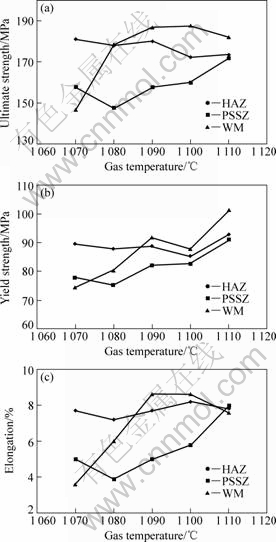
Fig.4 Values of tensile strength, yield stress and elongation in fully penetrated welds (samples 3-7) at different gas temperatures
It can be seen from these plots that elongation, the yield and tensile strength of both weld metal (WM) and partial shear stress zone (PSSZ) increased by increasing the gas temperature up to 1 100 ��C. Not significant variation was seen on the properties of the heat affected zone (HAZ). Above this temperature the yield and ultimate strengths of PSSZ increased whereas for weld metal they were decreased. When the temperature is high, part of WM is melted entirely, therefore a dendritic structure is formed as a result of cooling and solidification(Fig.5).
It can be seen from Fig.6 that hardness values within the partial shear stress zone in all welding conditions were lower than those of the base metal because porosity can be seen only in this area. On the other hand, the degree of porosity decreased by increasing the gas temperature. This can be due to the viscosity of the mushy zone which is decreased and therefore the number of entrapped air is decreased. Results also show that hardness values of WM increased with the increase in gas temperature but it is decreased above 1 100 ��C (Fig.6).
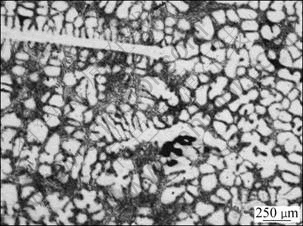
Fig.5 Dendrites created in microstructure of weld metal zone (Sample 7)
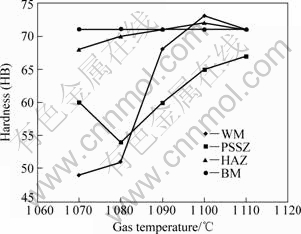
Fig.6 Brinell hardness profiles on transverse sections at different gas temperatures using load of 306.25 N applied for 30 s
As may be seen from Figs.7 and 8, four distinct different zones can be distinguished on the cross section of the semi-solid stir welded specimen; base metal (BM), heat affected zone (HAZ) or coarse dendrite zone (CDZ), partial shear stress zone (PSSZ), and weld metal (WM).
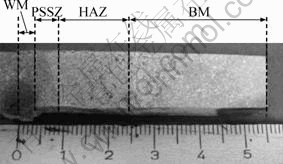
Fig.7 Different zones of semi-solid stir welded specimen
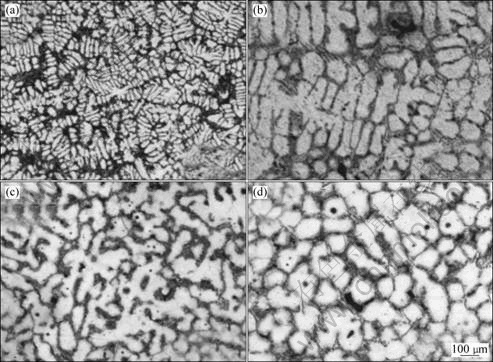
Fig.8 Microstructures in different zones of semi-solid stir welded specimen: (a) Base metal (BM); (b) Heat affected zone (HAZ); (c) Partial shear stress zone (PSSZ); (d) Weld metal (WM)
BM was part of the specimens where its microstructure is not changed due to heating cycles (Fig.8(a)). WM zone is stirred vigorously in a semi-solid state, therefore globular structure is created in this area (Fig.8(d)). Between BM and WM zones, partial remelting can be seen while the area adjacent to the WM has been affected slightly by rotation of the stirrer (PSSZ). In the HAZ, only coarsening of the dendrites can be revealed (Fig.8(c)).
Metallography investigation shows that significant changes take place in different zones. It can be seen in Fig.8(d) that the WMZ has the globular microstructure. The structure of PSSZ is rosette-like (Fig.8(c)), because there are light shear stresses in that zone and the dendrite arms are broken to some degree due to the light stress. Fig.9 exhibits SEM images of WMZ. In this figure, the globular structure of the weld metal can be seen, where A (inside the globule) and B (between the globules) are marked regions for EDS microanalysis. The contents in the globules and thick plates, respectively, are shown in Table 3. The Si-rich thick plates between the globules are clearly revealed in Fig.9(a). Furthermore, Fig.9(b) shows liquid entrapped pool within the primary phase that is solidified with eutectic composition.
Table 3 Microanalysis of different regions within WMZ

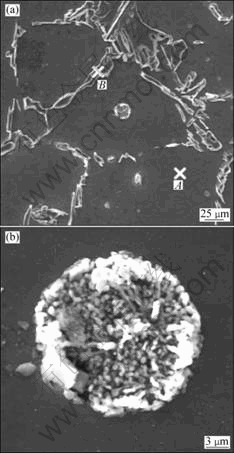
Fig.9 SEM images of weld metal zone (Sample 6): (a) Si-rich thick plates between globules; (b) Eutectic entrapped within primary phase
Fig.10 shows the images of the ruptured surfaces of the alloy (sample 6). In these images, the solid ��(Al) particles, mainly with globular shape, surrounded by the �� phase is a typical characteristic with respect to semi-solid microstructure of A356. The size of the majority ��(Al) particle is about 100-150 ?m.
The results of image analysis for weld metal zone of specimens 3-7 are shown in Fig.11. As may be seen from this figure, the degree of sphericity is increased by increasing the gas temperature. This can be due to the increase of liquid fraction which promotes ripening and degree of spheroidization of the primary particles[16].
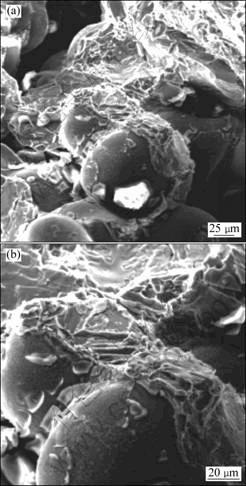
Fig.10 SEM images of fractured surfaces of semi-solid welded specimen (sample 6)
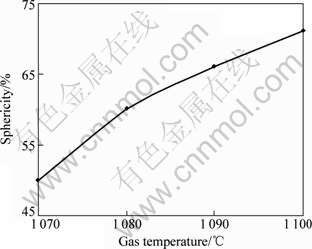
Fig.11 Sphericity for weld metal zone versus gas temperature
Results show that (Table 1), the mechanical properties of the weld zone is improved when liquid fraction of the weld pool is increased, accordingly the best mechanical properties are achieved at about 70% and very poor junctions are created bellow 50% liquid fraction.
4 Conclusions
Semi-solid welding pool was created locally by heating A356 aluminum alloy with nitrogen gas. Protection of the weld pool was performed by nitrogen gas, since temperature of the gas was below 700 ��C. At a lower level than this temperature metal gas reaction did not take place. Globular structure was obtained by inserting a small stirrer in the weld pool. Some porosity due to air entrapped caused by rotation of stirrer in a viscous slurry was detected in the area closed to the weld pool which was reduced by increasing the temperature of gas. Lower strength was achieved when the temperature was high and part of the pool was melted entirely (above liquidus), and dendritic structure was revealed.
Semi-solid stir joining decreases the heat affected area and also welding distortions, since the welding temperature is below the liquidus and temperature difference between the weld pool and the bulk substrate is much smaller than that in common fusion welding.
Acknowledgement
The authors would like to thank the valuable support of the technical staff at the Sharif university, and special thanks are also due to Mr. Alavi and Mr. Mansoori for their technical assistant to this work.
References
[1] MENDEZ P F, RICE C S, BROWN S B. Joining using semisolid metals [J]. Welding Journal, 2002, 81: 181-187.
[2] MISHRA R S, MA Z Y. Friction stir welding and processing [J]. Materials Science and Engineering, 2005, R50: 1-78.
[3] SALEM H G. Friction stirs weld evolution of dynamically recrystallized AA2095 weldments [J]. Scripta Mater, 2003, 49: 1103-1110.
[4] AASHURI H. Globular structure of ZA27 alloy by thermomechanical and semisolid treatment [J]. Mater Sci Eng A, 2005, 391: 77-85.
[5] WANG H, DAVIDSON C J, ST JOHAN D H. Semisolid microstructural evolution of AlSi7Mg during partial remelting [J]. Mater Sci Eng A, 2004, 368: 159-167.
[6] MENDEZ P F, RICE C S, BROWN S B. Joining using semisolid metals [J]. Welding Res, 2002, 9: 181-187.
[7] SHALCHI B, AASHURI H, KOKABI A, ABBASI GHARACHEH M, MOLLA J. Joining metals by combining mechanical stirring and thermomechanical treatment to form a globular weld structure [J]. Solid State Phenomena, 2006, 116/117: 397-401.
[8] NARIMANNEZHAD A, AASHURI H, KOKABI A H, KHOSRAVANI A. Microstructural evolution and mechanical properties of semisolid stir welded zinc AG40A die cast alloy [J]. Journal of Materials Processing Technology, 2009, 209: 4112-4121.
[9] ZHANG Q, REDDY R G. Mechanism of in situ formation of AlN in Al melt using nitrogen gas [J]. Journal of Material Science, 2004, 39: 141-149.
[10] ASM Handbook. Nonferrous alloys and special-purpose materials, Vol. 2 [M]. ASM International, 1992.
[11] FRAGNER W, KAUFMANN H. Differences in Al and Mg new rheocasting [C]//Proceeding of the 8th International Conference on Semisolid Processing. Limassol, Cyprus, 2004.
[12] LEON C A, DREW R A L. Small punch testing for assessing the tensile strength of gradient Al/Ni-SiC composites [J]. Mater Lett, 2002, 56: 812-816.
[13] TOLOCZKO M B, HAMILTON M L, LUCAS G E. Ductility correlations between shear punch and uniaxial tensile test data [J]. J Nucl Mater, 2002, 283/287: 987-991.
[14] GUDURU R K, DARLING K A, KISHORE R, SCATTERGOOD R O, KOCH C C, MURTY K L. Evaluation of mechanical properties using shear-punch testing [J]. Mater Sci Eng A, 2005, 395: 307-314.
[15] GHARACHEH M A, KOKABI A H, DANESHI G H, SHALCHI, SARRAFI R. The influence of the ratio of ��rotational speed/traverse speed�� (��/V) on mechanical properties of AZ31 friction stir welds [J]. Int J Mach Tools Manuf, 2006, 46: 1983-1987.
[16] SUMARTHA Y, de FIGUEREDO A M, FLEMINGS M C. Flow behavior of semi-solid aluminum alloys A356 and A357 [C]//Proceeding of the 5th International Conference on Semisolid Processing of Alloy and Composite. Colorado, USA, 1998: 57-67.
(Edited by YANG Bing)
Corresponding author: S. M. J. ALVANI; Tel: +98-91-32633632; E-mail: mohammad.alvani@yahoo.com
DOI: 10.1016/S1003-6326(09)60376-9