几何参数对高强TA18钛合金管数控弯曲成形质量的影响
来源期刊:中国有色金属学报(英文版)2018年第2期
论文作者:方军 梁闯 鲁世强 王克鲁
文章页码:309 - 318
关键词:高强TA18钛合金管;几何参数;成形质量;有限元模拟;数控弯曲
Key words:high-strength TA18 tube; geometrical parameters; forming quality; finite element simulation; numerical control bending
摘 要:采用有限元模拟方法研究弯曲角度β、相对弯曲半径R/D和管材尺寸(直径D和壁厚t)的变化对高强TA18钛合金管数控弯曲成形质量的影响。结果表明:不同β下壁厚变化率Δt和截面畸变率ΔD的分布非常相似;Δt和ΔD随着R/D的增加而减小,且为了获得合格的弯管件,R/D必须大于2.0;壁厚减薄率Δto随着D或t的增加而略有增大,而壁厚增厚率Δti和ΔD随着D的增加或t的减小而增大;在相同的D/t下,即D和t按比例增加时,Δto和ΔD先减小后增加,而Δti增加。
Abstract: The forming quality of high-strength TA18 titanium alloy tube during numerical control bending in changing bending angle β, relative bending radius R/D and tube sizes such as diameter D and wall thickness t was clarified by finite element simulation. The results show that the distribution of wall thickness change ratio Δt and cross section deformation ratio ΔD are very similar under different β; the Δt and ΔD decrease with the increase of R/D, and to obtain the qualified bent tube, the R/D must be greater than 2.0; the wall thinning ratio Δto slightly increases with larger D and t, while the wall thickening ratio Δti and ΔD increase with the larger D and smaller t; the Δto and ΔD firstly decrease and then increase, while the Δti increases, for the same D/t with the increase of D and t.
Trans. Nonferrous Met. Soc. China 28(2018) 309-318
Jun FANG1,2, Chuang LIANG2, Shi-qiang LU2, Ke-lu WANG2
1. Jiangxi Key Laboratory of Surface Engineering, Jiangxi Science and Technology Normal University, Nanchang 330038, China;
2. National Defense Key Discipline Laboratory of Light Alloy Processing Science and Technology, Nanchang Hangkong University, Nanchang 330063, China
Received 19 November 2016; accepted 24 April 2017
Abstract: The forming quality of high-strength TA18 titanium alloy tube during numerical control bending in changing bending angle β, relative bending radius R/D and tube sizes such as diameter D and wall thickness t was clarified by finite element simulation. The results show that the distribution of wall thickness change ratio Δt and cross section deformation ratio ΔD are very similar under different β; the Δt and ΔD decrease with the increase of R/D, and to obtain the qualified bent tube, the R/D must be greater than 2.0; the wall thinning ratio Δto slightly increases with larger D and t, while the wall thickening ratio Δti and ΔD increase with the larger D and smaller t; the Δto and ΔD firstly decrease and then increase, while the Δti increases, for the same D/t with the increase of D and t.
Key words: high-strength TA18 tube; geometrical parameters; forming quality; finite element simulation; numerical control bending
1 Introduction
High-strength TA18 titanium alloy tube (HS-TA18 tube) has attracted increasing applications in hydraumatic, fuel tubing systems for advanced aircraft and spacecraft due to its advantages of high specific strength, excellent corrosion resistance and fatigue resistance, and good welding performance [1]. Among various tube bending methods such as stretch bending, roll bending, compress bending and push bending, the numerical control (NC) bending is the unique one to incrementally obtain the HS-TA18 bent tubes due to high precision, high efficiency, low consumption and automation advantages [2]. However, the NC bending is a complex physical process with multi-die constraints and multi-factor coupling, as shown in Fig. 1. During NC bending process, the unequal stress and strain distributions of the tube lead to wall thinning/thickening and cross section deformation. Many different tube sizes, bending angles and radii of bent tubes have been used in various fields for different requirements, and the wall thinning/thickening and cross section deformation vary with different tube sizes, bending angles and radii of bent tubes. Thus, in order to obtain the common knowledge of multi-index limited bending deformation behaviors of HS-TA18 tube under different bending angles/radii and tube sizes, it is necessary to study the laws of wall thinning/thickening and cross section deformation with geometrical parameters change.
In recent years, many scholars have studied the deformation behaviors of different kinds of tubular materials on various bending process by analytical, experimental and finite element (FE) simulation methods. While, most of them focus on a single bending defect for specific tube diameter and wall thickness. The bending deformation behaviors of different tube sizes considering multi-defects are less studied. In literatures [3-6], the analytical formulae to predict wall thickness variation and cross section distortion of circular tubes in bending process based on plastic deformation theory were derived. LIU et al [7] deduced an analytical formula of collapsing deformation of thin-walled rectangular tube during rotary draw bending process based on the theory of plate and shell. MENTELLA and STRANO [8] presented the relationship between geometrical parameters of tube and cross section distortion in rotary draw bending. The analytical models of thin-walled tube bending in terms of stress/strain distributions, wrinkling tendency, wall thinning degree and cross section distortion degree according to the geometrical characteristic of rotary draw bending and plastic deformation theory were deduced by LI et al [9]. Although the friction contact conditions cannot be considered in the theoretical model, it can built the intrinsic relationship between bending deformation behaviors and geometrical parameters of tube.
By FE and experimental analysis, FANG et al [10-13] established a three-dimensional (3D) elastic plastic FE model of 21-6-9 high-strength stainless steel tube in NC bending and revealed the effect laws of mandrel types/parameters, material parameters and friction conditions on wall thickness change and cross section distortion. The influences of the push assistant loading conditions on wall thickness change and cross section distortion of thin-walled aluminum alloy tube in NC bending were numerically studied by LI et al [14].  [15] numerically researched the effect of bending radius on wall thinning and cross section distortion for circular aluminum alloy tube in rotary draw bending. By experimental analysis, LI et al [16] found that the effects of process parameters on wall thinning and cross section deformation for large diameter thin-walled 5052O aluminum alloy tubes in NC bending were similar to those for small diameter thin-walled tubes. In Refs. [17,18], the effect laws of dies and process parameters on wall thickness distribution and cross section deformation of aluminum alloy 3A21 thin-walled rectangular tube in rotary draw bending were experimentally obtained. In terms of the annealing treatment TA18 titanium alloy tubes, ZHAN et al [19] numerically investigated the wall thickness change and cross section deformation under various operating parameters and mandrel parameters for the NC bending of medium-strength TA18 tubes, proposed quickly determining the range of mandrel extension length and obtained appropriate process parameters. By embedding the variation of contractile strain ratio with deformation into FE simulation for NC bending of high-strength TA18 tubes, the prediction accuracy for wall thinning, cross section deformation and springback angle was improved [20]. LI et al [21] addressed the springback behaviors under variations of material and process parameters of high-strength TA18 tube in cold rotary draw bending using the theoretical analysis, FE simulation and experiments, and proposed a two-level springback compensation methodology to achieve the precision bending.
In the previous researches, the influences of the process parameters or material parameters on bending deformation behaviors of the stainless steel, aluminum alloy and titanium alloy tubes were generally carried out. However, the study on the bending deformation behaviors of high-strength titanium alloy tubes with respect to wall thickness change and cross section deformation under different geometrical parameters have not been reported. Therefore, in this work, a 3D elastic plastic FE model of the HS-TA18 tube in NC bending is established under ABAQUS code. Then, the influence laws of geometrical parameters including bending angle β, relative bending radius R/D and tube sizes such as tube diameter D and wall thickness t on bending deformation behaviors are explored in terms of wall thickness change and cross section deformation. The results of this study can provide useful knowledge on bending deformation behaviors of tube NC bending under different geometrical parameters and help efficient design and optimization forming parameters for tube NC bending process.
2 Forming principle and indices for tube NC bending
Figure 1 shows the schematic diagram of the tube NC bending process. As shown in Fig. 1, the bending die, clamp die and pressure die are three basic bending dies which are applied to fulfilling tube bending. The tube is firstly clamped against the bending die by clamp die and pressure die; then the bending die and clamp die rotate simultaneously around the center, and the tube goes past the tangent point and rotates along the groove of bending die to gain the desired bending angle and bending radius; finally, the mandrel retracts, and the tube is unloaded. The wiper die and mandrel are needed to reduce the wrinkling risk and cross section deformation of tube for the process with tough bending conditions and close tolerance.
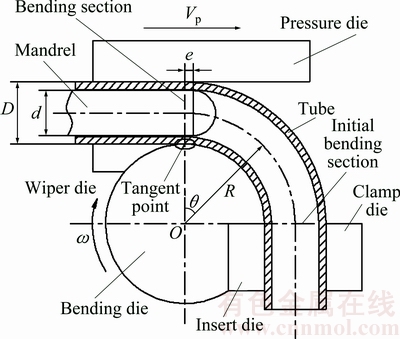
Fig. 1 Schematic diagram of tube NC bending
The wall thickness change ratio Δt and cross section deformation ratio ΔD are critical indices used to evaluate the tube bending forming quality and forming limit. The wall thinning ratio Δto and wall thickening ratio Δti can be expressed as
 (1)
(1)
 (2)
(2)
where t is the initial wall thickness of tube, t′ is the minimum or maximum wall thickness after bending deformation as shown in Fig. 2.
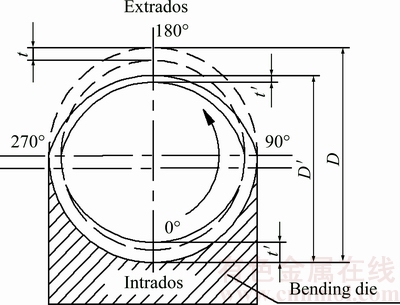
Fig. 2 Schematic diagram of wall thickness change and cross section deformation measurement
Due to the special boundary constraints as shown in Fig. 2, the tube is restrained in the transverse direction by bending die groove under free deformation conditions in vertical direction. Therefore, the cross section deformation ratio ΔD can be calculated as
 (3)
(3)
where D is the initial tube outer diameter, D′ is the vertical length of cross section after bending deformation as shown in Fig. 2.
3 3D elastic plastic FE models considering multi-die constraints and their validation
3.1 3D elastic plastic FE models considering multi-die constraints
According to the actual tube NC bending process, a series of explicit/implicit 3D elastic plastic FE models considering the dynamic constraints of multiple dies were established based on the platform of ABAQUS as shown in Fig. 3. The explicit algorithm was used for solving the bending tube and retracting mandrel operation, while the implicit one was employed for unloading process. The detailed solution process involved in FE model can be found in Refs. [10,11].
The results from the bending tube and retracting mandrel simulation in ABAQUS/Explicit were directly imported into ABAQUS/Standard. The geometrical nonlinearity was included, and the dissipated energy fraction of 0.02 was used to stabilize the implicit iteration procedure of the unloading process. Double precision was employed in the bending stage and the single precision for the unloading analysis. The mass scaling of 2000 was used to reduce the computation cost with neglected inertia effect by using convergence analysis in the bending stage simulation. The mechanical properties of the HS-TA18 tube were obtained by the uniaxial tension test in Ref. [22], as shown in Table 1. The strain hardening behaviors were described by the power exponent work hardening model σ =K(ε+a)n and the Hill(1948)′s anisotropic quadratic yield function was employed to describe the yield characteristics of the tube material. The tube was meshed by four-node doubly curved thin shell element S4R, while four-node bilinear quadrilateral rigid element R3D4 was employed to mesh rigid dies. The mesh densities of 0.8 mm × 0.8 mm and 1.0 mm × 1.0 mm were used to the tube and die surfaces, respectively. Five integration points with Simpson integration rule were used across the wall thickness of tube to describe the tube bending deformation better.

Fig. 3 3D elastic plastic FE model for HS-TA18 tube in NC bending
Table 1 Mechanical properties of HS-TA18 tube

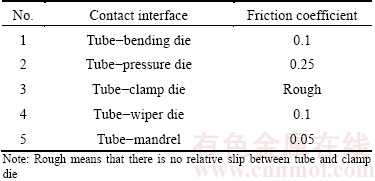
The boundary constraints and loading paths were applied by two ways to realizing the actual tube NC bending: “displacement/rotation” and “velocity/angular velocity”. As shown in Fig. 3, both bending die and clamp die were constrained to rotate along the center of bending die simultaneously; pressure die was constrained to translate only along the global X-axis; wiper die was constrained along all freedom degrees; the speed of mandrel along the global X-axis is 0 during the bending process, while the mandrel was retracted after the bending deformation process finished. The smooth step amplitude curves were applied to defining the smooth loading of the bending die, clamp die, pressure die and mandrel to reduce inertial effects in explicit simulation of the quasi-static process. The coulomb friction model was applied to modeling the friction behavior between tube and dies as shown in Table 2. For unloading process, all dies were removed and a fixed boundary condition was used to avoid the rigid motion.
Table 2 Friction coefficients at various contact interfaces
For post-processing, the wall thinning ratio, wall thickening ratio and cross section deformation ratio of the bent tube were calculated according to Eqs. (1)-(3) after the springback simulation finished because the springback may have obvious effects on cross section deformation.
3.2 Validation of FE model
In order to validate the 3D elastic plastic FE model of the HS-TA18 tube in NC bending process, simulation for the specification of 9.525 mm × 0.508 mm (diameter × wall thickness ) HS-TA18 tube was carried out based on the bending conditions in Ref. [23]. The forming parameters in experiment are listed in Table 3.
Figure 4 shows the comparison between FE simulation results and experimental results gotten in Ref. [23] in terms of wall thinning ratio and cross section deformation ratio. It is found that the FE simulation results for wall thinning and cross section deformation agree with the experimental ones, and the maximum relative error (error=(|Ve-Vs|/Ve)×100%, Ve and Vs denote experimental and simulative values, respectively) of the wall thinning ratio and the cross-section deformation ratio are 13.6% and 13.8%, respectively. Thus, the results show that the FE model used in the study is credible, which can be used to further explore the effect of geometrical parameters on forming quality of HS-TA18 tube in NC bending.
4 Results and discussion
In order to highlight the effect of geometrical parameters on bending deformation behaviors of HS-TA18 tubes, the bending angle β, relative bending radius R/D, tube sizes including tube diameter D and wall thickness t are deliberately given. The process parameters are the same in different bent tubes sizes simulation. Without special declaration, the relative bending radius R/D equals 3.0 and the bending angle β is 180°.
4.1 Wall thickness change and cross section deformation under different bending angles
Figure 5 shows wall thickness change and cross section deformation with different bending angles β. From Figs. 5(a) and (b), it is observed that the change tendency of wall thinning ratio and wall thickening ratio are very similarity, and the maximum value of those is less than 9% for different bending angles, which is much less than the aviation standard of 15%. When the bending angle is less than a critical value (here about 45°), the wall thickness change ratio firstly increases and then decreases from the bending plane to the initial bending plane, and the maximum wall thickness change ratio increases gradually with increasing the bending angle. When the bending angle attains the critical value, the wall thickness change ratio is of a platform deforming characteristic with little change between the clamp die and pressure die. And with the increase of the bending angle, the wall thickness change ratio in the platform area changes slightly and only the length of platform increases. These results are similar to the wall thickness variation of high-strength 21-6-9 stainless steel tubes in NC bending [10], but differ form those of the wall thickness variation for aluminum alloy thin-walled tubes during NC bending [24]. This is because the HS-TA18 tube will gradually reach a steady bending stage as the bending process proceeds until the contact, friction and interaction between tube and dies reach the stable state when the bending angle reaches the critical value, which makes the wall thickness change ratio present steady platform expansion behavior after the critical bending angle.
Table 3 Forming parameters in experiment

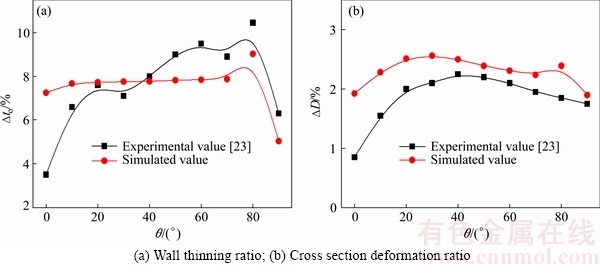
Fig. 4 Comparison of simulation with experimental results
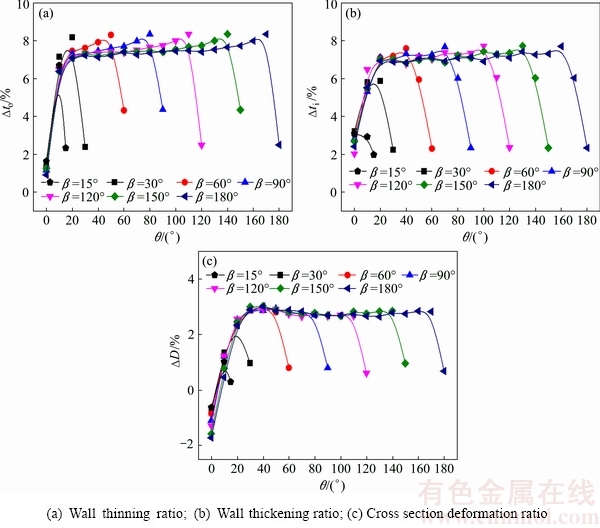
Fig. 5 Wall thickness change and cross section deformation with different bending angles β
It can be seen form Fig. 5(c) that the change tendency of cross section deformation ratio is similar to that of the wall thickness change ratio. When the bending angle is less than a critical value (here about 45°), the distribution curve of the cross section deformation from the bending plane to the initial bending plane seems as a parabola. When the bending angle reaches the critical value, the distribution curve of the cross section deformation from the bending plane to the initial bending plane seems as a plateau, and the maximum value of cross section deformation in the middle part changes slightly, but only the length increases with the increase of the bending angle, which indicates that the cross section deformation nearly reaches a steady state in this critical bending angle. This can also be explained that the contact, friction and interaction between tube and dies reach the stable state when the bending angle reaches the critical value.
4.2 Wall thickness change and cross section deformation under different relative bending radii
Figure 6 shows the wall thickness change and cross section deformation with different relative bending radii. It can be seen from Figs. 6(a) and (b) that the wall thickness change ratio firstly increases, then hardly changes and finally decreases from the bending plane to initial bending plane under the certain relative bending radius. And the wall thickness change ratio decreases with the increase of the relative bending radius, which indicates that the larger relative bending radius helps to decrease the wall thickness change ratio. This is because that the deformation degree decreases with the increase of the relative bending radius, which decreases the wall thickness change. When the relative bending radius equals 2.0, the curves of the wall thickness change ratio in the middle part show slight fluctuation. The reason may be that, the bending deformation degree is larger, which causes the wrinkling to happen.
It is found that the curve of cross section deformation ratio is similar to that of wall thickness change ratio. And the cross section deformation ratio increases with the decrease of the relative bending radius as shown in Fig. 6(c). The reason is also that the smaller the relative bending radius, the larger the bending deformation degree, which induces the tension and compressive stress to increase. Thus, the cross section deformation ratio increases with decreasing the relative bending radius. It can also be seen form Fig. 6(c), when the relative bending radius equals 2.0, the maximum value of the cross section deformation ratio is 6.59%, which exceeds the limit of 5% of the aviation standard. Therefore, to obtain the qualified bent tube of the HS-TA18, the relative bending radius must be greater than 2.0.
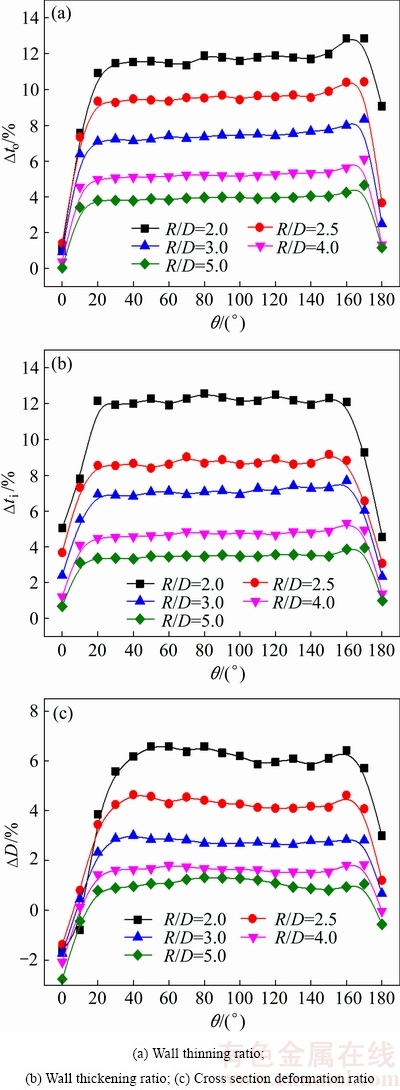
Fig. 6 Wall thickness change and cross section deformation with different relative bending radii R/D
4.3 Wall thickness change and cross section deformation under different tube sizes
Figure 7 shows the wall thickness change and cross section deformation under different diameters and the same wall thickness of 0.4064 mm. It is found that the maximum wall thinning ratio slightly increases with the increase of the diameter as shown in Fig. 7(a). The reason is that with the increase of diameter, the tangent strain at the extrados increases, which makes the wall thinning ratio increase [9]. As can be seen from Fig. 7(b) that the wall thickening ratio Δti at tube intrados increases with the increase of the diameter, which is similar to that of the NC bending for 5052O aluminum alloy thin-walled tube with different diameters [9]. This is because that the larger tube diameter is more prone to wrinkling in the bending process, while the wrinkling is the macroscopic manifestation of the wall thickening. Thus, the larger tube diameter needs larger mandrel diameter and more strict cooperation of bending dies to avoid wrinkling.
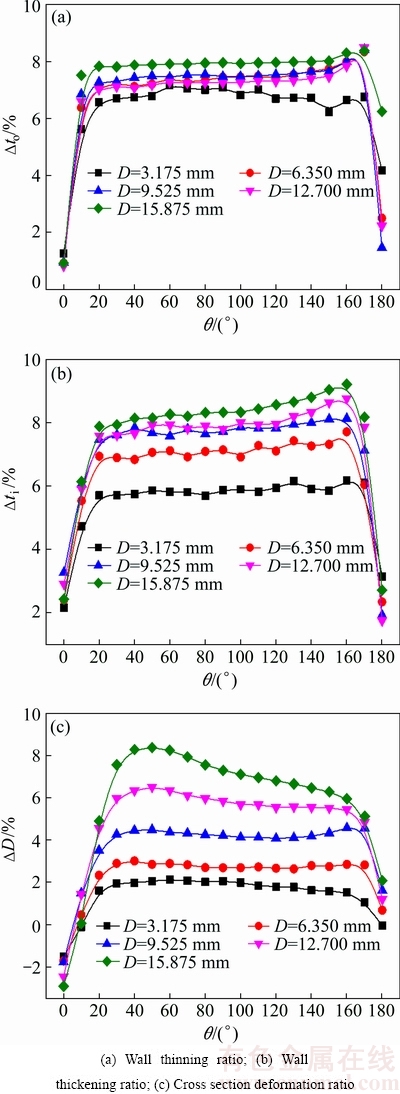
Fig. 7 Wall thickness change and cross section deformation with different diameters
It can be seen from Fig. 7(c) that the cross section deformation ratio increases with the increase of the diameter. The reason is that the structural stability of tube decreases with the increase of diameter, which causes the resistance ability of tube collapse to decrease, under the same deformation conditions. When the diameter equals 12.700 mm,the maximum value of the cross section deformation ratio is 6.51% under current forming conditions as shown in Fig. 7(c), which exceeds the requirement of aviation standards. Thus, the cross section deformation controlled needs the rigid dies such as mandrel and balls to be used appropriately.
Figure 8 shows the wall thickness change and cross section deformation under different wall thicknesses and the same diameter of 6.35 mm. It is observed that the wall thinning ratio at tube extrados slightly increases with the increase of the wall thickness as shown in Fig. 8(a). The results are similar to those of NC bending of the 1Cr18Ni9Ti stainless steel tube under different wall thicknesses [25].This is because that under the same bending deformation conditions, the smaller the wall thickness, the more serious the working hardening, which causes the wall thinning ratio to decrease. It can be seen from Fig. 8(b) that the wall thickening ratio at tube intrados decreases with the increase of the wall thickness, which is similar to that of NC bending of 5052O aluminum alloy thin-walled tube under different wall thicknesses [9]. The reason is that the structural stability of tube strengthens with the increase of wall thickness, which causes the wall thickening ratio to decrease.
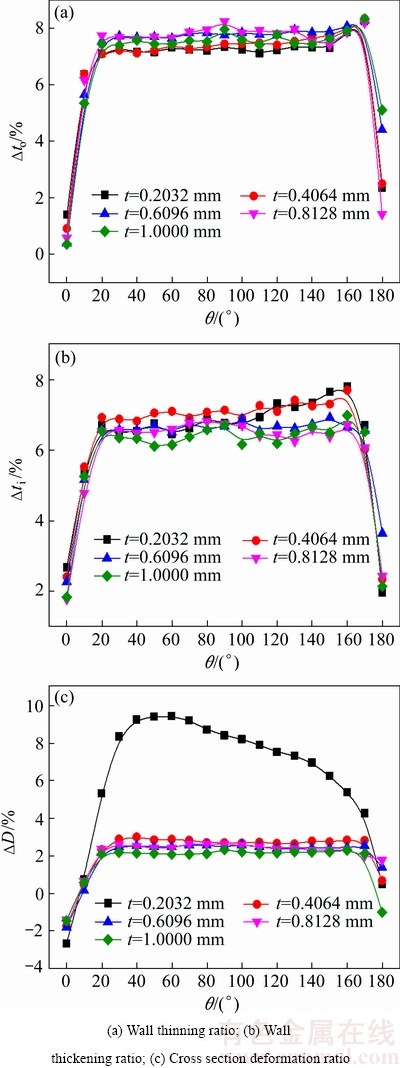
Fig. 8 Wall thickness change and cross section deformation with different wall thicknesses
As can be seen form Fig. 8(c), the cross section deformation ratio decreases with the increase of the wall thickness. This can also be explained by the structural stability of tube. The overall support role of tube increases with the increase of the wall thickness and the bending deformation conditions are improved obviously. Namely, the structural stability of tube increases with increasing the wall thickness, which causes the resistance ability of tube collapse to increase, under the same bending deformation conditions. When the wall thickness equals 0.2032 mm, the maximum value of the cross section deformation ratio is 9.43%, as shown in Fig. 8(c), which exceeds the requirement of the aviation standards of 5%.
Figure 9 shows the wall thickness change and cross section deformation under the same relative tube diameter of 15.625. In the FE simulation process, the wall thickness t0 and diameter D0 equal 0.4064 mm and 6.35 mm, respectively. It is observed that the wall thinning ratio firstly decreases and then increases for the same D/t with the increase of the diameter and wall thickness, as shown in Fig. 9(a), which is similar to that of NC bending of 5052O aluminum alloy thin-walled tube under the same D/t [9]. The reason is that the structural stability of tube weakens at a similar level with the same D/t when D and t increase proportionally, which causes the wall thinning ratio to increase. The wall thinning ratio firstly decreases because the wrinkling occurs as t and D equal to 0.5t0 and 0.5D0, respectively, as shown in Fig. 10. As can be seen from Fig. 9(b) that the wall thickening ratio increases for the same D/t with the increase of the diameter and wall thickness. The main reasons are that the structural stability of tube weakens and the coupling effects of tube sizes and contact conditions increase [9] for the same D/t with the increase of the diameter and wall thickness, which cause wall thickening ratio to increase. As can also be seen from Fig. 9(b), when t=0.5t0 and D=0.5D0, the curve of the wall thickening ratio fluctuates greatly because the wrinkling occurs.
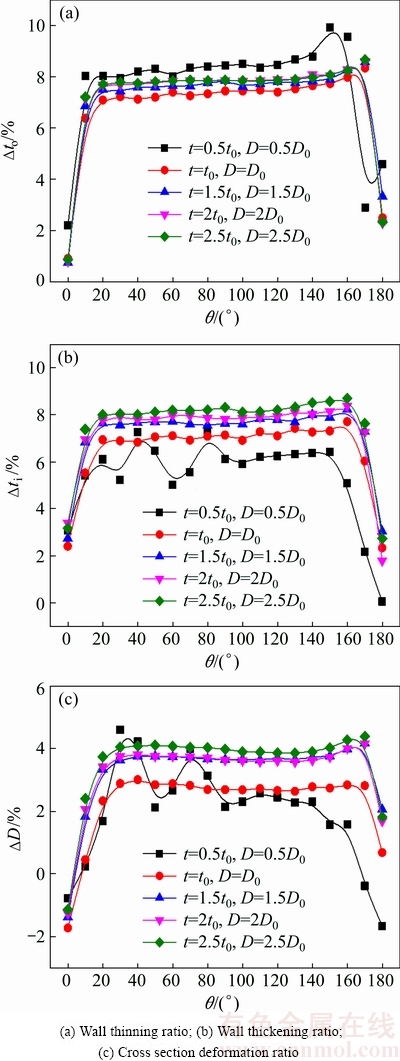
Fig. 9 Wall thickness change and cross section deformation with same D/t
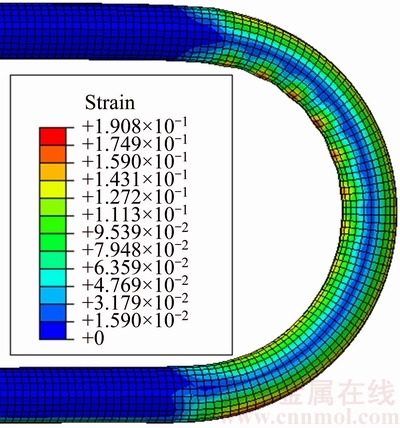
Fig. 10 Equivalent strain at t=0.5t0 and D=0.5D0
Figure 9(c) shows that the maximum cross section deformation ratio firstly decreases and then increases for the same D/t with the increase of the diameter and wall thickness. It can also be explained as that of the effect of the increase of D and t with the same D/t on wall thinning ratio.
5 Conclusions
1) The distribution of wall thickness change ratio and cross section deformation ratio are very similarity under different bending angles, when the bending angle reaches the critical value, the wall thickness change ratio and cross section deformation ratio are of a platform deforming characteristic with little change between the clamp die and pressure die.
2) The wall thickness change ratio and cross section deformation ratio decrease with the increase of the relative bending radius, and to obtain the qualified bent tube of the HS-TA18, the relative bending radius must be greater than 2.0.
3) The wall thinning ratio slightly increases with larger diameter D and wall thickness t, while the wall thickening ratio and cross section deformation ratio increase with the larger D and smaller t.
4) The wall thinning ratio and cross section deformation ratio firstly decrease and then increase, while the wall thickening ratio increases, for the same D/t with the increase of D and t.
References
[1] Aerospace Material Specification, AMS4956. Titanium alloy tubing, seamless, hydraulic 3Al-2.5V, textured controlled cold worked, stress relieved [S].
[2] YANG He, LI Heng, ZHANG Zhi-yong, ZHAN Mei, LIU Jing, LI Guang-jun. Advances and trends on tube bending forming technologies [J]. Chinese Journal of Aeronautics, 2012, 25(1): 1-12.
[3] E Da-xin, CHEN Ji-sheng, DING Jie, BAI Xue. In-plane strain solution of stress and defects of tube bending with exponential hardening law [J]. Mechanics Based Design of Structures and Machines, 2012, 40(3): 257-276.
[4] LU Shi-qiang, FANG Jun, WANG Ke-lu. Plastic deformation analysis and forming quality prediction of tube NC bending [J]. Chinese Journal of Aeronautics, 2016, 29(5):1436-1444.
[5] WANG J, AGARWAL R. Tube bending under axial force and internal pressure [J]. Journal of Manufacturing Science and Engineering, 2006, 128(2): 598-605.
[6] VEERAPPAN A R, SHANMUGAM S. Analysis for flexibility in the ovality and thinning limits of pipe bends [J]. ARPN Journal of Engineering and Applied Science, 2008, 3(1): 31-41.
[7] LIU Kuan-xin, LIU Yu-li, YANG He. An analytical model for the collapsing deformation of thin-walled rectangular tube in rotary draw bending [J]. The International Journal of Advanced Manufacturing Technology, 2013, 69(1-4): 627-636.
[8] MENTELLA A, STRANO M. Rotary draw bending of small diameter copper tubes: Predicting the quality of the cross-section [J]. Proceedings of the Institution of Mechanical Engineers, Part B: Journal of Engineering Manufacture, 2012, 226(2): 267-278.
[9] LI Heng, YANG He, ZHANG Zhi-yong, WANG Ze-kang. ‘Size effect’ related bending formability of thin-walled aluminum alloy tube [J]. Chinese Journal of Aeronautics, 2013, 26(1): 230-241.
[10] FANG Jun, LU Shi-qiang, WANG Ke-lu, YAO Zheng-jun. Three-dimensional finite element model of high strength 21-6-9 stainless steel tube in rotary draw bending and its application [J]. Indian Journal of Engineering and Materials Sciences, 2015, 22(2): 142-151.
[11] FANG Jun, LU Shi-qiang, WANG Ke-lu, XU Jian-mei, XU Xiao-mei, YAO Zheng-jun. Effect of mandrel on cross section quality in numerical control bending process of stainless steel 2169 small diameter tube [J]. Advances in Materials Science and Engineering, 2013, 2013(2): 1-9.
[12] FANG Jun, LU Shi-qiang, WANG Ke-lu, MIN Xu-guang. Effects of material mechanical properties on wall thickness variation in numerical control rotary draw bending process of tubes [J]. Materials for Mechanical Engineering, 2016, 40(4): 75-79. (in Chinese)
[13] FANG Jun, LU Shi-qiang, WANG Ke-lu, YAO Zheng-jun. Deformation behaviors of 21-6-9 stainless steel tube numerical control bending under different friction conditions [J]. Journal of Central South University, 2015, 22(8): 2864-2874.
[14] LI Heng, YANG He, ZHAN Mei, KOU Yong-le. Deformation behaviors of thin-walled tube in rotary draw bending under push assistant loading conditions [J]. Journal of Materials Processing Technology, 2010, 210(1): 143-158.
[15]  L. Numerical and experimental study on rotary draw bending of aluminum alloy tubes [J]. International Review of Applied Science and Engineering, 2011, 2(1): 33-38.
[16] LI Cheng, YANG He, ZHAN Mei, XU Xu-dong, LI Guang-jun. Effects of process parameters on numerical control bending process for large diameter thin-walled aluminum alloy tubes [J]. Transactions of Nonferrous Metals Society of China, 2009, 19(3): 668-673.
[17] LIU Kuan-xin, LIU Yu-li, YANG He, ZHAO Gang-yao. Experimental study on cross-section distortion of thin-walled rectangular 3A21 aluminium alloy tube by rotary draw bending [J]. International Journal of Materials and Product Technology, 2011, 42(1-2): 110-120.
[18] LIU Kuan-xin, LIU Yu-li, YANG He. Experimental study on the effect of dies on wall thickness distribution in NC bending of thin-walled rectangular 3A21 aluminum alloy tube [J]. The International Journal of Advanced Manufacturing Technology, 2013, 68(5-8): 1867-1874.
[19] ZHAN Mei, HUANG Tao, JIANG Zhi-qiang, ZHANG Pei-pei, YANG He. Determination of process parameters for the NC bending of a TA18 tube [J]. The International Journal of Advanced Manufacturing Technology, 2013, 68(1): 663-672.
[20] ZHAN Mei, HUANG Tao, YANG He. Variation of contractile strain ratio of Ti-3Al-2.5V tubes and its effects in tubes numerical control bending process [J]. Journal of Materials Processing Technology, 2015, 217: 165-183.
[21] LI Heng, YANG He, SONG Fei-fei, ZHAN Mei, LI Guang-jun. Springback characterization and behaviors of high-strength Ti-3Al-2.5V tube in cold rotary draw bending [J]. Journal of Materials Processing Technology, 2012, 212(9): 1973-1987.
[22] LI Heng, YANG He, SONG Fei-fei, WANG Yan, LI Guang-jun. Springback rules of TA18 titanium tube upon rotary draw bending under variations of material properties [J]. Rare Metal Materials and Engineering, 2014,43(1): 64-71. (in Chinese)
[23] SONG Fei-fei, YANG He, LI Heng, ZHAN Mei, LI Guang-jun. Springback prediction of thick-walled high-strength titanium tube bending [J]. Chinese Journal of Aeronautics, 2013, 26(5): 1336-1345.
[24] YUE Yong-bao, YANG He, ZHAN Mei, KOU Yong-le, LI Heng. Experimental study on thinning of thin-walled tube NC bending process with small bending radius [J]. Forging and Stamping Technology, 2007, 32(5): 58-62. (in Chinese)
[25] LIU Hai, E Da-xin, LAI Xiao-ping. FE simulation and experimental analysis of wall thinning for 1Cr18Ni9Ti tube upon bending [J]. Automobile Technology and Material, 2009, 8: 37-38. (in Chinese).
方 军1,2,梁 闯2,鲁世强2,王克鲁2
1. 江西科技师范大学 江西省材料表面工程重点实验室,南昌 330038;
2. 南昌航空大学 轻合金加工科学与技术国防重点学科实验室,南昌 330063
摘 要:采用有限元模拟方法研究弯曲角度β、相对弯曲半径R/D和管材尺寸(直径D和壁厚t)的变化对高强TA18钛合金管数控弯曲成形质量的影响。结果表明:不同β下壁厚变化率Δt和截面畸变率ΔD的分布非常相似;Δt和ΔD随着R/D的增加而减小,且为了获得合格的弯管件,R/D必须大于2.0;壁厚减薄率Δto随着D或t的增加而略有增大,而壁厚增厚率Δti和ΔD随着D的增加或t的减小而增大;在相同的D/t下,即D和t按比例增加时,Δto和ΔD先减小后增加,而Δti增加。
关键词:高强TA18钛合金管;几何参数;成形质量;有限元模拟;数控弯曲
(Edited by Xiang-qun LI)
Foundation item: Project (GJJ150810) supported by the Research Project of Science and Technology for Jiangxi Province Department of Education, China; Project (gf201501001) supported by National Defense Key Discipline Laboratory of Light Alloy Processing Science and Technology, Nanchang Hangkong University, China; Project (BSJJ2015015) supported by Doctor Start-up Fund of Jiangxi Science & Technology Normal University, China
Corresponding author: Jun FANG; Tel: +86-791-83863039; E-mail: fangjun020j13@163.com
DOI: 10.1016/S1003-6326(18)64664-3

