
Deforming mechanism of non-mandrel drawing process of circular aluminium tube by simulation
QUAN Guo-zheng(ИЁ№ъХю), ZHOU Jie(ЦЬ ЅЬ), WANG Meng-han(НхГОє®),
QUAN Guo-hui(ИЁ№ъ»Ф), TONG Ying(ЩЎ УЁ)
College of Mechanical Engineering, Chongqing University, Chongqing 400044, China
Received 28 July 2006; accepted 15 September 2006
Abstract: The aluminium tubes with high strength and smooth outer-surface can be produced by non-mandrel drawing process. It is an effective method to study forming mechanism of drawing process by simulation, based on which the relevant dies with reasonable dimensions can be designed to ensure tube precision. The dynamic model and elasto-plastic finite element model of the forming process were established based on FEM software Deform-3D, then the simulation was performed. The expressions about drawing load were deduced, and the influence of friction coefficient on drawing load was computed by the expressions and software respectively. Based on simulation results the deformation mechanism of drawing process without plug was expounded. According to flowing speed vector graph the law of material flowing was summarized, by which the deformation regions were partitioned. Furthermore, some potential problems of drawing process such as diameter shrinking, thickness varying were forecast and analyzed quantificationally.
Key words: non-mandrel drawing; FEM; untouched region; sizing section; shrink; speed vector graph
1 Introduction
Non-mandrel drawing is an important method to produce circular/abnormity aluminium tube. However it is difficult to ensure the dimension precision and outer-surface quality because the problems such as the law of material flowing, thickness and diameter varying, have not been expounded yet[1]. For a type of aluminium material the quantitative analysis contributes to designing reasonable forming process. Recently some works are focused on with-mandrel drawing process [2-3].
At the end of 20th century elasto-plastic finite element method was introduced into drawing process[4]. Some theory was established at that time. There was a research focused on how to establish a reasonable computer simulation model[5]. In this paper, the 3D dynamic model and elasto-plastic FE model of non-mandrel drawing process were simplified and established, meanwhile the calculating expressions about drawing load were deduced. The drawing processes in different friction conditions were simulated and calculated. Based on simulation results the deformation mechanism of drawing process without plug was expounded[6].
Based on simulation results the influence of different friction coefficients on drawing load and the material flowing speed vector was performed. The law of material flowing was summarized, according to which the tube blank was partitioned into four regions. For this tube in region ўт and N, the blank thickness and external diameter varying accumulate to 0.089 4 mm and 1.296 2 mm, while other regions only have a little displacement. The research contributes to planning forming process and designing compensation on the dimensions of die[7].
2 Formula deduction
During the non-mandrel drawing process, when the tube blank comes from deformation band into sizing section AЎЄA(Fig.1), it wonЎЇt keep on deforming in geometry, but it has the trend of spring-back. Thus the outer-surface of tube blank at sizing section endures pressure in the normal direction of die inner-surface whose value approaches that at the end of deformation area(section AЎЄA). Although the tube blank at sizing section is semi-plastic, some problems are dealt according to plastic conditions. In Fig.1 one element at sizing section is extracted as research object which is kept at the stress balance.
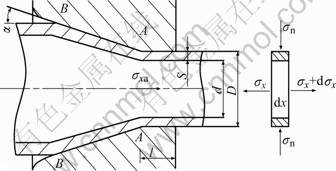
Fig.1 Sketch map of non-mandrel drawing
(¦Тx+d¦Тx) (D2-d2) -¦Тx
 (D2-d2)-f¦Тn¦РDdx=0 (1)
 d¦Тx=
d¦Тx= (2)
(2)
Taking approximate plasticity condition (¦Тx+¦Тn)=¦Тs into Eqn.(2) yields
 d¦Тx=
d¦Тx= (3)
(3)
 (4)
(4)
Integrating Eqn.(4), the following equations are obtained:
 (5)
(5)
ln (6)
(6)
 (7)
(7)
where ¦Тt is the drawing load at die exit cone; ¦Тs is the yield strength; c=-4Dfl/(D2-d2), is the influence coefficient of friction on sizing section; f is the friction coefficient; l is the length of sizing section; D is the diameter of sizing section; d is the tube inner diameter; and ¦Тxa is the drawing load at section AЎЄA.
3 Establishment of simulation model
Based on CAD/CAE software, the 3D dynamic model is simplified, as shown in Fig.2. The model is supposed as follows: the tube blank and die are of both axial symmetry, and fixed coaxes completely. The model is simplified as follows: the actual collet is replaced with cylindroconical structure at one end of tube blank, and simulated by the way that die moves instead of blank. The actual drawing movement is simplified to make simulation easier.
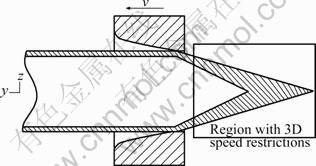
Fig.2 Die and tube blank
The actual production is: firstly rolling over the tube blank again and again to tamp one end; secondly putting the tamped end through die and making the other tube blank supported by rollers; finally holding the tamped end with the clamp of drawing machine and drawing at a constant speed. This process can be simplified as the way that die moves relative to tube by loading x, y and z speed restrictions on the tamped end and setting y speed for die. The 3D dynamics model does not change the actual stress state of blank, therefore the research is feasible.
4 Finite element model
The deformation of non-mandrel drawing process is featured by touch nonlinearity, geometry nonlinearity and borderline nonlinearity. It is a multiple nonlinear mutual coupling problem. Thus all sorts of nonlinearity must be considered during the simulation process.
The virtual work equation used in this article is ¦ДU=¦ДV, where U is the virtual strain energy; V is the virtual work done by outside force. While using amendatory Lagrange method(U. L), the element rigidity matrix can be expressed as ([K0]e +[K¦Т]e +[Kl]e )¦¤U=f + q-r, where [K0]e and [Kl]e are elasto-plastic rigidity matrix about small and big displacement, respectively; [K¦Т]e is the initial stress rigidity matrix; ¦¤U is the displacement increment; f is the node load; q is the surface load; r is the node vector of initial stress. The touch constitutive equation used is ¦Тc=[Kc]¦Еc, where ¦Тc and ¦Еc are touch stress and strain, respectively; [Kc] is the touch rigidity matrix.
5 Simulation and analysis
5.1 Influence of friction coefficient on drawing load
The drawing loads of circular aluminium tube under different friction coefficients can be calculated by Eqn.(7) and finite element model established in this paper. The two results are mostly consistent, and both are close to actual value, as shown in Fig.3. The curves indicate the influence of different friction coefficients on drawing load.
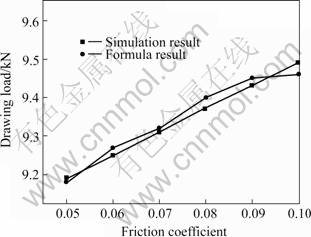
Fig.3 Influence of friction coefficient on drawing load
5.2 Partitioning deformation regions
The deformed tube blank can be divided into four regions as shown in Fig.4 based on following conditions: firstly supposing die speed v=300 mm/s relative to tube blank, secondly taking the section of blank at steady forming stage as research object, and thirdly analyzing each deformation zone according to flowing speed vector distribution (Fig.5).
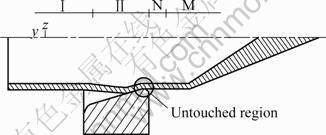
Fig.4 Forming regions of tube blank: ўс Non-deforming; ўт Radial shrinkage and body thickness changing; N Radial shrinkage and thickness changing of blank pulled out; M Body rigidizing of blank pulled out
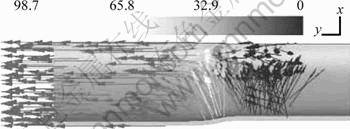
Fig.5 Flowing speed vector graph
In undeformed area ўс, there isnЎЇt plastic deformation but large displacement in y direction with the speed of 20.1 mm/s. The flowing is cased by the compressive stress from deformed area ўт.
In deformed area ўт, there is multiple flowing of drawing in y direction and shrinking in radial direction. Fig.5 shows that the multiple flowing velocity is nonuniform in y direction, reaching peak value at the position of die exit cone, and decreasing to both sides respectively. At the position of die exit cone the strain and stress are bigger, while the tube thickness tends to increase. In this study the external diameter of section AЎЄA includes 32 nodes, on which the thickness variance can be measured respectively to calculate the value added by average expression. For this standard tube the value is 0.056 0 mm. After the tube blank comes from die exit cone into die sizing section it doesnЎЇt contact with the sizing section surface. Therefore the non-contact area comes into being. In fact the sizing section doesnЎЇt work. Simulation results show that most of deformation is loaded on die exit cone where tool wear is very serious, therefore a larger negative tolerance at this place should be considered for a compensation while designing drawing die of aluminium tube.
In deformed area N, the tube blank getting out of die will not turn to be rigid soon, while shrinking in radial direction and flowing of drawing in y (anti-drawing) direction still exist. The inner diameter shrinks more slowly than external diameter, which results in thickness thinning. This trend disappears little by little along drawing direction and the body thickness tends to be stable. At this area the tube pulls out shrinks to a certain extent(Fig.6) for a radical reason that the tube always bears drawing load.
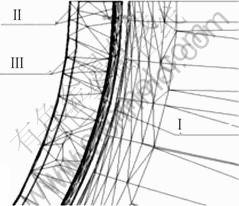
Fig.6 Radial shrinkage of tube blank pulled out: ўс Sizing section of die; ўт Rigid tube; ўу Tube blank at place of exit cone
In deformed area M, the tube blank pulled out turns to be rigid. The so-called rigidity is only an approximative one, especially under the very tiny strain situation. The inside and outside diameters of the rigid area all tend to be stable. Through studying on one of the place in the rigid area, the outside diameter reduces by 1.296 2 mm relative to the dieЎЇs hole diameter, while the body thickness decreases by 0.089 4 mm relative to the primary tube blank.
4 Conclusions
1) Based on the 3D dynamics model and elasto-plastic FE model, an effective method to study the deforming mechanism of non-mandrel drawing process of circular aluminium tube is established.
2) The influence of friction coefficient on drawing load is used to plan the proper lubrication conditions. The material flowing speed vector graph is performed, which contributes to expounding deforming mechanism. Meanwhile the formed tube blank is partitioned into four regions, which contributes to designing die structure and dimensions. The tube blank thickness and external diameter vary in the different regions. For this standard aluminium tube, the varied value is used to design proper dimension tolerance of die.
3) The computer simulation model contributes to research on non/with-mandrel drawing process of abnormity tube.
References
[1] ZHOU Jie, YIN Hong-ling, WU Yu-mei. Research on effects of friction on shell nosing[J]. Forging & Stamping Technology, 2001, 11(1): 39-43.(in Chinese)
[2] DU Feng-shan, WU Wei-yong, LIU Cai. Numerical prediction on drawing tube without plug[J]. Engineering Mechanics, 1998, 15(3): 77-92.(in Chinese)
[3] WANG Ji-zhou, LI Jin-xia, TAI Zhen-zhong. Inhomogeneous deformation and residual stress in tube drawing[J]. Journal of Plasticity Engineering, 2001, 8(4): 40-44. (in Chinese)
[4] LI Cheng-gong, WU Shi-jie. Application and development of advanced aluminum alloys in aerospace industry[J]. The Chinese Journal of Nonferrous Metals, 2002, 12(3): 16-21. (in Chinese)
[5] LUKASAK. Aluminum alloy development efforts for compression dominated structure of aircraft[J]. Light Metal Age, 1991, 49(10): 11-15.
[6] YANG H, LI S. Process optimization of the inverting-forming of thin-walled tubes with radius dies[J]. Mater Process Technol, 1995, 52: 489-495.
[7] RUBIO E M. Analytical methods application to the study of tube drawing processes with fixed conical inner plug: slab and upper bound methods[A]. DOBRZANSKI L A. Proc of the Int Scientific Conference on CAMЎЇ3S[C]. Gliwice-Zakopane, Poland, 2005: 841-850.
(Edited by YANG Bing)
Foundation item: Project(2005AA3012-4) supported by Science and Technology Committee of Chongqing, China
Corresponding author: QUAN Guo-zheng; Tel: +86-23-65103065; E-mail: quangz2005@yahoo.com.cn