3D surface profile diagnosis using digital image processing for laboratory use
��Դ�ڿ������ϴ�ѧѧ��(Ӣ�İ�)2020���3��
�������ߣ�Robert FRISCHER Ondrej KREJCAR Ali SELAMAT Kamil KUCA
����ҳ�룺811 - 823
Key words��profile diagnostics; image processing; 3D surface; MatLab; measurement
Abstract: The measurement of the surface quality and the profile preciseness is major issues in many industrial branches such that the surface quality of semi products directly affects the subsequent production steps. Although, there are many ways to obtain required data, the hardware necessary for the measurements such as 2D or 3D scanners, depending on the problem��s complexity, is too expensive. Therefore, in this paper, what we put forward as a novelty is an algorithm which is verified on the model of simple 3D scanner on the image processing basis with the resolution of 0.1 mm. There are many ways to scan surface profile; however, the image processing currently is the most trending topic in industry automation. Most importantly, in order to obtain surface images, standard high resolution reflex camera is used and thus the post processing could be realized with MatLab as the software environment. Therefore, this solution is an alternative to the expensive scanners, and single-purpose devices could be extended by many additional functions.
Cite this article as: Robert FRISCHER, Ondrej KREJCAR, Ali SELAMAT, Kamil KUCA. 3D surface profile diagnosis using digital image processing for laboratory use [J]. Journal of Central South University, 2020, 27(3): 811-823. DOI: https://doi.org/10.1007/s11771-020-4333-y.

J. Cent. South Univ. (2020) 27: 811-823
DOI: https://doi.org/10.1007/s11771-020-4333-y

Robert FRISCHER1, Ondrej KREJCAR1, Ali SELAMAT1, 2, 3, 4, Kamil KUCA1
1. Center for Basic and Applied Research, Faculty of Informatics and Management, University of
Hradec Kralove, Rokitanskeho 62, Hradec Kralove 50003, Czech Republic;
2. Malaysia Japan International Institute of Technology (MJIIT), Universiti Teknologi Malaysia
Kuala Lumpur, Jalan Sultan Yahya Petra, Kuala Lumpur 54100, Malaysia;
3. Media and Games Center of Excellence (MagicX), Universiti Teknologi Malaysia,Skudai 81310, Malaysia;
4. School of Computing, Faculty of Engineering, Universiti Teknologi Malaysia (UTM),Skudai 81310, Malaysia
 Central South University Press and Springer-Verlag GmbH Germany, part of Springer Nature 2020
Abstract: The measurement of the surface quality and the profile preciseness is major issues in many industrial branches such that the surface quality of semi products directly affects the subsequent production steps. Although, there are many ways to obtain required data, the hardware necessary for the measurements such as 2D or 3D scanners, depending on the problem��s complexity, is too expensive. Therefore, in this paper, what we put forward as a novelty is an algorithm which is verified on the model of simple 3D scanner on the image processing basis with the resolution of 0.1 mm. There are many ways to scan surface profile; however, the image processing currently is the most trending topic in industry automation. Most importantly, in order to obtain surface images, standard high resolution reflex camera is used and thus the post processing could be realized with MatLab as the software environment. Therefore, this solution is an alternative to the expensive scanners, and single-purpose devices could be extended by many additional functions.
Key words: profile diagnostics; image processing; 3D surface; MatLab; measurement
Cite this article as: Robert FRISCHER, Ondrej KREJCAR, Ali SELAMAT, Kamil KUCA. 3D surface profile diagnosis using digital image processing for laboratory use [J]. Journal of Central South University, 2020, 27(3): 811-823. DOI: https://doi.org/10.1007/s11771-020-4333-y.
1 Introduction
The surface profile identification is the major issue in many branches of industry, especially for devices which are sensitive to some sort of a mechanical abrasion. Considering a saw blade, its sharpness degrades throughout the time, if it is perpetually operating. The degraded saw blade can have a direct impact on sawed material that causes the abrasion. In this case, a simple 2D scanner could be used to identify the surface profile, since the blade is very thin and it is not assumed that there are any irregularities along its width. Given this situation, standard contact method for surface scanning could be used.
On the other hand, when the whole surface area needs to be scanned instead of a very thin profile, another approach should be considered such that the surface scanners was developed for that reason. They are able to scan rectangular area at a time and can significantly improve surface recognition time. The need of whole surface scan could emerge on metallurgical forms, compress device forms or on machine tools instruments for instance. Even a small deviation could depreciate some final products while a greater one could destroy the whole batch. The surface scanners, which could scan rectangular area, are mostly based on image processing technology approach requiring a surface 3D scanner [1-3].
There are usually two ways of scanning the surfaces; in the first method thin laser line to highlight the device��s profile is used while in the other, only light background. Either way is relatively well-known, nonetheless the details are kept secret due to high competitive rivalry. The brand-leaders in this field basically are ABB automation, SICK and Siemens having their own technologies and algorithms which are customized to meet their particular focus.
The technique and algorithms presented in this paper perfectly meet the laboratory conditions, since they could be easily modified to any environment where the surface scan is needed. Other companies in the market usually utilize thin laser line scans which highlight measured profile with specially designed cameras such as CCD or CMOS with highly disproportional resolutions that vary from 3072 px��512 px to 8000 px��512 px (px-pixel), in lieu of standard 4:3 and 16:9 aspect ratios. The main purpose of these devices is to monitor the wide narrow surfaces for identifying the surface defects, if any. These are proper state of the art devices with high price, however, they are not very suitable for laboratory purposes, since they focus on the particular industry problems [4, 5].
Given these facts, the suggested solution in this paper proposes to exhibit efficient performance in laboratory use, even though it cannot be used in real time systems since it only operates offline [6, 7]. This solution can mainly contribute in the field where it is necessary to monitor large surface area, such as in metallurgy, plastic form production, precise mechanical prototyping and others. In these cases offline processing is not a problem and surface profile can be precisely monitored and inspected.
Regarding the relevant studies published before, there are several articles which propose various algorithms for image processing on the surface deficiency recognition [8-17].
Especially in last five years there are numerous prominent papers in literatures. KIM et al [18] introduced a building information modelling. QIAN et al [19] and ZHOU et al [20] introduced 3D laser scanner technology for surface quality. The applicability of the method they proposed was examined by assessing the dimensional and defect qualities of actual precast concrete panels using a 3D laser scanner [8, 13, 21]. Their results detected defects on the surfaces with the accuracy of 86.9%.
WANG et al [22] presented an evaluation methodology for 3D surfaces to find the errors by HD metrology. They dealt with flatness of the planes not only the surface quality itself. They considered three types of characteristics in their research:contrast for the measurement of surface local deviation degree, entropy for the indication of randomness of the surface height distribution, and correlation for the ratio of a pixel to another pixel [23-25].
LI et al [9] introduced a real-time 3D laser scanning system for pavement detection. Their system can collect, measure and visualize 3D pavement surface data to identify possible distortions. They used hybrid systems including digital cameras to capture consecutive images of lines revealed by infrared lasers.
However, the main drawback of these researches is over-specification since the generalization of these algorithms is so hard to realize. Therefore, authors put their own ideas into the final equation yet there are some papers which are very close to our kernel [26-33]. TANAKA et al [26] compared two ways of binarization of microscope image. The standard way is making border of specific grain by hand. This method is very precise, since two materials (grains) can be distinguished and the resulting border line can be precisely drawn. However, this method certainly is very time-consuming; therefore, for the specific time, only a limited number of microscope images could have been processed. The development team created an algorithm which could automatically distinguish border line between two different grains. The resulting fractal analysis was very successful, namely, the maximum difference between the manually processed images and automatically processed images was only 5%. This is a very good result and the algorithm used can be easily applied to material grain analysis.
KUCHERIK et al [27] focused on image processing as well by describing probe microscopy study of a substance surface with high spatial resolution. They developed an optimized method for processing the data of scanning microscopy. However, they encountered the long processing time necessary to complete all analyses of the surface structure sample. This is a general issue while processing the images that have higher resolutions such as 5MPx or more. In the paper, the method for improving the image resolution is described due to the restoration of intermediate points using the generalized Brownian motion algorithm. For the data processing from real samples, the authors declared the accuracy of the method with an average of 89%.
DAVID et al [28] compared two ways of binarization of microscope image. The standard way is making border of specific grain by hand. This method is very precise, because the men can distinguish between two materials (grains) and can draw resulting border line precisely. This method is of course very time-consuming, so for a specific time, only limited microscope images could be processed. The development team created an algorithm, which is able to distinguish border line between two different grains automatically. Resulting fractal analysis is very successful, and the maximum difference between manually processed images and automatically processed images is only 5%. This is very good result and the algorithm used can be easily applied to material grain analysis.
There are many other scientific papers about the theme of laser based surface diagnostics which mainly focus on fusion devices [34-36], but the principles and ideas are possible to use it in our case.
2 Preparation phase
The surface profile identification has very complex dynamics and it is even more complicated, if it is necessary to compose a surface map. This composing procedure involves the accurate mechanical shift device, on which the camera is mounted, and complicated algorithms that subsequently process the signals. The identification principle is described as: initially thin laser line shines on the desired surface at the right angle (90��) that is supposed to be as precise as possible to avoid unnecessary profile distortions. In addition, the procedure is recommended to be performed in a dark room for improving the signal while reducing the noise. Furthermore, the laser line highlights the surface profile in the way that it is bending based on surface profile. Consequently, there is a camera scanning the laser line, which should be placed at the lowest angle as possible to ensure the best scanning conditions. Considering that the higher the angle, the smaller the resolution depth, the camera ideally should be placed on the infinite distance from the laser line at an angle around 0��.
Despite the theory, all distortions provided by camera lens should be taken into consideration in practice. Basically, the camera is the most important device in the measurement process, since it has a direct impact on profile picture quality. In this case, that main issue of the camera objective lenses is barrel distortion. The virtual straight lines running through the image center remain straight while the lines far from the center are bending. This kind of distortion could be minimized by using a better lens or high zoom values. In that case, the image is situated at the lens center and distortion is significantly reduced.
If a single profile is needed in conjunction with the whole surface topology, it is mandatory to create a stable camera shifting device which can smoothly shift the joint of the camera and the laser line as shown in Figure 1. The camera should be kept steady for a few seconds after shift, due to micro vibrations caused by mass inertia. If a standard laser line pointing device is used, the suggested linear shift is 1 mm to attain the sufficient accuracy. Given these facts, for 1 cm of surface profile 10 profile��s images are captured,which is sufficient for most laboratory tasks.
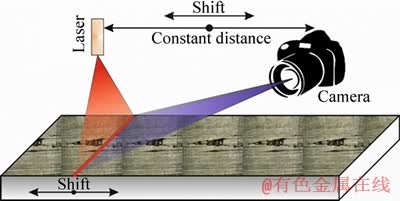
Figure 1 Laser emitter and reading camera fixed in constant distance
Altering the distances between reading camera and laser emitter, several experiments were conducted. The resolution depth and maximum reading depth capability are optimized as the maximum reading distance is 1.5 m with angle up to 10��. These numbers would be revised according to the experimental results.
3 Optical sensing methodology
There are several companies which deal with the online digital image processing and offer professional solutions using smart cameras or smart profile detection sensors [37-42]. The most prominent company probably is the SICK company with its ColorRanger type cameras and color/shape detection sensors 2D vision. The standard SICK 2D shape sensors can determine, correctly measure the edges and detect any unwanted distortions.
As presented in Figure 2, this type of sensor reliably detects product��s edge and can consequently do any necessary steps like stopping assembly lines or stamping defected product. These sensors are cheap (800-1500 �) and can detect profile on only one height level. The function principle is similar to ��Epsilon sensors which use the laser triangulation method to determine distance from the object. The profile turns into in the form of measured distances vs time base. There is relatively high read rate, usually above 750 samples per second with a resolution of 0.5 and 0.1 mm.
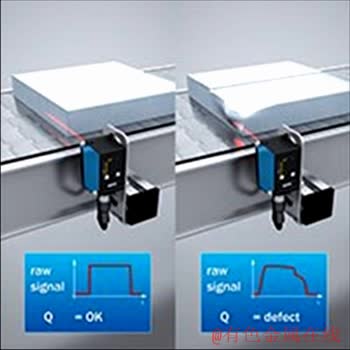
Figure 2 SICK 2D shape sensor for edge and color detection
This type of sensor is also used in this project to reveal the object��s surface profile; however, a very complex mechanical shifting device is necessary to accomplish this task, as shown in Figure 3 [28]. In this case, synchronizing the start position of the laser distance sensor is mandatory. The data of the surface��s profile are stored in one huge data array, where every single longitudinal profile starts. Afterwards, the whole surface profile is composed of each single longitudinal profile, as shown in Figure 4.

Figure 3 Solution for usage simple laser distance sensor to obtain object��s surface profile
As presented in Figure 4, the single longitudinal profile has good running and the content is readable. However, if all longitudinal profiles are combined to one 3D map, it would be hard to determine each start position. The generated color profile map is almost useless due to uneven travel speed during the sensor movement, uneven count of measured samples per passage, uneven length of passages and so on. This approach is intended to single longitudinal profile reading, exactly as the SICK or ��Epsilon companies do.
Furthermore, there is another possibility which is the usage of highly specialized 3D cameras. The principle is presented in Figure 5.
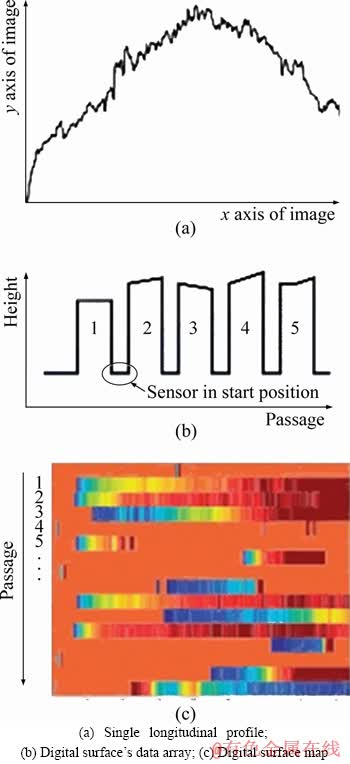
Figure 4 Surface profile generated from single longitudinal profiles:

Figure 5 Specialized 3D camera from SICK Company
The laser line highlights the surface profile while a camera placed above is reading this profile. The composition of all single profiles together will reveal the 3D profile map. This system is very expensive given the cost of basic versions is above 5200 �. In addition, laboratory usage is controversial yet this is real online 3D profile scanner which can be immediately used in production process.
This option was also tested to be able to compare our approach and commercial version. We obtain a special 3D scanner gapCONTROL 2911-50 from MICRO-EPSILON Company. The device is intended to measure the profiles with a maximum reinforcement of 120 mm and a reading width of 56 mm. The maximum measurement frequency is 2000 samples per second and it can read the profiles up to 950 ��C with blue laser emitter. It was necessary to fasten the 3D scanner to a traveling device shown in Figure 3 and setup control software [43]. The travel was controlled by Matlab Simulink, so we were able to change travel speed and reading direction in Figure 5.
As a scanned object serve piece of metal heated to 550 ��C, the results are presented in Figure 7.
We also test a red laser version of the 3D scanner, with no significant difference on the results, as shown in Figure 8.
The main advantages of the commercial 3D scanner [1] are processed imaging and computation parts. It can only be installed on user��s PC and therefore scanning of 3D profiles could be possible. The disadvantage is that the graphic interpretation of the scanned profiles is not so much precise.

Figure 6 Scanning software, Simulink model to control travel and I/O card MF624

Figure 7 Scanned hot metal piece, blue laser 3D scanner (a) and graphic output from 3D scanner control software (b)

Figure 8 Red laser version of 3D scanner scanning hot metal piece (a) and resulting 3D image (b)
There are many spikes deteriorating the resulting image and not every scanned profile can be used. The tested 3D scanner has to be tuned up for current task to achieve the required accuracy. Everything, what is slightly different from model pattern is useless. With good 3D scanner setup, the accuracy achieved was 0.15 mm.
The main purpose of the origination of this project was cooperation with Arcellor Mittal a.s. steelworks. There are several vertical continuous steel casting devices with direct work flow to rolling mill. The quality of primary product�Cblanks has direct impact on final quality of rolled metal plate. If there is a surface detected or inner defect, whole metal plate (usually several tons) has to be melted again. This is very inefficient and this approach dramatically increases the overall price per ton of output product as well as the energy consumption per ton and unnecessarily escalates the environmental stress.
The surface defects can be revealed easily by naked eye, nonetheless human factors tolerate many faults. The standard optical methods for determining surface profile cannot be used due to very high temperature of casted blank ((950��50) ��C). The high temperature has two main negative impacts: the first is high intensity light emission saturates the CCD sensors of profile detectors (SICK, MICRO-EPSILON) and therefore output profile becomes useless. The second disadvantage is extremely high thermal radiation such that every device within 3 m from the hot blank��s surface (1500 mm width, 100 mm height) is destroyed in a short time, even if it is in separate, shielded and cooled box [44]. Therefore, we have been inquired if there is a possibility to read surface profile and displace defective blanks before they are rolled down.
4 Experimental results of proposed measurement methods
Above all, the primary goal of this paper is to describe possibilities while generating 3D surface profile in laboratory environment using the digital SLR camera Canon 650D for the experiments. As an examination surface, a metallurgical blank from continuous steel casting device is chosen with very shallow surface defects on which the maximum depth of scratches does not exceed 1 mm, so it becomes a perfect testing object.
In the robust shifting device, a significant stability and maximum resolution is necessary, which can move the camera and laser together within 1 mm or less. This condition is crucial since the distance between the sensing camera and laser line has to be the identical through the whole measurement. The shifting device is based on stepper motor with precise motor driver. The shifting length depends on the pulse count heading into the motor driver. A laser line with line running evenly is necessary to recognize the object��s width. In this case, a simple laser line device with a price of 5 USD is used. The main camera device we used is a DSLR Canon EOS 650D with a standard lens. These core components are sufficient to obtain good quality image series, which would consequently be processed in the Matlab environment. The series of images represents the discrete visualization of the object��s profile Figure 9.

Figure 9 Image of object��s profile (Small distortion caused by scratch on surface can be seen in center of line)
Since the laser line is very bright while the rest of the image is dark, ISO could be kept (64-100 DIN) to avoid unwanted noise. The camera should be switched to manual focusing, due to the fact that the automatic focusing cannot handle high contrast. The manual focus is the best choice under these circumstances and after proper settings, the image are shown in Figure 9 in detail. The laser line should be as thin as possible to increase depth resolution. These images are is initial set of subsequent processing. Each image must be captured locating the start and end point of the line. Although is it not mandatory, processing time will be greatly reduced if the processing area is restricted. It has to be realized that the images have resolution 18 megapixels or more since today��s camera��s resolution increases almost 1 megapixel per month. The initial step in image processing is found the starting point of the line with an algorithm presented in Figure 10.
The processing algorithm is as follows: there is a cycle, in which the current pixels are compared with the variable LightTreshold. The value of this variable depends on light conditions while capturing the images. This variable changes its value from the maximum possible (255,0,0 �C RGB) to lower values. The algorithm regularly checks the whole start area, where width of the area depends on shooting condition about 100 pixels and if any sufficiently bright pixel is not found, the value of variable LightTreshold is lowered and checking goes from the start position X=0 pixel, Y=Ymax. This algorithm can be expressed by the following pseudo code in Algorithm (1).

 (1)
(1)

Figure 10 Algorithm for detection, where profile��s curve starts
We assume that the laser line is much brighter than the rest of the image. The end of the curve is found by the same procedure. After this first process, starting and ending position of inspected curve are gathered. These points are very important to speed up the whole evaluation process, since we can focused on narrow area around the curve. The second step is the reduction of laser line width. This is good to improve overall accuracy. Laser line is generated by the laser generator and subsequent optics. Due to the lens restrictions, the line is not perfectly thin. The best way to reduce laser line is averaging the line width with its length, as shown in Figure 11.
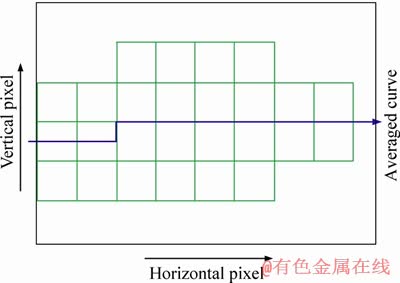
Figure 11 Aligning curve by averaging laser line width
The algorithm is also simple, namely,
 (2)
(2)
The third step is aligning the curve to set the starting point and the ending point on the same level. We assume that these points are on the same level and any inconsistencies are caused by camera optics. The aligning of the curve will improve overall readability of the surface image. An example of an aligned curve is shown in Figure 12.

Figure 12 Aligning profile curve to improve overall image readability
Original curve is displayed by red color, while the aligned curve is displayed by yellow by the algorithm:

 (3)
(3)
The third step is the conversion from bitmap area to vector area which significantly will reduce overall memory requirements. Each profile curve extracted from image occupies only one field in an array, while in bitmap area the curve is defined as various number of pixels, usually 1000 times more occupied memory. The extracted profile is shown in Figure 13.
The algorithm is presented in Algorithm (4):

 (4)
(4)
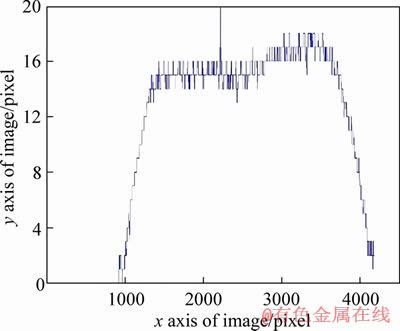
Figure 13 Resulting profile in vector area
The generated curve has many sharp peaks. Since this situation is very disturbing, an utilization of a filter is necessary, which will smooth current curve. After applying this filter, the curve became smoother likewise, as shown in Figure 14.
Although the curve in the figures looks odd, it is wide more than 3000 pixels; therefore it is not possible to catch detailed surface profile. The filter we used is relatively simple and defined by three parameters: DSP_smoothlvl, DSP_wdth and DSP_count. All these parameters directly affect the final surface profile��s look. The filter is necessary to be applied since the picture of the laser line is not perfect due to many picture defects which deteriorate final profile��s appearance. The laser line is very bright and that is why not only corresponding camera CCD cells are affected as well as many false pixels around the line.
Imperfection of the optics and fault in laser emitter with fault camera��s CCD cells entail to use some sort of filter to obtain statistically correct shape of the surface. The simple averaging of short intervals gives us good results, yet in this case a better filter has to be used, which can overcome some specific conditions of picture behavior. The basic idea of the specific algorithm we developed is presented in Figure 15.
The single profile curve is divided into several regions, defined by variable DSP_width. In each region average value for surface height is calculated. Surface curve is presented by y(fx) and actual height by y(i), where i is actual position on the curve. The average value for certain region is calculated by:
 (5)
(5)
where interval width is defined by the variables n and n+DSP_width. Resulting profile running is relative to calculated average value. There is a key value of variable DSP_smoothlvl. Each profile height is compared to calculated average height value and if the difference is greater than variable DSP_smoothlvl, actual profile height is substituted by average value. If the difference is smaller than variable DSP_smoothlvl, actual height remains the same and algorithm proceeds to another profile point. This algorithm is expressed by:

 (6)
(6)
This filter can be applied multiple times when necessary to remove random noise added to the profile image and to make it better and more readable than the original raw image. The difference in profiles images, before and after applying the filter, is presented in Figure 16.

Figure 14 Raw data without filtering and image data with advanced filtering
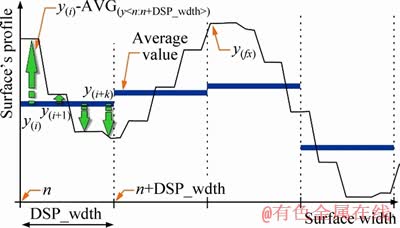
Figure 15 Digital filter used when correcting profile shape
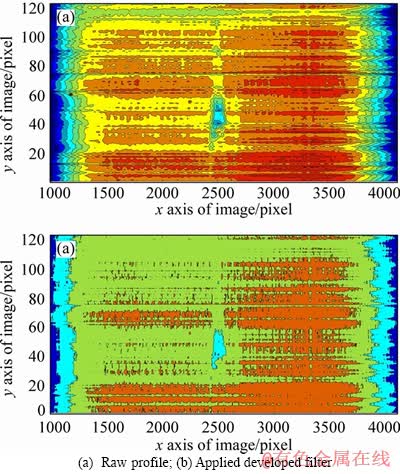
Figure 16 Applying filter to profile image:
The final step is to visualize whole surface profile composed of many single profile curves. There are several possibilities in MatLab environment; however, for the purpose of this paper there are only two: the first visualization method is 2D imaging, where the profile��s height is represented by color as shown in Figure 17. The second visualization method is 3D graphing shown in Figure 18. Each method is suitable to visualize surface profile with high resolution details and the choice should be based on requirements.
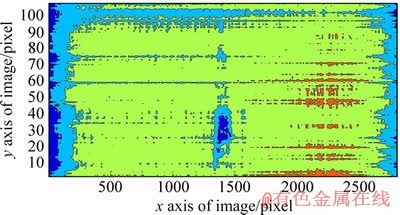
Figure 17 Profile visualization with 2D graph in MatLab environment

Figure 18 Profile visualization with 3D graph in MatLab environment
5 Discussion and conclusions
Briefly, the purpose of this paper is to develop a simple and effective method for scanning the surface profile in high-height resolution for laboratory use, on the contrary of the conventional scanners with low-height resolution. As the scanner device the Digital Single-Lens Reflex camera Canon EOS 650D with a standard lens is utilized, shifting device driven by PLC and ordinary line laser pointer is as well as simple [45]. Obtained profile images have been processed by Matlab software and two types of graphics representing scanned surface profile were achieved. With this basic equipment the maximum resolution of 100 pixels on 1 mm is obtained, which corresponds the height resolution of 0.01 mm per image pixel with 15 cm of processed profile width.
It is obvious that considerable noise was emerged from camera lens, generated laser line by camera image sensor and jpeg compression used by the camera, nevertheless the noise could be removed by using better equipment and improved processing algorithm. The experiment was so successful to be utilized in the laboratory environment for specific purposes. Since one of the purpose is presenting a low-cost solution [46], the lightest version of this scanner can be purchased for 1 EUR instead of a commercial one with price of 6 EUR at least. Finally, we believe that there are numerous fields such as the diagnostic applications in the laboratory environment or in education, where this system could be primed.
Proposed scanning system is only a prototype to confirm used procedures and algorithms. Of course, it has limitations such as scanning speed, susceptibility to environment light or processing speed [47]. These weaknesses will be removed in future, when the second prototype will be made. Currently we are preparing tests with usage of 4 high resolution web cameras, which will replace heavy, fragile DSLR and allow high speed surface scanning. Four cameras can additionally bring image stereoscopy, which can precisely estimate object��s dimension. This feature will be big help when creating a surface model. Also we are working on transcription from MatLab code to much faster C language. The MatLab environment is great for prototyping, but processing speed is pathetic. It turns out that the same algorithm wrote in C language was more than 30 times faster than in MATLAB. Also code optimization and multi thread processing will be the challenge in future development, while the final solution will be based on C language exported from MATLAB to be able to reach real-time processing speed and benefit of GPU acceleration [48-51]. The goal is to make such device, which will be robust, fast and can deliver reasonable surface model quality in laboratory environment.
Acknowledgments
The authors are grateful for the support of student Sebastien Mambou in consultations regarding application aspects.
References
[1] POLO M E, FELICISIMO A M. Analysis of uncertainty and repeatability of a low-cost 3D laser scanner [J]. Sensors, 2012, 12(7): 9046-9054.
[2] STANCIC I, MUSIC J, ZANCHI V. Improved structured light 3D scanner with application to anthropometric parameter estimation [J]. Measurement, 2013, 46(1): 716-726.
[3] LI G W, TANG J Y, ZHOU W, LI L. Fatigue life prediction of workpiece with 3D rough surface topography based on surface reconstruction technology [J]. Journal of Central South University, 2018, 25(9): 2069-2075.
[4] MATULOVA P, STEMBERKOVA R, ZDRALEK P, MARESOVA P, KUCA K. Regional development of small and medium enterprise in correlation of the life cycle [C]// Proceedings of the 28th International Business Information Management Association Conference-Vision. Innovation Management, Development Sustainability, and Competitive Economic Growth. 2016: 1253-1261.
[5] MATULOVA P, STEMBERKOVA R, ZDRALEK P, MARESOVA P, KUCA K. Utilization rate of open innovation in correlation of the SME life cycle [C]// IDIMT 2016-Information Technology, Society and Economy Strategic Cross-Influences-24th Interdisciplinary Information Management Talks. 2016: 251-258.
[6] KREJCAR O, FRISCHER R. Real time voltage and current phase shift analyzer for power saving applications [J]. Sensors (Switzerland), 2012, 12(8): 11391-11405.
[7] CZEKAJ P, KREJCAR O. Real-time control systems secured communication [C]// 9th IFAC Workshop on Programmable Devices and Embedded Systems. 2009: 23-26.
[8] BI Z M, WANG L. Advances in 3D data acquisition and processing for industrial applications [J]. Robotics and Computer-Integrated Manufacturing, 2010, 26(5): 403-413.
[9] LI Q, YAO M, YAO X, XU B. A real-time 3D scanning system for pavement distortion inspection [J]. Meas Sci Technol, 2009, 21(1): 015702.
[10] CHANG K T, CHANG J R, LIU J K. Detection of pavement distresses using 3D laser scanning technology [C]// Computing in Civil Engineering (2005). Cancun, Mexico, 2005: 1-11.
[11] KREJCAR O, FRISCHER R, DAVID J. Surface diagnostics of narrow plate moulds [J]. Metalurgija, 2015, 54(4): 653-656.
[12] WANG L S, LEE D L, NIE M Y, ZHENG Z W. A study of the precision factors of large-scale object surface profile laser scanning measurement [J]. Journal of Materials Processing Technology, 2002, 129: 584-587.
[13] GENG J. Structured-light 3D surface imaging: A tutorial [J]. Adv Opt Photon, 2011, 3(2): 128-160.
[14] SCHIRRIPA SPAGNOLO G, COZZELLA L, LECCESE F. Viability of an optoelectronic system for real time roughness measurement [J]. Measurement, 2014, 58: 537-543.
[15] DEMIRCIOGLU P. Estimation of surface topography for dental implants using advanced metrological technology and digital image processing techniques [J]. Measurement, 2014, 48: 43-53.
[16] GAO Y, LI X, DONG M, LI H P. An enhanced artificial bee colony optimizer and its application to multi-level threshold image segmentation [J]. Journal of Central South University, 2018, 25(1): 107-120.
[17] CHEN B Q, CUI J G, XU Q, SHU T, LIU H L. Coupling denoising algorithm based on discrete wavelet transform and modified median filter for medical image [J]. Journal of Central South University, 2019, 26(1): 120-131.
[18] KIM M K, CHENG J C P, SOHN H, CHANG C C. A framework for dimensional and surface quality assessment of precast concrete elements using BIM and 3D laser scanning [J]. Automation in Construction, 2015, 49: 225-238.
[19] QIAN D S, PENG Y Y, DENG J D. Hot deformation behavior and constitutive modeling of Q345E alloy steel under hot compression [J]. Journal of Central South University, 2017, 24(2): 284-295.
[20] ZHOU W, TANG J Y, HE Y F, ZHU C C. Modeling of rough surfaces with given roughness parameters [J]. Journal of Central South University, 2017, 24(1): 127-136.
[21] ALPAR O, KREJCAR O. Virtual road condition prediction through license plates in 3D simulation [C]// Computational Collective Intelligence, 8th International Conference, ICCCI 2016. 2016: 269-78.
[22] WANG M, XI L, DU S. 3D surface form error evaluation using high definition metrology [J]. Precision Engineering, 2014, 38: 230-236.
[23] HUANG S S, SUN Z Q, ZHOU T, ZHOU J M. Application of time�Cfrequency entropy from wake oscillation to gas�Cliquid flow pattern identification [J]. Journal of Central South University, 2018, 25(7): 1690-1700.
[24] ZENG M, LI J H, MENG Q H, ZHANG X N. Temporal-spatial cross-correlation analysis of non-stationary near-surface wind speed time series [J]. Journal of Central South University, 2017, 24(3): 692-698.
[25] MAJID S, MOHAMMAD J. Optimal selection of annulus radius ratio to enhance heat transfer with minimum entropy generation in developing laminar forced convection of water-Al2O3 nanofluid flow [J]. Journal of Central South University, 2017, 24(8): 1850-1865.
[26] TANAKA M, KAYAMA A. Automated image processing for fractal analysis of fracture surface profiles in high-temperature materials [J]. Journal of Materials Science Letters, 2001, 20: 907-909.
[27] KUCHERIK A, GERKE M, FATKULLIN E, PROKOSHEV V, ARALKELIAN S. The use of scanning probe microscopy for diagnostics of laser-induced surface instabilities [J]. Laser Physics, 2005, 15(7): 1071-1074.
[28] DAVID J, JANCIKOYAZ, FRISCHER R, VROZINA M. Crystallizer��s desks surface diagnostics with usage of robotic system [J]. Archives of Metallurgy and Materials, 2013, 58(3): 907-910.
[29] BASACA-PRECIADO L C, Sergiyenko O, Rodr��guez-Quinonez J C, Garc��a X, Tyrsa V V, Rivas-Lopez M, Hernandez-Balbuena D, Mercorelli P, Podrygalo M, Gurko A, Tabakova I, Starostenko O. Optical 3D laser measurement system for navigation of autonomous mobile robot [J]. Opticsand Lasers in Engineering, 2014, 54: 159-169.
[30] CHEN H, MA S, NUECHTER A. Non-synchronous point cloud algorithm for 3D reconstruction based on laser scanning and SFM [J]. Chinese Journal of Scientific Instrument, 2016, 37(5): 1148-1157.
[31] GARCIA-CRUZ X M, Sergiyenko O Y, Tyrsa V V, Rivas-Lopez M, Hernandez-Balbuena D, Rodriguez-Quinonez J C, Basaca-Preciado L C, Mercorelli P. Optimization of 3D laser scanning speed by use of combined variable step [J]. Optics and Lasers in Engineering, 2014, 54: 141-151.
[32] LINDSKOG E, VALLHAGEN J, JOHANSSON B. Production system redesign using realistic visualisation [J]. International Journal of Production Research, 2017, 55(3): 858-869.
[33] XIA C, SHI Y, YIN W. Obtaining and denoising method of three-dimensional point cloud data of plants based on TOF depth sensor [J]. Transactions of the Chinese Society of Agricultural Engineering, 2018, 34(6): 168-174.
[34] HUBER A, Schweer B, Philipps V, Gierse N, Zlobinski M, Brezinsek S, Biel W, Kotov V, Leyte-Gonzales R, Mertens, Samm U. Development of laser-based diagnostics for surface characterisation of wall components in fusion devices [J]. Fusion Engineering and Design, 2011, 86(6-8): 1336-1340.
[35] PODYMOVA N B, KARABUTOV A A, CHEREPETSKAYA E B. Laser optoacoustic method for quantitative nondestructive evaluation of the subsurface damage depth in ground silicon wafers [J]. Laser Physics, 2014, 24: No. 086003.
[36] van der MEIDEN H J, van den Berg M A, Brons S, Ding H, van Eck H J N, Hoen M H J 't, Karhunen J, de Kruif T M, Laan M, Li C, Lissovski A, Morgan T W, Paris P,Piip K, van de Pol M J, Scannell R, Scholten J, Smeets P H M, Spork C, van Emmichoven P A Z, ZoomersR, de Temmerman G. Laser-based diagnostics applications for plasma-surface interaction studies [J]. Journal of Instrumentation, 2013, 8: 11.
[37] ICOZ K. Image processing and cell phone microscopy to analyze the immunomagnetic beads on micro-contact printed gratings [J]. Applied Sciences, 2016, 6(10): No. 279. https://www.mdpi.com/2076-3417/6/10/279.
[38] CHEN Z G, LI Y G, CHEN X F, YANG C H, GUI W H. Edge and texture detection of metal image under high temperature and dynamic solidification condition [J]. Journal of Central South University, 2018, 25(6): 1501-1512.
[39] VESELKA L, DVORAK J, KREJCAR O. Smart automatic control of GSM alarm [C]//Mobile Web and Intelligent Information Systems, 13th International Conference, MobiWIS 2016. 2016: 363-375.
[40] KLIMOVA B, MARESOVA P, KREJCAR O. Smart home technology and energy savings with a special focus on Europe [C]// Advanced Multimedia and Ubiquitous Engineering, MUE/FutureTech 2017. 2017: 481-486.
[41] DENG Y, CHEN Z, YAO X, HASSAN S, WU J. Task scheduling for smart city applications based on multi-server mobile edge computing [J]. IEEE Access, 2019, 7: 14410-14421.
[42] ALVEAR O, CALAFATE C T, CANO J C, MANZONI P. Crowdsensing in smart cities: Overview, platforms, and environment sensing issues [J]. Sensors, 2018, 18(2): 460.
[43] KREJCAR O, FRISCHER R. Smart intelligent control of current source for high power LED diodes [J]. Microelectronics Journal, 2013, 44(4): 307-314.
[44] SPICKA I, Krejcar O, Frischer R, Kostial P, Selamat A, Jancikova Z, Kuca K. Utilization of linearization methods for measuring of thermal properties of materials [J]. AIMS Biophysics, 2018, 5(4): 257-271.
[45] KREJCAR O, KONARIK P. Remote wireless low cost RT process control using windows PLC by MATLAB/Simulink throw the REX control system [C]// 5th IEEE GCC Conference and Exhibition, GCC 2009. Kuwait City, 2009: No. 5734255.
[46] SUKALA O, MARESOVA P, DVORAK J, SELAMAT A, KREJCAR O. Calculating the optimal price of products in an online store [C]// Mobile Web and Intelligent Information Systems-14th International Conference, MobiWIS 2017. 2017: 104-114.
[47] MESICEK J, ZDARSKY J, DOLEZAL R, KREJCAR O, KUCA K. Simulations of light propagation and thermal response in biological tissues accelerated by graphics processing unit [C]// Computational Collective Intelligence, 8th International Conference, ICCCI 2016. 2016: 242-251.
[48] TERVEN J R, CORDOVA-ESPARZA D M. Kin2. A Kinect 2 toolbox for MATLAB [J]. Science of Computer Programming, 2016, 130: 97-106.
[49] SZILAGYI B, NAGY Z K. Graphical processing unit (GPU) acceleration for numerical solution of population balance models using high resolution finite volume algorithm [J]. Computers and Chemical Engineering, 2016, 91: 167-181.
[50] CASTANO-DIEZ D, MOSER D, SCHOENEGGER A, PRUGGNALLER S, FRANGAKIS A S. Performance evaluation of image processing algorithms on the GPU [J]. Journal of Structural Biology, 2008, 164(1): 153-160.
[51] FRANCO J, BERNABE G, FERNANDEZ J, UJALDON M. The 2D wavelet transform on emerging architectures: GPUs and multicores [J]. Journal of Real-Time Image Processing, 2012, 7( 3): 145-152.
(Edited by FANG Jing-hua)
���ĵ���
ʵ����������ͼ����������ά�����������
ժҪ�������������������ȵIJ����������ҵ��ҵ�д��ڵ���Ҫ���⣬���Ʒ�ı�������ֱ��Ӱ�쵽�������������衣��Ȼ����������Ի����������ݣ�����������ĸ���������Ҫ�IJ���Ӳ���������ά����άɨ���ǣ����Ƚϰ�����ˣ��������һ����ӱ���㷨�����ڼ���άɨ����ģ���ϣ���0.1 mm�ķֱ��ʵ�ͼ������������֤��ɨ����������ķ����кܶ࣬��ͼ������Ŀǰ��ҵ�Զ����������ŵĿ��⡣����Ҫ���ǣ�Ϊ�˻�ñ���ͼ��ʹ�ñ��ĸ߷ֱ��ʷ����������MatLabΪ��������ʵ�ֺ�������ˣ����ֽ������������������ɨ���ǣ����õ�һ��;�豸�Ķ������չ��ʵ�֡�
�ؼ��ʣ�������ϣ�ͼ��������ά���棻MatLab������
Foundation item: Project(2102�C2020) supported by the SPEV Project, University of Hradec Kralove, FIM, Czech Republic; Project(Vot-20H04) supported by Universiti Teknologi Malaysia (UTM); Project(Vot 4L876) supported by Malaysia Research University Network (MRUN); Project(Vot 5F073) supported by the Fundamental Research Grant Scheme (FRGS), Ministry of Education Malaysia
Received date: 2018-07-12; Accepted date: 2019-07-22
Corresponding author: Ondrej KREJCAR, PhD, Professor; Tel: +42-0777484280; E-mail: ondrej.krejcar@uhk.cz; ORCID: 0000-0002- 5992- 2574

