
Characteristics of damaged layer in micro-machining of copper material
Dong-Hee KWON1, Jeong-Suk KIM1, Myung-Chang KANG2, Se-Hun KWON2, Jong-Hwan LEE3
1. School of Mechanical Engineering, Pusan National University, Busan, 609-735, Korea;
2. National Core Research Center for Hybrid Materials Solution, Pusan National University, Busan, 609-735, Korea;
3. Department of Mechatronics, Busan College of Korea Polytechnic Ⅶ, Busan, 616-814, Korea
Received 2 March 2009; accepted 30 May 2009
Abstract: The study on damaged layer is necessary for improving the machinability in micro-machining because the damaged layer affects the micro mold life and micro machine parts. This study examined the ultra-precision micro-machining characteristics, such as cutting speed, feed rate and cutting depth, of a micro-damaged layer produced by an ultra-high speed air turbine spindle. The micro cutting force, surface roughness and plastic deformation layer were investigated according to the machining conditions. The damaged layer was measured using optical microscope on samples prepared through metallographic techniques. The scale of the damaged layer depends on the cutting process parameters, particularly, the feed per tooth and axial depth of the cut. According to the experimental results, the depth of the damaged layer is increased by increasing the feed per tooth and cutting depth, also the damaged layer occurs less in down-milling compared with up-milling during the micro-machining operation.
Key words: damaged layer; micro-machining; down-milling; up-milling
1 Introduction
A damaged layer refers to a layer that has a different nature from that of the base metal. When a metal material is machined, such a layer is found on the surface or outer layer of the material up to a certain thickness. The causes of these damaged layers can be classified as follows: damage due to contamination; absorbed layer; chemical compound layers; mixing of foreign substances; damage due to fine crystallization layers; increase in dislocation density; generation of twins; fiber texture; abrasion transformations; transformations of crystallization due to machining; changes in recrystallization structure textures caused by frictional heat; and damage as a result of internal factors, such as residual stress layers[1-3].
A damaged layer between the surface layer and based metal within metal cutting is affected by the cutting speed, feed rate and depth of the cut[4-6]. In particular, in machining processes, where the workpiece contacts the tool directly, damage from the working force is significant. In this contact scope, heat moves from the surface of the workpiece to the inner part. A certain temperature gradient is created and damaged layers occur in this zone[7-8]. In micro-machining and endmilling, the likelihood of damaged layers is low due to the relatively low cutting force, feed rate, cutting depth and cutting temperature. There are many difficulties in measuring the damaged layers, which hinder the progress of research[9-12]. In addition, in an evaluation of the micro-machining characteristics of micro-endmilling, many studies have been carried out on macroscopic precision but the studies on microscopic precision are still very limited. Using a micro-machining system, the micro-machining characteristics and surface damaged layers of copper micro-endmilling are evaluated depending on machining conditions. The characteristics of micro-machining and damaged layers are estimated by an optical microscope and this study demonstrates that the micro-machining depends on the cutting process parameters and the machining environments.
2 Experimental
In this experiment, a flat-type endmill (2-flutes) was mounted on an ultrahigh-speed air turbine spindle, which was attached to the main shaft of a high-speed machining center (MAKINO V55) for the machining experiment. The depth of the damaged layer was estimated using an optical microscope. For measurements of the cutting force, the system was constructed to measure the extent of micro cutting by clamping the workpiece to an exclusive jig. Fig.1 shows the composition of the experiment device configuration and Table 1 lists the equipment and specifications used in the experiment.
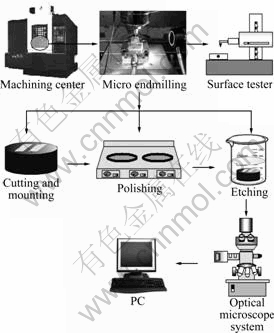
Fig.1 Schematic configuration of experimental set-up
Table 1 Specifications of experimental instruments
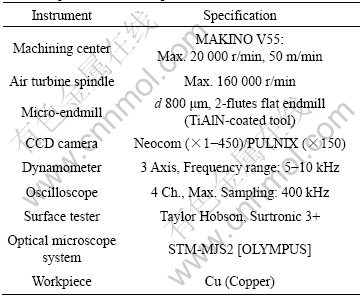
For the micro-machining experiment, the micro- machining condition was selected to be a d 800 μm micro tool at a speed of 150 m/min or higher. The spindle speed was set to 60 000-160 000 r/min with an increase of 20 000 r/min each time and machining was conducted depending on the depth of the cut. The depths of the damaged layer and the burr were measured using an optical microscope. Table 2 lists the micro-machining conditions applied to the micro-endmill machining experiment. Fig.2 shows the micro-endmill machining experimental method.
Table 2 Micro-machining conditions of copper material

.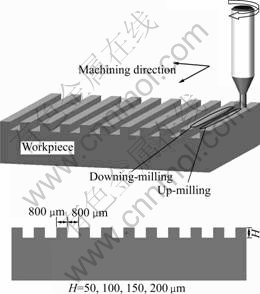
Fig.2 Schematic configuration of micro-endmill machining
If resin selection is not made properly in sample mounting, it becomes difficult to observe the edge part in the compression and rounding phenomena of the resin after mounting[13-15]. Therefore, the machining process was performed by selecting the EPOMET resin which has a high abortion force and a high level of hardness for the samples[16-17]. For etching, the natal concentration was adjusted to be 6%-9% depending on the metal material characteristics, and corrosion took place for approximately 10 s. Subsequently, the depth of the damaged layer was measured from the visual differences in texture[18-20].
3 Results and discussion
3.1 Sizes of damaged layer and burr
In order to determine the microscopic precision in micro-endmill machining, the burr shape and depth of the damaged layers were evaluated according to the spindle speed and depth of the cut and in terms of up-milling (upward cutting) and down-milling (downward cutting). The measurements were carried out for the upper, middle and lower parts of the damaged layers occurring on each lateral face, and the average value was obtained. Figs.3 and 4 show the burr shape of the cut in up-milling, and down-milling, respectively. While Figs.5 and 6 indicate the depth of the damaged layers depending on the depth of the cut in up-milling and down-milling, respectively.
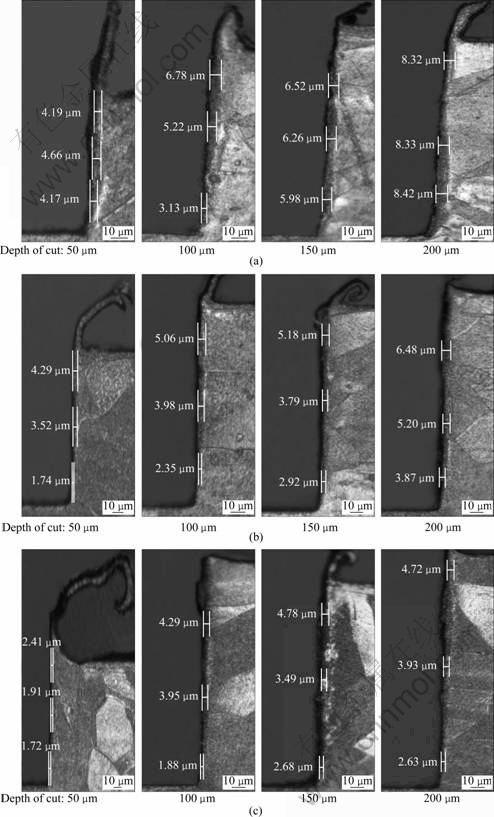
Fig.3 Variations of damaged layer and burr according to micro-machining conditions (up-milling): (a) Spindle speed of 60 000 r/min, feed of 4 μm/tooth; (b) Spindle speed of 120 000 r/min, feed of 4 μm/tooth; (c) Spindle speed of 160 000 r/min, feed 4 μm/ tooth
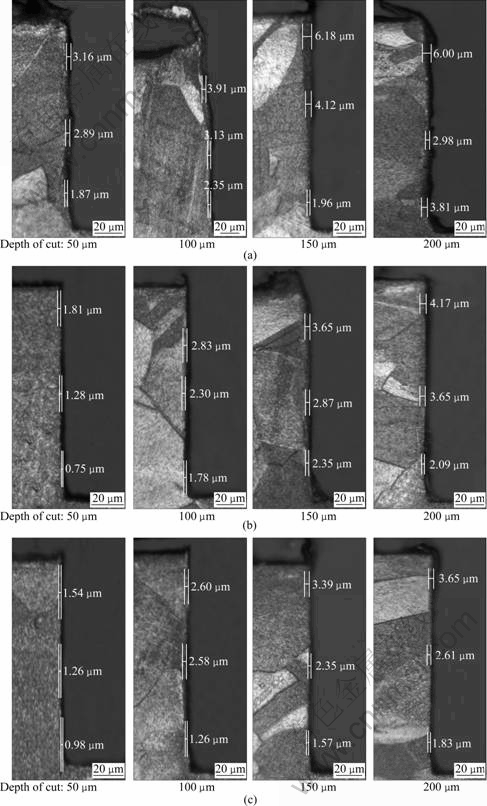
Fig.4 Variations of damaged layer and burr according to micro-machining conditions (down-milling): (a) Spindle speed of 60 000 r/min, feed of 4 μm/tooth; (b) Spindle speed of 120 000 r/min, feed 4 μm/tooth; (c) Spindle speed of 160 000 r/min, feed 4 μm/tooth
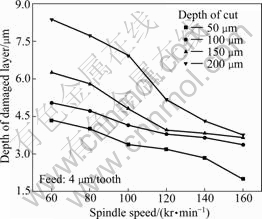
Fig.5 Relationship between depth of damaged layer and spindle speed (up-milling)
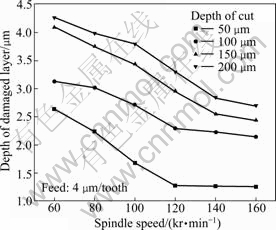
Fig.6 Relationship between depth of damaged layer and spindle speed (down-milling)
The depth of the damaged layer was smaller in down-milling(Fig.6) than that in up-milling (Fig.5). This is because down-milling receives less specific micro- cutting resistance and compressive residual stress than up-milling. In Figs.3 and 4, burrs increase consistently as the damaged layer becomes deeper. The depth of the damages layer decreased in both up-milling and down- milling with increasing spindle speed. The depth of the damaged layers in both cases increases with increasing depth of the cut.
3.2 Characteristics of micro cutting force
In micro-machining using an ultrahigh-speed air turbine spindle, micro cutting force signals of very high frequency were generated due to the high spindle speed. Such signals could not be acquired using an existing tool dynamometer with a low natural frequency. Therefore, it is essential to develop a new tool dynamometer that is suitable for such signals. Accordingly, in this study, a new tool dynamometer with a higher response frequency was developed and applied to actual micro-machining.
In this experiment, the maximum revolution of 160 000 r/min was 5.3 kHz under the condition of using a 2-teeth micro-flat endmill. A tool dynamometer with a resonance frequency of 10 kHz was introduced to measure the cutting force in a stable frequency range. Figs.7 and 8 show the characteristics of the cutting forces in the feed and radial directions using this tool dynamometer. The cutting force characteristics depended on the spindle speeds and cutting depth. Therefore, the occurrence of a damaged layer is closely related to the dynamic characteristics of the spindle speeds and cutting force.
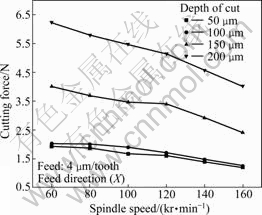
Fig.7 Relationship between the cutting force and spindle speed (feed direction)
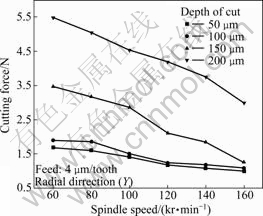
Fig.8 Relationship between cutting force and spindle speed (radial direction)
3.3 Characteristics of surface roughness
The roughness of the machined surface was measured using a Taylor Hobson three-dimensional surface roughness tester. The machined surface of the groove was indicated by the average roughness of the central line. Fig.9 shows the surface roughness of a machined surface. The characteristics of the surface roughness were similar to those of the cutting force (feed and radial directions) in terms of the damaged layer and their correlations. In the macro-machining experiments, the surface roughness is often correlated with the damaged layers[3, 13].
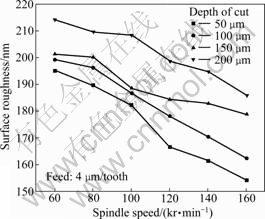
Fig.9 Relationship between surface roughness and spindle speed
4 Conclusions
In micro-endmill machining of copper, the evaluation experiments of the damaged layers led to the following conclusions:
1) The damaged layers increase in thickness with increasing the spindle speed in both up-milling and down-milling, and increase with increasing the depth of cut under the same conditions.
2) Damaged layer and burrs are strongly related, and the occurrence of a damaged layer is less frequent in down-milling than up-milling.
3) The depth of the damaged layers correlates with the dynamic characteristics of the spindle speeds and surface roughness of the machined surface.
4) The depth change characteristics of the damaged layers are related to the cutting force change characteristics of the feed and radial direction elements.
Acknowledgement
This research work was partly supported by the National Core Research Center Program from MOST and KOSEF (No. R15-2006-022-01001-0), Korea.
References
[1] Zhang Z, Jiang L, Lin G, XU Z. Effects of nitrogen concentration on microstructure and antibacterial property of copper-bearing austenite stainless steels [J]. Journal of Materials Science and Technology, 2008, 24(5): 781-786.
[2] Sokovic M, Mijanovic K. Ecological aspects of the cutting fluids and its influence on quantifiable parameters of the cutting processes [J]. Journal of Materials Processing Technology, 2001, 109: 181-189.
[3] Ahn D K, Kim H C, Lee S H. Determination of fabrication direction to minimize post-machining in FDM by prediction of non-linear roughness characteristics [J]. Journal of Mechanical Science and Technology, 2005, 19(1): 144-155.
[4] Chou Y K, Evans C J. White layers and thermal modeling of hard turned surfaces [J]. International Journal of Machine Tools and Manufacture, 1999, 39: 1863-1881.
[5] Clark W I, Shih A J, Hardin C W, Lemaster R L, McSpadden S B. Fixed abrasive diamond wire machining (PartⅠ): Process monitoring and wire tension force [J]. International Journal of Machine Tools and Manufacture, 2003, 43: 523-532.
[6] Chu T H, Walbank J. Determination of the temperature of a machined surface [J]. Journal of Manufacturing Science and Engineering, 1998, 120: 259-263.
[7] Karthikeyan R, Adalarasan R. Optimization of machining characteristics for Al/SiCp composites using ANN/GA [J]. Journal of Materials Science and Technology, 2002, 18(1): 47-50.
[8] Chou Y K, Evans C J. Process effects on white layer formation in hard turning [J]. Transactions of NAMRI/SME, 1998, 26: 177-182.
[9] Chen X, LI J, MA D, HU X, XU X, Jiang M. Fine machining of large-diameter 6H-SiC wafers [J]. Journal of Materials Science and Technology, 2006, 22(5): 681-684.
[10] Jeon S K, Shin Y J, KIM B H, KIM H Y, JEON B H. Micro-machining of glasses using chemical-assisted ultrasonic machining [J]. Transactions of KSME, 2003, 27(12): 2085-2091.
[11] NAN L, YANG W C, LIU Y Q, XU H, LI Y, LU M Q, YANG K. Antibacterial mechanism of copper-bearing antibacterial stainless steel against E. Coli[J]. Journal of Materials Science and Technology, 2008, 24(2): 197-201.
[12] Klocke F, Eisenblatter G. Dry cutting [J]. Annals of the CIRP, 1997, 46: 519-526.
[13] KWON W T, HONG I J. Estimation of the cutting torque without a speed sensor during CNC turning [J]. Journal of Mechanical Science and Technology, 2005, 19(12): 2205-2212.
[14] Palanikumar K, Karunamoorthy L, Karthikeyan R. Parametric optimization to minimise the surface roughness on the machining of GFRP composites [J]. Journal of Materials Science and Technology, 2006, 22(1): 66-72.
[15] SON J H, HAN C W, LEE S R, LEE Y M. A study on structural stability estimation of whirling unit [J]. Trans Nonferrous Met Soc China, 2007, 17: 814-817.
[16] Mohri N, Saito N, Tsunekawa Y. Metal surface modification by electrical discharge machining with composite electrode [J]. Annals of the CIRP, 1993, 42: 219-222.
[17] Rahman M, KumaR A S. Experimental evaluation on the effect of minimal quantities of lubricant in milling [J]. Journal of MTM, 2001, 42: 539-547.
[18] PARK J, JEONG H. A study on the fabrication of micro groove on Si wafer using chemical mechanical machining [J]. Journal of Mechanical Science and Technology, 2005, 19(11): 2096-2104.
[19] ZHANG Q H, ZHANG J H, JIA Z X, SUN J L. Material removal rate analysis in the ultrasonic machining of engineering ceramics [J]. Journal of Materials Processing Technology, 1999, 88: 180-184.
[20] Mohan L V, Shungmugam M S. Simulation of whirling process and tool profiling for machining of worms [J]. Journal of Materials Processing Technology, 2007, 185: 191-197.
Corresponding author: Myung-Chang KANG; E-mail: kangmc@pusan.ac.kr
(Edited by YANG Hua)