


Trans. Nonferrous Met. Soc. China 22(2012) 1902-1906
Finite element analysis of strain distribution in ZK60 Mg alloy during cyclic extrusion and compression
LIN Jin-bao1,2, WANG Qu-dong 2, LIU Man-ping2, CHEN Yong-jun3, Hans J. ROVEN3
1. School of Applied Science, Taiyuan University of Science and Technology, Taiyuan 030024, China;
2. National Engineering Research Center for Light Alloy Net Forming,Shanghai Jiao Tong University, Shanghai 200240, China;
3. Department of Materials Science and Engineering,Norwegian University of Science and Technology, NO-7491, Trondheim, Norway
Received 10 November 2011; accepted 9 May 2012
Abstract: Finite element method was used to study the strain distribution in ZK60 Mg alloy during multi-pass cyclic extrusion and compression (CEC). In order to optimize the CEC processing, the effects of friction condition and die geometry on the distribution of total equivalent plastic strain were investigated. The results show that the strain distributions in the workpieces are inhomogeneous after CEC deformation. The strains of the both ends of the workpieces are lower than that of the center region. The process parameters have significant effects on the strain distribution. The friction between die and workpiece is detrimental to strain homogeneity, thus the friction should be decreased. In order to improve the strain homogeneity, a large corner radius and a low extrusion angle should be used.
Key words: cyclic extrusion and compression; finite element method; friction; ZK60 magnesium alloy; strain homogeneity
1 Introduction
As one kind of continuously severe plastic deformation processing, cyclic extrusion and compression (CEC) seems to be more adaptable for industrial applications. Moreover, it is very suitable for refining the grains of not easily deforming metals, such as magnesium alloys, since they imposes three- dimensional compression stresses during processing [1].
The CEC processing was proposed by RICHERT and RICHERT [2], and it has been successfully used to produce a variety of metallic materials with ultra-fine grain structures [1,3-6]. The CEC processing is performed by pushing a workpiece from one cylindrical chamber to another chamber with equal dimensions. The inter-chamber can be considered an extrusion die having a smaller diameter [5]. During the final extrusion pass, the opposite ram is removed in order to release the rod. The equivalent strain �� generated in the workpiece after n-pass CEC processing is given by the following equation [2,6,7]:
 (1)
(1)
where D is the chamber diameter and d is the extrusion die diameter, as illustrated in Fig. 1.
Since strain affects the microstructure produced in the material, the homogeneity of strain across the cross- section and longitudinal section of an extruded workpiece is of importance [8]. The strain homogeneity in the equal channel angular extrusion has been widely studied using finite element method (FEM), and it is found that the main factor affecting the strain homogeneity are the process parameters including the friction between workpiece and die, and die geometry [8-14]. However, the strain evolution during the CEC has not been investigated. In this work, FEM was used to investigate the effects of process parameters on the strain homogeneity during CEC processing with a view to provide optimized die geometries and deformation parameters for CEC processing.
2 FEM simulation
The cylindrical die and workpiece can be simplified to an axisymmetric case. Figure 1 shows the axisymmetric FEM model for the simulation of the CEC processing. In the present study, D is 30 mm and d is 20 mm. The extrusion angle is �� and the corner radius is r. The process parameters used in simulation are listed in Table 1. The effects of process parameters on the strain were investigated after 4-pass CEC.
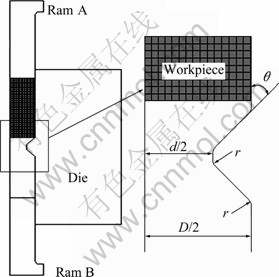
Fig. 1 Axisymmetric FEM model for CEC
Table 1 Process parameters used in simulation

Isothermal, two-dimensional, axisymmetric plane-strain FEM simulations of the CEC processing were carried out using the commercial finite element software, MSC. SuperForm. In the simulation, the die and the ram can be approximately considered rigid bodies since their strength was much higher than that of the workpiece. Automatic remeshing was used to accommodate large deformation during the simulations. A self-adaptive step length was used as the time step of the calculation. The simulation was performed at 350 �� and kept under isothermal condition. The friction between the billet and the die was modeled with the Coulomb friction law.
The most importance in FEM simulation is the material rheology [11,15]. To obtain results with a high degree of confidence, the material rheology for the studied alloy was defined by compression stress��strain curves measured using a Gleeble 3500 machine at 350 ��, as shown in Fig. 2. Moreover, the FEM model has been verified in another paper [16].
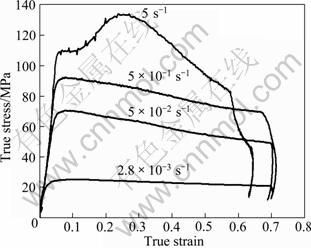
Fig. 2 True stress��strain curves of as-extruded ZK60 alloy at 350 ��
3 Results and discussion
3.1 Effect of friction
Figure 3 shows the simulated total equivalent plastic strain (TEPS) distribution in the workpiece after 4-pass CEC processing with different friction coefficients (��). Here the corner radius is set to be 2 mm, and the extrusion angle is 45��. The paths A-B and C-D are defined as shown in Fig. 4. The rectangle is the meridian plane of the cylindrical workpiece, path A-B is along the radial direction from axis to the surface of the workpiece, and the length is 10 mm; path C-D is along the axial direction located in the middle of the radius, and the length is about 90 mm. To obtain quantitative information regarding the strain homogeneity, the TEPS distribution along radial direction (A-B in Fig. 3) and axial direction (C-D in Fig. 3) are plotted in Fig. 5. It can be seen that at the condition of �� = 0.3, the TEPS of the surface is about 18% higher than that of the center because the friction force on the surface enhances the workpiece shear. When the friction coefficient decreases, the TEPS near the surface of workpiece is decreased clearly, and the center TEPS is increased slightly. It reveals that the relative homogeneity of strain increases with decreasing friction coefficients. The simulated TEPS value is also compared with the theoretical value obtained by Eq. (1), as shown in Fig. 5(b). The theoretical plastic strain after 4-pass CEC is about 5.67 in this study. About 87% TEPS of the whole workpiece is larger than the theoretical value under all friction conditions.
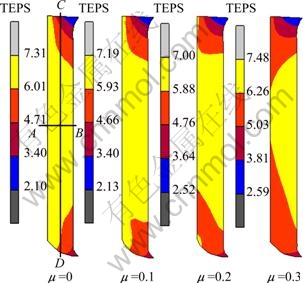
Fig. 3 Distribution of TEPS in workpiece after 4-pass CEC processing with different friction coefficients
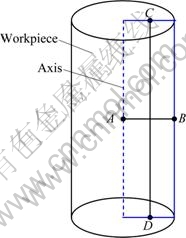
Fig. 4 Illustration of section in workpiece for CEC
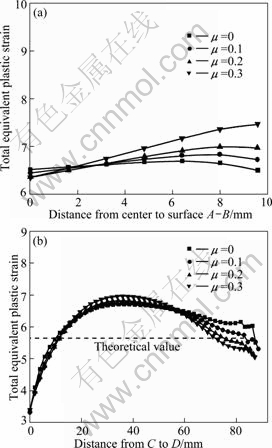
Fig. 5 Variation curves of TEPS from center to surface A�CB (a) and one end to another C-D with different friction coefficients (b)
As shown in Figs. 3 and 5(b), the TEPS distribution is inhomogeneous along the workpiece axis, and the TEPS values of both ends are lower than that of the middle part of the workpiece after CEC. With decreasing friction coefficient, the uniform strain region in the middle part is obviously extended. Therefore, friction is a disadvantageous factor during CEC processing, which increases the deformation inhomogeneity and may result in inner flaws of the workpiece [13]. Lubricant, such as graphite powder, is used to reduce the effect of friction in the practical pressing process [4,5].
3.2 Effect of corner radius
Die corner angle is another important parameter during CEC processing. The effects of corner radius on the strain distribution are simulated with ��=0.2, ��=45�� and v=8 mm/s. Figure 6 represents the diversification of TEPS distribution in the workpiece after 4-pass CEC processing with different corner radii. It is obviously that the corner radius has a significant effect on the strain distribution. With the increase of corner radius, the maximum value of TEPS is decreased. Compared with the condition of r=0, the maximum TEPS located on the surface of workpiece is decreased by about 38.5 % from 9.7 to 7.0 under the condition of r=2 mm. As a result, the uniform strain region is obviously extended. Therefore, in order to improve the strain homogeneity during CEC processing, a relative large corner radius should be used.
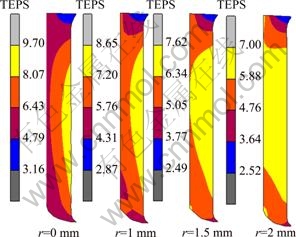
Fig. 6 Distribution of TEPS in workpiece after 4-pass CEC processing with different corner radii
The TEPS values along radial direction A-B and axial direction C-D are plotted in Fig. 7. It can be seen that, with the increase of corner radius, the TEPS on the surface of workpiece is decreased dramatically (Fig. 7(a)). However, the TEPS in the center almost keeps the same value. As a result, the strain homogeneity is improved with the increase of corner radius. DJAVANROODI et al [17] have recently shown that the increase of the corner radius can improve the metal flow in the deformation region and decrease the deformation concentration.
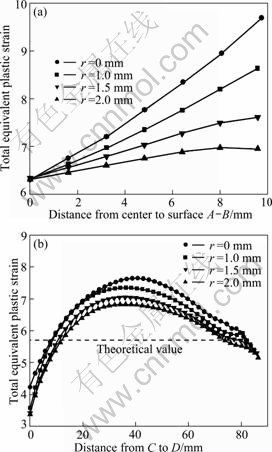
Fig. 7 Variation curves of TEPS from center to surface A�CB (a) and one end to another C-D with different corner radii (b)
3.3 Effect of extrusion angle
Figure 8 represents the distribution of TEPS in the workpiece after 4-pass CEC processing with different extrusion angles. Here other process parameters are set as ��=0.2, r=2 mm and v=8 mm/s. It can be seen that with the increase of extrusion angles from 45�� to 90��, the maximum value of TEPS is increased markedly from 7.00 to 13.79 which is almost doubled in value. On the other hand, with the increase of extrusion angle, the strain distribution becomes more inhomogeneous.
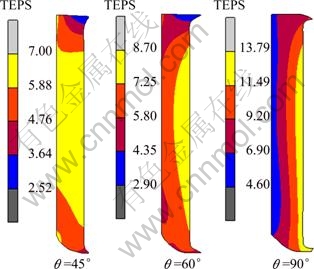
Fig. 8 Distribution of TEPS in workpiece after 4-pass CEC processing with different extrusion angles
Figure 9 represents the TEPS distribution along the marked lines A-B and C-D within the workpiece at different extrusion angles. It shows that the extrusion angle has a severe influence on the strain homogeneity. With a high extrusion angle ��=90��, though the TEPS maximum value is much higher, the TEPS in the center is almost the same under the low extrusion angle condition. Obviously, the high extrusion angle is detrimental to strain homogeneity.
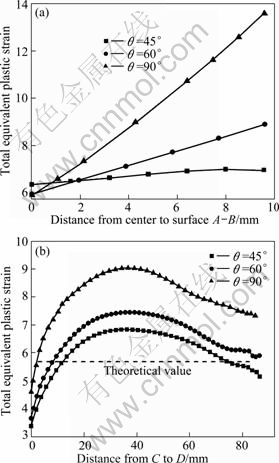
Fig. 9 Variation curves of TEPS from center to surface A�CB (a) and one end to another C-D with different extrusion angles (b)
4 Conclusions
1) The strain distribution is inhomogeneous in the workpiece after CEC processing, and the strain values of both ends are lower than that of the middle part. The equivalent strain value of 82% to 90% of the workpieces is larger than the theoretical value. The process parameters have significant effects on the strain distribution. The strain homogeneity can be improved by adjusting the process parameters.
2) The strain distribution is severely affected by die geometries, such as extrusion angle and die corner radius. A high corner radius and a low extrusion angle can improve the metal flow in the deformation region, and then improve the strain homogeneity.
3) The friction between die and workpiece is detrimental to strain homogeneity during CEC processing, but its influence is lower than that of the die geometry.
References
[1] WANG Q D, LIN J B, Peng L M, Chen Y J. Influence of cyclic extrusion and compression on the mechanical property of Mg alloy ZK60 [J]. Acta Metall Sin, 2008, 44: 55-58.
[2] Richert J, Richert M. A new method for unlimited deformation of metals and alloys [J]. Aluminium, 1986, 62(8): 604-607.
[3] Lee S W, Yeh J W. Microstructural evolution and superplasticity of Al-5.8Mg-0.23Mn alloys processed by reciprocating extrusion [J]. Metall Mater Trans A, 2005, 36: 2225-2234.
[4] Lin Jin-bao, Wang Qu-dong, Chen Yong-jun, liu man-ping, ROVEN H J. Microstructure and texture characterization of ZK60 alloy processed by cyclic extrusion and compression [J]. Transactions of Nonferrous Metals Society of China, 2010, 20(11): 2081-2085.
[5] LIN J B, WANG Q D, Peng L M, Peng T. Effect of the cyclic extrusion and compression processing on microstructure and mechanical properties of as-extruded ZK60 magnesium alloy [J]. Mater Trans, 2008, 49: 1021-1024.
[6] Richert M, Liu Q, Hansen N. Microstructural evolution over a large strain range in aluminum deformed by cyclic-extrusion- compression [J]. Mater Sci Eng A, 1999, 260: 275-283.
[7] Richert M, Korbel A. The effect of strain localization on mechanical properties of Al99, 992 in the range of large deformations [J]. J Mater Process Technol, 1995, 53: 331-340.
[8] Oruganti R K, Subramanian P R, Marte J S, Gigliotti M F, Amancherla S. Effect of friction, backpressure and strain rate sensitivity on material flow during equal channel angular extrusion [J]. Mater Sci Eng A, 2005, 406: 102-109.
[9] Dumoulin S, Roven H J, Werenskiold J C, Valberg H S. Finite element modeling of equal channel angular pressing: Effect of material properties, friction and die geometry [J]. Mater Sci Eng A, 2005, 410-411: 248-251.
[10] Jiang H, Fan Z G, Xie C Y. 3D finite element simulation of deformation behavior of CP-Ti and working load during multi-pass equal channel angular extrusion [J]. Mater Sci Eng A, 2008, 485(1-2): 409-414.
[11] Petrescu D, Savage S C, Hodgson P D. Simulation of the fastener manufacturing process [J]. J Mater Process Technol, 2002, 125�C126: 361-368.
[12] XUE Ke-min, WANG Xiao-xi, LI Ping, WANG Cheng, ZHANG Xiang. Numerical simulation and experiment of pure molybdenum powder sintered material with porosities during ECAP [J]. Transactions of Nonferrous Metals Society of China, 2011, 21(11): 198-204.
[13] Zhao W J, Ding H, Ren Y P, Hao S M, WANG J, WANG J T. Finite element simulation of deformation behavior of pure aluminum during equal channel angular pressing [J]. Mater Sci Eng A, 2005, 410-411: 348-352.
[14] REN Guo-cheng, ZHAO Guo-qun, XU Shu-bo, WANG Gui-qing. Finite element analysis of homogeneous deformation of AZ31 magnesium during equal channel angular pressing process [J]. Transactions of Nonferrous Metals Society of China, 2011, 21(4): 849-855.
[15] Gavrus A, Massoni E, Chenot J L. An inverse analysis using a finite element model for identification of rheological parameters [J]. J Mater Process Technol, 1996, 60: 447-454.
[16] LIN J B, WANG Q D, Peng L M, Peng T, HANS J R. Study on deformation behavior and strain homogeneity during cyclic extrusion and compression [J]. J Mater Sci, 2008, 43(21): 6920-6924.
[17] Djavanroodi F, Sabeghi M, Abrinia K. Analysis of the parameters affecting warping in radial forging process [J]. Am J Applied Sci, 2008, 5(8): 1013-1018.
������ѹ����ZK60þ�Ͻ�Ӧ��ֲ�������Ԫ��ֵģ��
�ֽ�1,2, ������2, ����ƽ2, ���¾�3, Hans J. ROVEN3
1. ̫ԭ�Ƽ���ѧ Ӧ�ÿ�ѧѧԺ��̫ԭ 030024��
2. �Ϻ���ͨ��ѧ ��Ͻ��ܳ����ҹ����о����ģ��Ϻ� 200240��
3. Ų���Ƽ���ѧ ���Ͽ�ѧ�빤��ѧԺ����¡����7491, Ų��
ժ Ҫ����������Ԫ���о�ZK60þ�Ͻ��ڶ����������ѹ�����е�Ӧ��ֲ���Ϊ�Ż�������ѹ���գ��о�Ħ��������ģ�߽ṹ�ߴ��ZK60�Ͻ��ܵ�Ч����Ӧ��ֲ���Ӱ�졣���������ZK60�Ͻ�������������ѹ����Ӧ��ֲ������ȡ����������˲���Ӧ�������������м䲿λ��Ӧ���������ղ�����Ӧ��ֲ���Ӱ��ܴ�������ģ���Ħ��������������Ӧ�����ľ��ȷֲ������Ӧ��������Ħ����Ϊ�����Ӧ�����ľ��ȷֲ���Ӧ��ʹ�ýϴ�Ĺ���Բ�ǰ뾶�ͽϵ͵ļ�ѹ�Ƕȡ�
�ؼ��ʣ�������ѹ������Ԫ����Ħ����ZK60þ�Ͻ�Ӧ�������
(Edited by FANG Jing-hua)
Foundation item: Projects (51074106, 50674067) supported by the National Natural Science Foundation of China; Project (09JC1408200) supported by the Science and Technology Commission of Shanghai Municipality, China; Project (2011-079) supported by the Shaanxi Scholarship Council, China; Project (20102015) supported by the Doctoral Startup Fund of TUST, China
Corresponding author: WANG Qu-dong; Tel: +86-21-54742715; E-mail: wangqudong@sjtu.edu.cn
DOI: 10.1016/S1003-6326(11)61405-2