FEA modeling of effect of axial feeding velocity on strain field of rotary swaging process of pure magnesium
来源期刊:中国有色金属学报(英文版)2006年第5期
论文作者:荣莉 聂祚仁 左铁镛
文章页码:1015 - 1020
Key words:rotary swaging; magnesium; strain filed; processing parameters
Abstract: A coupled thermal-mechanical model of the rotary swaging of pure magnesium was developed using the general finite-element software program MSC/Marc to visualize the effect of axial feeding velocity on the rotary swaging process. The radial displacement occurring in one pulse impact increases in proportion to axial feeding velocity (vax). When the other processing parameters are fixed, the surface roughness of the swaged bar increases with vax and is in parabolic relation with vax. There exists a minimum velocity vax, min below which the decrease of vax will no longer improve the surface roughness. Under the technological conditions of this simulation, when the finial diameter d=6.6 mm, vax, min=1.82 m/min, and when d=7.0 mm, vax, min=1.83 m/min. If Ra=3.2 is required for the end product, then vax, max=6.02 m/min is gotten for d=6.6 mm and vax, max=7.05 m/min for d=7.0mm. The increase of vax has no notable influence on strain distribution along radial direction. The errors between the experimental and simulated height of the spiral spine-like ridges are below 8.0%.
基金信息:the Ministry of Science and Technology of China

RONG Li(荣 莉), NIE Zuo-ren(聂祚仁), ZUO Tie-yong(左铁镛)
School of Material Science and Engineering, Beijing University of Technology, Beijing 100022, China
Received 16 November 2005; accepted 15 June 2006
Abstract: A coupled thermal-mechanical model of the rotary swaging of pure magnesium was developed using the general finite-element software program MSC/Marc to visualize the effect of axial feeding velocity on the rotary swaging process. The radial displacement occurring in one pulse impact increases in proportion to axial feeding velocity (vax). When the other processing parameters are fixed, the surface roughness of the swaged bar increases with vax and is in parabolic relation with vax. There exists a minimum velocity vax, min below which the decrease of vax will no longer improve the surface roughness. Under the technological conditions of this simulation, when the finial diameter d=6.6 mm, vax, min=1.82 m/min, and when d=7.0 mm, vax, min=1.83 m/min. If Ra=3.2 is required for the end product, then vax, max=6.02 m/min is gotten for d=6.6 mm and vax, max=7.05 m/min for d=7.0mm. The increase of vax has no notable influence on strain distribution along radial direction. The errors between the experimental and simulated height of the spiral spine-like ridges are below 8.0%.
Key words: rotary swaging; magnesium; strain filed; processing parameters
1 Introduction
Rotary swaging, which has properties of pulse forging and multidimensional beating, has high deformation efficiency and provides compressive stress state which benefits brittle material deformation[1]. On the other hand, magnesium wires are up to date fabricated mainly by casting and extrusion[2]. However, the as-cast magnesium wires have poor mechanical properties and inferior surface finish quality, and the as-extruded magnesium wires are not widely used because of its low deformation efficiency and insufficient strength. So it is important to develop a new process to fabricate magnesium wires. Researches on swaging of magnesium offers good opportunity to improve the magnesium wire fabrication.
In recent years, the study on conventional spin forming[3], sheet metal forming[4-6], extrusion[7] and superplasticity[8] of magnesium and its alloys has been reported. However, rotary swaging of pure magnesium has not been reported. There are some FEA of the swaging process, but reports on FEA of the rotary swaging process with the characteristic of pulse loading are rare.
Axial feeding velocity which is the distance the chuck jaw moves in unit time, directly influences the surface quality and production efficiency. In the article the effect of axial feeding velocity on pure magnesium swaging was studied through experiment and FEA simulation to provide theoretical information for implementing of pure magnesium rotary swaging.
2 Numerical modeling of rotary swaging processing
2.1 Finite element model definition
A schematic view of the swaging machine head are shown in Refs.[1]. The geometric parameters of swaging die segments are shown in Fig.1(a). The workpiece moves in both radial and axial directions. So in the FEM of swaging the die segment is defined as rigid contact body and the swaging processing parameters, such as radial displacement and axial feeding velocity, are adjusted by changing moving curves of the rigid body.
Considering the axial symmetry of both the loads and the workpiece, 1/2 of the axial section is analyzed in the FEA model. No.10 four-node, axisymmetric, quadrilateral full integration elements are chosen to develop FEA model of rotary swaging. Initial meshes and mechanical boundary conditions are shown in Fig.1(b). All related mechanical and thermal properties are functions of temperature and input according to ASTM handbook[9]. Flow stress curves obtained through experiments[10] are edited as a material data file which would be read by MSC.Marc in simulation[11].
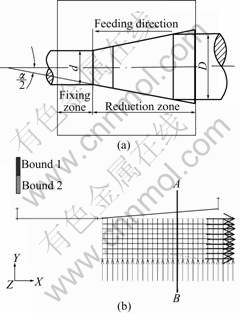
Fig.1 Geometric parameters of swing die segments(a) and geometric modeling and initial meshes of swaging(b)
2.2 Initial conditions and boundary conditions
The mechanical boundary conditions are as follows: based on the deformation nature of swaging, the radial displacement of nodes at the axis of the workpiece and the axial displacement of nodes at the right end face of the workpiece are set as zero. The conditions at the interfaces between the workpiece and dies were described using the Coulomb friction model and the friction coefficient is 0.25.
The thermal boundary conditions are as follows: as the measured temperature-fluctuation during experiments of pure magnesium swaging is small, the radiation heat-transfer coefficient changes insignificantly. So the rate of heat flow due to surface emission and convection is uniformly set as[12]
q″=q″+![]() =h1(T-T∞)+hr(T-Tsur)=h(T-T∞) (1)
=h1(T-T∞)+hr(T-Tsur)=h(T-T∞) (1)
where h1 is the convection heat-transfer coefficient, hr is the radiation heat-transfer coefficient, h is the equivalent heat-transfer coefficient, T is the temperature of swaging workpiece, and![]() is the ambient temperature. In the simulation the contact heat transfer coefficient is set as 3 kW/(m2?K) and the equivalent heat-transfer coefficient is set as 20 W/(m2?K)[13]. 90% of inelastic deformation associated with mechanical work is converted into heat which will affect temperature distribution. The heat generated from friction is averagely distributed to the workpiece and the dies. The ambient temperature is 25 ℃ and the die segments are preheated to 120 ℃.
is the ambient temperature. In the simulation the contact heat transfer coefficient is set as 3 kW/(m2?K) and the equivalent heat-transfer coefficient is set as 20 W/(m2?K)[13]. 90% of inelastic deformation associated with mechanical work is converted into heat which will affect temperature distribution. The heat generated from friction is averagely distributed to the workpiece and the dies. The ambient temperature is 25 ℃ and the die segments are preheated to 120 ℃.
2.3 Local adaptive meshing
During rotary swaging processing the loads pulse periodically and so the obvious characteristic of rotary swaging is periodic large local stress, the adaptive criteria based upon absolute testing using equivalent von mises stress is used. In this way, an element is subdivided if Eqn.(2) is not satisfied:
σvm>f (2)
where σvm is the equivalent stress of any element, f is the coefficient set by authors according to the computing context.
2.4 FEA conditions and determination of loadcase
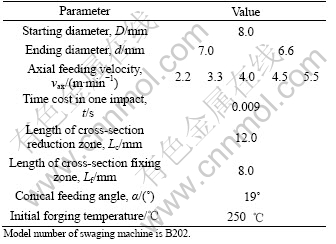
Table 1 lists the used process parameters which are the same as those of actual swaging machine. The total loading time varies with the magnitude of the axial feeding velocity on the principle of ensuring that the workpiece pass through the whole die longitudinal section. Fixed stepping procedures are adopted and the steps in one pulse impact varies with the magnitude of axial feeding velocity on the principle of ensuring the pulse apex of the moving curve of the rigid body be exactly an end-point of one step.
Table 1 Process parameters used in simulation
3.1 Equivalent strain distribution
The equivalent strain distribution maps after swaging for 0.12 s are shown in Fig.2. It is found that the deformation zone of swaged bar should be divided into three parts: partⅠis the bulging head-end, Ⅱis the formed zone and Ⅲ is the reduction zone. In part Ⅱ, the equivalent strain distribution on different sections perpendicular to the axis of the workpiece are the same (the only differences appear on the exterior surface of workpieces which will be clarified in section two of the article) and so the stress & strain distributions of partⅡ represents those of finished swaging products. By comparing Fig.2(a) with Fig.2(b), it can be declared that the FE model developed in the article accurately reflects the effect of axial feeding velocity on efficiency, viz. the part of the workpiece that has entered the cross-section fixing zone increases with the enhancement of vax. When the swaging proceeds for 0.12 s, three parts of deformation zone have appeared at the velocity of 4.5 m/min but at the same time part Ⅱ has not appeared at the velocity of 2.2 m/min.
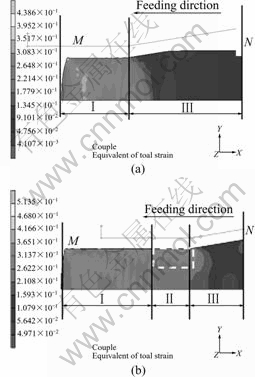
Fig.2 Equivalent strain distribution at swaging time 0.12 s (d=7.0 mm): (a) vax=2.2 m/min; (b) vax=4.5 m/min
3.2 Rotary swaging history
![]() In Fig.3, the radial displacements of nodes (see Fig.3(a) for the position of nodes) on section AB calculated in the model are plotted as a function of swaging time and pulse impact number at various velocities. The main point to note is that corresponding to the pulse impacting characteristic of swaging, the absolute value of radial displacement of each node increases stepwise and the lasting time of each step is the pulse period of the load. From Fig.3 it is also found that after entering the cross-section fixing zone, the value of radial displacement of each node increases no longer and the value is the final displacement of the node. Comparing plots in Fig.3, it is found that with the increase of vax, the time taken by the nodes at the same position of the workpieces to finish swaging (see t1 in Fig.3) decreases and the production efficiency improves. The radial displacement that occurs in one pulse impact h (see h in Fig.3) increases with the enhancement of vax, and this indicates that when vax is low, the total deformation of each node is achieved through many times of saddening which benefits the deformation of metals with poor plasticity.
In Fig.3, the radial displacements of nodes (see Fig.3(a) for the position of nodes) on section AB calculated in the model are plotted as a function of swaging time and pulse impact number at various velocities. The main point to note is that corresponding to the pulse impacting characteristic of swaging, the absolute value of radial displacement of each node increases stepwise and the lasting time of each step is the pulse period of the load. From Fig.3 it is also found that after entering the cross-section fixing zone, the value of radial displacement of each node increases no longer and the value is the final displacement of the node. Comparing plots in Fig.3, it is found that with the increase of vax, the time taken by the nodes at the same position of the workpieces to finish swaging (see t1 in Fig.3) decreases and the production efficiency improves. The radial displacement that occurs in one pulse impact h (see h in Fig.3) increases with the enhancement of vax, and this indicates that when vax is low, the total deformation of each node is achieved through many times of saddening which benefits the deformation of metals with poor plasticity.
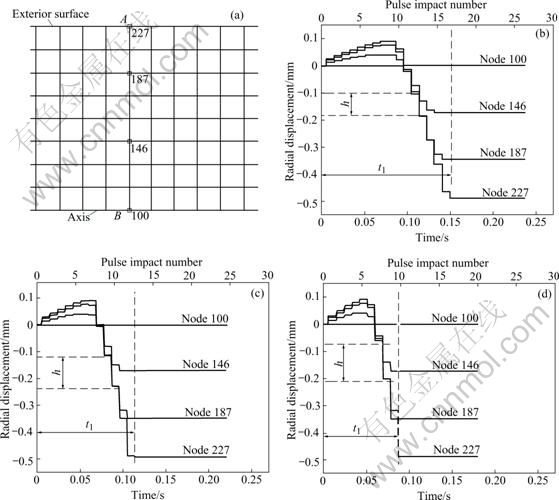
Fig.3 Node position on section AB (a) and history plot of radial displacements on various axial feeding velocities (d=7.0 mm): (a) vax=3.3 m/min; (b) vax=4.5 m/min; (c) vax=5.5 m/min
In order to study the relation between axial feeding velocity and ‘h’, the ‘h’ of each node on section AB is plotted as a function of vax (see Fig.4), and the correlation coefficient of linear fitting is above 0.997 which indicates that ‘h’ is in direct proportion to axial feeding velocity.
3.3 Strain distribution along axial direction and effect of vax on spiral spine-like ridge
Fig.5(a) shows the enlarged view of the broken rectangle zone of Fig.2(b). It is clear that the strain distributes unevenly and local high-strain zones (see the lightest colored triangle marked in Fig.5(a)) arrange periodically along axial direction. This indicates that the strain at exterior surface of the swaging workpiece periodically fluctuates along axial direction. In practical swaging processing, the spiral spine-like ridges at the exterior surface of swaging products are a familiar defect [1,2]. This defect arises from the uneven strain distribution along axial direction and results in periodical fluctuation of the radial displacement along axial direction at exterior surface of swaging products. So the displacement of nodes at exterior surface is plotted as a function of axial coordinates to exactly measure the effect of vax on the spiral spine-like ridges (see Fig.5(b)).
The marked partⅠin Fig.5(b) corresponds to the exterior surface of the head end of the swaging product, partⅡcorresponds to the exterior surface of the formed zone which represents the state of the finish swaging product. At other velocities simulated, the curves of radial displacement changing along axial direction are of the same shape, but the height of the spiral spine-like ridge increases with enhancement of vax. Increase of the height of the spiral spine-like ridge will result in enlargment of the difference in diameters of sections perpendicular to the axis and so in increasing of surface roughness. So the enhancement of vax will degrade the surface quality of swaging products.
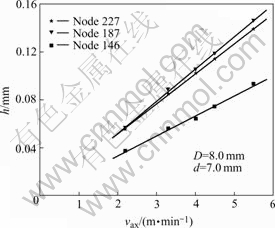
Fig.4 Correlation between h and axial feeding velocity (d=7.0 mm)
3.4 Strain distribution along radial direction
As for nodes at the exterior surface, strain distribution on sections perpendicular to the axis of swaging workpiece are of the same in part Ⅱ, section
AB (see Fig.1(b) for the position of AB) in part Ⅱ is chosen to study the path plot of the equivalent strain along radial direction. Fig.6(a) shows the path plots when ending diameter is 7.0 mm and the digits beside the plots denote the node numbers. It is clear that at various vax, the plots overlaps but for node 227 and this indicates that vax has no notable influence on the evenness of the equivalent strain distribution along radial direction. So the magnitude of the axial feeding velocity does not influence the level of the following two defects, viz. pits at the end of the product, and insufficient forging at the core of the swaging products[1]. In addition, the great difference between the equivalent strains of node 227 at various vax is caused by the defect of the spiral spine-like ridges which lead to local high strain zone at node 227 at the axial velocity of 4.5 m/min and local low strain zone at the axial velocity of 4.0 m/min. Fig.6(b) shows the path plot of the ![]() along the radial direction when ending diameter is 6.6 mm and from which the same conclusion can be drawn as that from Fig.6(a). Under various conical feeding angle, the magnitude of vax has no notable influence on the homogeneity of the strain distribution along the radial direction. So the change of vax has no obvious influence on the homogeneity of the strain distribution along the radial direction. This phenomenon arises from the fact that the magnitude of vax influences not the total strain of nodes but the strain in single loading impact (see Figs.3(b), (c) and (d)), and the total strain under various vax is of the same.
along the radial direction when ending diameter is 6.6 mm and from which the same conclusion can be drawn as that from Fig.6(a). Under various conical feeding angle, the magnitude of vax has no notable influence on the homogeneity of the strain distribution along the radial direction. So the change of vax has no obvious influence on the homogeneity of the strain distribution along the radial direction. This phenomenon arises from the fact that the magnitude of vax influences not the total strain of nodes but the strain in single loading impact (see Figs.3(b), (c) and (d)), and the total strain under various vax is of the same.
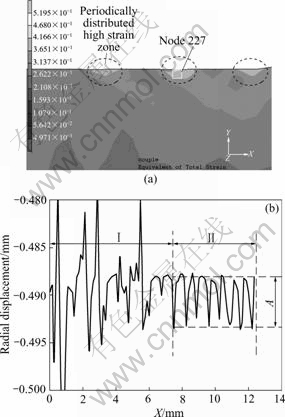
Fig.5 Local equivalent strain distribution (a) and path plot of radial displacement along axial direction (b) (vax=4.5 m/min, d= 7.0 mm)
3.5 Surface roughness and guide line to selection of vax
The rating parameter Rz of the surface roughness describes the profile irregularity. According to the definition, the height of spiral spine-like ridge ‘A’ is equivalent to Rz and so it can be used to describe the surface roughness of the swaged bars.
Fig.7 shows the relation between ‘A’ and vax with different radial compression ratios. Fitted with quadratic polynomial, the correlation coefficients are relatively 0.993 and 0.989 8, which indicates that under various radial compression ratios the ‘A’ and the vax meet the parabolic relation (see Fig.7):
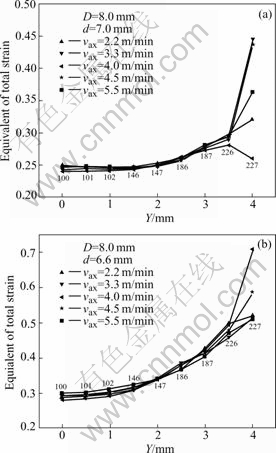
Fig.6 Path plot of equivalent strain along radial direction: (a) d=7.0 mm; (b) d= 6.6mm
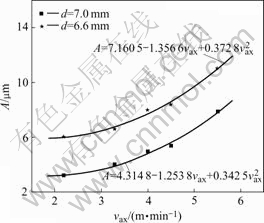
Fig.7 Correlation between height of spiral spine-like ridges and vax
![]() (3)
(3)
In Eqn.(3), when the vax equals to its minimum vax= -[b/(-2a)], the A reaches its minimum Amin= c-b2/4a. So when the other processing parameters (except for vax) remains fixed, there exists a vax, min below which the decrease of the vax will no longer improve the surface roughness. When d=6.6 mm, vax, min=1.82 m/min, and when d=7.0 mm, vax, min=1.83 m/min. To improve the production efficiency, the axial feeding velocity should be maximized under the precondition that the required surface roughness is meted. Commonly, when the end products are fabricated, the surface roughness Ra=3.2 (i.e. A=Rz=12.5) is necessary and substituting this value to Eqn.(3) yidelds the maximum vax. When d=6.6 mm, vax, max=6.02 m/min, and when d=7.0 mm, vax, max=7.05 m/min.
4 Test of validity of rotary swaging model
Practical swaging processing is performed with a swaging machine (B202) and all the processing parameters are the same as the simulated. Diameters of the swaging products are measured with a tool microscope (19JA) and forty values are acquired for every swaging product. So the experimental radial displacements of nodes at the exterior surface are: ?y= -(8.0-d)/2.
Thus the height of the spiral spine-like ridges can be calculated through the path plot of the radial displacement along axial direction (see Fig.5(b)) by
![]() (4)
(4)
where A is the height of the spiral spine-like ridges, ![]() the average of the peak of the pulse, and
the average of the peak of the pulse, and ![]() the average of the valley of the pulse. Table 2 shows the comparison of the simulated and measured height of the spiral spine-like ridges. The errors are below 8.0% which validates the FEA model of the swaging model developed.
the average of the valley of the pulse. Table 2 shows the comparison of the simulated and measured height of the spiral spine-like ridges. The errors are below 8.0% which validates the FEA model of the swaging model developed.
Table 2 Comparison between simulated and measured height of spiral spine-like ridges (D=8.0 mm, d=7.0 mm)

1) The radial displacement that occurs in one pulse impact is in direct proportion to vax. At low vax, the total deformation of each node is achieved through many times of saddening.
2) The height of the spiral spine-like ridge ‘A’ is equivalent to the surface roughness rating parameter RZ. When the other processing parameters (except for vax) remains fixed, A is in parabolic relation to the vax and there exists a minimum vax, min below which the decrease of the vax will no longer improve the surface roughness. When d=6.6 mm, vax, min=1.82 m/min, and when d=7.0 mm, vax, max=1.83 m/min.
3) vax should be maximized to improve the production efficiency under the precondition that the required surface roughness is met. If Ra=3.2 (i.e. Rz= 12.5) is required for the end product, then vax, max=6.02 m/min is gotten for d=6.6 mm and vax, max=7.05 m/min for d=7.0 mm.
4) The magnitude of vax has no notable influence on the homogeneity of strain distribution along radial direction and so on the level of the following two defects viz. pits at the end of the product, and insufficient forging at the core of the swaging products.
References[1] LIN Fa-yu. Special Forging Technology [M]. Beijing: Mechanical Industry Press, 1991. 150-170. (in Chinese)
[2] JIN Wen-zhong, LIU Shun-hua, LIU Li-ming. Research for structure, performance and shaping technical of magnesium alloys welding wire [J]. Metal Forming Technology, 2003, 21(6): 73-82. (in Chinese)
[3] YOSHIHARA S, MAC DONALD B, HASEGAWA T. Design improvement of spin forming of magnesium alloy tubes using finite element [J]. Journal of Materials Processing Technology, 2004, 153-154: 816-820.
[4] CHEN Fuh-kuo, HUANG Tyng-bin, CHANG Chih-kun. Deep drawing of square cups with magnesium alloy AZ31 sheets [J]. International Journal of Machine Tools & Manufacture, 2003, 43: 1553-1559.
[5] HARIHARASUDHAN P, GRACIOUS N, TAYLAN A. Finite element simulation of magnesium alloy sheet forming at elevated temperatures [J]. Journal of Materials Processing Technology, 2004, 146: 52-60.
[6] YOSHIHARA S, MACDONALD B J, NISHIMURA H. Optimisation of magnesium alloy stamping with local heating and cooling using the finite element method [J]. Journal of Materials Processing Technology, 2004, 153/154: 319-322.
[7] CHUNG S W, KIM W J, HIGASHI K. The effect of die geometry on the double shear extrusion by parametric FVM simulation [J]. Scripta Materialia, 2004, 51: 1117-1122.
[8] WANG Ling-yun, SONG Mei-juan, LIU Rao-chuan. Superplasticity and superplastic instability of AZ31B magnesium alloy sheet [J]. Transa Nonferrous Met Soc China, 2006, 16: 327-332.
[9] MICHAEL M AVEDESIAN. ASM Specialty Handbook-Magnesium and Magnesium Alloys [M]. USA: ASM, 1999. 1-11.
[10] RONG Li, NIE Zuo-ren, DU Wen-bo, ZUO Tie-yong. Symposium of Forum for China Magnesium Industry Development [M]. Beijing: China Magnesium Association, 2004. 122-128. (in Chinese)
[11] MSC Software Corporation. MSC. Marc 2001(Volume C): Program Input [M]. USA: MSC Software Corporation, 2001. 1668-1759.
[12] ZNCROPERA F P. Fundamentals of Heat Transfer [M]. GE Xin-shi, transl. Hefei: Anhui Educational Press, 1985.
[13] YU Han-qing. Surface Roughness and Its Measurement [M]. Beijing: Standard Press of China, 1987. 47-86. (in Chinese)
Foundation item: Project(98009999200301) supported by the Ministry of Science and Technology of China
Corresponding author: NIE Zuo-ren; Tel: +86-10-67391536; E-mail: zrnie@bjut.edu.cn
(Edited by LONG Huai-zhong)

