


Trans. Nonferrous Met. Soc. China 22(2012) 1723-1731
Advanced simulation of die wear caused by wire vibrations during wire-drawing process
LEE Kyung-Hun1, LEE Sang-Kon2, KIM Byung-Min3
1. Precision Manufacturing Systems Division, Pusan National University,
30 Jangjeon-Dong, Kumjeong-Gu, Busan 609-735, Korea;
2. Daegyeong Regional Division, Korea Institute of Industrial Technology, 711,
Hosan-dong, Dalseo-gu, Daegu 704-230, Korea;
3. School of Mechanical Engineering, Pusan National University, 30 Jangjeon-Dong,Kumjeong-Gu, Busan 609-735, Korea
Received 25 October 2011; accepted 29 February 2012
Abstract: An advanced simulation that considers the effect of wire vibrations was proposed for predicting accurately wear profiles of a die used in a wire-drawing process. The effect of wire vibrations, the changes in the wear profiles, and the generation of ringing during die approach were investigated by this simulation. Wire vibrations occurring between the die and the drum are governed by a partial differential equation called the wave equation, which is a function of the wire length, tension, density, and initial wire velocity. The wire-drawing process was simulated by the commercial code Abaqus FEA, and the die wear profiles were predicted by Archard’s wear model. The predicted profiles were compared with measured profiles of a worn drawing die after producing 5 t of AISI 1010 wire; the die was made of tungsten carbide with a Brinell hardness of HB 682. The profiles predicted by considering the effect of wire vibrations are in good agreement with the experimental data, indicating that the advanced simulation can be used to accurately predict the die wear profiles when ringing is observed during die approach.
Key words: wire drawing; wire vibrations; die wear profile; ringing
1 Introduction
In cold forming, the effects of die wear and failure must be investigated before a tool is designed because a high working pressure acts on the surface of the forming die during the forming process. According to an investigation conducted by DOEGE [1], more than 70% of tool replacements are due to premature die wear, 25% are due to mechanical fatigue, and the remaining 5% are due to plastic deformation and thermal-mechanical fatigue. Therefore, die wear is the principal reason for tool failure leading to tool replacement in mass production forming. In particular, wear affects the tolerance of the formed parts, metal flow, die life, and economics of the forming process. Die wear must be studied to reduce these effects, to ensure product precision, reliability, and economic feasibility of the forming tool, and to predict the probability of repairing or replacing the die. Minimization or prevention of tool wear is particularly essential for wire drawing because a high working pressure acts on the surface of the forming die and the flow of thin wires is very fast. Therefore, quantitative analysis and prediction of die wear are necessary.
Numerous experimental and numerical studies have been conducted to predict die wear. The abrasive wear theory is generally applied to predicting the die-wear mechanism involved in the cold forming process. The abrasive wear theory was first proposed by HOLM [2], by introducing an experimental equation for investigating the mechanism of wear observed when two electrical materials are in contact. He proposed that the wear phenomenon involves the disappearance of surface atoms in the actual area of contact between two contacting bodies. ARCHARD [3] introduced macromodels of the wear phenomenon and proposed that the wear phenomenon involves the destruction of microasperities present on two contacting bodies.
KIM et al [4] used Archard’s wear model for a wire-drawing process to calculate the die-wear depth by considering the hardness of the die as a function of the die temperature. HANSEN and BAY [5] applied Archard’s wear model to an upsetting processes and suggested that a rough die surface leads to high friction, which causes a large reduction in the sliding length, and thus, wear is minimized. HOLLINGER et al [6] suggested that a mechanical approach is not sufficient for explaining the wear phenomena observed during wet wire drawing and that precision wire products are affected by the heat generated in the contact zone [7]. DENG et al [8] performed wire-drawing tests with a ceramic composite die and 65-Mn steel wire. The results of these tests indicated that the most common reason for failure of the ceramic drawing die is wear in the approach zone owing to high compressive stress. SUMMERVILLE et al [9] investigated the reasons for the failure of forming dies by performing hot forging and extrusion experiments. Recently, TRONEL and CHENOT [10] used the rigid-plastic finite element (FE) method to analyze punch wear occurring during the compression of a block by a hemispherical punch. GILLSTR?M and JARL [11] evaluated the difference in die wear using wire rods descaled by two different treatments: pickling or reversed bending. KHIZHNYAKOVA et al [12] conducted experimental and numerical studies of die wear in steel X210CrW12 thixoforging, which is useful for further tool design. The above researches mainly involved experimental investigation of die wear; however, only a few studies focus on the wear of a wire-drawing die.
In this study, we performed an advanced simulation of wear for a wire-drawing die by considering the vibration characteristics of the wire, and predicted the wear profiles of the die used in the wire-drawing process. To investigate the influence of wire vibrations on die wear, a displacement function of the wire was determined by using a partial differential equation (PDE) called the wave equation. The effects of wire vibrations, which can change the die wear profiles, and the factors that generate ringing during die approach were also investigated through FE analysis by considering the vibration characteristics of the wire. The simulations in this study were performed to obtain field solutions such as equivalent strain, sliding velocity, and normal working stress on the die surface using the commercial FE code Abaqus FEA. Archard’s wear model was used in the FE simulations; the die wear profiles predicted with or without consideration of wire vibrations were compared with the profiles of worn dies that were used in a laboratory-scale wire-drawing process.
2 Vibration characteristics of wire subjected to drawing and wear analysis model
Figure 1 shows a schematic of a multi-pass wire-drawing process. In an actual multi-pass drawing process, a certain amount of tension exists in the wire between the die and drum, which are separated by a distance, L; moreover, the wire moves at a constant speed. The linear equation of transverse motion, y(x, t), of the traveling wire becomes a wave equation under the following assumptions.
1) The wire mass is uniformly spread along its length.
2) The wire is not static, namely, it is moving.
3) The transverse motion of the wire is small compared with L.
4) The initial tension in the wire is sufficiently large for the small-amplitude vibrations in the wire to be considered negligible.
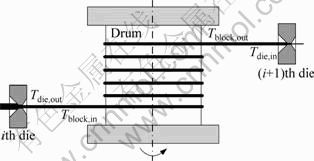
Fig. 1 Schematic of wire-drawing process (T―Tension; i―Actual number of die)
2.1 Vibrational motion of wire
Wire vibrations occurring during wire drawing are governed by a PDE called the wave equation [13]. A wire is placed along the x-axis from 0 to L and is assumed to vibrate in the x-y plane. We attempt to determine the displacement function, y(x, t), that is represented by a curve in the x-y plane and shows the shape of the wave at time t. The boundary-value problem for the displacement function is
 for 00 (1)
y(0,t)=y(L,t)=0 for t≥0 (2)
y(x,0)=0 for 0≤x≤L (3)
 for 0≤x≤L (4)
Let  and y(x,t)=X(x)T(t). The PDE and boundary conditions are as follows:
X″=λx=0; X(0)=X(L)=0 (5)
The eigenvalues and eigenfunctions are constant multiples of
 ,
,  (6)
(6)
However, the boundary-value problem for T is different, and we can have
y(x,0)=0=X(x)T(0) (7)
Hence, T(0)=0. The PDE and boundary conditions for T are
 ; T(0)=0 (8)
The general solution of the differential equation for T is
 (9)
(9)
Because T(0)=a=0, the solutions for T(t) are constant multiples of sin(nπct/L). Thus, for n=1, 2, …, we have the following functions:
 (10)
(10)
Each of these functions satisfies the wave equation, the boundary conditions, and the zero initial displacement condition. To satisfy the initial velocity condition yt(x,0)=g(x), the following superposition condition must generally be fulfilled:
 (11)
(11)
Assuming that we can differentiate this series term-by-term, so we have
 (12)
(12)
This is the Fourier sine expansion of g(x) for [0, L]. The entire coefficient of sin(nπx/L) is chosen to be the Fourier sine coefficient of g(x) for [0, L]:
 (13)
(13)
The solution is

 (14)
(14)
Suppose that the wave is initiated from its horizontal position with an initial velocity given by g(x)=ν. We compute
 (15)
(15)
The solution for this initial velocity function is
 (16)
(16)
where ρ is the line density of the wire, kg/m; ν is the wire velocity in the perpendicular direction during drawing, m/s; Т is the tension in the wire, kg・m/s; and L is the length of the wire between the die and the drum, m.
2.2 Wear analysis model
The factors affecting wear during the contact between two metal surfaces are the temperature on the contact surfaces, distribution of the contact asperities, hardness of the die material, normal stress on the die surface, sliding length between the contacting metals, and lubrication conditions.
In this study, Archard’s wear model, which is widely used to examine wear behavior and to simplify numerical approaches, is used to predict the wear profiles of the die used in wire drawing. The Archard model equation used in the FE simulation can be expressed as follows:
 on
on  (17)
(17)
where σn is the normal stress on the die surface; ?ν is the sliding velocity between the die and the wire; and ?t is the discretized time.
To analyze the wear behavior, the following assumptions are made:
1) The die is treated as a rigid body in which no elastic deformation occurs during wire drawing; however, plastic deformation can occur on the die surface.
2) Pressure variations and changes in the mechanical properties of the die caused by heat generation are ignored.
3) The friction coefficient is constant throughout the wire-drawing process.
3 Wear analysis of wire-drawing die
3.1 FE analysis of wire-drawing process
Wire drawing was analyzed using the elastic-plastic FE method. The wire material used in the FE analysis was AISI 1010, and the wire had an initial diameter of 4.5 mm. The wire was assumed to be made of an isotropic and nonlinear elastic-plastic material with elastic modulus, E, of 200 GPa, and Poisson ratio, v, of 0.3; the flow stress and strain relationship was given by  . The die material was tungsten carbide (WC) with an elastic modulus of 680 GPa and a Brinell hardness of HB 682. The semi-die angle (α), Coulomb friction coefficient (μ), and reduction in the cross-sectional area upon reducing the diameter from d4.5 mm to d4 mm were 6.5°, 0.09, and 20.99%, respectively. The other process conditions are listed in Table 1.
Table 1 Process conditions for wire drawing

A sketch of a drawing die is shown in Fig. 2. The die consists of a die core made of sintered WC inserted in a metallic casing. A longitudinal cut in the core (Fig. 2(a)) reveals an entrance zone, which is used to concentrate the lubricant particles and create a pressure gradient. A conical reduction zone, known as the “working zone,” with a semi-die angle (α) and a cylindrical zone, also called bearing, are designed to minimize local stress and wear.
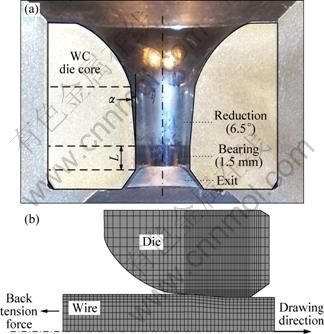
Fig. 2 Sketch of drawing die: (a) Longitudinal cut; (b) Mesh systems for calculating workpiece deformation and die wear
To evaluate the effects of wire vibrations on die wear, FE analysis was carried out for two different cases, i.e., cases in which wire vibrations were considered or neglected. The analysis involved the following five steps:
Step 1 Perform FE simulations of the wire-drawing process without considering the effect of wire vibrations, referred to as process A. Input the required information for the analysis: material properties, die geometry, friction coefficient between the wire and the die, etc.
Step 2. Estimate the drawing force. Calculate the back tension using Eytelwein’s equation [10].
Step 3 Calculate the amplitude and frequency of the wire vibrations using Eq. (16).
Step 4 Perform FE simulations of the wire-drawing process by considering the effect of wire vibrations, referred to process B. Input the required information for the analysis: material properties, die geometry, friction coefficient between the wire and the die, the amplitude and frequency of the wire vibrations, etc.
Step 5 Calculate the normal contact stress on the die surface and the sliding velocity between the die and the wire for the two cases.
Step 6 Predict the die wear profiles using Archard’s wear model defined in Eq. (17).
The information required for solving the wave equation given in Eq. (16) is obtained from the FE analysis of process A, in which the effect of wire vibrations on the wire-drawing process is not considered. From the FE simulation, the drawing force, T, is determined to be approximately 4610.70 N. When a large number of wire windings are present, no slip occurs, making it possible to carry out multi-pass dry wire drawing, which is the common method for producing fine wires, without any back tension. However, in this study, back tension is generated because of slip, which is the difference between the wire and drum speeds; this difference occurs because the number of windings used in the laboratory-scale wire-drawing experiments is small.
The back tension, T′, is calculated by Eytelwein’s equation (Eq. (18)). In Fig. 1, the back tension at the inlet of the die is calculated by the following equation:

 (18)
(18)
where μ, the friction coefficient between the wire and the drum is 0.12; m, the number of wire windings on the surface of the drum is 3.5; kfm is the average yield strength of the wire; F is the difference between the cross-sectional areas of the wire before and after passing through the die; α is the semi-die angle; and Q(F/sin α) is the contact area between the wire and the die. The back tension, T′, is 1796 N, as calculated by Eytelwein’s equation.
The amplitude and frequency of the wire vibrations, listed in Table 1 for process B, are determined by substituting the following values in Eq. (16): line density at the inlet of the die (ρi) of 0.124 kg/m, line density at the outlet of the die (ρo) of 0.098 kg/m, initial wire velocity in the vertical direction at the inlet of the die during the drawing process (vi) of 0.06 m/s, and the initial wire velocity in the vertical direction at the outlet of the die (vo) of 0.01 m/s.
Graphs of the wire profiles for the mode where n is 1 are shown in Fig. 3. Figure 3(a) shows the positions of the wire at the inlet of the die where back tension is observed. Figure 3(b) shows the positions of the wire at the outlet of the die where front tension is observed. The maximum amplitude of the wire vibrations at the inlet of the die is higher than that of the wire vibrations at the outlet because of the low tension and high wire velocity in the vertical direction.
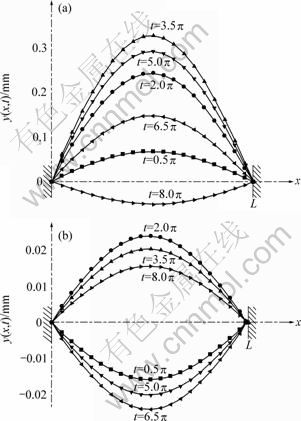
Fig. 3 Wire profiles at mode n=1: (a) Inlet of drawing die; (b) Outlet of drawing die
Finally, wire drawing was analyzed by a new method, in which the effect of wire vibrations was considered, to explain the effect of wire vibrations on the die wear profile. To determine the contact stress on the die surface and the sliding velocity between the die and workpiece, the die and workpiece were discretized, as shown in Fig. 2(b). FE simulations of the wire-drawing process were performed by the Abaqus Explicit code.
Figures 4 and 5 show the distribution of the effective strain and stress at the final deformation stage of the wire, respectively. The maximum deformation of the wire during wire drawing was observed near the die land. As shown in Fig. 4, the maximum effective strain in process B was higher than that in process A owing to the influence of wire vibrations. The dimensions of the drawn wire were the same for both processes A and B. The maximum effective stress in the wire was observed in the die land in process A but at the starting points of the reduction zone and the die land in process B (Fig. 5).
Figures 6 and 7 show the distribution of the contact stress along the inner surface of the die and the sliding velocity at the die-wire interface in the wire-drawing process, respectively. In process A, the maximum normal stress was observed at the starting point of the die land. The sliding velocity of the wire gradually increased toward the die exit. In process B, the maximum normal stress was observed at the starting points of the die land and the reduction zone. The sliding velocity in process B fluctuated but was higher than that in process A. In process B, the normal working stress and sliding velocity due to wire vibrations were observed during die approach.
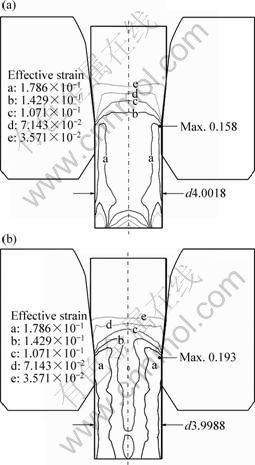
Fig. 4 Distribution of effective strain: (a) Without wire vibrations; (b) With wire vibrations
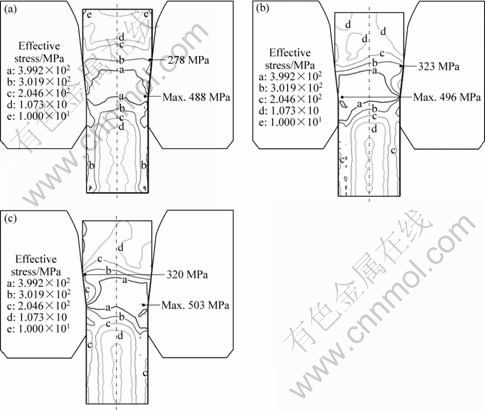
Fig. 5 Distribution of effective stress: (a) Without wire vibrations; (b) With wire vibrations (positive peak point); (c) With wire vibrations (negative peak point)
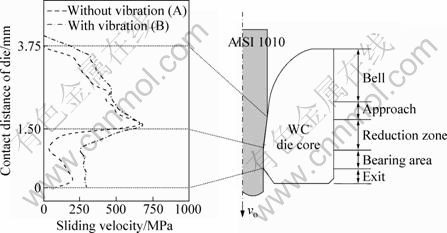
Fig. 6 Distribution of normal stress along inner surface of die
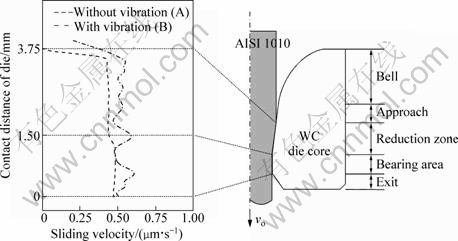
Fig. 7 Distribution of sliding velocity along inner surface of die
3.2 Analysis and measurement of die wear
The procedure to predict die wear using the results of the deformation analysis is shown in Fig. 8. In Eq. (17), the main factors affecting die wear are the normal stress (σn), sliding velocity (Δv), and discretized time (Δt). The values of σn and Δv were obtained by FE simulations. To estimate Δt, the die wear profiles were predicted by multiplying the amount of drawn wire by the wear volume of the die during wire drawing.
To experimentally determine the wear coefficient, k, pin-on-disk wear tests were performed under the same conditions as those used for wire drawing, namely, the same material, load state, lubrication conditions, sliding velocity, humidity, and temperature. The tests results indicated that k was 6.0×10⁻⁶. This value was used to analyze die wear during the forming process.
To measure the dimensions of the unused die and the die used to produce 5 t of AISI 1010 wire, cylindrical steel rings with a diameter of 25 mm and a height of 3 mm were placed on the top of each die, and the exits of the dies were sealed. The rings were securely attached to the dies, and a melted Cerrolow-117 alloy, which is characterized by a low melting point and contraction ratio, was then poured into the cylindrical steel rings. The Cerrolow-117 alloy was ejected after it was solidified and its dimensions were measured using an optical projector (Rank Precision Industries) with a scale of 20″ by 30″. The properties of the Cerrolow-117 alloy are listed in Table 2. Figure 9 shows the wear depth of the worn die, as measured from the solidified Cerrolow- 117 alloy. A comparison between the simulated and measured wear depths of the dies is shown in Fig. 10.
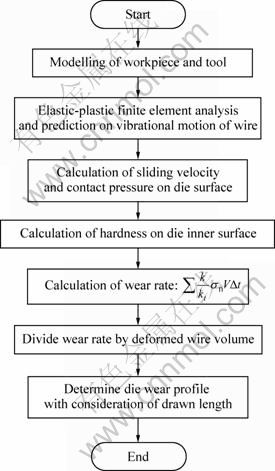
Fig. 8 Flow chart for predicting die wear during wire-drawing process
Table 2 Mechanical properties of Cerrolow-117 alloy
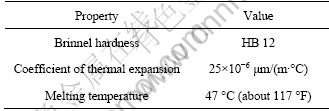
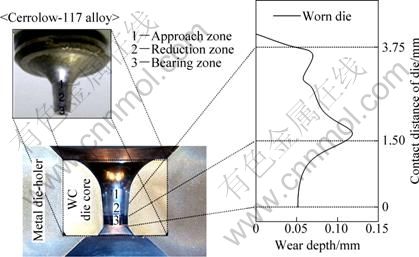
Fig. 9 Wear depth of worn die measured using solidified Cerrolow-117 alloy
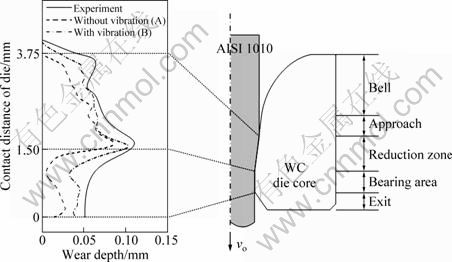
Fig. 10 Comparison between measured and simulated values of wear depth
4 Results and discussion
The abrasive wear theory was used to predict die wear during the wire-drawing process. The deformation of the wire was analyzed using the elastic-plastic FE method to determine the normal working stress on the inner surface of the die, the sliding velocity at the die-wire interface, and the discretized time during the deformation process. As shown in Fig. 6, the maximum working stress was observed near the die land in process A and the starting points of the reduction zone and die land in process B, when the effect of wire vibrations was considered. The characteristics of the wire vibrations were determined by the wave equation. The wear profiles of the die used in the wire-drawing process were predicted by the FE simulations; in this case, the amount of drawn wire was multiplied by the wear volume.
The wear profiles obtained by the FE simulation were compared with the measured wear profiles of the worn die. To validate the wear prediction scheme, unused and used dies were subjected to the conditions employed in processes A and B, as listed in Table 1. After producing 5 t of wire, the die was withdrawn. The dimensions of the unused and used dies were measured, and the wear profiles were compared with the profiles predicted by the FE simulation, as shown in Fig. 10.
The simulated wear profiles of the drawing die were in better agreement with the measured profiles in process B than with the measured profiles in process A. Severe wear at the point where the wire enters the die resulted in the so-called ringing. Ringing, which was not observed in process A, was investigated by carrying out wear analysis for the case in which the vibration characteristics of the wire were considered. Surface fatigue wear is suspected to be the main reason for ringing. Localized compression of the surface causes ringing. A high stress gradient is damaging, even under continuous loading, and this gradient is aggravated by wire vibrations. WISTREICH [14] suggested that cyclic, localized compression of the surface causes ringing. Therefore, accurate alignment of the die and wire and elimination of vibrations by using guide pulleys can reduce wear. This result indicates that the die wear profiles and final product dimensions can be predicted with a high accuracy when wire vibrations are considered.
5 Conclusions
1) The vibration behavior of the wire in the wire-drawing process was governed by a PDE called the wave equation.
2) The maximum working stress during the wire-drawing process was observed near the inlet of the die and the starting point of the die land in the FE simulation when the effect of wire vibrations, as determined from a PDE, was considered. The sliding velocity fluctuated but was higher than the sliding velocity for the case in which the effect of wire vibrations was not considered. The maximum working stress and maximum wear depth were observed in the same regions.
3) The FE simulations indicated that the wear profiles obtained by considering the effect of wire vibrations were in better agreement with the measured profiles than those obtained without considering the effect of vibrations. Ringing in worn dies, which was observed at a certain distance from the bearing, can be predicted by the advanced simulation of wear by considering the vibration characteristics of the wire. The localized compression increasing because of wire vibrations caused ringing.
4) The dimensional accuracy of final products resulting from die wear can be predicted by the proposed method. The suggested method can be applied to predicting wear profiles of dies used in other forming processes.
Acknowledgements
This research was supported by the National Core Research Center (NCRC) program through the National Research Foundation of Korea funded by the Ministry of Education, Science and Technology (2010-0008-277).
References
[1] DOEGE E. Standmengenverbesserung von schmidegesenken [R]. Industriverband Deutcher Schmiden (internal report. Part B), 1990: 8-9.
[2] HOLM R. Electric contacts [M]. Stockholm: Almqvist and Wiksells, 1946: 203.
[3] ARCHARD J F. Contacts and rubbing of flat surfaces [J]. Journal of Applied Physics, 1953, 24: 981-988.
[4] KIM T H, KIM B M, CHOI J C. Prediction of die wear in wire-drawing process [J]. Journal of Materials Processing Technology, 1997, 65(1-3): 11-17.
[5] HANSEN P H, BAY N. A flexible computer based system for prediction of wear distribution in forming tools [J]. Advanced Technology of Plasticity, 1990, 1: 19-26.
[6] HOLLINGER S, DEPRAETERE E, GIROUX O. Wear mechanism of tungsten carbide dies during wet drawing of steel tire cords [J]. Wear, 2003, 255(7-12): 1291-1299.
[7] LEE S K, KO D C, KIM B M. Pass schedule of wire drawing process to prevent delamination for high strength steel cord wire [J]. Mater & Design, 2009, 30(8): 2919-2927.
[8] DENG Jian-xin, YANG Xue-feng, WANG Jing-hai. Wear mechanisms of Al2O3/Tic/Mo/Ni ceramic wire-drawing dies [J]. Materials Science and Engineering A, 2006, 424(1-2): 347-354.
[9] SUMMERVILLE E, VENKATESAN K, SUBRAMANIAN C. Wear processes in hot forging press tools [J]. Materials & Desing, 1995, 16(5): 289-294.
[10] TRONEL Y, CHENOT J L. Prediction of tool wear using finite element software for the three-dimensional simulation of the hot-forging process [J]. Journal of Materials Processing Technology, 1992, 31(1-2): 255-263.
[11] GILLSTR?M P, JARL M. Wear of die after drawing of pickled or reverse bent wire rod [J]. Wear, 2007, 262: 858-867.
[12] KHIZHNYAKOVA L, EWERING M, HIRT G, BOBZIN K, BAGCIVAN N. Metal flow and die wear in semi-solid forging of steel using coated dies [J]. Transactions of Nonferrous Metals Society of China, 2010, 20(s): s954-s960.
[13] ERVIN K. Advanced engineering mathematics [M]. Daners: John Wiley & Sons, Inc, 2003.
[14] WISTREICH J G. The fundamentals of wire drawing [J]. International Materials Reviews, 1958, 3(1): 97-142.
拉丝过程中线振动导致的拉模磨损模拟
LEE Kyung-Hun1, LEE Sang-Kon2, KIM Byung-Min3
1. Precision Manufacturing Systems Division, Pusan National University,
30 Jangjeon-Dong, Kumjeong-Gu, Busan 609-735, Korea;
2. Daegyeong Regional Division, Korea Institute of Industrial Technology, 711,
Hosan-dong, Dalseo-gu, Daegu 704-230, Korea;
3. School of Mechanical Engineering, Pusan National University, 30 Jangjeon-Dong,
Kumjeong-Gu, Busan 609-735, Korea
摘 要:考虑到拉丝工艺过程中线振动的影响而建立一个能精确预测磨具磨损的模型。利用该模型研究了线振动的影响、磨损轮廓的变化、振荡的产生。出现在磨具和突起之间的线振动服从偏微分方程,也称波动方程。该方程是一个与拉丝长度、张力、密度和初始线速度有关的函数。用商业Abaqus软件来模拟拉丝工艺过程,并应用Archard磨损模型预测模具磨损。在生产5 t AISI 1010线材的情况下,将预测的磨损与实际的磨损进行对比。磨具是布氏硬度为HB682的碳化钨。考虑了线振动影响的预测结果与实验结果相当一致,表明所建立的模型能够精确预测存在振荡的磨具磨损。
关键词:拉丝;拉丝振动;磨具磨损轮廓;振荡
(Edited by YANG Hua)
Corresponding author: KIM Byung-Min; Tel: +81-51-510-3074; E-mail: bmkim@pusan.ac.kr
DOI: 10.1016/S1003-6326(11)61379-4