Trans. Nonferrous Met. Soc. China 22(2012) s820-s824
Microstructure of fast tool servo machining on copper alloy
Hong LU1, Soo-chang CHOI2, Sang-min LEE1, Deug-woo LEE3
1. Department of Nano Fusion Technology, Pusan National University, Miryang 627-706, Korea;
2. Korea Institute of Machinery & Materials, Daejeon 305-343, Korea;
3. Department of Nano Mechatronics Engineering, Pusan National University, Miryang 627-706, Korea
Received 21 May 2012; accepted 27 September 2012
Abstract: The development of the fast tool servo (FTS) for precision machining was investigated. The micron machining performance of a piezoelectric-assisted FTS on copper alloy was evaluated. The results indicate that the quality of the microstructure depends mainly on two important factors: the cutting speed (or spindle speed) and the driving frequency of the FTS. The excessive driving frequency increases the formation of burrs. The effect of the clearance angle of the diamond tool on the microstructure machining precision was also investigated.
Key words: fast tool servo; microstructure; piezoelectric; diamond machining; copper alloy
1 Introduction
Copper alloys, widely used in diverse applications due to their excellent thermal and electrical conductivity, are also used in micro-lens arrays in advanced optical products. Ultra-precision diamond turning with a fast tool servo (FTS) is one of the leading techniques for producing metal mirrors for high-power lasers and non-conventional optics. The FTS requires the use of a high-precision lathe system, tool position controls with a long stroke, large bandwidth, and nanometer resolution. The development of piezoelectric actuator-based FTSs for micro-structured precision machining has been studied extensively by many researchers [1-6]. There are two main applications of the FTS to diamond turning. First, the FTS eliminates the repetitive errors that come from resonances in the turning machine (i.e., spindle imbalance or bearing noise). In one particular case of this application, when an FTS was used to control the cut depth to compensate for waviness in the machined surface, the results revealed that the peak-to-valley waviness profile decreased from 3.3 ��m to 0.3 ��m [7]. Second, the FTS can be used with diamond turning to produce complex machined geometries on a specimen. In this application, a spindle-position estimator provided better accuracy and resolution of the spindle-angle feedback, which significantly improved the FTS trajectory generation in both 1-D and 2-D sinusoidal surface turning [8]. A long-stroke FTS can be used to fabricate free-form surfaces. For example, a copper free-form mirror with diameter of 50 mm was produced with a form accuracy of 0.15 ��m peak-to-valley ratio [9]. GAO et al [10] fabricated a large-area sinusoidal grid (150 mm in diameter); however, research also revealed that thermal deformation of the workpiece (1 ��C over the 13 h-period) was an issue during the fabrication process. In most previous studies on FTS machining of 1-D sinusoidal surfaces, the microstructure surface quality and influence of the machining parameters on the microstructure were not discussed in detail. In this work, the fabrication and evaluation of a microstructure were described using a piezoelectric-assisted FTS prototype on a copper-alloy specimen. The complexity of the machined features and resulting surface quality of the microstructure depend mainly on the behavior of the FTS. The results revealed that the machined surface was affected by two main factors: the cutting speed (spindle speed) and the FTS driving frequency. Additionally, the clearance angle of the diamond tool should also be considered for the machined microstructure configuration. A more precise microstructure was achieved by keeping the clearance angle in appropriate value.
2 Performance analysis of FTS
Figure 1 shows the configuration of the FTS used for microstructure fabrication in this investigation. The FTS was composed of the main body, a moving part, a tool holder, a capacitive displacement sensor and its housing, and a piezoelectric actuator. A single diamond tool was connected to the main body with two sets of parallel leaf springs. The symmetry of the designed structure inherently balanced the flexure mechanism to prevent coupled-interference motion. A piezoelectric actuator drove the stretch and retraction�Cflexure mechanism at a frequency of several kHz in response to the control signals provided by a high-voltage amplifier. The control voltages ranged from +3 V to +1100 V; the average output power was 30 W. The overall dimensions of the FTS were 155 mm (length) �� 80 mm (width) �� 15 mm (height).
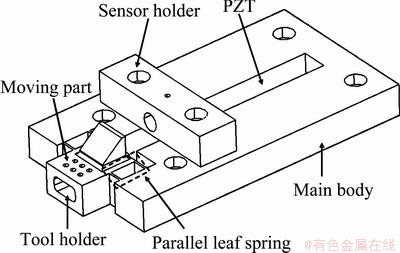
Fig. 1 Schematic diagram of fast tool servo (FTS)
A series of tests were carried out to evaluate the performance of the FTS. The piezoelectric actuator used in the test had a displacement up to 120 ��m, an axial stiffness of 20 N/��m, and a maximum driving force of 2400 N. A capacitive displacement sensor was used for position measurement, with a displacement signal range from -250 ��m to +250 ��m and resolution of 2.9 nm. The bandwidth of the capacitive displacement sensor was set to 5 kHz in response to the maximum frequency required for fast tracking performance of the FTS. Figure 2 shows the FTS test system, which includes the FTS, a LabVIEW computer, a high-voltage amplifier, a capacitive displacement sensor, and a high-speed data-acquisition board. The FTS received driving signals from the LabVIEW computer. These signals were amplified 100 times to produce the voltage signals to drive the piezoelectric actuator. A 16-bit A/D converter then collected the displacement signals of the moving part measured by the capacitive displacement sensor. The experiments were carried out on a passive microvibration table, which reduced the environmental noise by about 3 nm.
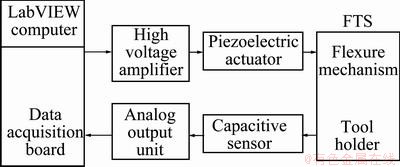
Fig. 2 Block diagram of FTS performance testing
The hysteresis curve of the FTS with open-loop control was obtained by applying increasing and then decreasing voltages to the piezoactuator at 30 V intervals, from 0 to 180 V (Fig. 3). The lower curve represents the expansion process, and the upper curve represents the retraction process. When a 180 V control voltage was applied to the piezoelectric actuator, the maximum displacement of the FTS was approximately 21.4 ��m. It is noted that the displacement curve of the expansion process was different from that of retraction process; the maximum difference was about 2.72 ��m. Under closed-loop control conditions, the hysteresis can be reduced, and the linearity of the FTS can be improved.
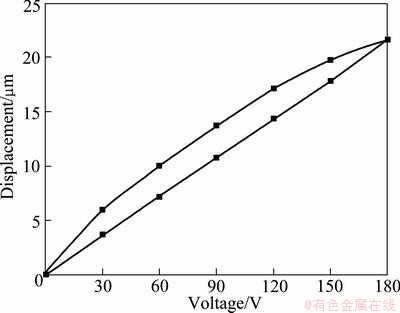
Fig. 3 Hysteresis loop generated by FTS in open-loop control
Although the resolution of the piezoelectric actuator itself was smaller than 1 nm, the FTS generally had reduced resolution due to environmental factors and the quantization error of the D/A converter. The resolution of the FTS was obtained by applying a stair-step control voltage (in 0.3 V steps) to the piezoelectric actuator. The resulting displacement of the FTS was recorded by the capacitive displacement sensor, as shown in Fig. 4. A resolution of 10 nm was determined for the FTS; however, strict control of the environmental noise significantly improved the resolution.
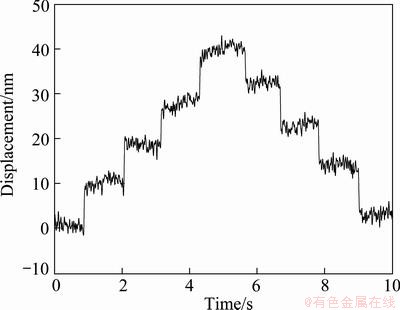
Fig. 4 Resolution testing with stair-step control voltage
3 Results and discussion
To evaluate the effectiveness of the piezoelectric- assisted FTS, diamond-cutting tests were performed. Copper-alloy specimens were machined on a precision lathe. The lathe consisted of x-, y-, and z-axes and a rotation table. The rotation table was mounted to an isolator to prevent external vibration while maintaining high structural stiffness. The x-axis used an air guide and a linear motor with 100 nm-resolution. The y- and z-axes, which were responsible for positioning, also used linear guides equipped with a ball-screw, needle-roller bearing stepping motor with 10 nm- resolution.
The quality of the machined microstructure was evaluated by optical microscopy (OM), scanning electron microscopy (SEM), and atomic force microscopy (AFM). Figure 5 shows the results for three cutting tests examined under low magnification. In the cases shown in Fig. 5, the tool was driven by a sinusoidal oscillation at cutting speed of 60 mm/min, with frequencies of 100, 50, and 10 Hz corresponding to Figs. 5(a)-(c), respectively. Each single oscillation is clearly distinguishable in the images, and the microstructure is free from breakage.

Fig. 5 OM photographs showing microstructures formed at cutting speed of 60 mm/min, cutting depth of 4 ��m and driving frequency of 100 Hz (a), 50 Hz (b), and 10 Hz (c)
The machining parameters used for the workpiece in Fig. 5 were the result of several test series.
Figure 6 shows SEM images of the copper-alloy specimens, which were machined with the same cutting speed and driving frequency as the samples in Fig. 5. Burr formation and piling are clearly evident, as shown in Figs. 6(a) and (b), respectively. The length of the burrs in Fig. 6(a) is approximately 3 ��m. The highest value of the three samples was discussed in this paper. Because they obstruct the visibility of the groove bottom and degrade the optical properties of the machined surface, the formation of burrs should be avoided. However, no visible burrs are evident in Fig. 6 (c). The valleys generated by the FTS motion are clearly distinguishable in Fig. 6(d) (side view of Fig. 6(c) under high magnification); where, the sample was machined at driving frequency of 10 Hz. At the same cutting speed of 60 mm/min, the burr formation was minimized using a smaller driving frequency.
An AFM was used to evaluate the profile quality of the machined microstructure, as shown in Fig. 7. The 100 Hz-driving frequency produced burrs, as clearly shown in Fig. 7(a). The profile of one of these burr structures is shown to the right in Fig. 7(a), and its position is indicated with a red line on the height map. This profile shows a 10 ��m-distance between the two valleys. In this investigation, the distance between valleys depended on the cutting speed and the driving frequency of the FTS and was calculated using the following equation:
L=v/f (1)
where L is the distance between the two valleys of the profile, v is the cutting speed, and f is the driving frequency of the FTS. With a cutting speed of 60 mm/min and driving frequency of 100 Hz, L is determined to be 10 ��m, which agrees well with the experimental value indicated in Fig. 7(a). Figure 7(b) shows the microstructure machined with a driving frequency of 50 Hz applied to the piezoelectric actuator. The formation of burrs is obviously reduced in this case, and the distance between the two valleys is 20 ��m, which is also in agreement with Eq. (1).
The profiles shown in Fig. 7, however, are not the standard sinusoidal waveform. Relative to the value of L (10 and 20 ��m), the clearance angle of the diamond tool is not small enough. The formed sinusoidal structures were flattened when the diamond tip cut into the bottom of the groove, as shown in the shaded portion of Fig. 8. In theory, this phenomenon can be improved by two methods. One method uses a diamond tool with a larger clearance angle. The other method increases the cutting speed (v) or decreases the driving frequency (f) to enhance L. These factors should satisfy the following equation:
��>arctan(2H/L) (2)
where �� is the clearance angle of the diamond tool, and H is the amplitude of the profile. However, there is a limitation on how much the clearance angle of the tool can be decreased. After a certain point, the surface finish may be deteriorated due to shearing of the metal chips and the tool rigidity decreased. Therefore, increasing the value of L is the best approach for improving the precision in this study. Machining test results indicated that the standard sinusoidal profile occurred when L was greater than or equal to 100 ��m.
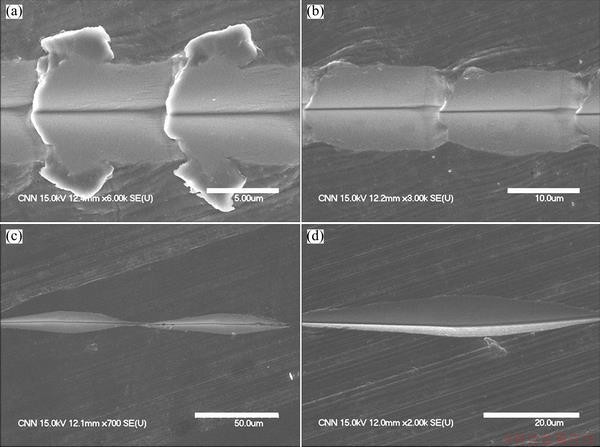
Fig. 6 SEM images showing microstructures produced using cutting speed of 60 mm/min, cutting depth of 4 ��m, and driving frequency of 100 Hz (a), 50 Hz (b), 10 Hz (c) and 10 Hz (d) (side view under high magnification)
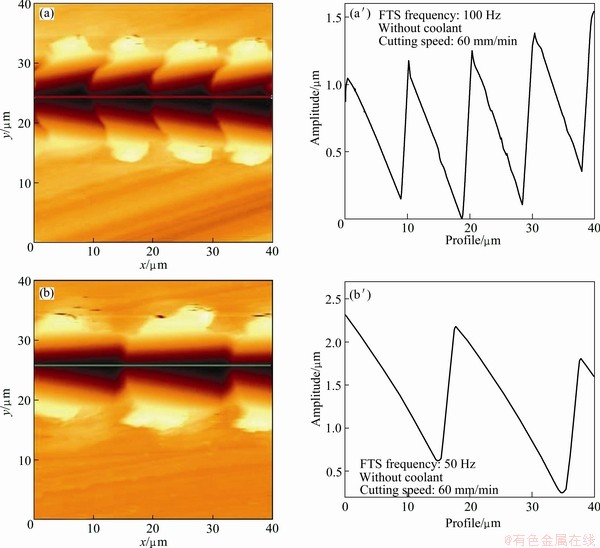
Fig. 7 AFM images of microstructures formed at cutting speed of 60 mm/min, cutting depth of 4 ��m, and driving frequencies of 100 Hz (a) and 50 Hz (b)
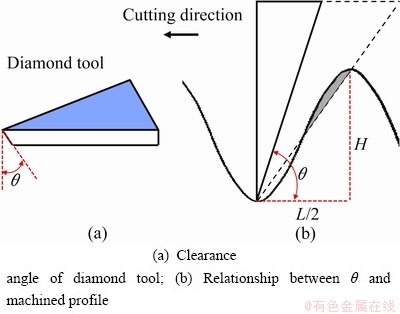
Fig. 8 Schematic diagram of clearance angle
4 Conclusions
1) Using a developed piezoelectric-assisted FTS, a defined surface microstructure with sub-micron precision was produced on a copper-alloy specimen. The effects of the machining conditions on microstructure configuration were investigated, and the single microstructure was analyzed.
2) The machined surface structure depended mainly on two important factors: the cutting speed (or spindle speed) and the FTS driving frequency. The dimensions of the microstructures (peak-to-valley amplitude and L) were calculated and then compared with the SEM and AFM results.
3) Excessively high driving frequency increased burr formation for the same cutting speed and depth. Additionally, the clearance angle of the diamond tool should also be considered for the machined microstructure configuration. A more precise microstructure was achieved by keeping the clearance angle larger than the arctan(2H/L). Future research will focus on plane and roller machining using the developed piezoelectric-assisted FTS method.
References
[1] MAO H, HU D, ZHANG K. A fast tool feeding mechanism using piezoelectric actuators in noncircular turning [J]. International Journal of Advanced Manufacturing Technology, 2005, 27(3-4): 254-259.
[2] CUTTINO J F, MILLER A C, SCHINSTOCK D E. Performance optimization of a fast tool servo for single-point diamond turning machines [J]. IEEE/ASME Transactions on Mechatronics, 1999, 4(2): 169-179.
[3] RAKUFF S, CUTTINO J F. Design and testing of a long-rang precision fast tool servo system for diamond turning [J]. Precision Engineering, 2009, 33(1): 18-25.
[4] BREHL D E, DOW T A. Review of vibration-assisted machining [J]. Precision Engineering, 2008, 32(3): 153-172.
[5] NATH C, RAHMAN M. Effect of machining parameters in ultrasonic vibration cutting [J]. International Journal of Machine Tool & Manufacture, 2008, 48(9): 965-974.
[6] LUDWICK S J, CHARGIN D A, CALZARETTA J A, TRUMPER D L. Design of a rotary fast tool servo for ophthalmic lens fabrication [J]. Precision Engineering, 1999, 23(4): 253-259.
[7] KIM J D, KIM D S. Waviness compensation of precision machining by piezoelectric micro cutting device [J]. Journal of Machine Tool & Manufacture, 1998, 38(10-11): 1305-1322.
[8] LU X, TRUMPER D L. Spindle rotary position estimation for fast tool servo trajection generation [J]. International Journal of Machine Tool & Manufacture, 2007, 47(9): 1362-1367.
[9] KIM H S, LEE K I, LEE K M, BANG Y B. Fabrication of free-form surfaces using a long-stroke fast tool servo and corrective figuring with on-machine measurement [J]. International Journal of Machine Tool & Manufacture, 2009, 49(12-13): 991-997.
[10] GAO W, ARAKI T, KIYONO S, OKAZAKI Y, YAMANAKA M. Precision nano-fabrication and evaluation of a large area sinusoidal grid surface for a surface encoder [J]. Precision Engineering, 2003, 27(3): 289-298.
(Edited by LONG Huai-zhong)
Foundation item: Project (2010-0008-277) supported by NCRC (National Core Research Center) Program of the Ministry of Education, Science and Technology, Korea; Project supported by ��Development of Micro Feature Machining System on Large Surface and Core Technologies for Measurement & Inspection�� of Ministry of Knowledge Economy, Korea
Corresponding author: Deug-woo LEE; Tel: +82-55-3505666; E-mail: dwoolee@pusan.ac.kr
DOI: 10.1016/S1003-6326(12)61810-X