Effect of microstructure on impact toughness of TC21 alloy
CHEN Jun(陈军)1, ZHAO Yong-qing(赵永庆)1, ZENG Wei-dong(曾卫东)2
1. Northwest Institute for Nonferrous Metal Research, Xi’an 710016, China;
2. Northwestern Polytechnical University, Xi’an 710072, China
Received 15 July 2007; accepted 10 September 2007
Abstract: The impact toughness of TC21 alloy after different types of forging and heat treatments was studied. The results show that heat treatment at 915 ℃ for 1 h followed by air-cooling can achieve the highest impact toughness. The crack propagation path of bimodal microstructure is different from that of lamellar microstructure. Boundaries of primary α grain are observed to be preferential sites for microcrack nucleation. With the increase of heat treatment temperature, the volume fraction of primary α phase decreases and the nucleation sites of microcrack at the primary α phase boundaries also decrease, the impact toughness value is effectively improved. The microcracks of lamellar microstructure are located on α/β interface, or the boundary of colony, and/or grain boundary α phase. The crack propagates cross the colony, or along the colony boundary, and/or along β grain boundary. The crack propagation path of lamellar microstructure is dependent on the size, direction of colony. The crack path deflects at grain boundaries, colony boundaries, or arrests and deviates at α/β interface because of crisscross α lamellar. Therefore the impact toughness value of basket microstructure is higher than that of Widmanstatten microstructure.
Key words: TC21 titanium alloy; bi-modal microstructure; lamellar microstructure; impact toughness
1 Introduction
The literatures have illustrated that the microstructure plays an important roll on impact toughness in titanium alloy. The impact toughness of TC4 titanium alloy changes greatly with the increase of annealing temperature. The impact toughness at 600 ℃ starts obvious decrease, and the lowest value occurs at 700 ℃, while the highest value appears in temperature region of 900-950 ℃[1]. ZHANG et al[2] have considered that the bimodal microstructure is 50% higher impact toughness than lamellar microstructure. LI et al[3-4] have studied the influence of hydrogen on impact toughness of titanium alloy. With the increase of hydrogen content, the hydrides which decrease the toughness are separated out from the interface of crystal in materials.
At present, many literatures have been published on the investigation of impact toughness of the weld type, such as gas tungsten arc welding and electron beam welding, of the different position of weld, and of the post-weld treatment and the weld[5-9]. The impact toughness of the welds is affected by grain size and phase content, which is related to input energy and cooling rate of weld.
Impact toughness of the weld metal is more than 50% higher than that of the parent material. The signification improvement in impact toughness was shown to be due to the much reduced amount of primary α grain in the weld metal. Boundaries of primary α grains were observed to be preferential sites for microcrack nucleation and provide relatively easy path for fracture toughness[9].
The higher toughness values are attributed to wider fusion zone β grain and acicular α microstructure in the welds[5-8]. RADHAKRISHNA et al[9] have also found that the as welded metal impact toughness of gas tungsten arc weld in Ti-6Al-4V titanium alloy was higher than that of their electron beam welded counterparts.
TC21 titanium alloy is a new α+β titanium alloy developed by Northwest Institute for Non-ferrous Metal Research with self-determinate intellectual asset. It belongs to Ti-Al-Mo-Nb-Sn-Zr-Cr-X system with good comprehensive properties of strength, ductility and toughness. Its good workability makes it possible to be made into billet and forging productions used for structure material.
In this study, the microstructure and properties of TC21 titanium alloy after different types of forging and heat treatments were investigated. The effect of microstructure on the impact toughness and crack propagation path was discussed. 2 Experimental
TC21 titanium alloy used in this study was melted by vacuum self-consumed electron arc furnace. The ingot was forged into billets with 170 mm in diameter in α+β phase region and β phase region on 1 600 t water press. The transus temperature is (945±5) ℃. The impact toughness specimens of the billets were cut by line-cutting machine along the tangent direction. The details of various heat treatments were 980 ℃, 1 h FC, 915 ℃, 1 h AC and 750 ℃, 1 h AC.
The impact toughness properties were evaluated on a JBC-300 impact-testing machine. One half of one sample from each set of the broken impact samples was sectioned normal to the notch at the center. The specimens were subjected to conventional metallographic sample preparation. Fractographic examination was carried out on JMS 6460 scanning electron microscopy. Metallographic study was observed on Olympus PMG3 optical microscope. The microstructure along the direction of crack propagation path and fractography were observed by scanning electron microscopy.
3 Results and discussion
3.1 Impact toughness
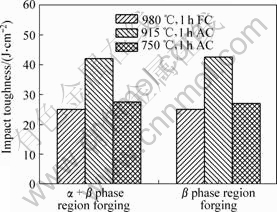
Fig.1 shows the impact toughness of TC21 alloy after heat treatments. It can be seen that the impact toughness forged in α+β phase region is similar to that in the β phase region. The highest impact toughness is observed at 915 ℃; the impact toughness at 750 ℃ is lower than that at 915 ℃, furthermore, is in correspondence with the impact toughness obtained at 980 ℃ followed by furnace cooling.

Fig.1 Impact toughness of TC21 alloy after heat treatments
3.2 Microstructure
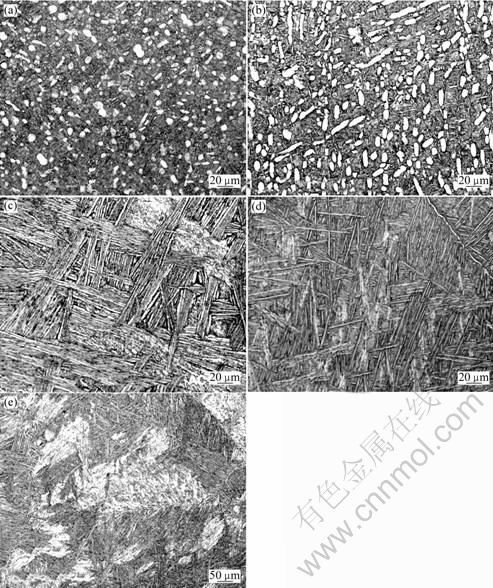
The microstructures of TC21 titanium alloy forged in α+β phase region and β phase region after different heat treatments are shown in Fig.2. The microstructures of specimens forged and heat treated in α+β phase region are bi-modal microstructure which is made up of primary α phase and transformed β phase. The bi-modal microstructure heat treated at 915 ℃ has 10%-15% volume fraction equiaxed α phase whose size is about 3-7 μm. With the decrease of temperature, the size and the volume fraction of equiaxed α phase increase. The volume fraction of primary α phase at 750 ℃ is about 20%, and second acicular α phase in transformed β grain becomes coarser.

Fig.2 Microstructures of TC21 alloy after heat treatments: (a) 915 ℃, 1 h AC, forged in α+β phase region; (b) 750 ℃, 6 h AC, forged in α+β phase region; (c) 980 ℃, 1 h FC, forged in α+β and β phase region; (d) 915 ℃, 1 h AC, forged in β phase region; (e) 750 ℃, 6 h AC, forged in β phase region
Forged either in α+β phase region or in β phase region, the heat treatment at 980 ℃ for 1 h followed by furnace cooling, which is above transus temperature, obtains coarse Widmanstatten microstructure. The coarse Widmanstatten microstructure is composed of large β grain with continues grain boundary α and colony with alternated α phase and β phase lamellar. The direction of alternated α phase and β phase lamellar in the same colony is the same, but different in different colonies. The sizes of colony and β grain are respectively 70-250 μm and 600 μm.
The microstructure of TC21 alloy which is forged in β phase region and heat treated at 915 ℃ for 1 h and 750 ℃ for 2 h followed by air cooling subtransus obtains basket microstructure. In general, the Widmanstatten microstructure and basket microstructure are called as lamellar microstructure. The nucleation and growth of α phase in β phase grain is controlled by diffusion phase transformation mechanism during cooling from β phase region. The growth of α lamellar corresponds to Burgers orientation relationship with {110}β∥(0001), <111>β∥<1120>α[10-11]. Because of air cooling from α+β phase region, the colony size of basket microstructure is smaller than that of Widmanstatten microstructure. Compared with the lamellar microstructure heat treated at 750 ℃, the α lamellae of basket microstructure heat treated at 915 ℃ for 1 h followed by air cooling do not have the same length, and are arranged in a crisscross pattern resulted from heat treatment at higher temperature.
3.3 Fractograph
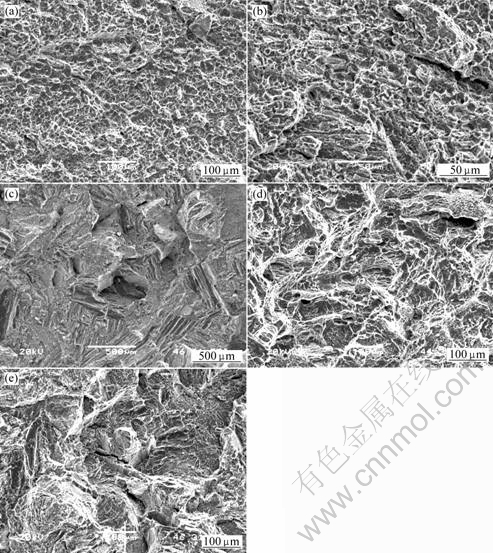
Fractographs of impact toughness specimens after different heat treatments are shown in Fig.3. The fractographs of impact toughness specimens with bi-modal microstructure are composed of a great deal of dimples. The fracture pattern of impact toughness through a heat treatment of 915 ℃, 1 h+air cooling is ductile fracture with a large amount of dimples (Fig.3(a)). While the fracture surface of impact toughness sample at temperature of 915 ℃ is larger than that of 750 ℃. The large dimples correspond to higher impact toughness.
The fracture surface of Widmanstatten microstructure obtained through a heat treatment condition of 980 ℃, 1 h+furnace cooling presents a large mount of coarse grooves. The size of coarse grooves is smaller than primary β grain, but similar to colony size. Therefore, the fracture unit of Widmanstatten microstructure is considered colony which is likely to the initiation division of affecting crack.
While fracture surface of basket microstructure obtained through a heat treatment of 915 ℃, 1 h AC and 750 ℃, 1 h AC after forged in β phase region shows ductility feature. The fracture surface of heat treatment following forging in β phase region is covered by many dimples and fluctuations, which is related to the higher impact toughness (Fig.3(d)). The basket microstructure of 750 ℃, 1 h AC produces the fracture surface of strip groove, dimples and second crack. The fraction of grooves is much more than that of dimples. The feature of basket microstructure is opposition to the characteristic of bi-modal microstructure heat treatment at the same temperature of 750 ℃. Furthermore, the strip groove of basket microstructure heat treatment at 750 ℃ is smaller than that of Widmanstatten microstructure obtained through 980 ℃ for 1 h followed by furnace cooling.

Fig.3 Fractographs of impact toughness specimens after different heat treatments: (a) 915 ℃, 1 h AC, forged in α+β phase region; (b) 750 ℃, 6 h AC, forged in α+β phase region; (c) 980 ℃, 1 h FC, forged in α+β and β phase region; (d) 915 ℃, 1 h AC, forged in β phase region; (e) 750 ℃, 6 h AC, forged in β phase region
4 Analysis and discussion
4.1 Influence of primary α phase of bi-modal microstructure on impact toughness
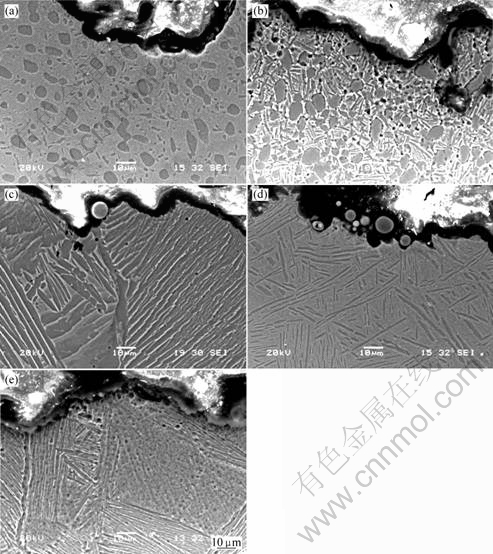
The crack propagation path after different types of forging and heat treatments are shown in Fig.4. It can be seen that there are a lot of microcracks along the direction of main crack path propagation. Currently, the microcracks are found to be located at primary α grain boundaries or at /β interface or/and β grain boundaries.
The microcrack nucleation of impact toughness sample with bi-modal microstructure is found to be located at primary α grain boundaries or at α/β interface of transformed β grain (Figs.4(a) and (b)). The microcracks coalesce with the main propagation crack during impact test. The number of microcracks at 915 ℃ is relatively fewer than that at 750 ℃, because primary α phase increases with heat treatment temperature decreasing. This result is similar to Ref.[2] which has reported primary α phases are advantageous of nucleation of microcracks. Although the size of primary α phases is small, about 5-15 μm, the microcracks at primary α grain boundaries or at α/β interface of transformed β grain can produce a degree deviation on crack propagation path, the microcracks are so easy to accumulate and connect during main crack propagation, therefore, the connection ability of microcracks intensify and result in less absorption energy. So the impact toughness at 750 ℃ is lower than that at 915 ℃.
4.2 Influence of lamellar microstructure on impact toughness
SEM micrographs show crack propagation path features of lamellar microstructure are shown in Figs.4(c) -(e). It can be seen that the microcracks of lamellar microstructure are located at α/β interface and α phase boundaries of β grains. In the present literatures, acicular α structure shows a tortuous crack path due to crack deviation at α/β interfaces, resulting in improved toughness.

Fig.4 Crack path propagation features of impact specimens after different heat treatments: (a) 915 ℃, 1 h AC, forged in α+β phase region; (b) 750 ℃, 6 h AC, forged in α+β phase region; (c) 980 ℃, 1 h FC, forged in α+β and β phase region; (d) 915 ℃, 1 h AC, forged in β phase region; (e) 750 ℃, 6 h AC, forged in β phase region
On account of the crack propagation along the lowest consumption plasticity energy path, when falling across obstacle, the crack is difficult to expand and is compelled to change the crack propagation direction. The crack propagates cross the colony, or along the colony boundary, and/or along β grain boundary. These results are corresponding to the transgranular fracture mixed with intergranular fracture. In general, the crack path deflects at grain boundaries, colony boundaries, or arrests and deviates at α/β interface because of crisscross α lamellae. The crack propagation path of lamellar microstructure is dependent on the size, direction of colony. The microstructure heat-treated at 915 ℃ for 1 h followed by air-cooling after β phase region forging is basket microstructure. The crack path deflects at grain boundaries, colony boundaries, or arrests and deviates at α/β interface because of crisscross α lamellae. Therefore the impact toughness value of basket microstructure is higher than that of Widmanstatten microstructure. 5 Conclusions
1) The highest impact toughness is observed at 915 ℃, the impact toughness at 750 ℃ is lower than that at 915 ℃, and is similar to impact toughness of Widmanstatten microstructure obtained at 980 ℃ for 1 h followed by furnace cooling.
2) During impact toughness test, microcracks developed at α grain boundary in mi-modal microstructure. With the increase of volume fraction of primary α phase, the nucleation microcracks increase. The microcracks accumulate and coalesced with the main propagation crack. The connection ability of microcracks intensity and absorbed energy decrease, so the impact toughness of bi-modal microstructure heat treated at 750 ℃ is lower than that at 915 ℃.
3) The microcracks of lamellar microstructure are located on α/β interface, or the boundary of colony, and/or grain boundary α phase. The crack propagates cross the colony, or along the colony boundary, and/or along β grain boundary. The impact toughness specimen shows transgranular or/and intergranular fractures. The crack propagation path of lamellar microstructure is dependent on the size, direction of colony. The crack path deflects at grain boundaries, colony boundaries, or arrests and deviates at α/β interface because of crisscross α lamellae. Therefore the impact toughness value of basket microstructure is higher than that of Widmanstatten microstructure.
References
[1] WANG Kong-tan, YAN Zhong-lin, ZHANG Zhi-ren. Influence of annealing treatments on toughness of TC4 titanium alloy[C]// Titanium alloy Science and Technology-6th Titanium and Titanium Alloys Proceedings(II). Beijing: Atomic Power Press, 1987: 147-151. (in Chinese)
[2] ZHANG Wang-feng, CAO Chun-xiao, LI Xin-wu, MA Ji-min, ZHU Zhi-shou. Influence rule of Beta heat treatment on mechanic properties of TA15 titanium alloy[J]. Rare Metal Material and Engineering, 2004, 33(7): 768-770. (in Chinese)
[3] LI Yuan-rui, HUANG Ben-duo, HE Qing-bing. Influence of hydrogen on impact strength and M microstructure of the titanium alloy Ti-Al-V[J]. Journal of Chongqing University, 2003, 26(2): 128-131. (in Chinese)
[4] WEI Cheng-fu, CAO Jiang, WANG Hong-yan, LUO Yan-lan. Research on the effect mechanism of hydrogen to the impact toughness of T225NG titanium alloys[J]. Journal of Xihua University Natural Science, 2005, 24(5): 82-84. (in Chinese)
[5] ZHOU Wei, CHEW K G. Effect of welding on impact toughness of butt-joints in a titanium alloy[J]. Materials Science and Engineering, 2003, A347: 180-185.
[6] LATHABAI S, JARVIS B L, BARTON K J. Comparison of keyhole and conventional gas tungsten arc welds in commercially pure titanium[J]. Materials Science and Engineering, 2001, A299(1): 81-93.
[7] BARREDA J L, SANTANMARIA F, AZPIROZ X, IRISARRI A M, VARONA J M. Electron beam welded high thickness Ti6Al4V plates using filler metal of similar and different composition to the base plate[J]. Vacuum, 2001, 62(2/3): 143-150.
[8] MOHANDAS T, BANERJEE D, KUTUMBA RAO V V. Observation on impact toughness of electron beam welds of the α+β titanium alloy[J]. Materials Science and Engineering, 1998, A254(1/2): 147-154.
[9] RADHAKRISHNA C, RAO K P. Comparative study on impact toughness of gas toughness arc and electron beam weld metals of Ti-6Al-4V[J]. Materials Science and Technology, 1997, 13(12): 1057-1062.
[10] NINOMI M, KOBAYASHI T. Toughness and microstructure factor of Ti-6Al-4V alloy[J]. Material Science and Engineering, 1988, 100: 45-55.
[11] NIINOMI M, INAGAKI I, KOBAYASHI T. Micromechanism of improvement in crack initiation and propagation toughness of a Ti-Al-Sn-Zr-Mo alloy by coarsening prior β-grains[J]. Materials Science and Technology, 1988, 4(9): 803-810.
Foundation item: Project (2007CB613805) supported by the National Basic Research Program of China
Corresponding author: CHEN Jun; Tel: +86-29-86231078; E-mail: chenjun@c-nin.com
(Edited by YANG You-ping)