
Machining characteristics of complex prism pattern on electroplated roll by copper
Tae-Jin JE1, Sang-Cheon PARK2, Kang-Won LEE1, Yeong-Eun YOO1, Doo-Sun CHOI1,
Kyung-Hyun WHANG1, Myung-Chang KANG3
1. Nano-Machining Laboratory Division of Nano-Mechanical Systems,
Korea Institute of Machinery and Materials, 104, Sinseongno, Youseong-Gu, Daejeon, 305-343, Korea;
2. Nano-Mechatronics Department, University of Science and Technology,
104, Sinseongno, Youseong-Gu, Daejeon, 305-343, Korea;
3. National Core Research Center for Hybrid Materials Solution, Pusan National University,
98, Pusandaehang-no, Geumjeong-Gu, Busan, 609-735, Korea
Received 2 March 2009; accepted 30 May 2009
Abstract: The BLU (back light unit) is the core component of the LCD for notebook, mobile-phone, navigation, as well as large sized TV, PID (public information display), etc. In order to enhance optical efficiency of LCD, optical films with the uniform prism patterns have been used for BLU by stacking two films up orthogonally. In this case, light interference-phenomenon occurred such as Morie, wet-out, u-turning, etc. It caused several problems such as low brightness, spots and stripes in LCD. Recently, the high-luminance micro complex prism patterns are actively studied to avoid the light interference-phenomenon and enhance the optical efficiency. In this study, the roll master to manufacture complex micro prism pattern film was machined by using the high precision lathe. The machined patterns on the roll master were 50, 45, 40, 35, 30, 25, 20, 15, 10 and 5 μm in the pitch with 25.0, 22.5, 20.0, 17.5, 15.0, 12.5, 10.0, 7.5, 5.0 and 2.5 μm in the peak height, respectively. The roll was 2 000 mm in length and 320 mm in diameter. The electroplated roll by copper and the natural single crystal diamond tool was used for machining the patterns. The cutting force was measured and analyzed for each cutting condition by using the dynamometer. The chips and the surfaces after being machined were analyzed by SEM and microscope.
Key words: high precision lathe; diamond tool; electroplated roll master by copper; optical film; complex prism patterns; light interference-phenomenon
1 Introduction
LCD (liquid crystal display) is recently popular as the general display devices such as notebook, PDA, LCD TV and PID (public information display). So in these days, the LCD has been rapidly developed and widely used[1]. Because the LCD cannot light by itself, the BLU (back light unit) including lamp, reflecting plate and several optical films is needed[2-3]. Especially, the core component is optical film in the BLU. The general optical films have single pitch prism pattern structure. The optical films have been used by stacking two optical films up orthogonally[4-5]. However, the problems of interference-phenomenon such as Moire, wet-out and u-turning occur when orthogonally contacting two films with the single pitch prism are used. Light interference- phenomenon causes several problems such as inhomogeneous distribution of lights and low brightness. So, the studies on the optical films of the BLU have actively progressed to reduce the interference- phenomenon[6-7]. The complex prism pattern films were proposed as one of the solutions to avoid the problems of light interference-phenomenon[8-9].
In order to produce the optical films, the master with the complex prism patterns is used. The master can be produced by laser techniques, photolithography, stepped techniques, LIGA techniques, and mechanical processes[10-14]. The large-size roll master was machined by lathe-process proposed as the method meeting the mass demands for display equipment[15-22].
In this paper, the results of machined roll master with the complex prism patterns are reported. The machining mechanism using the machining methods of the multiple threads which belong to the lathe-process is considered. And the machining conditions using the step by step cutting are optimized.
2 Machining mechanism of multiple thread prism patterns on roll master
Fig.1 shows the diagrams of machining mechanism which is the general method of machining a single thread by the lathe process. In this lathe process, double, triple or even multiple threads can be machined on the roll by applying the cutting tool at different starting positions on the circumference of the end of the roll. The pitch of the prism patterns (P) is the same as a pitch of the unit set (PU) which is the pitch of the identical thread in Fig.1(a). As shown Fig.1(b), the pitch of the unit set is as twice as the pitch of prism patterns. And the 2nd starting position of the tool is opposite to the 1st tool position on the circumference of the roll. A method of triple threads is shown in Fig.1(c). The pitch of the unit set is as three times as pitch of prism patterns. And the three different starting positions of the tool have a positional difference of 120?. The machining method of multiple threads is shown in Fig.1(d). The pitch of the feed is to multiply the pitch of the prism pattern by the number of the threads.
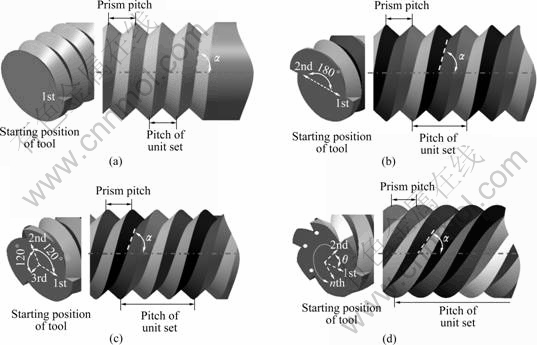
Fig.1 Schematics of machining mechanism of multiple threads using lathe-process: (a) Single thread; (b) Double threads; (c) Triple threads; (d) Multiple threads
Some mathematical expressions for the phase differential machining method are shown in Eqs.(1)-(3).
 (1)
(1)
 (2)
(2)
 (3)
(3)
Namely, the starting position of the tool on the circumference of the roll (θ) was divided by number of thread (N). The thread or angle of tool progress (α) was calculated by inverse-tangent dividing the circumference of the roll by the pitch of tool feed.
The complex prism patterns consisting of different pitches are in shown Fig.2. Starting position (θn) of the each thread needs first to be defined for machining these complex patterns. The distance (Ln) from the peak of the 1st prism(①) to the peak of the nth prism peak ( ) is the total summation of each pitch (P′n) in Eq.(4). Starting position (θn) of each thread for complex prism pattern is defined by dividing length of the nth prism peak from the first prism peak by the pitch of tool feed in Eq.(5).
 (4)
(4)
 (5)
(5)
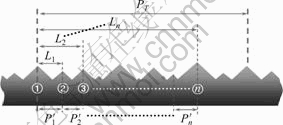
Fig.2 Schematic drawing of machining process for complex prism pattern
The designed pattern for this study is shown in Fig.3. A unit set of the micro prism patterns is designed to have various pitches and heights of 50, 45, 40, 35, 30, 25, 20, 15, 10 and 5 μm in the pitch with 25.0, 22.5, 20.0, 17.5, 15.0, 12.5, 10.0, 7.5, 5.0 and 2.5 μm in the peak height, respectively. The unit set of the micro prism patterns consists of different pitches of prism and is repeated to 1 200 mm in length. The unit set of the micro prism patterns is 275 μm. And the prism angle is designed to be 90?.

Fig.3 Design for complex pitch prism pattern (μm)
3 Machining systems and conditions
3.1 Experimental systems
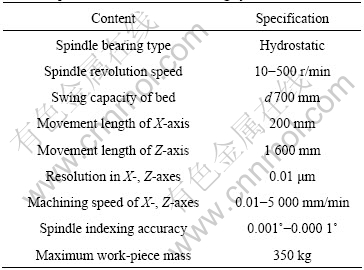
Processing system for machining the micro prism patterns on roll master is shown in Fig.4. The specifications of the system are listed in Table 1. This system is based on the high precision lathe. The hydrostatic bearing was used for two C-axis spindles of the system. The X- and Z-axes were driven by linear motors. Dynamometer (Kistler-9256C2) was utilized to measure the cutting force and the vacuum suction equipment was installed to remove the flow type chip on the tool post.

Fig.4 High precision roll-machining system for experiment
Table 1 Specifications of roll-machining system
The blank roll master is shown in Fig.5(a). The roll master is 2 000 mm in length, 320 mm in diameter and about 350 kg in mass. The copper was electroplated to be 1 000 μm in thickness on the roll. The hardness of the copper electroplated on the roll is about HV 240. Fig.5(b) shows the tool whose tip is single crystal natural diamond. The angle of tool is 90? that is the same angle as the designed micro prism pattern.

Fig.5 Roll master and tool shape for experiments (Hardness: HV 243; Mass: 350 kg): (a) Coated roll master by copper; (b) Single crystal diamond tool
3.2 Experimental methods and conditions
In order to machine micro complex prism patterns on the roll master, the application of the machining mechanism of Fig.1(d) and Fig.6 is needed. In brief, this mechanism is one of the lathe-processes, which is to divide the rotation angle of the roll master for machining multiple threads. The starting positions of the tool calculated from Eq.(5) are shown in Table 2.
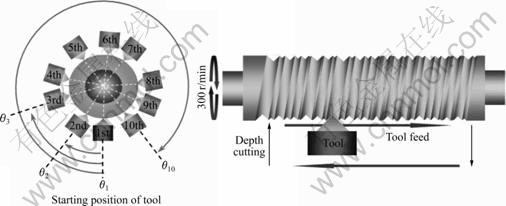
Fig.6 Schematics of start position of tool on circumference of roll master angle and machining motion
Table 2 Division angle by angular division

Fig.7 shows the machining progress and the machining orders of each prism pattern. These patterns are machined by the machining pass of step by step cutting in Fig.7(a). For example, the 8th prism is completed at 1st machining pass. The prism patterns are completed in order of the 8th, 6th, 10th, 2nd, 4th, 5th, 9th, 3rd, 7th and 1st prism in Fig.7(c).
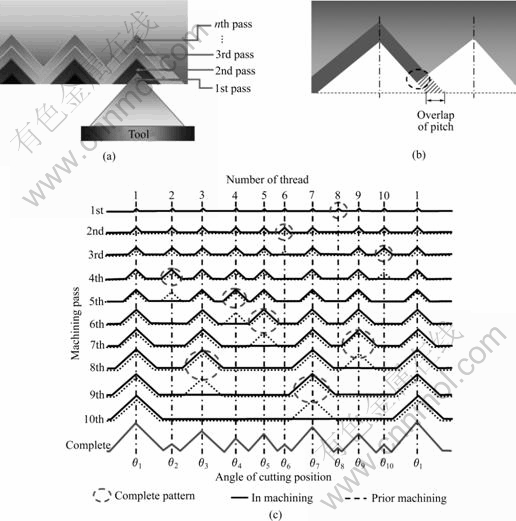
Fig.7 Schematics of machining conditions: (a) Step by step cutting; (b) Overlap pitch; (c) Machining order of each pass
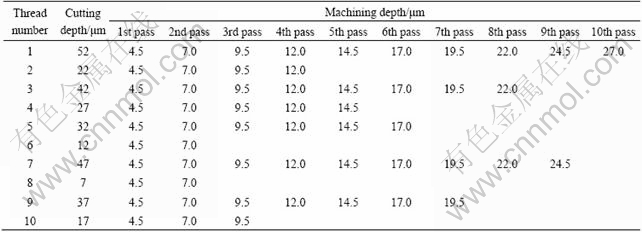
The machining conditions of prism patterns in this order are listed in Table 3. The velocity of main spindle is 300 r/min and the machining feedrate is 275 μm/r. The pitch of tool feed is determined by pitch of the unit set to machine one thread in each machining pass. The cutting depth of the 1st pass is 4.5 μm. The overlap pitch of 2 μm is considered in the cutting depth of the 1st pass to obtain exact and sharp angle of the prism in Fig.7(b). The depths of step by step cutting increase linearly by each 2.5 μm. This complex prism pattern was machined by step by step cutting from one time to ten times that depends on the pitch and the peak of each prism. The machining mechanism using the machining methods of the multiple threads which are one of the lathe-processes was established.
Table 3 Machining conditions (Velocity of main spindle: 300 r/min; Machining feedrate: 275 μm/r)
4 Results and discussion
4.1 Surfaces of prism patterns
The machined roll master is shown in Fig.8. In order to observe the machined complex prism patterns on the large-size roll master under different conditions, the patterns were duplicated by the silicone resin. Fig.9 shows images of duplicated patterns. The surface of the machined micro complex prism patterns is shown in Fig.9(a). The satisfying surfaces of the prism patterns without machining defects such as burr were machined. The section of machined micro complex prism patterns is shown in Fig.9(b). The pitches and heights of the machined complex prism patterns were measured by microscope to compare the shapes of the machined patterns with those of the designed patterns. Especially, the smallest pitch of 5 μm was machined successfully. In the view of the results, micro and complex patterns can be machined.

Fig.8 Machined roll master with complex pitch prism pattern (d: 320 mm; Length: 1 500 mm)
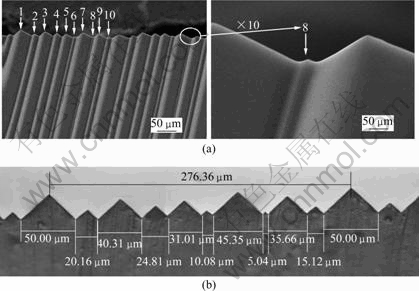
Fig.9 Results of machined patterns: (a) Surfaces of machined pattern; (b) Section parts of machined pattern
4.2 Cutting force
The graph of gauged cutting force in accordance with each cutting depth is shown in Fig.10. The cutting force is increased at each pass because the cutting areas are increased by constant increasing the depth of step by step cutting. And the increasing rate of cutting force is constant. In other words, the cutting area increases with the increase of cutting depth step by step and the cutting force increases in proportion to the cutting area. However, the cutting force decreases with the decrease of the increasing rate of cutting force because the cutting area decreases between the 9th pass and the 10th pass.
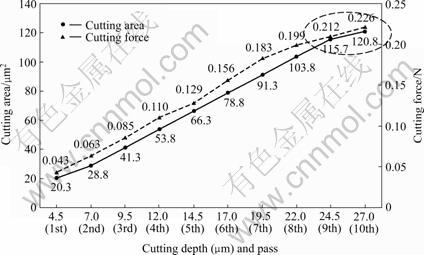
Fig.10 Graph of cutting areas and forces according to cutting depth
4.3 Cutting chips
The features of machined chips are observed by SEM and shown in Fig.11. Every chip is created as flow type. Smooth surfaces form at the outside which is the friction surface. And micro creases are observed at the inside of chip. As shown in Fig.11(a), the chip is created during cutting of the 1st pass, and the section feature of chip is triangle, which is very similar to feature of the tool. Fig.11(b) shows features of chip which is machined during cutting from the 2nd to the 9th pass. The “V”-shape is created at the inside of chips and plate-shape is made at the outside of chips because of friction between outside of chip and surface of tool. Fig.11(c) shows picture of chip during cutting of the 10th pass. Micro marks are shown at both ends of chip which is affected by over depth cutting. Judging from the above results such as machined smooth surfaces and consideration of created chips, machining processing and conditions are generally suitable.

Fig.11 Chip shapes of machined micro prism patterns: (a) Chip after cutting of the 1st pass; (b) Chip after cutting of the 2nd-9th pass; (c) Chip after cutting of the 10th pass
5 Conclusions
1) A study on machining the micro complex prism patterns which are 50, 45, 40, 35, 30, 25, 20, 15, 10 and 5 μm in the pitch with 25.0, 22.5, 20.0, 17.5, 15.0, 12.5, 10.0, 7.5, 5.0 and 2.5 μm in the peak height was accomplished.
2) The machining mechanism using the machining methods of the multiple threads which are one of the lathe-processes was established. The machining methods using different staring positions of the tool on the circumference of the roll master were applied. And the machining conditions using the step by step cutting were optimized.
3) The large-size electroplated roll master by copper with the complex prism patterns was machined. And the surfaces, geometric accuracy, cutting force and chip were considered and analyzed.
4) The results from this study can be used to machine the roll master and produce the high efficiency optical films which can be applied to complex prism patterns.
References
[1] JAFRI R, HASAN W, SHAHZAD M. Current trends in electronic display technology[J]. Journal of Information and Communication Technology, 2008, 2(1): 68-75.
[2] MIN J H. Backlight unit: USA 0130880[P]. 2004-07-08.
[3] YANAGI E, FUKUNISH T, SHOJI O. Back lighting device for a liquid crystal panel: USA 4937709[P]. 2001-01-02.
[4] SHIM Y S, CHO S M. Prism sheet of back light unit for LCD: USA 0097708[P]. 2007-05-03.
[5] WANG K H, LIN D, KO Y C. Luminance enhancement optical substrates: USA 0049451[P]. 2008-02-28.
[6] WANG K H, LIN C, KO D Y C. Moire reducing optical substrates with irregular prism structures: USA 0010594[P]. 2007-01-11.
[7] NEMOTO A, SASUGA M. LCD having a pattern for preventing a wavy brightness irregularity at the edges of the screen due to drive elements or tape carrier packages: USA 6456344[P]. 2001-01-02.
[8] CAMPBELL A B. Optical film: USA 7278771[P]. 2001-01-02.
[9] NILSEN R B. Retroreflective prism structure with windows formed thereon: USA 5565151[P]. 2001-01-02.
[10] DAVIES M A, EVANS C J, PATTERSON S R. Application of precision diamond machining to the manufacture of micro-photonics components[C]//Collection of Scientific Conference. 2003: 94-108.
[11] RIZVI N, GREUTERS J, DALLIMORE J. Laser micromachining- new techniques and developments[C]//Collection of Scientific Conference. 2000: 278-287.
[12] CHO K H, YOON K H. Direct surface forming―New polymer processing technology for large light guide of TFT-LCD module[J]. Korea-Australia Rheology Journal, 2003, 15(4): 167-171.
[13] KIM J S, KO Y B, HWANG C J. Fabrication of micro injection mold with modified LIGA micro-lens pattern and its application to LCD-BLU[J]. Korea-Australia Rheology Journal, 2007, 19(3): 165-169.
[14] OK C H, HAN J M. The study of high brightness prism patterned LGP using optical simulation analysis[J]. Transactions on Electrical and Electronic Materials, 2007, 8(4): 178-181.
[15] CHAU C W, LERNER J M. Method of making liquid crystal display system: USA 5735988[P]. 2001-01-02.
[16] WU C H, LU C H. Fabrication of an LCD light guide plate using closed-die hot embossing[J]. Journal of Micromechanics and Microengineering, 2008, 18: 035006.
[17] AKIYAMA T, KATO S. Precision roll turning lathe: USA 0011132[P]. 2008-01-17.
[18] PAKRER J R, MCCOLLUM T A. Methods of making a pattern of optical element shapes on a roll for use in making optical elements on or in substrates: USA 0135273[P]. 2004-07-15.
[19] OLCZAK E, LIANG E W. Method and apparatus for fabricating a light management substrates: USA 0120136[P]. 2004-06-24.
[20] HAYASHI S R, MEYERS M M. Method of aligning a cutting tool: USA 0113713[P]. 2007-05-24.
[21] CHOI D S, JE T J, YOO Y E, YOON J S. A study on the high aspect ratio pattern roll master fabrication technologies[C]//European Society for Precision Engineering and Nanotechnology International Conference. Zurich, 2008.
[22] PARK S C, JE T J. A study on micro prism pattern roll master processing using cutting method of multiple screw thread[C]//The Korean Society of Manufacturing Process Engineers. JeJu, 2008.
Foundation item: Project(R15-2006-022-01001-0) supported by the National Core Research Center Program from MOST and KOSEF
Corresponding author: Tae-Jin JE; E-mail: jtj@kimm.re.kr
(Edited by CHEN Wei-ping)