搅拌摩擦加工TA5钛合金的显微组织和力学性能
来源期刊:中国有色金属学报(英文版)2021年第2期
论文作者:周利 于明润 陈伟光 张自立 杜帅 刘会杰 郁炎 高福洋
文章页码:404 - 415
关键词:搅拌摩擦加工;TA5钛合金;欧拉-拉格朗日耦合模拟;织构;力学性能
Key words:friction stir processing; TA5 alloy; coupled Euler-Lagrange simulation; texture; mechanical properties
摘 要:对TA5钛合金进行搅拌摩擦加工(FSP),获得超细晶组织。为了研究搅拌摩擦加工过程中的温度分布和材料流动情况,使用欧拉-拉格朗日耦合(CEL)方法对加工过程进行热力耦合模拟。采用光学显微镜、扫描电镜、硬度和拉伸测试技术对合金的显微组织和力学性能进行表征。由于在加工过程中材料发生动态再结晶,因此,加工后的合金由细小等轴晶粒组成。TA5钛合金在加工过程中通过位错塞积与晶界旋转实现动态再结晶。搅拌区组织在前进侧晶粒尺寸最小,且晶粒位相差最大。在200 r/min转速下进行搅拌摩擦加工后,材料的抗拉强度最高,达到830 MPa以上,而伸长率变化不大。所测试样均在晶粒较大的搅拌区后退侧断裂,且断口处观察到细小韧窝。
Abstract: Ultra-fine grained TA5 titanium alloy was fabricated by friction stir processing (FSP). Temperature distribution and material flow were simulated by the coupled Euler-Lagrange (CEL) method. The microstructure and mechanical properties of TA5 alloy were characterized by optical and scanning electron microscope, Vickers hardness, and tensile tests. The processed alloy was composed of ultra-fine grained and equiaxed grains due to dynamic recrystallization. The microstructure recrystallized through grain boundary rotation and dislocation accumulation. The grain size reached the minimum on the advancing side of the stir zone with the highest grain misorientation. Ultimate tensile strength was promoted to over 830 MPa after FSP at a rotating speed of 200 r/min, whereas elongation varied a little. The specimens all fractured on the retreating side of the stir zone and smaller dimples were depicted from the fracture morphologies of FSP specimens.
Trans. Nonferrous Met. Soc. China 31(2021) 404-415
Li ZHOU1,2, Ming-run YU1,2, Wei-guang CHEN2, Zi-li ZHANG2, Shuai DU1, Hui-jie LIU1, Yan YU3, Fu-yang GAO3
1. State Key Laboratory of Advanced Welding and Joining, Harbin Institute of Technology, Harbin 150001, China;
2. Shandong Key Laboratory of Special Welding Technology, Harbin Institute of Technology at Weihai, Weihai 264209, China;
3. Luoyang Ship Material Research Institute, Luoyang 471000, China
Received 12 March 2020; accepted 8 September 2020
Abstract: Ultra-fine grained TA5 titanium alloy was fabricated by friction stir processing (FSP). Temperature distribution and material flow were simulated by the coupled Euler-Lagrange (CEL) method. The microstructure and mechanical properties of TA5 alloy were characterized by optical and scanning electron microscope, Vickers hardness, and tensile tests. The processed alloy was composed of ultra-fine grained and equiaxed grains due to dynamic recrystallization. The microstructure recrystallized through grain boundary rotation and dislocation accumulation. The grain size reached the minimum on the advancing side of the stir zone with the highest grain misorientation. Ultimate tensile strength was promoted to over 830 MPa after FSP at a rotating speed of 200 r/min, whereas elongation varied a little. The specimens all fractured on the retreating side of the stir zone and smaller dimples were depicted from the fracture morphologies of FSP specimens.
Key words: friction stir processing; TA5 alloy; coupled Euler-Lagrange simulation; texture; mechanical properties
1 Introduction
Titanium (Ti) alloys have low density, high specific strength, excellent corrosion properties, and high-temperature resistance [1,2]. They have been widely employed as structural materials in aeronautics, nuclear, and chemical industries [3]. Especially in aeronautics, the demand of Ti alloy has been kept increasing in the past decade, and in some jets, up to 41% of the structures were made by Ti alloy as reported [4]. However, the poor machinability of Ti alloys overshadows the conventional manufacturing processes. Undesirable brittle phases (such as TiN), over-coarsened grains, and significant residual stresses, which are caused by conventional manufacturing processes (such as micro-arc oxidation), limit the use of Ti alloys [5,6]. Friction stir processing (FSP), which is a solid-state approach for microstructural modification, is one of the candidates for Ti alloy manufacturing [6-8].
Severe plastic deformation was performed on the base materials during FSP, which resulted in the considerable grain refinement [9,10]. The grain refinement was generally attributed to the dynamic recrystallization [11,12]. The continuous dynamic recrystallization (CDRX), which was powered by the friction heat and plastic strains, led to a stable grain size of ~10 μm at a rotation speed of 400 r/min and a welding speed of 95 mm/min, as reported in the friction stirred TC4 alloy [13]. Further smaller grain size of the TC4 alloy was obtained by using an additional cooling system, which also led to 2.7% and 50.4% improvement for tensile strength and elongation, respectively [14]. ZHANG et al [15,16] reported that highly refined grain microstructure, which was obtained by FSP, led to the excellent low-temperature mechanical properties of the Ti-6-4 and Ti-15-3 alloys. WU et al [17-19] further pointed out that the low- temperature plasticity of the friction stir processed Ti-6Al-4V alloy was closely related to the fine lamellar structure which was induced by the severe plastic deformation. Otherwise, FSP was considered to eliminate the original textures and to introduce shear textures into the stirred materials [20,21]. JIANG et al [22,23] suggested that shear textures were introduced into the Ti alloys by FSP, which also led to the hardening of the processed materials. FALL et al [24] reported that, while the parameters are varied, the texture changes were well agreed with those of mechanical properties. This indicated that not only the grain refinement but the grain orientations also have effects on the mechanical properties. The P1 component of shear texture was found in the stirred CP-Ti, which was accompanied by a weak B component [25,26]. However, C components were also observed in the Ti alloys after FSP [12,27].
Although some studies have been conducted on the FSP of Ti alloy, the following critical points have been still unclear so far: (1) the mechanism of the dynamic recrystallization of Ti alloys in FSP; (2) the texture evolution of the stirred materials; (3) the fracture mechanism of the friction stir processed Ti alloys. In this work, FSP was performed on the TA5 alloy, which was a kind of near-α Ti alloys. The temperature distribution and material flow during FSP were simulated by the coupled Eulerian-Lagrangian (CEL) method. Misorientation evolution was studied to reveal the processes of dynamic recrystallization, and texture evolution was studied by analyzing the crystal directions of the stirred materials. The mechanical properties of the processed alloy were tested. The relationship between the microstructure and mechanical properties of the friction stir processed TA5 alloy was further discussed.
2 Experimental
In this work, FSP was performed on 5 mm- thick TA5 plates, which were cut into 250 mm-long and 150 mm-wide pieces. TA5 alloy is one of the α-Ti alloys, which has good corrosion resistance and mechanical properties. Chemical composition and physical properties of the base material (BM) are listed in Tables 1 and 2, respectively.
Illustrations of the FSP and its simulation in this study are given in Fig. 1. FSP was performed along the mid-line of the plate after mechanical polishing on the surface of the processed zone. The FSP tool was meshed with free-tetragonal elements of C3D10M. It was meshed coarsely in the holding area, whereas the elements were finer around the pin and shoulder. The diameter of the shoulder was 12 mm and the plunge depth was 0.2 mm. The diameters of the root and top of the pin were 4.1 and 3.1 mm, respectively and the pin length was 2.8 mm. The TA5 sheet was meshed using the hexagonal elements (EC3D8RT). The elements of the FSP zone were ~0.25 mm in length, which was about 10 times finer than other elements in the rest region of the sheet. This made the model predict the material flow precisely.
Table 1 Chemical composition of TA5 alloy (wt.%)

Table 2 Physical properties of TA5 alloy

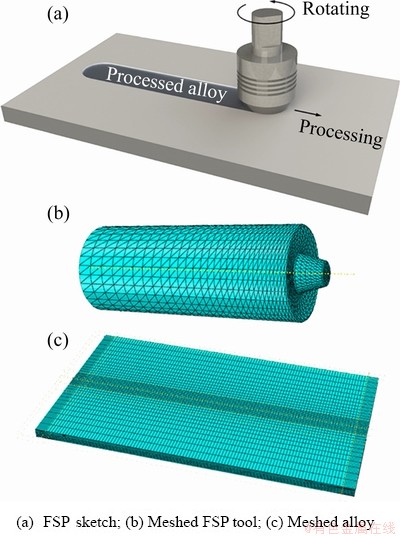
Fig. 1 Illustrations for FSP and simulation
FSP was performed at a constant processing rate of 75 mm/min and various rotation speeds ranging from 150 to 300 r/min, and the tilt angle of the tool pin was 3° in FSP. The temperature histories were recorded from the surface by K-type thermocouples placed at 11 and 18 mm away from the center-line on the advancing side (AS) respectively. Metallurgical specimens were cross-sectioned from the processed plate using a wire electrical discharging machine (DM-Cut, 6531). The microstructural characteristics of the joints were examined via optical microscope (OM, DSX 510) and electron backscatter diffractometer (EBSD, DIGIVIEW 5). Vickers hardness was tested on the cross-sections, using a microhardness tester (MICRO-586) with a load of 980 mN for 10 s. The hardness was tested parallel to the surface by 1.5 mm with a step size of 0.5 mm. Tensile specimens were milled from the processed plates with a thickness of 2 mm. The top and bottom surfaces were removed to keep the test from the influence of surface patterns and internal defects. For each plate, three tensile specimens were tested at a crosshead speed of 1 mm/min, using a mechanical testing machine (Instron 5967).
3 Results and discussion
3.1 CEL simulation
FSP processes were simulated by the CEL method based on the material properties, which are listed in Table 2. In this work, the Johnson-Cook model was used to describe the plasticity of TA5 alloy [28]:
 (1)
(1)
where σy is the yield strength; εpl is the effective plastic strain,  is the effective strain rate, T is the processing temperature, Tr is the room temperature (20 °C), Tm is the melting temperature (1673 °C), and A, B, C, n, and m are constants.
Plastic deformation and friction were incorporated because both generated heat during FSP. The frictional heat (Qf), which was the main heat source, was generated by the friction between the tool and the workpiece:
 (2)
(2)
where μ is the friction coefficient which is taken as 0.50 in this work, P is the contact pressure, and  is the slip rate which is found to be 0.31 in this work. Otherwise, the heat which was generated by plastic deformation (Qp) could be described by
 (3)
(3)
where β is the conversion efficient which is commonly taken as 0.9 for metals,  is the equivalent stress, and
  is the equivalent strain rate. Heat was transferred based on Fourier law of heat conduction as follows [29]:
 (4)
(4)
where ρ is the density of TA5 alloy, cp is the specific heat capacity, K is the thermal conductivity, and t is the time. The original temperatures of the workpiece and FSP tool are the same as the room temperature. In consideration of the thermal convection and radiation, the thermal boundary condition is presented in Eq. (5):
 (5)
(5)
where k is the heat transfer coefficient, Ts is the surface temperature, T∞ is the environmental temperature, σ is the Stefan-Boltzmann constant, ε is the emissivity which is taken as 0.09, and h is the heat convection coefficient which is 30 W/(m2・°C) between the workpiece and the air and 1000 W/(m2・°C) between the workpiece and the clamps.
The temperature distributions and histories are shown in Fig. 2. The maximum temperature of 822 °C reached at the beginning of holding at 200 r/min, which was in accordance with former studies [30,31]. The temperature of the materials behind the FSP tool was higher than that in the front of the tool, which was attributed to the heat accumulation. And, the temperature on the AS was higher than that on the RS generally, as the strain rate was higher on the AS due to the increase of rotating and welding rates. In stably processing period, the peak temperature was simulated to be 799 °C at 200 r/min, which was slightly lower than the peak temperature in plunging period. This was attributed to less heat accumulation in stably processing period as compared to the plunging period. The peak temperature was closely related to the rotating speed as simulated by the CEL method. The peak temperatures were elevated from 663 to 848 °C when the rotating speed increased from 150 to 250 r/min. The peak temperatures were all lower than the β phase-transition temperature (882 °C). In order to examine the accuracy of the simulation in this work, comparison between the simulated and experimental temperature histories was carried out at the points which were 11 and 18 mm away from the weld center on the AS, respectively. The simulated temperature histories were well matched with the experimental ones. It could be concluded that the FSP was well fitted by the CEL method.
Material flows of the plasticized TA5 alloy during FSP are shown in Fig. 3. In the airview (xy plane), the material on the AS was found to flow around the FSP tool towards the RS and the material on the RS was refilled to the back of the tool. It should be noticed that the RS material was mainly refilled to the AS and RS areas, whereas the refilling flow was weak in the middle. This was considered to be responsible for the internal defects, such as cavity and tunnel. Less materials refilling to the middle area behind the FSP tool could be attributed to the influence of the shoulder. As shown in the profile (yz plane), vortex of the plasticized materials was found between the shoulder and the pin. This was caused by the downward component of the shoulder’s rotation, which was tilted by 3° and the materials thus moved upward through the vortex partially other than refilling backward, which was in accordance with former studies [28,32]. The materials flowed around the FSP tool on the cross-section (zx plane). The difference could be depicted from the directions of the external flows. On the AS, the materials moved towards the bottom and the RS of the weld. The plasticized materials also flowed towards the weld bottom on the RS and returned to the RS when the materials reached the weld bottom. This was attributed to the influence of the rotating FSP tool.
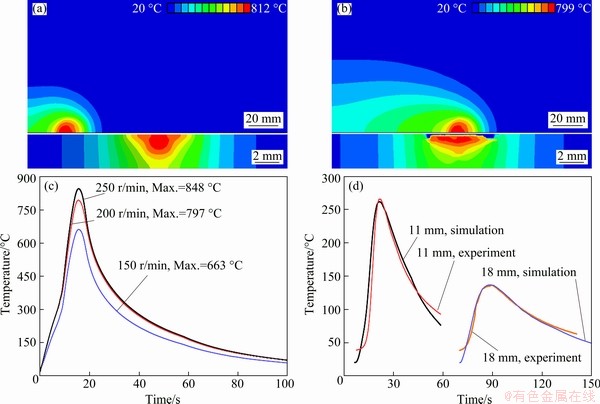
Fig. 2 Temperature distributions at end of plunging (a) and in stable FSP period (b), and temperature histories at different rotating rates (c) and comparison of simulated and experimental temperatures (d)
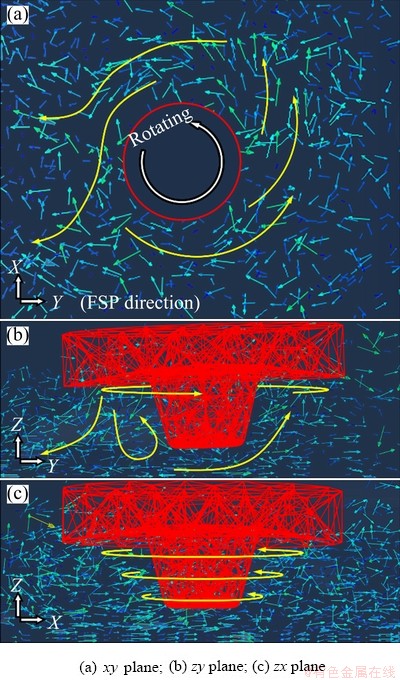
Fig. 3 Material flows on standard planes
3.2 Microstructure
Appearances of the processed TA5 alloys are given in Fig. 4 after FSP at different rotating speeds. The FSP equipment shook obviously when the rotating speed was 150 r/min, resulting in the inhomogeneous appearance. This indicated that the TA5 alloy flowed insufficiently when the FSP was performed at 150 r/min. Regular waves were formed on the surface homogeneously as the rotating speed increased to 200 r/min, suggesting that the FSP was stable at 200 r/min. Small flashes were formed on the advancing side where the strain rate was higher during FSP. As rotating speed increased to 250 r/min, a little overlap was formed on the retreating side (RS), which could be attributed to the over plasticized materials at high rotating speed. Much more TA5 alloys were overlapped on the retreating side of the FSP zone at a rotating speed of 300 r/min, resulting in the undesirable appearance. This was because the material flow in FSP was superfluously enhanced when the rotating speed increased over 250 r/min. As a result, the alloy processed at 300 r/min was not studied in following analysis due to poor appearance, which showed little value for the application.
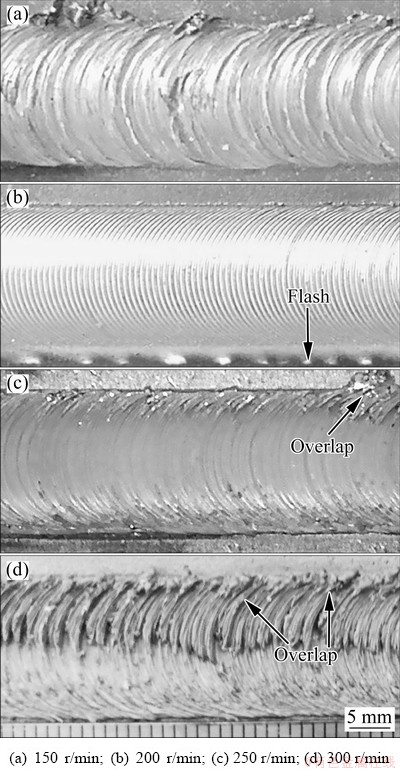
Fig. 4 Appearances of TA5 alloy after FSP at different rotating speeds
Microstructures of the typical FSP specimen, which was processed at 200 r/min, are shown in Fig. 5. Stir zone (SZ) and thermo-mechanically affected zone (TMAZ) could be seen from the cross-section. No distinguishable coarsened region of the base material, which was considered heat affected zone (HAZ) commonly, was observed. The BM was composed of lath grains, indicating that the plates had been rolled before FSP. TMAZ was the transition zone between SZ and BM, which was composed of both refined and deformed grains due to the incomplete dynamic recrystallization. The microstructure of TMAZ varied with the distance from SZ, which was attributed to the change of the temperature and strain rate. The grains in SZ were significantly refined and equiaxed with a much smaller grain size. This was because the severe deformation and heat, which were caused by the friction and stirring during FSP, resulted in the continuous dynamic recrystallization [33]. This was further discussed using EBSD data.
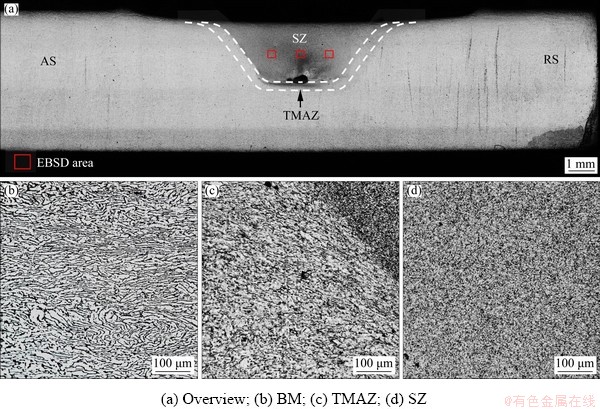
Fig. 5 Microstructures of typical specimen at rotating speed of 200 r/min
Misorientations of the FSP zones are shown in Fig. 6. Red, green and blue lines in images show the subgrain boundaries, low-angle grain boundaries and high-angle grain boundaries, respectively. Near half of the misorientations of BM were ranged from 2° to 5°, indicating that there were a great number of dislocations in the plate. In the TMAZ, the fraction of high-angle grain boundaries (>15°) increased to 47.9% at the expense of subgrain boundaries (2°-5°). This suggested that the dislocations immigrated towards the grain boundaries to increase the misorientation angles or accumulated to form new grain boundaries, which resulted in the recrystallization. As the grains were fully recrystallized, the high-angle grain boundaries were predominant in the SZ. The fractions of subgrain boundaries and low-angle grain boundaries were both decreased lower than 15%. Misorientations with different angles could be depicted along single-grain boundaries, even though the grains were fully refined in SZ. It was concluded that the dislocation immigration was enhanced with the influence of the plastic deformation and processing heat in FSP. The dislocation movement was impeded by the grain boundaries due to the interaction between the local stress fields, resulting in the increase of the misorientation at the grain boundaries. This suggested that, in the CDRX processes of TA5 FSP, grain boundaries were evolved into higher-angle boundaries, forming new grains, and new low-angle boundaries were formed through dislocation accumulation. As the rotating speed increased, the grain size of the TMAZ decreased to 7 μm (250 r/min) from 9.5 μm (150 r/min), whereas the SZ grain grew to 2.4 μm with a little increase from 2.1 to 2.4 μm. The grain refinement in the TMAZ was attributed to the fact that more grains were refined by dynamic recrystallization which was enhanced with increasing rotating speed. However, the SZ grains were fully recrystallized and grew more due to the increase of the welding heat with higher rotating speed.
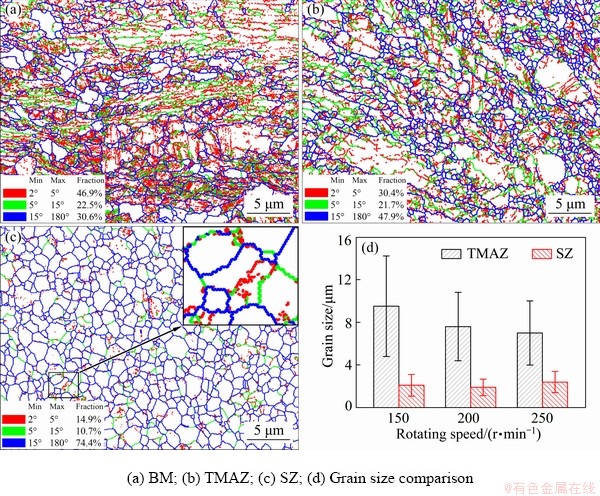
Fig. 6 Misorientations of FSP zones
Inverse pole maps of the AS, center and RS of the SZ are shown in Fig. 7. The SZ was considered to consist of α titanium alloy because the peak temperature during FSP was lower than the transition point as aforementioned. Crystal orientation varied from AS to RS obviously due to the differences between the directions of material flow on the AS and RS. The mean grain diameter was 1.26 μm on the AS, which was the smallest in the SZ due to the highest strain rate. The grain size in the middle was slightly increased to 1.27 μm. On the RS, the mean grain diameter was 1.41 μm, which was ~12% larger than that on the AS. This was attributed to the low strain rate on the RS, as a result of the variation of rotating direction, which was codirectional with the processing direction on the AS, and reverse on the RS. Otherwise, the average misorientation was 0.74° on the AS, and then it decreased to 0.63° in the middle and 0.59° on the RS. This indicated that the dynamic recrystallization was finished on the RS firstly, due to the lower strain rate. And, the grains on the RS thus experienced a longer grain growth, which was performed by the immigration of dislocations towards grain boundaries, leading to a larger grain size and lower grain misorientation.
Pole figures (PFs) of the microstructure in different zones are given in Fig. 8. Rolling texture, with a maximum intensity of 15.02, was depicted from the PFs of the BM. The microstructure in TMAZ was composed of extrusion textures which rotated ~45° from TD to negative ND, according to the PFs, and the texture intensity was 5.81 at most. This indicated that the microstructure in TMAZ experienced extrusion in FSP, which was tilted from TD to negative ND due to the oblique deformation shown in Fig. 3. The PFs of different regions of the SZ were more complicated, and shear textures could be identified from the PFs after limited rotation. C1/C2 components were found on the AS of the SZ, and the maximum texture intensity was 4.29. This was because any significant intensities developing around C fibers would be prevented by the rotation vectors around them. P1 component was predominant in the middle of the SZ, indicating that large amounts of shear strains were introduced into the material during FSP [34]. The texture intensity was 15.46 in the middle, which was the highest over the SZ. On the RS of the SZ, C1/C2 components were also the dominant textures, which had a maximum intensity of 9.36. The angle between the fibers of the textures on the AS and RS was ~90°, which matched up the difference between the flow directions. It was thus concluded that the crystal orientations along the SZ were determined by the local deformation directions.
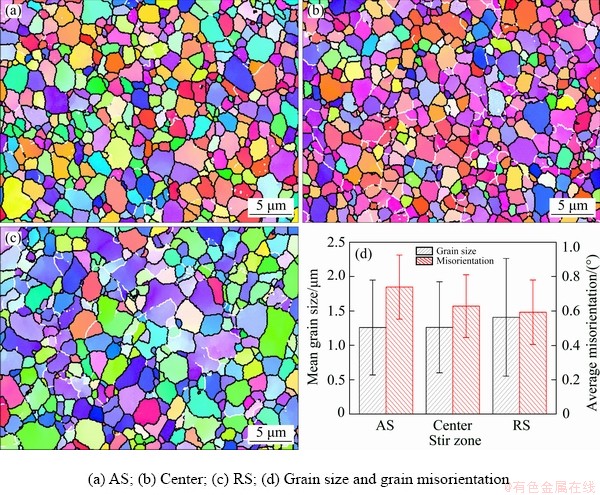
Fig. 7 Inverse pole maps of SZ
3.3 Mechanical properties
Vickers hardness profiles of the processed TA5 specimens are shown in Fig. 9. The hardness was tested twice per millimeter along the mid-line of the Ti plate. The SZ exhibited an average hardness over HV 280, which was much higher than that of the BM (~HV 250). The highest value of HV 296 was found in the SZ at 150 r/min. The hardness of the SZ was generally decreased as rotating speed increased. In addition, the width of the SZ was extended with increasing rotating speed, according to the hardness results. The hardness decreased in the TMAZ, which was attributed to the coarser grains. The variation of the microhardness was considered depending on the grain structures. The highest hardness reached with the finest grains in SZ and then decreased as the grain size increased. This highly agreed with the Hall-Petch relationship in α-Ti alloy [35], which was expressed as
Hv=228.0+89.6d-1/2 (6)
where Hv and d are Vickers hardness and mean grain diameter (μm), respectively. It was suggested that the hardness of the processed Ti alloy was closely related to the grain size.
Tensile tests were performed at room temperature and the results are illustrated in Fig. 10. As the top and bottom surfaces were both removed, the influence of the grain structure was revealed through the tests. The ultimate tensile strengths (UTS) of the specimens were in the range of 830-880 MPa, which were all higher than that of the BM (727 MPa). This was attributed to the highly refined grain structure in the SZ. On the other hand, the elongation changed slightly after FSP (20.9%-28.2%), as compared to the BM (24.1%). The UTS was 835 MPa at 150 r/min with a relatively low elongation, which was 23.9% for average due to the influence of the internal cavity. The internal defect, such as cavity, lowered the energy for the initiation and extension of cracks and hence resulted in lower strength. The average UTS and the average elongation both reached the maxima at 200 r/min, which were 852 MPa and 27.3% respectively. When the rotating speed further increased, the average UTS and elongation respectively decreased to 836 MPa and 26.6% at 250 r/min, which was attributed to the coarsened grain structure with high rotating speed.

Fig. 8 Pole figures of FSP zone
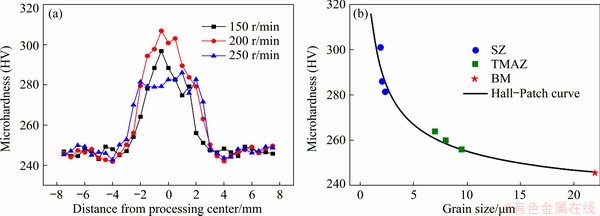
Fig. 9 Microhardness distributions at different rotating speeds (a) and grain sizes (b)
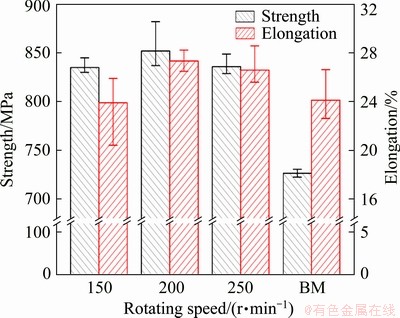
Fig. 10 Ultimate tensile strength and elongation
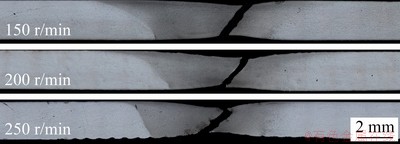
Fig. 11 Profiles of fractured specimens
The profiles of the fractured specimens were obtained by OM, as shown in Fig. 11. The specimens were all found to fracture on the RS of the SZ. This was attributed to the coarser grain structure on RS, which was weaker than the finer grains in the middle or on the AS. The coarsened grain structure resulted in less grain boundaries, which could impede dislocations. The dislocations hence moved more easily on the RS, resulting in the plastic deformation. The bearing area was shrunk due to the plastic deformation and this led to the fracture finally. Necking was seen from the profiles of the cracked specimens, as distinctive plastic deformation was observed on the SZ. This indicated good plasticity of the processed TA5 alloy.
Fracture morphologies, which were obtained by SEM in the secondary electron mode, are given in Fig. 12. Discontinuous internal cavities were observed from the fractured specimen of 150 r/min. Cracks propagated from the cavities into the FSP alloy easily due to the tip effect of the internal defects, resulting in the relatively low strength and elongation at 150 r/min as aforementioned. Plastic deformation, including necking, was more obvious at 200 and 250 r/min, compared to the specimen of 150 r/min and BM, which was in agreement with better elongations shown in Fig. 10. Fracture surfaces of the FSP and BM specimens were composed of dimples and tearing edges. The dimples had a mean diameter smaller than 5 μm after FSP, which was much smaller than that of the BM (over 10 μm). This was attributed to the highly refined grain structure, which induced more grain boundaries limiting the movement of dislocations and the propagation of cracks. In addition, the less texture in the SZ enhanced the isotropy of the processed alloy, which was closely related to the better plasticity of the SZ.
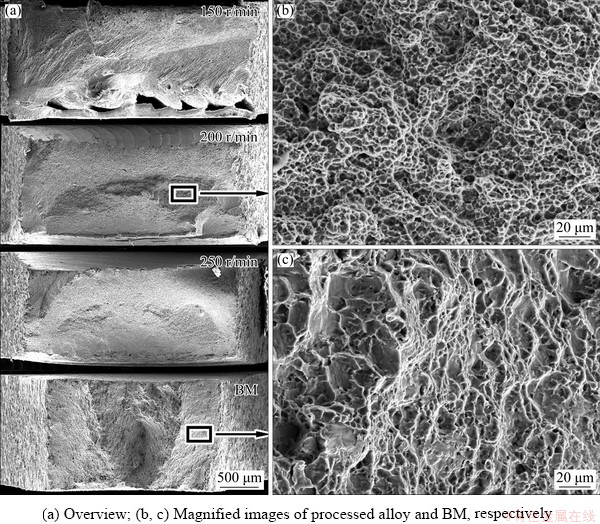
Fig. 12 SEM images showing fracture morphologies
4 Conclusions
(1) FSP was performed on the 5 mm-thick TA5 plate. The grain microstructure was highly refined and equiaxed by means of dynamic recrystallization in FSP, resulting in better mechanical properties than that of the BM.
(2) The temperature remained below the transition point of Ti during FSP. High-temperature materials were mostly distributed behind the FSP tool rather than other regions. The material generally flowed forwards the upside on the AS and backward the downside on the RS.
(3) Dislocations immigrated during FSP, resulting in the CDRX and the increase of misorientations at grain boundaries. Shear textures, including P1 and C1/C2 components, were introduced into the material with a relatively low intensity during FSP, replacing the rolling texture in the BM. Crystal directions varied along the SZ, which was determined by the local deformation directions.
(4) Hardness increased to over HV 280 in the stir zone, and ultimate tensile strength was promoted to over 830 MPa after FSP, while elongation varied a little. The specimens all fractured on the RS, which was attributed to the larger grain size. Necking and dimples were observed from the fracture morphologies, and the specimens had a smaller dimple size after FSP.
Acknowledgments
The authors are grateful for the financial support from the National Natural Science Foundation of China (51974100).
References
[1] ZHOU Li, LIU Hui-jie, WU Lin-zhi Texture of friction stir welded Ti-6Al-4V alloy [J]. Transactions of Nonferrous Metals Society of China, 2014, 24(2): 368-372.
[2] KUMAR R, BALASUBRAMANIAN M. Application of response surface methodology to optimize process parameters in friction welding of Ti-6Al-4V and SS304L rods [J]. Transactions of Nonferrous Metals Society of China, 2015, 25(11): 3625-3633.
[3] WANG S Q, LIU J H, CHEN D L. Tensile and fatigue properties of electron beam welded dissimilar joints between Ti-6Al-4V and BT9 titanium alloys [J]. Materials Science and Engineering A, 2013, 584: 47-56.
[4] PUTYRSKII S V, YAKOVLEV A L, NOCHOVNAYA N A. Benefits and applications of high-strength titanium alloys [J]. Russian Engineering Research, 2018, 38(12): 945-948.
[5] GANGWAR K, MAMIDALA R, SANDERS D. Friction stir welding of near α and α+β titanium alloys: metallurgical and mechanical characterization [J]. Metals, 2017, 7(12): 565(1-23).
[6] MIRONOV S, SATO Y S, KOKAWA H. Friction-stir welding and processing of Ti-6Al-4V titanium alloy: A review [J]. Journal of Materials Science and Technology, 2018, 34(1): 58-72.
[7] SU J Q, WANG J Y, MISHRA R S, XU R, BAUMANN J A. Microstructure and mechanical properties of a friction stir processed Ti-6Al-4V alloy [J]. Materials Science and Engineering A, 2013, 573: 67-74.
[8] FATTAH-ALHOSSEINI A, VAKILI-AZGHANDI M, SHEIKHI M, KESHAVARZ M K. Passive and electrochemical response of friction stir processed pure Titanium [J]. Journal of Alloys and Compounds, 2017, 704: 499-508.
[9] PATEL V, LI W, VAIRIS A, BADHEKA V. Recent development in friction stir processing as a solid-state grain refinement technique: Microstructural evolution and property enhancement [J]. Critical Reviews in Solid State and Materials Sciences, 2019, 44(5): 378-426.
[10] WEGLOWSKI M S. Friction stir processing―State of the art [J]. Archives of Civil and Mechanical Engineering, 2018, 18(1): 114-129.
[11] ZHANG Wen-jing, LIU Hui-hong, DING Hua, FUJII H. Superplastic deformation mechanism of the friction stir processed fully lamellar Ti-6Al-4V alloy Materials Science and Engineering A, 2020, 785: 139390.
[12] YOON S, UEJI R, FUJII H. Effect of rotation rate on microstructure and texture evolution during friction stir welding of Ti-6Al-4V plates [J]. Materials Characterization, 2015, 106: 352-358.
[13] TCHEIN G J, JACQUIN D, COUPARD D, LACOSTE E, GIROT MATA F. Genesis of microstructures in friction stir welding of Ti-6Al-4V [J]. Metallurgical and Materials Transactions A, 2018, 49(6): 2113-2123.
[14] LIU Zhen-lei, WANG Yue, YANG Kang, YAN De-jun. Microstructure and mechanical properties of rapidly cooled friction stir welded Ti-6Al-4V Alloys [J]. Journal of Materials Engineering and Performance, 2018, 27(8): 4244-4252.
[15] ZHANG Wen-jing, LIU Hui-hong, DING Hua, FUJII H. Grain refinement and superplastic flow in friction stir processed Ti-15V-3Cr-3Sn-3Al alloy [J]. Journal of Alloys and Compounds, 2019, 803: 901-911.
[16] ZHANG Wen-jing, DING Hua, CAI Ming-hui, YANG Wen-jing, LI Jin-zhong. Ultra-grain refinement and enhanced low-temperature superplasticity in a friction stir-processed Ti-6Al-4V alloy [J]. Materials Science and Engineering A, 2018, 727: 90-96.
[17] WU L H, ZHANG H, ZENG X H, XUE P, XIAO B L, MA Z Y. Achieving superior low temperature and high strain rate superplasticity in submerged friction stir welded Ti-6Al-4V alloy [J]. Science China: Materials, 2017, 61(3): 417-423.
[18] WU L H, XUE P, XIAO B L, MA Z Y. Achieving superior low-temperature superplasticity for lamellar microstructure in nugget of a friction stir welded Ti-6Al-4V joint [J]. Scripta Materialia, 2016, 122: 26-30.
[19] WU L H, XIAO B L, NI D R, MA Z Y, LI X H, FU M J, ZENG Y S. Achieving superior superplasticity from lamellar microstructure of a nugget in a friction-stir-welded Ti-6Al-4V joint [J]. Scripta Materialia, 2015, 98: 44-47.
[20] PILCHAK A L, WILLIAMS J C. Microstructure and texture evolution during friction stir processing of fully lamellar Ti-6Al-4V [J]. Metallurgical and Materials Transactions A, 2010, 42(3): 773-794.
[21] PILCHAK A L, TANG W, SAHINER H, REYNOLDS A P, WILLIAMS J C. Microstructure evolution during friction stir welding of mill-annealed Ti-6Al-4V [J]. Metallurgical and Materials Transactions A, 2010, 42(3): 745-762.
[22] JIANG Lu-yao, HUANG Wei-jiu, LIU Cheng-long, GUO Yong-yi, CHEN Chen-hui. Influences of work hardening and crystallographic texture on dry-sliding tribological properties of friction stir processed pure Ti with slow rotation speed [J]. Materials Research Express, 2019, 6(8): 0865c9.
[23] JIANG Lu-yao, HUANG Wei-jiu, LIU Cheng-long, CHAI Lin-jiang, YANG Xu-sheng, XU Qiao-liang. Microstructure, texture evolution and mechanical properties of pure Ti by friction stir processing with slow rotation speed [J]. Materials Characterization, 2019, 148: 1-8.
[24] FALL A, MONAJATI H, KHODABANDEH A, FESHARAKI M H, CHAMPLIAUD H, JAHAZI M. Local mechanical properties, microstructure, and microtexture in friction stir welded Ti-6Al-4V alloy [J]. Materials Science and Engineering A, 2019, 749: 166-175.
[25] SHAFIEI-ZARGHANI A, KASHANI-BOZORG S F, GERLICH A P. Texture analyses of Ti/Al2O3 nanocomposite produced using friction stir processing [J]. Metallurgical and Materials Transactions A, 2016, 47(11): 5618-5629.
[26] LIU H, NAKATA K, YAMAMOTO N, LIAO J S. Grain orientation and texture evolution in pure titanium lap joint produced by friction stir welding [J]. Materials Transactions, 2010, 51(11): 2063-2068.
[27] YOON S, UEJI R, FUJII H. Microstructure and texture distribution of Ti-6Al-4V alloy joints friction stir welded below β-transus temperature [J]. Journal of Materials Processing Technology, 2016, 229: 390-397.
[28] SHOKRI V, SADEGHI A, SADEGHI M H. Thermomechanical modeling of friction stir welding in a Cu-DSS dissimilar joint [J]. Journal of Manufacturing Processes, 2018, 31: 46-55.
[29] WEN Q, LI W Y, GAO Y J, YANG J, WANG F F. Numerical simulation and experimental investigation of band patterns in bobbin tool friction stir welding of aluminum alloy [J]. The International Journal of Advanced Manufacturing Technology, 2018, 100(9-12): 2679-2687.
[30] PEI Xian-jun, DONG Ping-sha. An improved friction stir shear localization model and applications in understanding weld formation process in alloy Ti-6-4 [J]. The International Journal of Advanced Manufacturing Technology, 2017, 95(9-12): 3549-3562.
[31] SONG K J, DONG Z B, FANG K, ZHAN X H, WEI Y H. Cellular automaton modelling of dynamic recrystallisation microstructure evolution during friction stir welding of titanium alloy [J]. Materials Science and Technology, 2013, 30(6): 700-711.
[32] WU C T, HU W, WANG H P, LU H S. A robust numerical procedure for the thermomechanical flow simulation of friction stir welding process using an adaptive element-free Galerkin method [J]. Mathematical Problems in Engineering, 2015, 2015: 486346.
[33] MIRONOV S, SATO Y S, KOKAWA H. Development of grain structure during friction stir welding of pure titanium [J]. Acta Materialia, 2009, 57(15): 4519-4528.
[34] FONDA R W, KNIPLING K E. Texture development in near-α Ti friction stir welds [J]. Acta Materialia, 2010, 58(19): 6452-6463.
[35] LIU F C, LIAO J, GAO Y, NAKATA K. Influence of texture on strain localization in stir zone of friction stir welded titanium [J]. Journal of Alloys and Compounds, 2015, 626: 304-308.
周 利1,2,于明润1,2,陈伟光2,张自立2,杜 帅1,刘会杰1,郁 炎3,高福洋3
1. 哈尔滨工业大学 先进焊接与连接国家重点实验室,哈尔滨 150001;
2. 哈尔滨工业大学(威海) 山东省特种焊接技术重点实验室,威海 264209;3. 洛阳船舶材料研究所,洛阳 471000
摘 要:对TA5钛合金进行搅拌摩擦加工(FSP),获得超细晶组织。为了研究搅拌摩擦加工过程中的温度分布和材料流动情况,使用欧拉-拉格朗日耦合(CEL)方法对加工过程进行热力耦合模拟。采用光学显微镜、扫描电镜、硬度和拉伸测试技术对合金的显微组织和力学性能进行表征。由于在加工过程中材料发生动态再结晶,因此,加工后的合金由细小等轴晶粒组成。TA5钛合金在加工过程中通过位错塞积与晶界旋转实现动态再结晶。搅拌区组织在前进侧晶粒尺寸最小,且晶粒位相差最大。在200 r/min转速下进行搅拌摩擦加工后,材料的抗拉强度最高,达到830 MPa以上,而伸长率变化不大。所测试样均在晶粒较大的搅拌区后退侧断裂,且断口处观察到细小韧窝。
关键词:搅拌摩擦加工;TA5钛合金;欧拉-拉格朗日耦合模拟;织构;力学性能
(Edited by Wei-ping CHEN)
Corresponding author: Li ZHOU, Tel: +86-15066316572, E-mail: zhouli@hitwh.edu.cn; Hui-jie LIU, E-mail: liuhj@hit.edu.cn
DOI: 10.1016/S1003-6326(21)65505-X
1003-6326/ 2021 The Nonferrous Metals Society of China. Published by Elsevier Ltd & Science Press

