Trans. Nonferrous Met. Soc. China 22(2012) s548-s552
Magnetic pulse joining of aluminum alloy-carbon steel tubes
YU Hai-ping1, 2, XU Zhi-dan1, JIANG Hong-wei1, ZHAO Zhi-xue1, LI Chun-feng1
1. National Key Laboratory for Precision Hot Processing of Metals, School of Materials Science and Engineering, Harbin Institute of Technology, Harbin 150001, China;
2. State Key Laboratory of Advanced Welding and Joining, School of Materials Science and Engineering, Harbin Institute of Technology, Harbin 150001, China
Received 28 August 2012; accepted 25 October 2012
Abstract: The magnetic pulse joining (MPJ) between 3A21 aluminum alloy and steel 20 tubes was experimentally investigated with a solenoid coil assisted by a field shaper. The mechanical properties and microstructure of MPJ joints were tested and observed. The results show that the metallurgical joints can be obtained at a voltage of 15 kV, a radial gap of 1.2-1.4 mm, and a slope angle of 3°-7° in the lapping area. The joint comprises a transition zone with different widths, two matrix metals and two interfaces between the zone and the two metals. The interface presents a typical wavy pattern and mutual diffusion of Fe and Al elements happens in the zone. The transition zone is composed of Fe-Al intermetallics, micro cracks and micro pores. The microhardness of the transition zone is much higher than that of the matrix metals.
Key words: magnetic pulse joining; dissimilar metals; metallurgical joint; field shaper; aluminum; steel
1 Introduction
Magnetic pulse joining (MPJ), or named magnetic pulse welding (MPW), is a solid state and high rate joining (welding) process [1,2]. It can be used not only to join axisymmetrical tubes and metal sheets, but also to clad bimetal tube and sheet.
During last years, the amount of steel used in car body manufacturing has decreased continuously. As a consequence, light metals and plastics have replaced many parts previously manufactured from steel [3]. So, the aluminum-steel joining parts present themselves in automobile. Whilst, the bimetal joining parts, such as two dissimilar aluminum alloys, aluminum alloy and steel, aluminum alloy and stainless steel [4,5], have been needed urgently and will be used extensively in the manufacturing of aerospace, petrochemical engineering, etc.
However, due to the remarkable differences in their physical characteristics between two dissimilar metals, such as the melting temperatures, a conventional fusion welding process easily gives rise to large volume fraction of fragile intermetallics, which will reduce the mechanical properties of the joint [6].
To solve these problems, the third metal element is conventionally proposed to add during the diffusion joining process. Consequently, it will destroy the single-phase characteristics of basic metals, such as aluminum and copper [7]. And several different techniques (like friction stir welding, delta spot welding [8], spot friction welds [9], magnetic pulse welding [10,11]) have been investigated in recent years. With suitable parameters, a solid state metallurgical joining between dissimilar metal tubes can be realized by MPW process and there is almost no heat affected zone in the joint [5]. The dissimilar joints by this method are capable of implementing the high efficiency and low cost manufacturing of light-weight, high strength and multifunction tube parts [12,13].
Because a joining coil endures severe conditions during magnetic pulse joining, including high pulse impact loading, vibration and transient heat cycles for the Joule heat effects [14,15], the solid coil must be of high strength, enough mass and toughness. However, it is difficult to achieve this kind of coil that needs a very complicated design and manufacturing process. The field shaper, a cylindrical one especially, can be used to resolve the problem mentioned above. During a MPJ process, the field shaper is able to receive the better part of magnetic force for the coil, to optimize the electromagnetic parameters of the discharging circuit, and to improve the working efficiency of MPJ. Therefore, the actuator coil combined with a field shaper is the optimum one for joining or forming by pulsed magnetic force. Up to now, there have been few reports on the coil-field shaper structure design and the technological details of MPJ process by using the coil-field shaper. In this work, the MPJ experiments were performed between 3A21 aluminum alloy and steel 20 tubes using the proposed coil-field shaper and the mechanical properties and microstructure of the joint were investigated.
2 Experimental
Figure 1 shows the schematic diagram of MPJ tubes using a coil-field shaper. The capacitance of the experimental setup is 100 μF, the rated voltage is 20 kV and the rated discharge energy is 20 kJ consequently. The coil has 10 turns of copper wire with rectangular section of 5 mm × 7 mm. The shaper is of cylindrical shape with a longitudinal slot, through which the eddy current induced in the outer surface of field shaper flows into the inner surface or the operating surface. Between the operating surface and the outer tube, the magnetic force generates to form and join the two tubes. The shaper is made of bronze with conductivity of 80% (IACS).
The testing tube materials are 3A21 aluminum alloy (like AA3003) and steel 20. The original tube is 130.0 mm in length. The sectional dimension of the aluminum alloy tube is d20 mm×1.0 mm, and the outer diameter of steel tube is 15.2-15.6 mm for the variation of radial gap between two tubes. The inner diameter of the steel tube is 8 mm. Aluminum alloy tubes were annealed, whose density, elastic modulus and Poisson ratio are 2740 kg/m3, 68.4 GPa and 0.33, respectively. According to the GB/T228―2002, the tension strength and yield strength of the aluminum tube material are 97.0 MPa and 42.0 MPa at room temperature, respectively. By polishing and cleaning, the grease, impurity and oxide film on the surface in lapping area of both tubes were removed before joining. The microstructures in the MPJ joint were observed and evaluated with the Olympus BHM-2UM optical microscope and Hitachi S-570 scanning electron microscope.
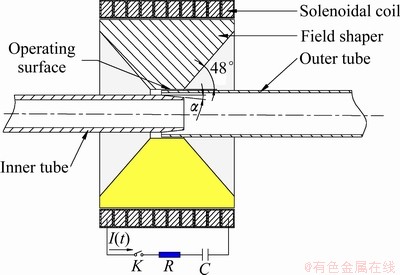
Fig. 1 Schematic diagram of MPJ of tubes
3 Results and discussion
The collision speed and the collision angle between tubes are two critical factors for deformation and joining during MPJ process [13]. By changing the magnitude of the preset angle α at the end of inner tube, as shown in Fig. 1, the collision angle can be adjusted initiatively. In this work, preset angle α was obtained by turning in advance, including 3°, 4°, 5° and 7°. The parallel lapping condition is regarded as 0°. The position relationship of the lapping area before MPJ is illustrated in Fig. 1. The length of the lapping area is 20.0 mm in axial direction.
3.1 Mechanical properties
At a initial radial gap of 1.4 mm, discharge voltage of 8.0 kV and preset angle of 3°, the tension strength of the MPJ joint is higher than that of the aluminum alloy tube, which has the lower strength than the steel tube as stated in section 2. Hence, MPJ experiments were performed with increasing discharge voltage and the joining strength and quality were checked by the basic peeling test.
When the discharge voltage was increased up to 15.0 kV, metallurgical joint was obtained with the preset angle of 3°-7°. The peeling test was performed for a joint with preset angle of 3° (see Fig. 2). All the aluminum strips along the circular direction cannot be peeled from the steel tube. Whereas, the result cannot be repeated for the joint with the preset angle of 0°. Thus, it can be concluded that the preset angle of 3° actively improves the collision conditions between two tubes, which contribute to produce the metallurgical joint between the two dissimilar materials. And the joining quality is not sensitive to the preset angle value ranging from 3° to 7°. Not only being limited by the original wall thickness of the inner tube, but also by the increasing instability of wrinkling of outer tube, the effect of preset angle α larger than 7° on the joining quality was not investigated.
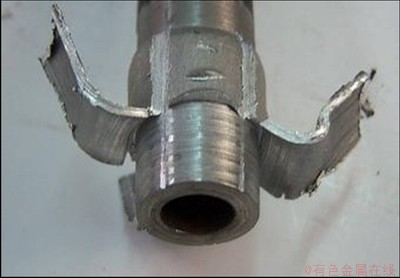
Fig. 2 Peeling test result of MPJ point with preset angle of 3°
The tension and torsion tests were performed for MPJ joints at the discharge voltage of 15 kV, radial gap of 1.4 mm, preset angles of 0°, 3° and 4°. The testing results indicate that the tension and torsion strengths of MPJ joints are higher than that of the weaker basic metal, viz. the aluminum tube. The torsion test specimen is shown in Fig. 3.
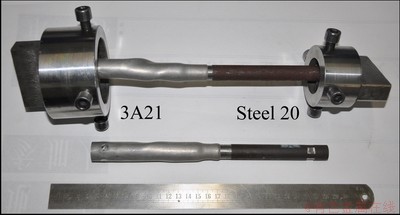
Fig. 3 Torsion test results of MPJ joints
3.2 Microstructure of MPJ joint
3.2.1 Constitution and micro pattern of MPJ joint
The micro pattern of MPJ joints with the radial gap of 1.2 mm, preset angle of 3°-7° and discharge voltage of 15 kV was observed. The joining area of the joint in axial specimen consists of two interfaces and a transition zone besides two basic metals. A wave interface characterizes the joint with preset angle of 4° and the width of transition zone along the axial direction of the tube is not uniform, which can be seen in Fig. 4 where the preset angle of the joint is 4°. The average length of the interface wave is around 100 μm and its average magnitude is about 30 μm. The width of the transition zone is also inhomogeneous and the average width is about 40 μm. However, the width of the transition zone of the circular specimen cut vertically to the symmetry axis of the joint is more uniform than that of the specimen in axial direction, viz. the joining quality along the circular direction is better.
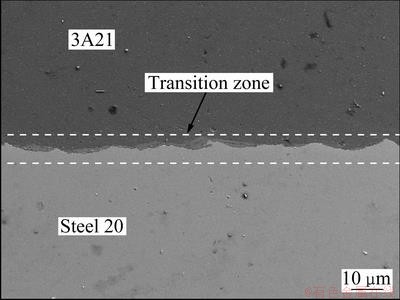
Fig. 4 SEM image of MPJ joint
It can be seen from Fig. 5 that, the marked diffusion of the basic elements, Fe and Al, is shown in the transition zone by a EDS line scanning. The content of Al element is higher than that of Fe element across nearly all width of the transition zone, which is about 90 mm in width. Through the EDS point scanning of the transition zone, it is found that the mass fraction of Fe element is 34.71% and the mole fraction is 20.44%, and the mass fraction of Al element is 65.29% and the mole fraction is 79.56%. Referring to the equilibrium phase diagram of Fe-Al alloy, the intermediate compound similar to FeAl3 is produced in the transition zone, which is fragile and hard and might cause the micro cracks.
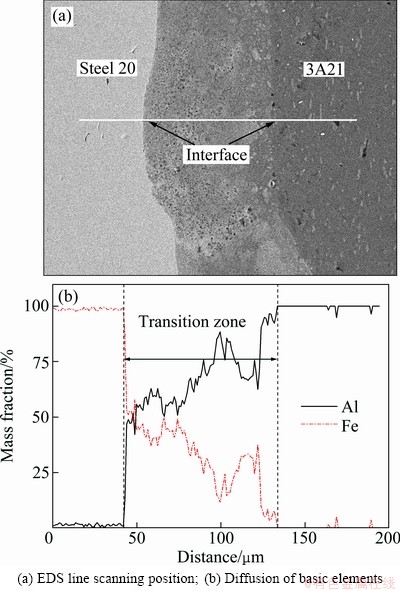
Fig. 5 EDS results of MPJ joint
3.2.2 Microhardness of MPJ joint
For MPJ joint at the discharge voltage of 15 kV, radial gap of 1.4 mm and preset angle of 4°, the nano indentation test was carried out to measure the microhardness across the transition zone by using a Nano Indeniter XP equipment. Four points near the interfaces on both basic metals and one point on the transition zone were chosen for the test. The magnitude and the distribution of the microhardness are given in Fig. 6. It is illustrated that the hardness value in the transition zone is the highest and the values decrease with increasing the distance away from the zone or the interface. It can be attributable to the sharp plastic deformation along the interfaces that causes the gradient of work hardening near the interface. Both the plastic deformation and the hardness reduce with increasing the distance from the interfaces. In addition, the intermediate compounds might be produced in the transition zone that is fragile and has higher hardness than the basic metals, which will be analyzed deeply.
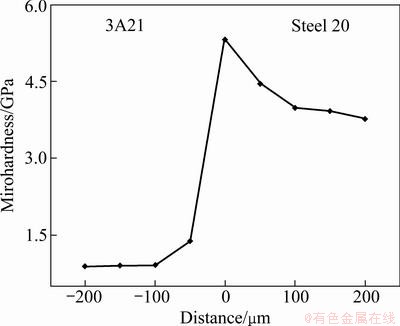
Fig. 6 Distribution of microhardness across transition zone of MPJ joint
3.2.3 Micro defects across interface of joint
With a radial gap of 1.4 mm, preset angle of 4° and discharge voltage 15 kV, the micropattern of MPJ joints was observed. Some defects, such as micro cracks and pores are found and indicated in Fig. 7 (the enlarged view of the pores region is shown in Fig. 8). The micro cracks present themselves in various directions in the transition zone and most of them start from the interface between the steel and the transition zone. The most marked crack in the SEM image (Fig. 7) is vertical to the joining direction. The dense micro cavities appear near or across some micro cracks and the dimension of the largest pore is around 3 mm. The creation of both micro defects can be attributed to the immense impact load by the transient collision, which contributes to the severe plastic deformation and the arising dislocation climb and tangle. The irreversible movement of dislocation causes high density dislocation and pore. On the other hand, the defects may be caused by the little impurity that cannot escape from the gap between the two surfaces during the high speed collision. The high density point defects will impair the joining strength of the joint. The generation, development and effects of the defects on the joint quality will be studied deeply and extensively.
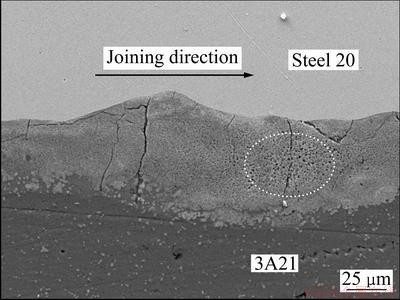
Fig. 7 Micro cracks in transition zone
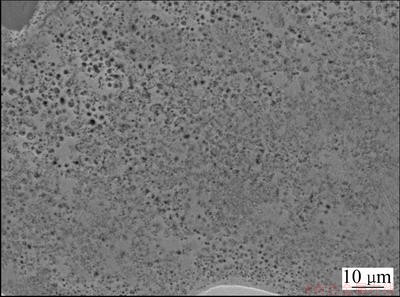
Fig. 8 Micro pores in transition zone
4 Conclusions
1) For the lapping area with a preset angle of 3°-7°, the metallurgical joints are obtained at a discharge voltage of 15 kV and a radial gap of 1.2-1.4 mm.
2) Due to the high speed collision, the microhardness of the basic metals near the interface is higher than that of original tubes and the highest hardness value appears in the transition zone.
3) The MPJ joints with preset angle have wave interface with varied wave length and the width of transition zone is not uniform. There is mutual diffusion of the basic elements across the transition zone, where there are some intermediate compounds of Al-Fe, such as FeAl3.
References
[1] Psyk V, Risch D, Kinsey B L, Tekkaya A E, Kleiner M. Electromagnetic forming―A review [J]. Journal of Materials Processing Technology, 2011, 211: 787-829.
[2] YU Hai-ping, XU Zhi-dan, LI Chun-feng, ZHAO Zhi-xue. Experimental research on magnetic pulse joining of 3A21 aluminum alloy-20 steel tubes [J]. Acta Metallurgica Sinica, 2011, 47: 197-202. (in Chinese)
[3] Liedl G, Bielak R, Ivanova J, Enzinger N, Figner G, Bruckner J, Pasic H, Pudar M, Hampel S. Joining of aluminum and steel in car body manufacturing [J]. Physics Procedia, 2011, 12: 150-156.
[4] Aizawa T, Kashani M, Okagawa K. Application of magnetic pulse welding for aluminum alloy and spcc steel sheet joints [J]. Welding Journal, 2007, 86: 119-124.
[5] Shribman V, Stren A. Take advantage of the new magnetic pulse welding process [J]. Welding Review, 2001, 56(2-3): 14-16.
[6] Kore S D, Date P P, Kulkarni S V. Electromagnetic impact welding of aluminum to stainless steel sheets [J]. Journal of Materials Processing Technology, 2008, 208(1-3): 486-493.
[7] Marya M, Priem D, Marya S. Microstructures at aluminum-copper magnetic pulse weld interfaces [J]. Materials Science Forum, 2003, 426-432: 4001-4005.
[8] Sun X, Stephens E V, Khaleel M A, Shao H, Kimchi M. Resistance spot welding of aluminum alloy to steel with transition material-from process to performance. Part 1: Experimental study [J]. Welding Journal, 2004, 83(6): 188-195.
[9] Tran V X, Pan J. Fatigue behavior of dissimilar spot friction welds in lap-shear and cross-tension specimens of aluminum and steel sheets [J]. International Journal of Fatigue, 2010, 32: 1167-1179.
[10] Raoelison R N, Buiron N, Rachik M, Haye D, Franz G. Efficient welding conditions in magnetic pulse welding process [J]. Journal of Manufacturing Processes, 2012, 14: 372-377.
[11] Ben-Artzy A, Stern A, Frage N, Shribman V. Interface phenomena in aluminum-magnesium magnetic pulse welding [J]. Science and Technology of Welding and Joining, 2008, 13(4): 402-408.
[12] Shribman V, Stern A, Livs Y, Gafri O. Magnetic pulse welding produces high-strength aluminum welds [J]. Welding Journal, 2002, 81(4): 33-37.
[13] Zhang Y, Babu S S, Prothe C, Blakely M, KWASEGROCH J, LAHA M, DAEHE S S. Application of high velocity impact welding at varied different length scales [J]. Journal of Materials Processing Technology, 2010, 211: 944-952.
[14] AHMED M, PANTHI S K, RAMAKRISHNAN N, JHA A K, YEGNESWARAN A H, DASGUPTA R, AHMED S. Alternative flat coil design for electromagnetic forming using FEM [J]. Transactions of Nonferrous Metals Society of China, 2011, 21(3): 618-625.
[15] YU Hai-ping, LI Chun-feng. Effects of coil length on tube compression in electromagnetic forming [J]. Transactions of Nonferrous Metals Society of China, 2007, 17(6): 1270-1275.
铝合金-碳钢管的磁脉冲变形连接
于海平1, 2,徐志丹1,江洪伟1,赵志学1,李春峰1
1. 哈尔滨工业大学 材料科学与工程学院,金属精密热加工国家级重点实验室,哈尔滨 150001;
2. 哈尔滨工业大学 材料科学与工程学院,先进焊接与连接国家重点实验室,哈尔滨 150001
摘 要:采用带集磁器线圈装置对3A21铝合金-20钢管件进行磁脉冲连接,并对连接接头的力学性能和微观结构进行测试和观察。结果表明,在电压为15 kV、径向间隙为1.2~1.4 mm和搭接区锥角为3°~7°的条件下可获得冶金连接接头。连接接头由宽度不均匀的过渡区、两母材及其与母材连接的界面构成。连接界面呈微波状形貌,过渡区发生基体元素Fe和Al的互扩散。过渡区由Fe-Al金属间化合物构成,并存在微裂纹和微孔洞等缺陷;其显微硬度明显高于邻近母材的显微硬度。
关键词:磁脉冲连接;异种金属;冶金接头;集磁器;铝;钢
(Edited by CHEN Wei-ping)
Foundation item: Project (2011CB012805) supported by the National Basic Research Program of China; Project (AWPT-M05) supported by the State Key Laboratory of Advanced Welding and Joining, China
Corresponding author: YU Hai-ping; Tel: +86-451-86413970; Fax: +86-451-86418753; E-mail: haipingy@hit.edu.cn
DOI: 10.1016/S1003-6326(12)61759-2