
Effects of reduction of diameter on microstructure and surface roughness of rotary swaged magnesium by FEA
RONG Li(荣 莉), NIE Zuo-ren(聂祚仁), ZUO Tie-yong(左铁镛)
College of Materials Science and Engineering, Beijing University of Technology, Beijing 100124, China
Received 12 June 2008; accepted 5 September 2008
Abstract: Combining the processing maps with FEA, the critical values of reduction of diameter (ΔR) for the appearance of as-cast microstructure, dynamic recrystallization grains and twins in the swaged magnesium were respectively studied, by which the rational range of ΔR was obtained. To ensure that the as-cast microstructure wouldn’t be retained in the rotary-swaged magnesium, ΔR should be larger than 0.25 mm. To avoid the appearance of twins in the microstructure of rotary-swaged magnesium, ΔR should be less than 1.0 mm. ΔR should be between 0.25 mm and 1.0 mm to ensure the appearance of recrystallized grains. The surface roughness of rotary-swaged magnesium increases with the increase of ΔR by quadratic function. The simulated results accord well with the experimental data. In the process control of rotary-swaging(RS), ΔR should be maximized between 0.25 mm and 1.0 mm on the precondition that the requests for surface roughness have been satisfied.
Key words: magnesium; rotary swaging; FEA; processing optimization; microstructure
1 Introduction
Magnesium wires are now mainly produced by die casting or extrusion[1]. But the poor mechanical properties and surface quality of cast wires and the lower extrusion speed limit the industry application of the magnesium wires. With the characteristics of high- frequency pulse stroking (1 500 and 6 000 min-1) and multidirectional forging, rotary-swaging(RS) is an efficient forming process and favors the formation of materials with poor formability[2-3]. So development of RS of magnesium is a favorable method to improve the production of magnesium wires. Nevertheless, the researches on RS of magnesium are sparse.
The types of microstructures of hot deformed magnesium may be recrystallized grains, twins, at-cast microstructure or hot crack[4-5]. Controlling the micro- structure of the hot worked magnesium is important to control the mechanical properties. The twins will lower the ductility of products, however, the products with fine dynamic recrystallization(DRX) grains will have excellent mechanical properties. So control of the micro-structure is important for controlling of mechanical properties of swaged products.
Due to the complex RS process including rotational and feeding movement of the material, it is difficult to properly design process conditions. Thus, many studies have been devoted to analyze this process both experimentally or numerically to obtain a high production rate with acceptable quality. LIM et al[6] experimentally studied the forming characteristics of a tube by rotary swaging process and the effects of process variables on the quality of the tube such as the dimensional precision, hardness, surface roughness and microstructure of the product. But they didn’t obtain the relation between the process variables and the microstructure and the surface roughness of the products. Other experimental researches[7-9] on microstructure and properties of swaged products were also carried out, but all of them didn’t deal with the relation between microstructure and process variables. On the other hand, many numerical studies on swaging process of tubes or rods by FEA[10-11], or by upper bound solution[12] were carried out. But all these numerical studies didn’t refer to the microstructures of swaged products.
ΔR is the main process variable that determines the microstructure and surface roughness of the RS products [2-3]. So the aim of this article is to quantitatively study the relations between ΔR and the microstructure and surface roughness of rotary-swaged magnesium by combined use of FEA and processing maps. This work is benefit for optimum design of RS process and for producing magnesium wires by RS.
2 FEA model and RS experiments of magne- sium
2.1 FEA model
Principles of the RS process have been described in Refs.[2-3]. The dies moved in both radial and axial directions relative to the workpiece. Considering the axial symmetry of both the loads and the workpiece, 1/2 of the axial section was analyzed in the FEA model. Ten four-node axisymmetric quadrilateral full integration elements were chosen to develop FEA model of RS. Initial meshes and mechanical boundary conditions are shown in Fig.1(a). In the FEA model, the die segment was defined as rigid contact body and the RS process variables were adjusted by changing moving curves of the rigid body. All related mechanical and thermal properties were functions of temperature and were input according to ASM handbook[13]. The constitutive behavior was obtained through experiments[14]. Local adaptive meshing was adopted to rectify excessive mesh distortion and assure subsequent simulation.
The conditions at the interfaces between the workpiece and dies were described using the coulomb friction model and the friction coefficient was 0.25. The contact heat transfer coefficient between dies and workpiece was set as 3 kW/(m2・K), and the equivalent heat transfer coefficient was set as 20 W/(m2・K)[15]. Factor of translation of plastic deformation energy to heat was set as 0.9. The initial temperature of the dies was 120 ℃.
The total loading time in simulation was determined on the principle of ensuring that the workpiece would pass through the whole die cavity. Fixed stepping procedures were adopted and the number of steps in one pulse impact varied with the magnitude of axial feeding velocity on the principle of ensuring that the pulse apex
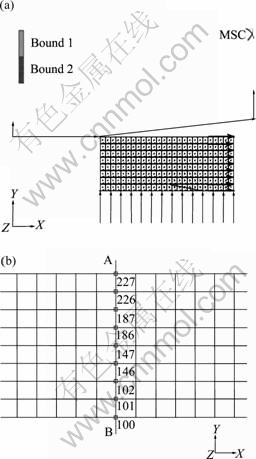
Fig.1 (a) Initial meshes and mechanical boundary conditions of FEA model; (b) Schematic diagram of node-position in section AB
of the stroke―time curve of the dies would be exactly an end-point of one step.
2.2 RS experiments
The RS experiments were carried out on a B202 rotary swager. The magnesium with purity of 99.5% was used as test material. The cylindrical billets used for RS experiments are cut from cast ingot. The process parameters used in FEA simulation and RS experiments are listed in Table 1. The reduction of diameter ΔR can be calculated by:
?R=(D-d)/2 (1)
Table 1 Process parameters used in simulation and experiments

where D is the original diameter, mm; d is the swaged diameter, mm.
3 Results and discussion
3.1 Strain distribution characteristics during RS of magnesium
The equivalent strain distribution maps after swaging for 0.12 s are shown in Fig.2(a), the processing parameters of which is α=19?, v=4.5 m/min and ΔR= 0.5 mm. It is found that the deformation zone of rotary- swaged magnesium should be divided into three parts: part Ⅰ is the bulging head-end, part Ⅱthe formed zone and part Ⅲ the reduction zone. Part Ⅱ presents the finished swaged products. In part Ⅱ, the equivalent strain distribution on different transverse sections are the same (the only differences appear on the exterior surface of rotary-swaged product, which will be clarified in section 3.3). So a transverse section AB, the position of which is shown in Fig.2(a), will be selected to represent the distribution and histories of various field variables in the rotary-swaged magnesium products below.
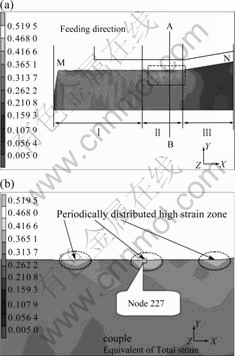
Fig.2 Equivalent strain distribution: (a) At swaging time of 0.12 s; (b) Enlarged view of box in (a)
3.2 Effects of ΔR on microstructure of swaged magnesium
3.2.1 Effects on appearance of as-cast microstructure
Fig.3 shows the equivalent strain distribution on section AB. The numbers along the curves are the node- labels as shown in Fig.1(b). It can be found from Fig.3 that in every ΔR, the equivalent strain of a node increases with the distance between it and the workpiece axis. But ΔR has notable influence on the strain of each node. For a node of the same label, the larger the ΔR is, the larger the equivalent strain is.

Fig.3 Path plots of along radial direction at various ΔR
If the microstructure of the rotary-swaged magnesium is expected to be refined through dynamic recrystallization, the smallest strain on the transverse section AB, i.e. the strain of node 100, should be larger than the critical strain εc for the onset of DRX of magnesium. It can be seen from Fig.3 that when ΔR is 0.25 mm, the equivalent strain of node 100 is 0.125, which is clearly smaller than εc. As-cast microstructures will thus remain in the rotary-swaged magnesium when ΔR is 0.25 mm. So it can be concluded that ΔR should be larger than 0.25 mm with the process parameters listed in Table 1.
3.2.2 Effects on appearance of dynamic recrystallization grains and twins
During hot deformation, if the initial conditions of the material are the same, strain, temperature and strain rate are the factors which determine the microstructure of products[5]. So, by combining the processing maps of magnesium and the simulated distribution and histories of strain, temperature and strain rate under various ΔR, the effects of ΔR on microstructure of rotary-swaged magnesium are analyzed.
Fig.4 shows the history plots of temperature of node 227 under various ΔR. It is found that temperature of the magnesium billet increases during RS. Nevertheless, the increase of temperature is less than 3 ℃, which can be neglected in industrial manufacture. So as much as the processing parameters studied in this work, the influence of ΔR on temperature during RS of magnesium can be neglected.
Fig.5 shows the history plots of  of node 227. Through comparing between Fig.5(a) and Fig.5(b), it can be found that the maximal strain rate
 (see the sign in Fig.5 for the meaning of
  ) increases with the increase of ΔR. When ΔR is 1.0 mm, the
  is increase to 11.5 s-1. According to the processing maps of magnesium[4, 13], when the deformation temperature is less than 450 ℃ and the strain rate is higher than 10 s-1, microstructural flow instability will occur and twins will appear. So combining the processing maps of magnesium and FEA results, it can be forecast that twins will be dominant in the microstructure of rotary-swaged magnesium when ΔR is 1.0 mm. Fig.6 shows the microstructure of rotary-swaged magnesium when ΔR is 1.0 mm, which verifies the simulated results. So during RS of magnesium, ΔR should be less than 1.0 mm to avoid the appearance of twins. Besides, because the recrystallized grain size decreases with the increase of strain rate, in order to obtain finer grains and higher mechanical properties, ΔR should be maximized on the condition that the twins don’t appear.
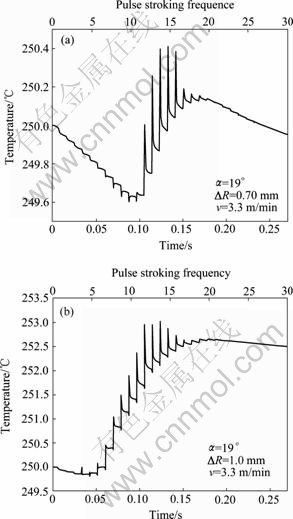
Fig.4 History plot of temperature of node 227 at different ΔR: (a) ΔR=0.70 mm; (b) ΔR=1.0 mm
3.3 Effects of ΔR on surface roughness of swaged magnesium
It can be clearly seen from Fig.2(b) that the strain

Fig.5 History plot of  of node 227 at different ΔR: (a) ΔR=0.70 mm; (b) ΔR=1.0 mm

Fig.6 Microstructure of as rotary-swaged magnesium: (α=19?, v=3.3 m/min, Tinitial=250 ℃, ΔR =1.0 mm)
distributes unevenly and local high-strain zones (see the lightest colored triangle marked in Fig.2(b)) arrange periodically along axial direction of the rotary-swaged magnesium. In practical swaging processing, a familiar defect shows the spiral pattern on the exterior surface of rotary-swaged products[2]. So the displacement of nodes on exterior surface is plotted as a function of axial coordinates to exactly measure the effect of ?R on the spiral patterns (see Fig.7(a)).
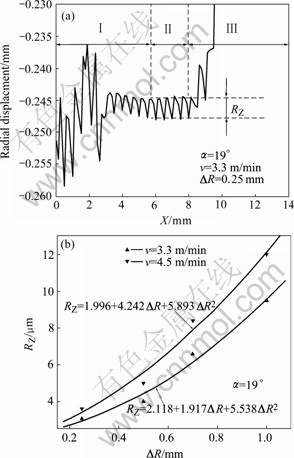
Fig.7 Path plot of radial displacement of nodes on exterior surface along axial direction (a) and correlation between surface roughness coefficient RZ and ΔR (b)
The surface roughness RZ of rotary-swaged magnesium under various ΔR is calculated by use of the path plots of radial displacement of nodes on exterior surface along axial direction of rotary-swaged magnesium. Fig.7(b) shows the correlation between RZ and ΔR. Fitting with quadratic functions, the correlation coefficients are all higher than 0.982, which indicates that the RZ increases with the increase of ΔR by quadratic correlations provided that the other process parameters of RS are fixed.
3.4 Experimental verification
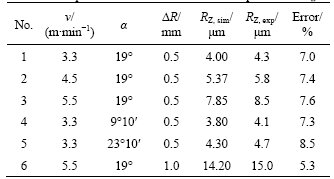
RZ of the rotary-swaged magnesium is measured with a tool microscope (19JA). Table 2 shows the comparison between the simulated and experimentally measured RZ. The errors are below 10.0%, which indicates the simulated and experimental data are in good accordance. Besides, it can be seen from Fig.6 that the simulated type of microstructure of swaged magnesium accords well with the experimental result.
Table 2 Comparison between simulated and experimental RZ
4 Conclusions
1) The minimum ΔR should ensure the strain in the axis of the billet be larger than the critical strain for the onset of dynamic recrystallization of magnesium to avoid as-cast microstructure retained in the rotary-swaged magnesium. The maximum ΔR should be selected to avoid the appearance of twins in the rotary-swaged magnesium. As far as the process parameters simulated in this work, the rational range of ΔR should be larger than 0.25 mm and smaller than 1.0 mm.
2) The surface roughness of rotary-swaged magnesium increases with the increase of ΔR by quadratic correlations.
3) In selecting processing variables of RS, ΔR should be maximized in the rational range to refine the microstructure and to improve the production rate, on the precondition that the request for the surface roughness have been satisfied.
References
[1] China Welding Association. Welding handbook [M]. Beijing: Mechanical Industry Press, 2001: 646-650.
[2] YIN Xie-shi. Principle, processing and properties of tungsten wires [M]. Beijing: Metallurgrcal Industry Press, 1998: 302-316.
[3] FELSS Company. Rotary swaging [EB/OL]. [2008.5.6]. http://www.felss.de.
[4] SIVAKESAVAM O, RAO I S, PRASAD Y V R K. Processing map for hot working of as cast magnesium [J]. Materials Science and Technology, 1993, 9(9): 805-810.
[5] PRASAD Y V R K, SESHACHARYULU T. Modeling of hot deformation of microstructural control [J]. International Materials Reviews, 1998, 43(6): 243-258.
[6] LIM S J, CHOI H J, LEE C H. Forming characteristics of tubular product through the rotary swaging process [J]. J Mater Process Tech, 2009, 209(1): 283-286.
[7] DELINCE M, BRECHET Y, EMBURY J D, GEERS M G D, JACQUES P J, PARDOEN T. Structure-property optimization of ultrafine-grained dual-phase steels using a microstructure-based strain hardening model [J]. Acta Materialia, 2007, 55(7): 2337-2350.
[8] BELYAKOV A, TSUZAKI K, KIMURA Y, MISHIMA Y. Comparative study on microstructure evolution upon unidirectional and multidirectional cold working in a Fe-15%Cr ferritic alloy [J]. Materials Science and Engineering A, 2007, 456(1/2): 323-331.
[9] ELIAS L M, SCHNEIDER S G, SCHNEIDER S, SILVA H M, MALVISI F. Microstructural and mechanical characterization of biomedical Ti-Nb-Zr(-Ta) alloys [J]. Materials Science and Engineering A, 2006, 432(1/2): 108-112.
[10] PIELA A. Analysis of the metal flow in swaging―numerical modeling and experimental verification [J]. International Journal of Mechanical Science, 1997, 39(2): 221-231.
[11] CHO J R, SONG J I. Swaging process of power steering hose: Its finite element analysis considering the stress relaxation [J]. Journal of Materials Processing Technology, 2007, 187/188: 497-501.
[12] GHAEI A, TAHERI A K, MOVAHHEDY M R. A new upper bound solution for analysis of the radial forging process [J]. International Journal of Mechanical Sciences, 2006, 48(11): 1264-1272.
[13] AVEDESIAN M M, BAKER H. ASM specialty handbook: Magnesium and magneium alloys [M]. OH: ASM International Materials Park, 1999: 1-288.
[14] RONG Li, NIE Zuo-ren, ZUO Tie-yong. 3D finite element modeling of cogging-down rotary swaging of pure magnesium square billet: Revealing the effect of high-frequency pulse stroking [J]. Materials Science & Engineering A, 2007, 464(1/2): 28-37.
[15] CHEN Huo-hong, YU Jun-quan, XI Yuan-shan. Basis and application of MSC. Marc/Mentat 2003 [M]. Beijing: Science Press, 2004: 1-29.
(Edited by ZHAO Jun)
Foundation item: Project(2007CB613706) supported by the National Basic Research Program of China; Project(52009999200702) supported by the Initiating Fund of Doctors’ Research of Beijing University of Technology, China
Corresponding author: NIE Zuo-ren; Tel: +86-10-67391536; E-mail: zrnie@bjut. edu. cn