Finite element analysis and experiment on multi-wedge cross wedge rolling for asymmetric stepped shaft of C45
��Դ�ڿ������ϴ�ѧѧ��(Ӣ�İ�)2017���4��
�������ߣ�����ƽ �ͺ곬 ������ ��ѧ�� ������ ����
����ҳ�룺854 - 860
Key words��multi-wedge; cross wedge rolling; asymmetric stepped shaft; C45
Abstract: A rigid-plastic finite element method (FEM) simulation model for a multi-wedge cross wedge rolling (MCWR) was developed to analyze an asymmetric stepped shaft. To evaluate the MCWR process and better understand its deformation characteristics, the material flowing mechanisms, temperature distributions, strain and rolling force were analyzed. The correctness of the finite element simulation is experimentally verified. Numerical simulations and experiments led to the following conclusions: when ��=36�� and ��=7.5��, the quality of the work piece can be significantly improved. Finally, the development of the asymmetric stepped shaft is applied to industrial production.
Cite this article as: JI Hong-chao, LIU Jin-ping, FU Xiao-bin, TANG Xue-feng, WANG Bao-yu, HUANG Xu. Finite element analysis and experiment on multi-wedge cross wedge rolling for asymmetric stepped shaft of C45 [J]. Journal of Central South University, 2017, 24(4): 854-860. DOI: 10.1007/s11771-017-3487-8.
J. Cent. South Univ. (2017) 24: 854-860
DOI: 10.1007/s11771-017-3487-8

JI Hong-chao(�ͺ곬), LIU Jin-ping(����ƽ), FU Xiao-bin(������), TANG Xue-feng(��ѧ��),
WANG Bao-yu(������), HUANG Xu(����)
School of Mechanical Engineering, University of Science and Technology Beijing,Beijing 100083, China
 Central South University Press and Springer-Verlag Berlin Heidelberg 2017
Abstract: A rigid-plastic finite element method (FEM) simulation model for a multi-wedge cross wedge rolling (MCWR) was developed to analyze an asymmetric stepped shaft. To evaluate the MCWR process and better understand its deformation characteristics, the material flowing mechanisms, temperature distributions, strain and rolling force were analyzed. The correctness of the finite element simulation is experimentally verified. Numerical simulations and experiments led to the following conclusions: when ��=36�� and ��=7.5��, the quality of the work piece can be significantly improved. Finally, the development of the asymmetric stepped shaft is applied to industrial production.
Key words: multi-wedge; cross wedge rolling; asymmetric stepped shaft; C45
1 Introduction
Stepped shafts are widely used in the machine- building, automotive, and railway industries. These parts are now mainly produced by metal forming methods such as die forging, rotary forging, and extrusion and cross wedge rolling (CWR) [1-4]. Of all the forming methods, CWR has been used to produce a wide range of stepped axisymmetric components [5]. Compared with the traditional practices of forging and machining, CWR has many advantages, such as high productivity, conservation of materials and energy, high precision product, and good working conditions [6]. In CWR, the workpiece revolves and deforms in a gap between two contra-rotating rolls. Various types of components are manufactured using CWR processes, such as stepped shaft parts with different diameters for automobiles, tractors, motorcycles, engines, and pumps [7, 8]. Many theoretical and experimental studies were conducted by HU et al [5] including rolling principle, forming mechanism, shaping curve, and rotation condition. These studies have provided the necessary support for the application of CWR solid shafts on a large scale in China [5]. A coupled thermal�Cmechanical and microstructural finite element model (FEM) was developed to simulate the CWR process, obtaining the distributions of different field variables. CWR shafts have been widely used in industrial production based on research. The above research mostly focused on the one-wedge CWR.
In recent years, some research has been focused on the multi-wedge cross wedge rolling (MCWR) process. ZHAO et al [9, 10] used Deform software to analyze the MCWR process. The rolling process of using MCWR for a RD2 axle was simulated successfully, and the three- dimensional regularities of metal flow and stress distributions were analyzed at length. ZHAO et al [11] studied the mechanism of defects in the transition section with the MCWR-forming automotive semi-axis. LOVELL et al [12-14] set up a simplified model of a flat CWR and analyzed the stress and deformation of the work piece material. LI et al [15] established a failure criterion in the CWR process. Several different failure mechanisms were analyzed. LI et al [15] categorized the failures in CWR into three types. These types are excessive slip, surface defects, and internal voids. Surface defects include three types: necking, spiral grooves, and lapping. The authors used FEM and experiments to investigate the relationship between the tool�Cwork piece interfacial slip and the CWR process variables for the flat-wedge CWR process. ZHOU et al [16, 17] studied a three- dimensional rigid-plastic finite element simulation to simulate the MCWR process based on Deform-3D. ZHOU [16, 17] also studied the connecting rod created with CWR; the bending of the work piece was analyzed, and the stress and temperature change of the work piece were studied during the CWR process. ZHOU et al [18] studied internal voids in the MCWR rolling stepped shaft. In his study, a rigid-plastic FEM simulation model for a MCWR was developed to analyze the generation mechanisms of internal defects. The influence of mold parameters was discussed and an optimized parameter group was achieved. The industrial test manifested the feasibility of the study results.
Generally, the asymmetric shaft is transformed into a symmetrical parts rolling, so as to avoid the uneven distribution of axial force and axial movement. But for small size of slender shaft parts symmetry rolling is prone to bending deformation. This needs thorough reasonable mould design, and the distribution of axial force. Most research mainly discusses the MCWR process of symmetric rolling. The present work deals with the MCWR technique for producing long asymmetric stepped shafts. Material flowing mechanisms, temperature distributions, strain, and rolling force were analyzed based on Deform-3D. The correctness of the finite element simulation is verified by experiment.
2 Numerical model for multi-wedge cross wedge rolling
Figure 1(a) shows the geometrical dimensions of the target products. The tolerance is ��1 mm. Figure 1(b) shows the target product of the MCWR process for producing a stepped shaft. The shaft will be formed by two rolls, and belongs to the typical narrow steps of the MCWR process.
The geometry for the MCWR process is established and then saved as an.stl file after being imported into Deform-3D. Figure 2 shows the numerical model of the MCWR process for producing the stepped shaft. The model consists of a top die, bottom die, guide plate, and a work piece. The work piece has a diameter of 28 mm and a length of 180 mm. The shaft is assigned the properties of C45 steel. The materials are assumed isotropic and the yielding behavior follows the von Mises yield criterion. The flow stress, in which plastic deformation occurs in metal, is influenced by the equivalent strain, equivalent strain rate, and temperature. The structure and chemistry of the metal materials are influenced by deformation factors such as velocity, temperature, and timing [19, 20]. The flow stress is influenced by strain, strain rate, and temperature. The constitutive relation can be obtained in the DEFORM-3D material library as shown in Fig. 3. The chemical composition in mass fraction (%) of C45 steel is as follows: 0.42�C0.50 C, 0.17�C0.37 Si, 0.50�C0.80 Mn, 0.035 P, 0.035 S, 0.25 Ni, 0.25 Cr, and 0.25 Cu. Table 1 shows the parameters of the MCWR simulation. The simulation parameters are listed in Table 2.
To reduce CPU processing time and to eliminate the effects of irrelevant factors, the following assumptions are made.
1) Wedge molds and guide plates are rigid models for material molds because of their negligible elastic deformation.
2) Billet is a plastic model that exhibits large deformation during formation. The material manifests several small elastic deformations. Hence, these deformations can be ignored.
3) The rolling speed is set at a fixed step size. In practical rolling, speed is processed with accelerated, constant, and decelerated variants. Furthermore, acceleration time is extremely short. Given the actual condition of the H500 mill, the roll speed is set at 10 r/min in Deform-3D.
4) Friction coefficient m on the material�Cmold interface is constant. The friction force in the constant shear model is defined as follows:
fs=mk (1)
where fs is the frictional stress and k is the shear yield stress. Equation (1) indicates that friction is a function of k in the deforming body.
5) The friction between the guiding plate and the work piece is neglected.
3 Experiment
Experimental tests on the MCWR process were conducted using an H500 mill and electric tube furnace available at the University of Science and Technology of Beijing in Beijing, China. A picture of the H500 mill is shown in Fig. 4(a), and its main technical parameters are listed in Table 3. Figure 4(b) shows the electric tube furnace, and its main technical characteristics are listed in Table 4. The length of the material was 180 mm. Thework piece was placed in the electric tube furnace and heated up to 1100��C. The work piece was heated until it completely austenitized, and then quickly transferred to the H500 and rolled.
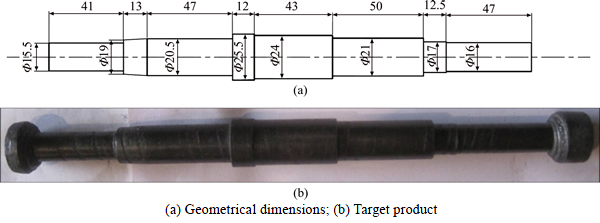
Fig. 1 Stepped shaft produced by MCWR method (Unit: mm):

Fig. 2 FEM model of multi-wedge cross wedge rolling

Fig. 3 Flow curves of C45:
Table 1 Parameter of multi-wedge cross wedge rolling simulation
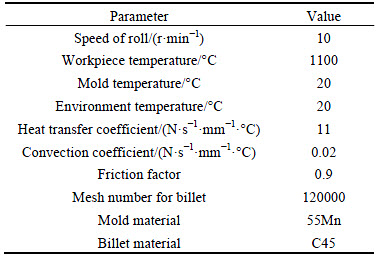
Table 2 Main process parameters for simulation

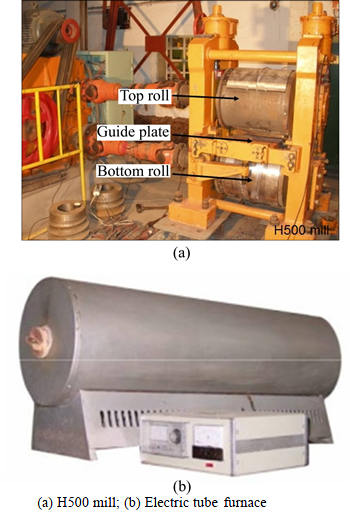
Fig. 4 Experimental equipment:
4 Results and discussion
The MCWR forming process from the billet to a rolled shaft is displayed in Fig. 5. In the initial stage of the process, wedge tools cut into the central part of the work piece, reducing its diameter. When t equals 0.893 s, the 24-mm step finishes rolling. At this time, the second step begins wedge rolling at 25.5 mm, and stops when t equals 1.5 s. At the same time, the 21-mm rolling half steps are used. When t equals 3.02 s, the 21-mm step is completed. When t equals 3.54 s, the rolling of the 17-mm step finishes. The left side wedge continues broadening until t equals 3.91 s, and completes the left cone rolling. The process finally ends when the 15.5-mm and 16-mm rolling steps are completed.
Table 3 Main technical parameters of H500
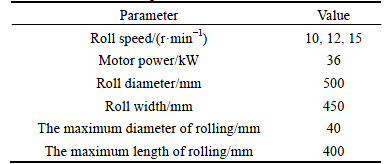
Table 4 Main technical parameters of electric tube furnace

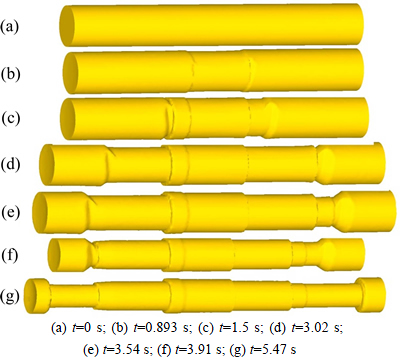
Fig. 5 Forming process of rolled piece (��=36��, ��=7.5��, ��=69.35%):
Figure 6(a) shows the distribution of effective strain in the produced stepped shaft. The strains increase as the diameter decreases and their values are relatively constant in particular steps of the shaft. At the same time, however, the effective strain is higher in the shaft head (the diameter of the head was not subjected to reduction). Figure 6 shows that the maximum strain is 28.8, and is located in the 16-mm step. The minimum strain is 0.453. To completely analyze the deformation characteristics, two points (whose sequential rolling centers point toward the surface) were selected for analysis, as shown in Fig. 6(b). The strain in the surface point (P2) changes faster than that in the inner point (P1). The deformation of the surface is large. The effective strain increases sharply in the knifing zone, and increases gradually in the stretching zone and sizing zone. The effective strains between the center point and surface points vary. The effective strains of the surface point are larger than the center point.

Fig. 6 Effective strain distribution during MCWR process (��=36��, ��=7.5��):
Figure 7(a) illustrates the effective stress distributions in the longitudinal direction of the product shafts. The largest effective stress is seen at the surface of the work piece, at approximately 686 MPa. Figure 7(b) shows the effective stress variations of P1 and P2 with the MCWR process. The effective stress increases almost linearly with deformation time in the knifing zone and remains almost constant throughout the stretching zone. At the surface, the effective stress shows oscillations because of contact and noncontact of the tools with the work piece. In addition, the highest effective stresses are found on the surface and the lowest is in the center point.
During the forming process of MCWR, the main deformations of the work piece are radial compression and axial extension. The displacement of the end metal flow is determined by axial metal flow. In conducting MCWR on the asymmetric stepped shaft, when the rolled piece is in a steady state of rolling, although the rolled piece is balanced by axial force, the rolled piece stillundergoes axial channeling. The channeling moving will inevitably cause part of the change in the volume of metal flow. Therefore, the mechanism of the rolled piece axial channeling moving must know which part of the volume of metal flow has changed. Figure 8(a) shows the initial longitudinal grid, and Fig. 8(b) shows the longitudinal grid after deformation.

Fig. 7 Effective stress distribution during MCWR process (��=36��, ��=7.5��, ��=69.35%):
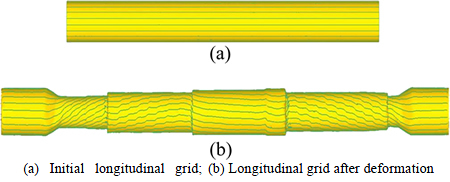
Fig. 8 Deformation grid during CWR hollow valve process (��=36��, ��=7.5��, ��=69.35%):
During the MCWR process, the temperature of the work piece increases because of heat deformation. Heat exchange with the environment causes the temperature to drop. Figure 9(a) presents the final temperature distribution in the stepped shaft. The upper FEM part shows the entire part and the lower FEM part shows the cutting plane. The lowest temperature observed is approximately 500 ��C and the highest is approximately 1000 ��C. A similar temperature was recorded by camera in the experimental tests (Fig. 9(b)). To completely analyze the rolling temperature, two points were selected. The locations of the points are presented in Fig. 9(c). The points at the knifing zone come in contact with the mold surface, causing the temperature to rapidly decrease and reach a minimum of approximately 950��C. The outer surface temperature at the stretching zone reached 950 ��C. With the completion of the rolling process, the temperature in the rolling section decreased to 650 ��C. As plasticity is favorable within this temperature range, rolling is easy.
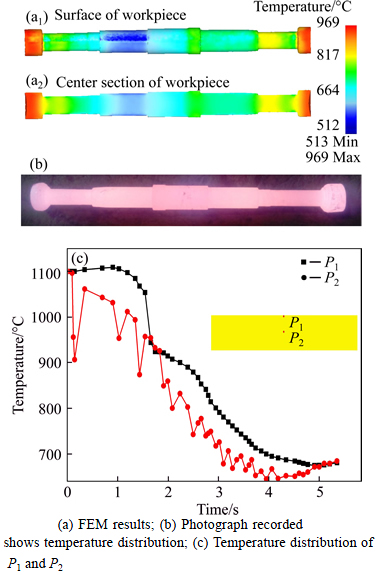
Fig. 9 Temperature distribution during MCWR process (��=36��, ��=7.5��, ��=69.35%):
Determining the rolling forces and rolling torque is significantly important. The rolling force is the main basis for the rolling mill design, whereas the rolling torque is the main basis for the calculation of motor power [21, 22]. Torque measurement is based on when the drive shaft is subjected to torque, shear stress is generated on the surface of the shaft, and in a 45�� direction there is the axial stress. The resistance sheet is directly pasted on the surface of a 45�� with the axis. To compensate for bending impact, the sheet resistance into two groups attached to the symmetrical position, consisting of a full bridge circuit, and then through the ring leads to strain gauge. Figure 10(a) presents the distribution of forces of the influencing tools during the MCWR process. This figure shows how forces change. Figure 11(a) shows that the distribution of forces is quite different. The quantitative radial force (Fx) is larger than the tangent force (Fy). The radial force is approximately 700 kN, whereas the tangent force is approximately50 kN. The axial force (Fz) is smaller than the tangent force. The tangent force is approximately 2 kN. The MCWR process is characterized by axial extension and radial compression. Based on Fig. 10(a), the radial force (Fx) increases quickly in the knifing zone; at 1s, it reaches its maximum and relatively stable form in the stretching zone, and then slowly decreases in the sizing zone. The tangent force (Fy) is likely the radial force (Fx).

Fig. 10 Distribution of forces and torque:
Figure 10(b) presents a comparison between the torque measured in the experiments and the torque calculated in the simulation during the MCWR process. The distribution of the rolling torque is also shown in thefigure. Torque is relatively stable and volatile. The max torque is 35kN��m during the process. The results of the experiment agree with the results of the simulation of the MCWR forces.
Based on the results of the finite element simulation and the experimental research, the following set of parameters was chosen: ��=36�� and ��=7.5��. Under these conditions, the size of the work piece satisfied the requirements. The forming test was conducted at room temperature (20��C). The diameter of experiment and numerical simulation is defined as d1. The diameter of target products is defined as d. The relative error (eRE) of the step diameter is calculated using the following equation:
 (2)
(2)
Table 5 shows the different steps in diameter distribution after rolling. The FEM result is slightly larger than the experiment result. The largest error of the experiment is 2.11%, whereas that of FEM is 3.45%. The experiment and FEM results have sufficient agreement.
During the MCWR process, dynamic recrystallization takes place. The recrystallization depends on the magnitude of the strain and temperature and closely correlates with the numerically determined equivalent strain values. Figure 12 shows the stepped shaft after rolling in the experiment. The experiment and simulation of MCWR show sufficient agreement. Therefore, using MCWR to produce long asymmetric stepped shafts is feasible.

Fig. 12 Experiment of MCWR for asymmetric stepped shaft (��=36��, ��=7.5��, ��=69.35%)
Table 5 Different steps diameter distribution after rolling

5 Conclusions
1) The MCWR method can be used to form long parts such as an asymmetric stepped shaft.
2) Forming angle and stretching angle are important parameters for the MCWR process. The forming angle equals 36 �� and the stretching angle equals 7.5 ��. The quality of the work piece is significantly improved.
3) The deformation characteristics, material flowing mechanisms, temperature distributions, and strain rolling force were analyzed in MCWR. The lowest temperature observed was approximately 500 ��C. The highest temperature observed was approximately 1000 ��C during the MCWR process.
4) The rolling force and torque were analyzed in MCWR. The max torque is 35 kN��m during the process.
5) The microstructure of the step shaft was observed. All rolled grains undergo dynamic recrystallization and thus meet the grain size requirements of the shaft.
References
[1] PATER Z, TOFIL A, TOMCZAK J. Numerical analysis of the cross wedge rolling process (CWR) for a stepped shaft [J]. Metalurgija, 2015, 54: 177-180.
[2] PATER Z, TOMCZAK J, BULZAK T. Numerical analysis of the skew rolling process for main shafts [J]. Metalurgija, 2015, 54: 627-630.
[3] TOMCZAK J, PATER Z, BULZAK T. Thermo-mechanical analysis of a lever preform forming from magnesium alloy Z31 [J]. Archives of Metallurgy and Materials, 2012, 57: 1211-1218. doi: 10.2478/v10172-012-0135-z.
[4] BULZAK T, TOMCZAK J, PATER Z. Theoretical and experimental research on forge rolling process of performs from magnesium alloy AZ31 [J]. Archives of Metallurgy and Materials, 2015, 60(1): 437-443. doi: 10.1515/amm-2015-0072.
[5] HU Zheng-huan, ZHANG Kang-sheng, WANG Bao-yu, SHU Xue-dao, YANG Cui-ping. Technology and simulation of cross wedge rolling forming parts [M]. Beijing: Metallurgical Industry Press, 2004: 16-17. (in Chinese)
[6] DONG Y, TAGAVI K A, LOVELL M R, DENG Z. Analysis of stress in cross wedge rolling with application to failure [J]. International Journal of Mechanical Sciences, 2000, 42: 1233-1253.
[7] JI Hong-chao, LIU Jin-ping, WANG Bao-yu, ZHENG Zhen-hua, HUANG Jiang-hua, HU Zheng-huan. Cross-wedge rolling of a 4Cr9Si2 hollow valve: explorative experiment and finite element simulation [J]. The International Journal of Advanced Manufacturing Technology, 2015, 77: 15-26.
[8] WANG, M T, LI X T, DU F S. Analysis of metal forming in two-roll cross wedge rolling process using finite element method [J]. Journal of Iron and Steel Research International, 2009, 16: 38-43.
[9] ZHAO Jing, SHU Xue-dao, HU Zheng-huan. Study of stress distribution of forming slandering of automobile semi-axes with multi-wedge rolling by FEM simulation [C]// ICMIT 2005: Control Systems and Robotics. Chongqing: SPIE, 2005, Pts 1 and 2, 6042: 604247.
[10] ZHAO J, LU L Q, HU Z H. Study on varying rule of mechanical parameters in forming automobile semi-axes with multi-wedge cross wedge rolling [C]// Proceedings of the International Conference on Mechanical Engineering and Mechanics. 2007, Pts 1 and 2: 1723-1727.
[11] ZHAO J, LU L Q. The mechanism on defect of transition section with multi-wedge cross wedge rolling forming automotive semi-axis [C]// Proceedings of the Second International Conference on Modelling and Simulation. Manchester: World Academic Union, Mill Lane, 2009, 6: 167-170.
[12] LOVELL M R. Evaluation of critical interfacial friction in cross wedge rolling [J]. Journal of Tribology-Transactions of the ASME, 2001, 123: 424-429.
[13] DENG Z. LOVELL M R, TAGAVI K A. Influence of material properties and forming velocity on the interfacial slip characteristics of cross wedge rolling [J]. Journal of Manufacturing Science and Engineering, 2001, 123: 647-653.
[14] LI Q, LOVELL M R, SLAUGHTER W, TAGAVI K. Investigation of the morphology of internal defects in cross wedge rolling [J]. Journal of Materials Processing Technology, 2002, 125-126, 248-257.
[15] LI Q, LOVELL M R. The establishment of a failure criterion in cross wedge rolling [J]. The International Journal of Advanced Manufacturing Technology, 2004, 24: 180-189.
[16] ZHOU J, XIAO C, YU Y, JIA Z. Influence of tool parameters on tool wear in two-roll cross-wedge rolling [J]. The International Journal of Advanced Manufacturing Technology, 2013, 65: 745-753.
[17] JIA Z. ZHOU J, JI J, LEI Z, XIANG D, SUN X. Influence analysis of area reduction for necking in twice-stage cross wedge rolling [J]. The International Journal of Advanced Manufacturing Technology, 2013, 66: 1407-1413.
[18] ZHOU J, YU Y, ZENG Q. Analysis and experimental studies of internal voids in multi-wedge cross wedge rolling stepped shaft [J]. The International Journal of Advanced Manufacturing Technology, 2014, 72(9): 1559-1566. doi: 10.1007/s00170-014-5768-9.
[19] ZHANG N, WANG B, LIN J. Effect of cross wedge rolling on the microstructure of GH4169 alloy [J]. International Journal of Minerals, Metallurgy, and Materials, 2012, 19: 836-842.
[20] HUO Y, BAI Q, WANG B, LIN J, ZHOU J. A new application of unified constitutive equations for cross wedge rolling of a high-speed railway axle steel [J]. Journal of Materials Processing Technology, 2015, 223: 274-283.
[21] JI Hong-chao, LIU Jin-ping, WANG Bao-yu, ZHANG Zhen-rong, ZHANG Tao, HU Zheng-huan. Numerical analysis and experiment on cross wedge rolling and forging for engine valves [J]. Journal of Materials Processing Technology, 2015, 221: 233-242.
[22] JIA Zhi, ZHOU Jie, JI Jin-jin, YU Ying-yan, XIAO Chuan. Influence of tool parameters on internal voids in cross wedge rolling of aluminum alloy parts [J]. Transactions of Nonferrous Metals Society of China, 2012, 22: s21-s26
(Edited by YANG Hua)
Cite this article as: JI Hong-chao, LIU Jin-ping, FU Xiao-bin, TANG Xue-feng, WANG Bao-yu, HUANG Xu. Finite element analysis and experiment on multi-wedge cross wedge rolling for asymmetric stepped shaft of C45 [J]. Journal of Central South University, 2017, 24(4): 854-860. DOI: 10.1007/s11771-017-3487-8.
Foundation item: Projects(51375042, 51505026) supported by the National Natural Science Foundation of China; Project (201312G02) supported by Yangfan Innovative & Entepreneurial Research Team, China; Project(2015M580977) supported by China Postdoctoral Science Foundation
Received date: 2015-11-03; Accepted date: 2016-03-17
Corresponding author: LIU Jin-ping, Associate Professor; Tel: +86-10-62332331; E-mail: liujp@ustb.edu.cn

