Article ID: 1003-6326(2005)06-1258-06
Variations of properties across plate thickness for Al alloy 7010
M. Salazar-Guapuriche1, 2, Y. Y. Zhao2, A. Pitman3, A. Greene3
(1. Materials Laboratory, Airbus UK, Broughton, Chester CH4 0DR, UK;
2. Department of Engineering, The University of Liverpool, Liverpool L69 3GH, UK;
3. Materials and Process Group, Airbus UK, Filton, Bristol, BS99 7AR, UK)
Abstract: The variations of electrical conductivity and hardness across the thickness of an Al alloy 7010 plate under the temper condition T7651 were investigated. The electrical conductivity and hardness respond in a reciprocal manner. Cross-sectional slices of the plate subjected to re-solutionising/natural ageing and re-solutionising/artificial ageing show the similar tendencies in property changes as in the as-received raw material. This clearly suggests that the property inhomogeneity across the plate thickness is inherent of the manufacturing route. The differences in properties through the plate thickness are due to the changes in the concentrations of the strengthening alloying elements in the solid solution and the associated changes in microstructure; these are believed to be mainly due to the nature of plate solidification and prolonged high temperature during the rolling operation. The combination of electrical conductivity and hardness can be used as an integral quality property indicator for assessing inhomogeneity of thick products.
Key words: alloy 7010; electrical conductivity; hardness; plate thickness CLC
number: TG113 Document code: A
1 INTRODUCTION
Al alloy (AA) 7010 in the T7651 temper condition is extensively used in the manufacture of aircraft structural wing components, because of its high strength coupled with high resistance to stress corrosion cracking and good fracture toughness, particularly in thick sections. The suppliers of this raw material commonly use non-destructive testing of electrical conductivity and hardness to monitor the quality consistency during manufacturing. Due to their accuracy and fast response, hardness and electrical conductivity measurements have also been used extensively to study the age hardening process and the associated precipitation mechanism in many heat treatable Al alloys. Rosen et al[1] reported that electrical conductivity and hardness responded in a complementary manner to the varying microstructure that forms during different stages of the ageing process in AA 2024. Rosen[2] also used the eddy current method to study the changes in the mechanical properties during the age hardening process in AA 2024 and evaluated quantitatively the extent of removal of the minor constituents Cu and Mg from the solid solution. Brasche et al[3] and Koch and Kolijn[4] studied the correlations of the non-destructive measurements to properties such as strength, fracture toughness and stress corrosion cracking.
In the aircraft industry, non-destructive inspection techniques are also used to assess the indications of overheating due to machining operations, when it is detected by chromic acid anodising. It has been observed that, even when no indication of overheating is detected by chromic acid anodising, the electrical conductivity and hardness change notably from the outside surface towards the centre of the plate, indicating a lack of property homogeneity through the plate thickness. The quenching-rate gradient in the solution heat treatment was reported to be a major factor leading to the property differences in thick sections[5]. The property inhomogeneity through the thickness can also be a result of other factors, such as the segregation of alloying elements during solidification and the subsequent thermo-mechanical processing, especially when subjected to prolonged high temperature during rolling.
This investigation is to identify the main contributors to the property inhomogeneity through the plate thickness of AA 7010 and to gain an understanding of the metallurgical phenomena, with an aim to improve the manufacturing efficiency of the structural aircraft parts.
2 EXPERIMENTAL
The Al alloy assessed in this investigation was AA 7010-T7651 with a chemical composition of Zn 6.30, Mg 2.34, Cu 1.75, Zr 0.12, Fe 0.05, Si 0.04, Ti 0.032, Ni 0.01 and Al the remainder (mass fraction, %). A slab of 1960kg, which was subjected to a complex thermo-mechanical treatment of solidification, homogenizing, hot rolling, solutionising, quenching, stretching and artificial ageing during manufacturing, was supplied as a plate of 3403mm long, 1320mm wide and 157mm thick.
Fig.1 schematically shows the locations of the plate from which 5 cross-sectional slices were cut perpendicular to the longitudinal direction, i.e. the rolling direction. Each slice was 3mm thick, 140mm wide and 157mm long, the length of which spans the full thickness of the plate. Slice 1 was further cut into two halves vertically. One half was cut into 20 equal coupons in series across the plate thickness, i.e. along the short transverse(ST) direction of the plate, for chemical analysis; each coupon was 7.85mm wide and represented a location across the plate thickness. The other half of slice 1 and slices 2-5 were marked from top to bottom every 5mm for electrical conductivity and hardness measurements before and after heat treatments. Each of the 5mm wide strips represented a location across the plate thickness and was numbered so that the measurements could be conducted on the identical location.
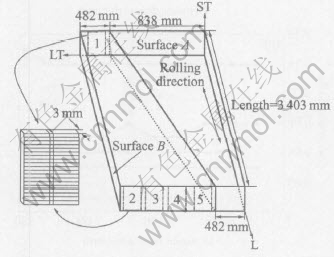
Fig.1 Schematic showing locations of test samples in plate
The electrical conductivity and hardness measurements were conducted on the test coupons in three different temper conditions: as received, naturally aged and artificially aged. After testing in the as-received condition, the test coupons were re-heat treated following the procedure in Fig.2, which is the standard procedure used in Airbus. All slices or test coupons were re-solutionised at 475℃ for 50min and quenched in water at a quenching rate of about 95℃/s. The slices were then naturally aged for more than 120h and re-tested. The final artificial ageing heat treatment was performed at 120℃ for 10h followed by 173℃ for 8h and further tested.
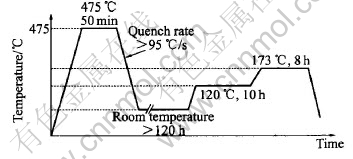
Fig.2 Standard heat treatment of AA7010
The chemical analysis was performed using the ion plasma couple technique. The hardness tests were carried out on a Vickers HTM8313 hardness machine with a 5kg load. The electrical conductivity tests were carried out using a Forster SIGMATEST EC2.068 electrical conductivity meter, based on the eddy current principle. An optical microscope was used to examine the micro-structure changes across the plate thickness.
3 RESULTS
Fig.3 shows how the electrical conductivity and hardness change across the plate thickness in slice 1 for the three different temper conditions. The hardness and electrical conductivity vary in a reciprocal manner, i.e. an increase in one results in a decrease of the other and vice versa. Fig.3(a) shows that the hardness of the as-received plate generally decreases with increasing distance from the edge across the thickness. The respective reciprocal change of electrical conductivity is also observed. Fig.3(b) shows that the properties of the plate in the solutionised and naturally aged condition do not change significantly in the first 40mm from either side of the plate; however a notable property change is evident at the plate centre, where a drop in hardness is accompanied by an increase in electrical conductivity. Fig.3(c) shows that in the re-solutionised and artificially aged condition the hardness increases progressively from either edge of the plate towards 1/4 of plate thickness and then decreases towards the plate centre. The respective reciprocal change of electrical conductivity is also observed through the plate thickness. The differences in electrical conductivity and hardness between the plate centre and 1/4 of the plate thickness from the edges are approximately +0.4MS/m and HV -9.5, respectively. The hardness values of Fig.3(c) are higher than those of Fig.3(a) at the same locations, and the electrical conductivity values for the re-treated condition are lower than those of the as received condition. Although Figs.3(a) and (c) show very different hardness profiles through the plate thickness, they have a similar profile of electrical conductivity through the thickness of the plate.
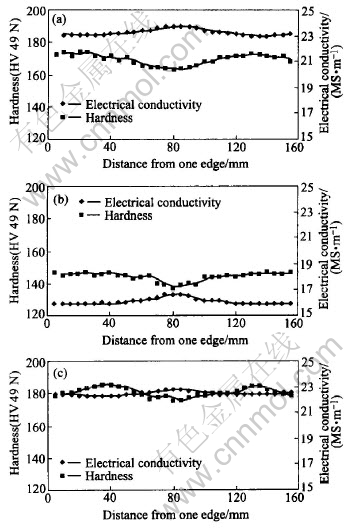
Fig.3 Variations of electrical conductivity and hardness across plate thickness for temper conditions of as-received(a), naturally aged(b) and artificially aged(c)
The results of the electrical conductivity and hardness measurements across the plate thickness of slices 2-5 in the artificial ageing condition also reveal similar profiles to those of slice 1 as shown in Figs.3(a) - (c). The variations in electrical conductivity and hardness in all the five slices show consistent “W” and “M” shape profiles respectively. It is apparent that the hardness and electrical conductivity profiles do not change along the longitudinal transverse(LT) direction.
Repeated re-solutionising treatments and full ageing of slice 1 gave the same profiles for hardness and conductivity as in the received and single re-solutionising/artificial ageing conditions. However, three cycles of re-solutionising and full ageing, with prolonged soaking time, resulted in higher hardness values and lower conductivity values.
Fig.4 shows the results of the chemical analysis of the coupons of slice 1 from the outside surface to the centre of the plate. Fig.4(a) shows the concentrations of the major alloying elements Zn, Cu and Mg. They increase slightly from the surface to approximately a depth of 32mm of the plate thickness and then decrease slightly towards the centre. Fig.4(b) shows the concentrations of the minor alloying elements Zr, Fe, Si and Ti. At the depth of 32mm from the surface, the concentrations of Fe and Si show a decrease. The maximum changes of Zn, Cu, Mg, Fe and Si between the surface and this depth are 0.3%, 0.15%, 0.13%, 0.01% and -0.01%, respectively. The remaining elements Ti, Zr and Mn do not change much through the thickness, except for higher Ti and Zr concentrations at the centre of the plate.
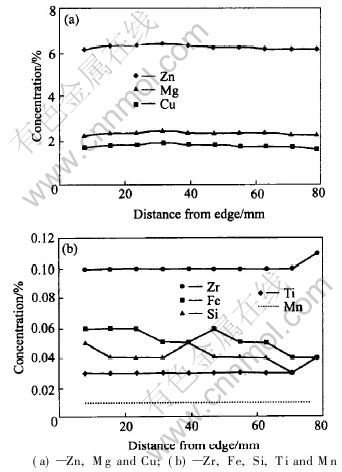
Fig.4 Variations of chemical composition across half plate thickness
Fig.5 shows the microstructures of the as-received plate at different locations on surfaces A and B as indicated in Fig.1. Figs.5(a) and (b) show the microstructure near the top edge and at the centre across the plate thickness on surface A, respectively. The mean grain size varies across the plate thickness, i.e. the short transverse(ST) direction; the grains are coarser at the centre than near the edge. Figs.5(c) and (d) show the micro- structure near the top edge and at the centre across
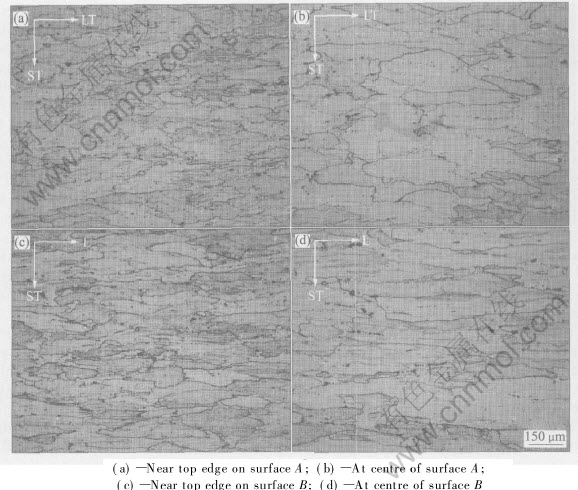
Fig.5 Microstructures of plate at different locations
the plate thickness on surface B, respectively. It can be seen that the grains are elongated on the rolling direction, i.e. the longitudinal(L) direction. It is demonstrated again that the grains are coarser at the centre than near the edge. A grain size measurement at the outside face and the centre was performed by the intercept method; the results show average grain sizes of approximate 90μm and 120μm, respectively.
Higher magnification micrographs show that the primary dispersoids are predominantly irregular in shape and are mainly confined to the grain and sub-grain boundaries. There is a gradual change in the number and size of dispersoids through the plate thickness. They are larger and slightly less numerous at the centre than towards the edge of the plate.
4 DISCUSSION
The hardness and electrical conductivity of an Al alloy are dependent upon the composition and microstructure of the Al alloy. The alloying elements can exist in the solution as solute and form primary dispersoids and fine precipitates. The primary dispersoids are relatively large particles formed during solidification, which cannot be dissolved completely during solutionising in the ageing treatment. The primary dispersoids have little contribution to the hardness and electrical conductivity of the alloy. The hardness is largely determined by the amount of fine precipitates in the alloy formed during age hardening; more fine precipitates lead to higher hardness. All known metallic addition to aluminium reduces its electrical conductivity, and metals in solid solution depress the conductivity to a greater extent than when out of solution[5]. Hatch[5] reported that the effect of grain size on electrical conductivity for commercial materials is negligible. The electrical conductivity is therefore largely determined by the amount of alloying elements in the solid solution and the amount of fine precipitates.
The general differences in hardness and electrical conductivity between the as-received, naturally aged and artificially aged conditions, as shown in Fig.3, can be explained by the amount of alloying elements in the solid solution and the amount of strengthening precipitates. Because in natural ageing the alloying elements are still dissolved in the solid solution and very little precipitates are formed, the Al alloy in the naturally aged condition has much lower hardness and electrical conductivity than in the as-received and artificially aged conditions. The hardness values across the plate thickness in the artificially aged condition are generally higher than those in the as-received condition, as shown in Figs.3(a) and (c), although the heat treatment procedures of the Al alloy in the as received and artificially aged conditions are similar. This is mainly due to the difference in quenching rate after solutionising. With a thickness of only 3mm, the re-solutionised slices have a higher quenching rate; they will therefore have reduced quench-induced precipitates and increased quenched-in vacancies needed to aid the low temperature precipitation. Because of the increased amount of fine precipitates, the re-solutionising and artificial ageing condition will lead to higher hardness. In comparison, the as-received condition is expected to have a greater level of quenching induced precipitates than the re-solutionised/artificially aged slices, due to the low quenching rate and prolonged manufacturing operations at high temperature. Godard et al[6] reported that for AA 7075 the low quenching rate from solutionising temperatures leads to heterogeneous precipitation on primary dispersoids and at grain boundaries. As a consequence, the amount of alloying elements available for age hardening is reduced.
The variations in hardness and electrical conductivity across the plate thickness are normally in a reciprocal relationship, i.e. higher hardness corresponds to lower electrical conductivity and vice versa. This is because higher hardness is associated with fine precipitates or GP zones generating more distortion to or more strain in the crystal lattice, which also leads to more scattering to electron movement and thus lower conductivity.
The variations in hardness and electrical conductivity through the plate thickness were observed on all five slices and showed “M” and “W” shape profiles respectively. Chakrabarti et al[7] also showed inhomogeneous yield strength through the thickness of an AA 7050-T74 plate. These property variations through the thickness are believed to be inherent from the cast ingot and partly due to the inhomogeneity of the alloying elements.
The drop in hardness and the corresponding increase in electrical conductivity at the plate centre in as-received, naturally aged and artificially aged conditions are mainly due to the depletion of alloying elements from the solid solution at mid-plate. Metallographic examination of the plate shows that the grains at the plate centre are much coarser than at the surface. This examination also shows a notable difference in the size and number of primary dispersoids between the surface and centre of the plate. These features, as shown in Fig.5, all indicate that the centre part of the plate is subject to low cooling rate during solidification, homogenization and prolonged high temperature during the thermo-mechanical manufacturing operations. During the solidification of a large ingot, the dendrites containing peritectic intermetallic compounds can be broken away and transported towards the ingot centre by the liquid metal flow, resulting in the formation of primary dispersoids. High temperature precipitates can also form on the dispersoids during the thermo-mechanical operations. The formation and growth of dispersoids at the centre can decrease the amount of solute elements within the solid solution, which otherwise will be available for artificial age hardening. The lack of strengthening alloying elements within the solid solution (Zn, Cu and Mg) may have resulted in the lower hardness and higher electrical conductivity observed at the centre of the plate.
The gradual increase in hardness (up to HV +6.5) and respective electrical conductivity drop (-0.17MS/m) from the surface to approximately 1/4 of plate depth is believed to be influenced by the slight increase in the major alloying elements as shown in Fig.4(a). According to Ref.[5], a 1%(mass fraction) increase in Zn, Cu, Mg, Zr, Fe, Ti, Mn or Si in solid solution in Al alloys would result in an increase in resistivity of 0.094, 0.344, 0.54, 1.74, 2.56, 2.88, 2.94 or 1.02μΩ・cm, respectively. The measured concentrations of Zn, Cu, Mg, Zr, Fe, Ti, Mn and Si at the surface and at 32 mm from the surface were (6.1%, 1.69%, 2.26%, 0.1%, 0.06%, 0.03%, 0.01% and 0.05%) and (6.64%, 1.84 %, 2.39%, 0.1%, 0.05%, 0.03%, 0.01% and 0.04%), respectively. Using the above principle, these alloying elements would result in increases in resistivity of pure aluminium (2.65μΩ・cm at 20℃) by approximately 2.87μΩ・cm and 3.01μΩ・cm for the outside face and 32mm from the surface respectively. The corresponding values of electrical conductivity for these locations would be 18.12MS/m and 17.68MS/m respectively. Although the estimated values are different from the measured values of electrical conductivity, because of ignoring the precipitation effects, they clearly demonstrate the possible cause of the difference in electrical conductivity between the two locations.
The change of chemical composition registered at the location 32mm from the surface is apparently inherent from the cast ingot from which the plate was derived. During the solidification of a large ingot, the microstructure changes from equiaxed to columnar and to equiaxed again from the surface to the centre, due to the cooling rate gradient. As a consequence, the alloying elements are pushed inwards until a new solidification mode becomes dominant. The subsequent homogenization and hot rolling operation cannot remove the compositional inhomogeneity completely. The registered increases in the major alloying elements at 32mm from the surface might coincide with the transition zone between the equiaxed and columnar regions. The higher Ti and Zr concentrations at the plate centre, as shown in Fig.4(b), are also a result of the solidification-induced inhomogeneity.
Hatch[5] reported that the quenching-rate gradient in the solution heat treatment for AA 7075 was the major factor leading to the property differences in thick sections. In this investigation, the quenching rate for the re-solutionised slices (3mm thick) was much higher than that for the as received condition. However, the profile of properties through the plate thickness remained similar as the received condition. Repeated re-solution treatments (longer soaking time) and full ageing of slice 1 showed the same trend. The quench rate gradient from the surface to the centre is therefore not a major contributing factor for the low hardness at the plate centre.
The slight difference in property profile through the plate thickness between the as-received and the re-treated conditions is that the re-treated slices will not have the beneficial effects of the controlled stretching. Martin[8] reported that the stretching could introduce uniformly distributed dislocations into the alloy prior to age hardening, which leads to a more uniform distribution of semi-coherent precipitates and therefore more homogeneous properties. In this investigation, the stretching effect will have been removed during re-solutionising. The re-solutionising/artificial ageing showed more pronounced changes in hardness and electrical conductivity.
5 CONCLUSIONS
The electrical conductivity and hardness vary across the thickness of the AA 7010 plate and respond in a reciprocal manner. The combination of electrical conductivity and hardness is a reliably quality indicator and can therefore be used as a non-destructive assessment for the property homogeneity of thick products. The property inhomogeneity across the plate thickness, especially low hardness and high electrical conductivity at the centre and the high hardness and low electrical conductivity at a depth of 32mm from the surface, is inherent of the solidification and thermo-mechanical process of the product during manufacturing; the quenching rate is not the main contributor.
REFERENCES
[1]Rosen M, Horowits E, Swartzendruber L, et al. The aging in aluminium alloy 2024 studied by means of eddy currents [J]. Materials Science and Engineering, 1982, 53(2): 191-198.
[2]Rosen M. Eddy current analysis of precipitation kinetics in aluminium alloys [J]. Metallurgical Transactions A, 1989, 20(4): 605-610.
[3]Brasche L J H, Bracci D J, Jiles D C, et al. Correlation of mechanical properties with non-destructive evaluation measurements in Al-Li alloys [J]. Materials Science and Engineering A, 1989, 119: 7-15.
[4]Koch G H, Kolijn D T. The heat treatment of the commercial aluminium alloy 7075 [J]. Journal of Heat Treating, 1979, 1(2): 3-14.
[5]Hatch J E. Aluminium: Properties and Physical Metallurgy [M]. 1st ed. Metals Park, Ohio: American Society for Metals, 1984. 7-205.
[6]Godard D, Archambault P, Aeby-Gautier E, et al. Precipitation sequence during quenching of the AA 7010 [J]. Acta Materialia, 2002, 50(9): 2319-2329.
[7]Chakrabarti D J, Weiland H, Cheney B A, et al. Through thickness property variation in 7050 plate [J]. Materials Science Forum, 1996, 217-222: 1085-1090.
[8]Martin J W. Precipitation Hardening [M]. 2nd ed. Oxford: Butterworth-Heinemann, 1998. 44.
(Edited by YUAN Sai-qian)
Received date: 2005-08-15; accepted date: 2005-11-11
Correspondence: Mr. Manuel Salazar-Guapuriche, Materials Laboratory, Airbus UK, Broughton, Chester CH4 0DR, UK; Tel: 0044 1244 522949; Fax: 01244 522109; E-mail: manuel.salazar@airbus.com