Trans. Nonferrous Met. Soc. China 22(2012) s650-s655
Effect of strain, strain rate and temperature on workability of AZ80 wrought magnesium alloy
 Wen-quan, QUAN Guo-zheng, YU Chun-tang, ZHAO Lei, ZHOU Jie
College of Materials Science and Engineering, Chongqing University, Chongqing 400044, China
Received 21 May 2012; accepted 18 October 2012
Abstract: The hot deformation behavior of AZ80 wrought magnesium alloy was studied in the temperature range of 523-673 K and the strain rate range of 0.01-10 s-1 using hot compression tests. Through the flow stresses behavior, the processing maps were calculated and analyzed according to the dynamic materials model. The stable, metastable and unstable regimes were clarified. The optimum processing conditions were suggested as following: the DRX regions in Domain #1-0.25, Domain #2-0.25, Domain #1-0.45, Domain #2-0.45, Domain #3-0.45, Domain #1-0.65 and Domain #1-0.85, and the DRV regions in Domain #3-0.25 and Domain #4-0.45. In each “safe” DRX domain, it is preferable to conduct hot working in the small region around efficiency peak point. The strain has a great influence on the processing maps. The whole area of the “safe” domains increases with the increase of true strain from 0.25 to 0.65, while it decreases with the increase of true strain from 0.65 to 0.85. The results of kinetic analysis reveal that the values of apparent activation energy in all the domains are higher than that for self-diffusion in pure magnesium (135 kJ/mol), and the deformation mechanism in all the domains is likely to be cross-slip.
Key words: AZ80 magnesium alloy; strain rate; kinetic analysis; processing map; flow behavior
1 Introduction
Magnesium alloys have the highest specific strength among common structural metals, and hence offer many benefits in terms of reducing mass and energy savings for both the automotive and the aerospace industries, in spite of their higher cost [1]. Recently, although casting process of magnesium alloys has been widespread in manufacturing the complex-shaped parts due to its good castability, the mechanical properties of the part made by casting process may not meet industrial requirements [2]. Thus, an alternative process like hot forging has been required to improve the mechanical characteristics. Unfortunately, due to the HCP crystal structure with limited number of slip systems, Mg and Mg alloys exhibit poor hot workability which limits their applications [3]. Different approaches are available for evaluating the working mechanisms and these include evaluation of the stress-strain curves and the standard parameters such as stress exponent or activation energy. Much studies were put on the flow curves and constitutive equations in the past and a promising approach, processing map based on dynamic materials model (DMM) has been developed with the purpose of optimizing hot working process and controlling microstructure [4-7].
DMM, the basis of processing map was firstly proposed on the fundamental principles of continuum mechanics of large plastic flow by PRASAD and GEGEL [6,7]. Until now, the validity of processing maps has been approved in many alloys but little report is found on AZ80 magnesium alloys. This investigation is to study the hot deformation characteristics of AZ80 wrought magnesium alloy from hot compression data with the help of processing maps combined with flow curves and kinetic analysis. With the help of processing maps at different strains, the domains and regimes of flow instabilities were clarified, and the effect of strain on intrinsic workability was interpreted. Meanwhile it is possible to arrive at the optimum parameters for designing a metal working process without resorting to expensive and time-consuming trial-and-error methods.
2 Experimental
The as-cast AZ80 magnesium alloy employed in the present investigation was provided in the form of bar with the diameter of 100 mm. The chemical compositions of AZ80 magnesium alloy used in this work are (mass fraction, %) Al 8.90, Zn 0.53, Mn 0.20, Si 0.008, Fe 0.004, Cu 0.008, Ni 0.0008, Mg balance. Before the experiment, the compression specimens, with the diameter of 10 mm and the length of 12 mm, were machined with their cylinder axes parallel to the axial line direction of the bar. On a computer-controlled servo-hydraulic Gleeble 1500 machine, the specimens were heated at a rate of 1 K/s and held at a certain temperature for 180 s to ensure a uniform starting temperature and decrease the material anisotropy. All the 16 specimens were compressed to true strain of 0.9163 (height reduction of 60%) at the temperatures of 523, 573, 623 and 673 K, and the strain rates of 0.01, 0.1, 1 and 10 s-1, then immediately water cooled down to retain the recrystallized microstructures. During the compressing process, the variations of stress and strain were monitored continuously by a personal computer equipped with an automatic data acquisition system. The true stress―strain relationships were derived from the nominal stress―strain curves collected according to the following formula: σT = σN(1+εN), εT = ln(1+εN), where σT is the true stress, σN is the nominal strain, εT is the true strain and εN the nominal strain [8,9].
3 Results and discussion
3.1 Plastic flow behavior at elevated temperatures
The true compressive stress―strain curves for AZ80 wrought magnesium alloy at different temperatures and strain rates are illustrated in Fig. 1.
Comparing these curves, it is clearly observed that increasing strain rate or decreasing deformation temperature makes the flow stress increase, in other words, it prevents the occurrence of softening due to dynamic recrystallization (DRX) and dynamic recovery (DRV) and makes the deformed metals exhibit work hardening (WH), because higher strain rate provides shorter time for the energy accumulation and lower temperature provides lower mobilities at boundaries which result in the nucleation and growth of dynamically recrystallized grains and dislocation annihilation [10].
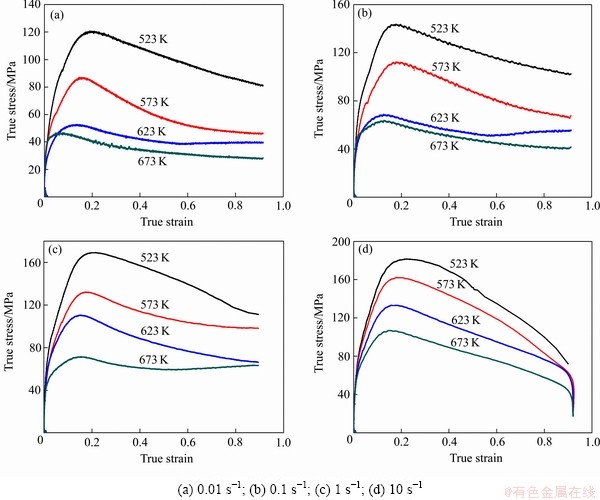
Fig. 1 True stress―strain curves of AZ80 wrought magnesium alloy obtained by Gleeble 1500 under different deformation temperatures and strain rates
The flow curves in Fig. 1 show that for each deformation condition, there is initial work hardening, which leads to a pronounced peak stress, followed by stress decreasing monotonically with varying softening rate. Such softening behaviors have been shown to be typical for DRX taking place under hot deformation originally described by ZHANG et al [11].
Moreover, there are two types of stress decreasing tendency generalized as following: decreasing gradually to a steady state with DRX softening (573-673 K and 0.01 s-1, 623-673 K and 0.1 s-1, 573 K and 1 s-1, 673 K and 1 s-1), and decreasing continuously with significant DRX softening (523 K and 0.01 s-1, 523-573 K and 0.1 s-1, 523 K and 1 s-1, 623 K and 1 s-1, 523-673 K and 10 s-1). The results indicate that AZ80 wrought magnesium alloy is very sensitive to deformation temperature and strain rate.
3.2 Processing map
In DMM model proposed by PRASAD and GEGEL, the work piece undergoing hot deformation can be considered as a dissipater of power, and the characteristics of power dissipation through micro- structural changes are expressed in terms of an efficiency of power dissipation  , where m is the strain rate sensitivity of flow stress. The
  vs
vs  data are fitted by a cubic spline and the strain rate sensitivity m is calculated as a function of strain rate. This is repeated for various temperatures and strains. The variation of efficiency which is usually expressed as percent with temperature and strain rate represents the power dissipation characteristics occurring through microstructural changes in the work piece material and constitutes a power dissipation map. This map exhibits different domains, which may be correlated with specific microstructural process. According to the criterion developed by PRASAD and MURTY, flow instability will occur if

 [9]. The variation of instability parameter
  with temperature and strain rate constitutes an instability map. A superimposition of the instability map over the power dissipation map gives a processing map, which reveals the deterministic domains where individual microstructure processes occur and the limiting conditions for the regimes of flow instability. This methodology has been applied for various materials [4-12]. Processing maps obtained at strains of 0.25, 0.45, 0.65, and 0.85 are shown in Fig. 2.
In the present work, we set the border lines of  -value on the basis of
  ,
,  , and
, and  regime. We consider the regime where
  to be stable with uniform deformations. The mathematical error in the boundary region can be easily determined when calculating ξ. Thus, in the regime where
  , both stable and unstable deformations are observed, and this regime is called the metastable regime. In the regime where
  , the unstable deformations are sure to occur. In each processing map, the “safe” domains as predicted by the criterion are distinguished from the unstable and metastable regions by using thick borders. There is marked change in the iso-efficiency contour maps at different strains, but the flow instability regions increase with the development of deformation. At strains of 0.25, the map exhibits three domains with higher value of power dissipation: Domain #1-0.25 occurs in the temperature range of 575-673 K and strain rate range of 0.01-0.1 s-1, with a peak efficiency of about 0.35 at about 623 K and 0.1 s-1.
Domain #2-0.25 occurs in the temperature range of 523-673 K and strain rate range of 0.32-1 s-1, with a peak efficiency of about 0.37 at about 623 K and 0.32 s-1. Domain #3-0.25 occurs in the temperature range of 550-590 K and strain rate range of 1-10 s-1, with a peak efficiency of about 0.24 at about 573 K and 10 s-1. At strains of 0.45, the map exhibits four domains with higher value of power dissipation: Domain #1-0.45 occurs in the temperature range of 575-673 K and strain rate range of 0.01-0.18 s-1, with a peak efficiency of about 0.35 at about 623 K and 0.18 s-1. Domain #2-0.45 occurs in the temperature range of 523-548 K and strain rate range of 0.01-0.18 s-1, with a peak efficiency of about 0.35 at about 548 K and 0.01 s-1. Domain #3-0.45 occurs in the temperature range of 523-673 K and strain rate range of 0.32-1 s-1, with a peak efficiency of about 0.35 at about 623 K and 0.32 s-1. Domain #4-0.45 occurs in the temperature range of 550-590 K and strain rate range of 1-10 s-1, with a peak efficiency of about 0.24 at about 573 K and 10 s-1. At strain of 0.65, the map exhibits one domain with higher value of power dissipation: Domain #1-0.65 occurs in the temperature range of 523-673 K and strain rate range of 0.01-0.56 s-1, with a peak efficiency of about 0.35 at about 573 K and 0.01 s-1. At strain of 0.85, the map exhibits one domain with higher value of power dissipation: Domain #1-0.85 occurs in the temperature range of 523-673 K and strain rate range of 0.01-0.18 s-1, with a peak efficiency of about 0.35 at about 573 K and 0.18 s-1. As it is clearly seen, the whole area of the “safe” domains increases with the increase of true strain from 0.25 to 0.65, while it decreases with the increase of true strain from 0.65 to 0.85. In addition, the deformation conditions corresponding to domains change greatly with the increase of true strain from 0.25 to 0.65, while they do not show any significant change with the increase of true strain from 0.65 to 0.85. The “safe” domains in the processing map have the characteristics of dynamic restoration mechanisms, namely DRX and DRV. Generally, the efficiency values associated with such mechanisms are 0.35-0.45 for DRX and 0.2-0.3 for DRV [12]. Usually, the optimum processing conditions are suggested as follows: the DRX regions in Domain #1-0.25, Domain #2-0.25, Domain #1-0.45, Domain #2-0.45, Domain #3-0.45, Domain #1-0.65 and Domain #1-0.85, and the DRV regions in Domain #3-0.25 and Domain #4-0.45. DRX will be operated to reduce the tendency for flow localization, so in each “safe” DRX domain, it is preferable to conduct hot working in the small region around efficiency peak point.
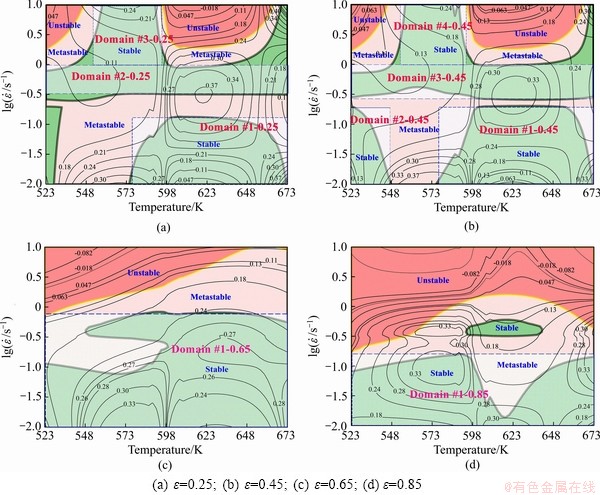
Fig. 2 Processing maps obtained on AZ80 wrought magnesium alloy at different true strains
3.3 Kinetic analysis
The effects of temperature and strain rate under hot working condition are often incorporated in the well-known Zener-Hollomon parameter, Z [8,11], as follows:
 (1)
(1)
where  is the strain rate (s-1), R is the universal gas constant (8.31 J/(mol・K)), T is the absolute temperature (K), Q the apparent activation energy for hot working (kJ/mol), A and
  are the constants related to materials, and n is the stress exponent. Then the activation energy Q can be expressed as
 (2)
(2)
In order to calculate such material constants, the stresses at true strain of 0.25, 0.45, 0.65 and 0.85 have been selected as the representative stress array of each curve. The stress exponent n is obtained from the  vs
vs  plots, and the mean value of all the slope rates is accepted as n, 10.19. Constant
  is obtained from the
  vs
vs  plots, and the mean value of all the slope rates is accepted as
  , 0.0992 MPa-1, thus
  MPa-1. The activation energy of DRX is a term defined as the energy that must be overcome for the nucleation and growth of new surface or grain boundary. In order to calculate Q, the linear curves between
  and 1/T at different strain rates and true strains were fitted out as shown in Fig. 3. These slope rates were accepted as the values of Q/(Rn). Thus, the Q values at different strains and strain rates were calculated as listed in Table 1.
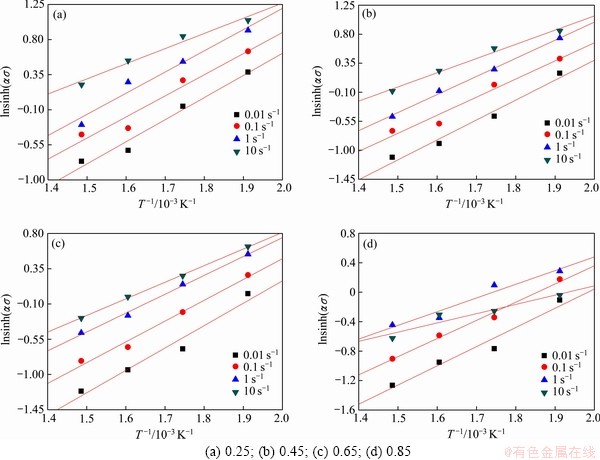
Fig. 3 Relationships between  and
and  under different strain rates at different true strains
Table 1 Apparent activation energy, Q at different strains (ε) and strain rates ( ) (kJ・mol-1)
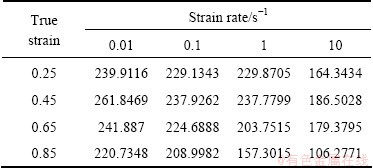
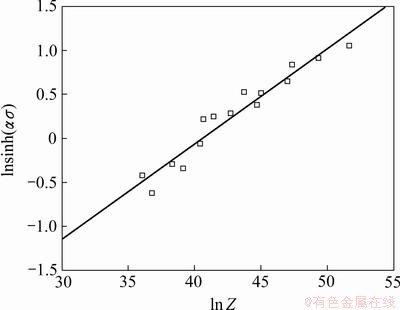
Fig. 4 Relationship between hot deformation peak stress and Z parameter of AZ80 wrought magnesium alloy
As all the Q values in Table 1 have been linked with the processing maps in Fig. 2, and a significant conclusion can be drawn as following: the values of apparent activation energy in all the domains are higher than the self-diffusion energy in pure magnesium (135 kJ/mol) [13]. Thus the deformation mechanism in all the domains is likely to be cross-slip. Variation of flow stress with Zener-Hollomon parameter for AZ80 wrought magnesium alloy is plotted in Fig. 4. This plot shows a good linear correlation between flow stress and Z value. The regression coefficient R2 is 0.9738. It can be seen that in the region of temperatures and strain rates considered, the rate equation is valid.
4 Conclusions
1) The strain has a great influence on the processing maps. The whole area of the “safe” domains increases with the increase of true strain from 0.25 to 0.65, while it decreases with increasing true strain from 0.65 to 0.85. Meanwhile, the deformation conditions corresponding to domains change greatly with the increase of true strain from 0.25 to 0.65, while they do not show any significant change with the increase of true strain from 0.65 to 0.85.
2) The stable, metastable and unstable regimes are clarified. The “safe” domains in the processing map have the characteristics of dynamic restoration mechanisms, namely DRX and DRV. The optimum processing conditions are suggested as follows: the DRX regions in Domain #1-0.25, Domain #2-0.25, Domain #1-0.45, Domain #2-0.45, Domain #3-0.45, Domain #1-0.65 and Domain #1-0.85, and the DRV regions in Domain #3-0.25 and Domain #4-0.45. In each “safe” DRX domain, it is preferable to conduct hot working in the small region around efficiency peak point.
3) The values of apparent activation energy in all the domains are higher than the self-diffusion energy in pure magnesium (135 kJ/mol), and the deformation mechanism in all the domains is likely to be cross-slip.
References
[1] ALJARRAH M, MEDRAJ M, WANG X, ESSADIQI E, MUNTASAR A, DENES G. Experimental investigation of the Mg-Al-Ca system [J]. Journal of Alloys and Compounds, 2007, 436(1-2): 131-141.
[2] KANG S H, LEE Y S, LEE J H. Effect of grain refinement of magnesium alloy AZ31 by severe plastic deformation on material characteristics [J]. Journal of Materials Processing Technology, 2008, 201(1-3): 436-440.
[3] JANECEK M, KRAL R, DOBORN P, CHMELIK F, SUPIK V, HOLLANDER F. Mechanisms of plastic deformation in AZ31 magnesium alloy investigated by acoustic emission and transmission electron microscopy [J]. Materials Science and Engineering A, 2007, 462(1-2): 311-315.
[4] MENG G, LI B L, LI H M, HUANG H, NIE Z R. Hot deformation and processing maps of an Al-5.7wt.%Mg alloy with erbium [J]. Materials Science and Engineering A, 2009, 517(1-2): 132-137.
[5] RYAN N D, MCQUEEN H J. Hot strength and microstructural evolution of 316 stainless steel during simulated multistage deformation by torsion [J]. Journal of Materials Processing Technology, 1993, 36(2): 103-123.
[6] PRASAD Y V R K, RAO K P. Processing maps for hot deformation of rolled AZ31 magnesium alloy plate: Anisotropy of hot workability [J]. Materials Science and Engineering A, 2008, 487(1-2): 316-327.
[7] PRASAD Y V R K, RAO K P. Processing maps and rate controlling mechanisms of hot deformation of electrolytic tough pitch copper in the temperature range 300-950 ℃ [J]. Materials Science and Engineering A, 2005, 391(1-2): 141-150.
[8] QUAN G Z, SHI Y, WANG Y X, KANG B S, KU T W, SONG W J. Constitutive modeling for the dynamic recrystallization evolution of AZ80 magnesium alloy based on stress―strain data [J]. Materials Science and Engineering A, 2011, 528(28): 8051-8059.
[9] QUAN G Z, KU T W, SONG W J, KANG B S. The workability evaluation of wrought AZ80 magnesium alloy in hot compression [J]. Materials & Design, 2011, 32(4): 2462-2468.
[10] PETKOVIC R A, LUTON M J, JONAS J J. Recovery and recrystallization of polycrystalline copper after hot working [J]. Acta Metallurgica, 1979, 27(10): 1633-1648.
[11] ZHANG W, LIU Y, LI H Z, LI Z, WANG H, LIU B. Constitutive modeling and processing map for elevated temperature flow behaviors of a powder metallurgy titanium aluminide alloy [J]. Journal of Materials Processing Technology, 2009, 209(12-13): 5363-5370.
[12] SRINIVASAN N, PRASAD Y V R K, RAO P R. Hot deformation behaviour of Mg-3Al alloy: A study using processing map [J]. Materials Science and Engineering A, 2008, 476(1-2): 146-156.
[13] KANG D M, AN J O, KWAK J S. Effect of minor elements on the creep resistance of Mg-Zn-Mn-(Ca) alloy [J]. International Journal of Automotive Technology, 2010, 11(6): 843-847.
(Edited by HE Yun-bin)
Foundation item: Project (2012ZX04010081) supported by the National Key Technologies R&D Program of China; Project (cstc2009aa3012-1) supported by the Science and Technology Committee of Chongqing, China; Project (CDJZR12130045) supported by Fundamental Research Funds for the Central Universities, China
Corresponding author: QUAN Guo-zheng; Tel: +86-23-65103065, +86-15922900904; E-mail:quangz2007@yahoo.com.cn
DOI: 10.1016/S1003-6326(12)61780-4