Effect of annealing treatment on microstructure and fatigue crack growth behavior of Al–Zn–Mg–Sc–Zr alloy
来源期刊:中南大学学报(英文版)2018年第5期
论文作者:潘清林 陈婧 虞学红 李梦佳 邹浩 向浩 黄志其 胡权
文章页码:961 - 975
Key words:Al–Zn–Mg–Sc–Zr alloy; annealing treatment; microstructures; fatigue crack growth rate; fatigue crack path
Abstract: Al–Zn–Mg–Sc–Zr alloy samples were annealed to four different states (under-aging, peak-aging, over-aging and double-aging) and then thoroughly investigated by means of electron backscatter diffraction (EBSD), transmission electron microscopy (TEM), scanning electron microscopy (SEM), tensile and fatigue crack growth rate tests to explore the influence of annealing treatment on microstructure and fatigue crack growth behavior. The results indicate that Al3(Sc,Zr) particles can effectively refine grains and enhance tensile properties and fatigue properties. After annealing treatment, the under-aged sample and double-aged sample obtained average grain sizes of 4.9473 and 4.1257 μm, and the maximum value of yield/tensile strength (561 MPa/581 MPa) was obtained in peak-aged state. In the Paris region, fatigue crack growth rate, crack deflection and bifurcation, crack blunting and inter/trans-granular propagation were discussed based on data fitting and Laird model and Griffith theory. And the results show that the under-aged sample possesses the best resistance to fatigue crack propagation and the most tortuous and bifurcated crack path. For all samples, the fatigue crack growth rate in the rupture region was inversely proportional to yield strength.
Cite this article as: CHEN Jing, PAN Qing-lin, YU Xue-hong, LI Meng-jia, ZOU Hao, XIANG Hao, HUANG Zhi-qi, HU Quan. Effect of annealing treatment on the microstructure and fatigue crack growth behavior of Al–Zn–Mg–Sc–Zr alloy [J]. Journal of Central South University, 2018, 25(5): 961–975. DOI: https://doi.org/10.1007/s11771-018-3797-5.

J. Cent. South Univ. (2018) 25: 961-975
DOI: https://doi.org/10.1007/s11771-018-3797-5

CHEN Jing(陈婧)1, PAN Qing-lin(潘清林)1, YU Xue-hong(虞学红)1, LI Meng-jia(李梦佳)1,
ZOU Hao(邹浩)1, XIANG Hao(向浩)1, HUANG Zhi-qi(黄志其)2, HU Quan(胡权)2
1. School of Materials Science and Engineering, Central South University, Changsha 410083, China;
2. Guangdong Fenglu Aluminum Co., Ltd, Foshan 528000, China
 Central South University Press and Springer-Verlag GmbH Germany, part of Springer Nature 2018
Abstract: Al–Zn–Mg–Sc–Zr alloy samples were annealed to four different states (under-aging, peak-aging, over-aging and double-aging) and then thoroughly investigated by means of electron backscatter diffraction (EBSD), transmission electron microscopy (TEM), scanning electron microscopy (SEM), tensile and fatigue crack growth rate tests to explore the influence of annealing treatment on microstructure and fatigue crack growth behavior. The results indicate that Al3(Sc,Zr) particles can effectively refine grains and enhance tensile properties and fatigue properties. After annealing treatment, the under-aged sample and double-aged sample obtained average grain sizes of 4.9473 and 4.1257 μm, and the maximum value of yield/tensile strength (561 MPa/581 MPa) was obtained in peak-aged state. In the Paris region, fatigue crack growth rate, crack deflection and bifurcation, crack blunting and inter/trans-granular propagation were discussed based on data fitting and Laird model and Griffith theory. And the results show that the under-aged sample possesses the best resistance to fatigue crack propagation and the most tortuous and bifurcated crack path. For all samples, the fatigue crack growth rate in the rupture region was inversely proportional to yield strength.
Key words: Al–Zn–Mg–Sc–Zr alloy; annealing treatment; microstructures; fatigue crack growth rate; fatigue crack path
Cite this article as: CHEN Jing, PAN Qing-lin, YU Xue-hong, LI Meng-jia, ZOU Hao, XIANG Hao, HUANG Zhi-qi, HU Quan. Effect of annealing treatment on the microstructure and fatigue crack growth behavior of Al–Zn–Mg–Sc–Zr alloy [J]. Journal of Central South University, 2018, 25(5): 961–975. DOI: https://doi.org/10.1007/s11771-018-3797-5.
1 Introduction
The age hardenable Al–Zn–Mg alloys, benefiting from their high strength/weight ratio and stiffness, have been widely used in aerospace manufacturing and other transportation applications [1–3]. As we all know, the common methods of strengthening aluminum alloys are strain hardening and heat strengthening. However, strain hardening also leads to poor ductility and may cause the formation of unstable microstructures [4, 5]. Artificial aging has been traditionally applied to enhance the strength of Al–Zn–Mg alloys on account of fine and uniformly distributed precipitates MgZn2 in the matrix [6–8]. However, higher strength obtained by heat treatment is gained at the price of lower toughness [9]. Inverse correlations between strength and ductility, strength and fracture toughness are repeatedly found.
As the aerospace technology develops at an incredible speed, aluminum alloys with higher strength and toughness are in badly need. A number of researches about micro-alloying have been conducted to further enhance the mechanical performance of Al–Zn–Mg alloys. Among dozens of micro-alloying elements, the combination of Sc and Zr is considered to be one of the most effective elements due to the fact that the coherent Al3(Sc,Zr) precipitates can effectively inhibit grain growth and prevent the motion of dislocations [10, 11]. It has been reported that Sc and Zr can also interact with aluminum separately to form Al3Sc and Al3Zr precipitations, but the Al3Zr precipitation always exhibits disordered distribution for the segregation of Zr during solidification, while the Al3Sc phase can disperse uniformly for its higher solubility [12–15]. PEREZ et al [11] and ROBSON et al [15] confirmed that the disordered distribution of Al3Zr precipitates can be remedied by the faster nucleating Al3Sc precipitates by forming a finer and dispersive Al3(Sc,Zr) phase. RIDDLE et al [16] found that alloys containing both Sc and Zr show even better recrystallization resistance than either addition of Sc or Zr. Moreover, Sc is more costly than Zr, which restricts the commercial application of Al–Sc alloys. Consequently, the combination of Sc and Zr is applied in this work. Numerous researches have concentrated on the precipitation behavior of Al3(Sc,Zr) particles and their grain refining effect. The effect of varied amount of Sc addition on microstructure and mechanical properties of Al–Zn–Mg–Zr alloy has been studied in our previous work [17]. The result showed that the optimal amount of Sc is 0.25% (wt%), which can obtain the finest grain size. ZHAO et al [18] also indicated that the addition of Sc contributes considerably in enhancing tensile strength and ductility, as Sc can influence the morphology of the primary α-Al in the slurry.
The fatigue failure is known to be one of the main destruction causing air crashes [19–21]. Unfortunately, the fatigue resistance of aluminum alloys is usually poor. Therefore, the study on fatigue properties of aluminum alloys is necessary. As a result, fatigue crack growth behavior and fatigue life prediction became quite heated in recent years. Fatigue crack growth rate, the most commonly used indicator to characterize the fatigue properties of alloys, can be described by the da/dN–△K curve which can be divided into three regions and the Paris law has been widely accepted to describe the relation of fatigue crack growth rate da/dN and applied stress intensity factor range △K in the second region [22]. Many models have been proposed to illustrate the process in the Paris region such as the slip band extrusion intrusion model, dislocation blocking model and crack tip blunting and resharping model. However, none of them can explain the fatigue behavior of precipitation hardened aluminum alloys. It is generally agreed that heat treatment has significant influence on the fatigue properties as different microstructures can lead to different crack propagation behaviors [23]. Various heat treatments have been extensively studied to explore the effect of heat treatment on fatigue behavior [19, 24–27]. As early as the 1930 s, OROWAN [19] reported that metastable precipitates in peak-aged aluminum alloys will turn to over-aging state even at room temperature during cyclic deformation, resulting in a degradation of mechanical performance. Recently, in HAN’s reports [25] and HUTCHINSON’s [24], profuse dynamic precipitations of aluminum alloys were observed during the process of cyclic deformation at room temperature. The volume fraction of GP zone increased in the under-aged states, and it was found that under-aged aluminum alloys exhibited longer fatigue life compared with the peak-aged ones. WANG et al [26] revealed that retrogression and reaging treated Al–Zn–Mg–Cu alloy, benefiting from its precipitates in the matrix and the narrower PFZs, demonstrated better fatigue property than T7451.
However, previously reported studies mainly focused on the fatigue performance of Al–Zn–Mg– Sc–Zr alloys under different heat treatments. The present work performs a detailed analysis on crack propagation process from microscopic view. And the effect of different annealing treatments on the microstructure and fatigue crack growth behavior of studied alloy is also thoroughly investigated. These results may offer useful information for optimizing the heat treatment system for industrial applications, and will be necessary for establishing a crack propagation mechanism for Al–Zn–Mg–Sc–Zr alloys.
2 Experimental procedures
2.1 Material
Base metal used in the experiment was Al–Zn–Mg–Sc–Zr alloy, which was cast via metallurgy with pure Al, Zn, Mg metals and Al–Cu, Al–Mn, Al–Sc, Al–Zr master alloys into 260 mm× 150 mm×30 mm ingots. Table 1 shows its chemical composition. The specimens were taken from the middle of the ingot and homogenized at 470 °C for 24 h. Then a hot rolling process was applied to 5.7 mm (77% rolling reduction) at 470 °C, which was followed by intermediate annealing at 420 °C for 1 h. Subsequently, the hot-rolled sheets were cold-rolled to a thickness of 2.0 mm (65% reduction). The cold-rolled sheets were subjected to solid solution treatment at 470 °C for 1 h, followed by water quenching, and then the specimens were aged at 120 °C for 4 h (under-aged sample, designated as UA), 24 h (peak-aged sample, designated as PA), 48 h (over-aged sample, designated as OA), and 120 °C for 6 h then 140 °C for 20 h (double-aging, designated as DA), respectively.
Table 1 Chemical composition of Al–Zn–Mg–Sc–Zr alloy (mass fraction, %)

2.2 Tensile and fatigue crack growth rate tests
The tensile tests were conducted on MTS-858 tester. Specimens were taken from the plates in the longitudinal transverse direction according to ASTM E647 standard. For each sample, three tensile specimens were tested and the average value of the results was adopted to evaluate the strength and ductility of the sample.
Fatigue crack growth tests were carried out on a MTS-810 test machine using middle-tension (MT) specimens according to ASTM E647 standard. Figure 1 shows the major dimensions of the sample used in the tests. All the tests were conducted in air at room temperature, with a stress ratio (Pmin=1.4 kN, Pmax=14 kN, R=Pmin/Pmax) of 0.1 and a sinusoidal loading which was applied at a frequency of 10 Hz. The length of fatigue crack was measured by an optical microscope (±1 μm) attached on the fatigue machine. The following equation was used to determine the stress intensity factor △K:
 (1)
(1)
where P is the load (in MPa); B and w are the thickness (in mm) and the width of the sample, respectively; α=2ɑ/w, and ɑ is the half-crack length (in mm).
2.3 Microstructural analysis
To characterize the microstructure of samples detailedly, the transmission electron microscopy (TEM) was utilized. The tested thin foils were prepared by twin-jet electro-polishing at 20 V in a solution consisting of 30% nitric acid and 70% methanol (vol.%) at –25 °C and observed on a TECNAI G2 F20 electron microscope, with an acceleration voltage of 200 kV.
The fatigue fracture surfaces and crack propagation paths were analyzed on FEI QUANTA- 200 and Helios scanning electron microscopy (SEM).
To explore the crystallographic relationships between fatigue crack path and the subgrain morphology and orientation, electron backscattered diffraction (EBSD) methods was implemented with an accelerating voltage of 20 kV.
3 Results and discussion
3.1 Microstructure characterization
As shown in Figure 2, orientation distribution of the grains with the crack were measured by EBSD analysis accessory. Different orientations of the grains are marked by different colors and the EBSD inverse pole-figure (IPF) map superposed with the grain boundary (GB) component of the crack reveals the grain structure. The high angle boundary (>15°) and low angle boundary (2°<θ<15°) are delineated by lines in different colors. The misorientation angle distribution and grain size statistics are shown in Figure 3. According to the results, the average misorientation angles of the UA sample and DA sample are 27.709° and 27.336°, and the average grain sizes are 4.9473 μm and 4.1257 μm, respectively. WANG et al [26] and WEI et al [28] studied the mechanical properties and fatigue fracture behavior of Al–5.67Zn–1.92Mg–1.89Cu alloy with different heat treatments, and its composition is close to that of the alloy used in this work except the present alloy containing a small amount of Sc and Zr. The average grain size of Al–5.67Zn–1.92Mg–1.89Cu alloy after aging treatment was about 50 μm, nearly 13 times ours, which proves that the addition of Sc resulted in a good recrystallization resistance.

Figure 1 Geometry of MT specimen (dimensions in mm)
There is no significant change of structural and grain size between samples under different annealing treatments in EBSD analysis (Figure 2). Therefore, the TEM observation was applied to further explore the detail microstructure inside grains. It is widely accepted that the precipitation sequence of Al–Zn–Mg–Cu series aluminum alloys is showed as followings: supersaturated solid solution (α)→GP zone→metastable η′→ equilibrium η (MgZn2) [7, 29]. GP zone is atom clustering zone which is coherent with α(Al) matrix. The η′ phase is a metastable hexagonal phase and is semi-coherent with α (Al) matrix. The η phase is an equilibrium phase and is non-coherent with α (Al) matrix. And Al3(Sc,Zr) precipitate, the most important type of precipitates in this work, is coherent with α(Al) matrix [30–32]. These Al3(Sc,Zr) precipitates, dispersing in the grains and at the grain boundaries, can pin dislocations and grain boundaries, resulting in better resistance of mechanical properties[29].
Figure 4 shows the TEM images of the samples with different annealing treatments. For the UA sample (Figures 4(a) and (b)), no obvious precipitates can be found in the grains, and the grain boundaries were continuous. The inset image in Figure 4(b) is the SAED pattern of the UA sample obtained by projecting along the [011]Al orientation. The diffraction spots from α(Al) matrix have been indexed, and those spots marked by the white arrows are derived from Al3(Sc, Zr) particles with a Ll2 cubic crystal structure. For the PA sample, a large quantity of precipitates distribute homogenously in the grains, and the precipitates in grain boundaries are more apparent and coarser as shown in Figures 4(c) and (d). The precipitation free zone (PFZ) can also be observed, and its small width indicates that it was just formed during this process. As the sample was aged to OA and DA states (Figures 4(e) and (f)), the precipitates in the grain grew lager and the η precipitates coarsened and became completely discontinuous along the grain boundaries. Meanwhile, the precipitation free zone (PFZ) broadened. Compared with DA sample, the precipitates inside the grains of OA sample are more unevenly dispersed and the precipitates in grain boundaries are more discontinuous and coarser. Petal-shaped Al3(Sc,Zr) precipitates can be observed in all samples (Figure 4). Around the particles, a large number of dislocations and dislocation tangles were observed, which proves that Al3(Sc,Zr) precipitates can pin the dislocation. In order to investigate the evolution of these particles during annealing treatment, two TEM images were selected randomly to calculate the average size of Al3(Sc,Zr) particles for each sample. Results show that the average equivalent diameters of Al3(Sc,Zr) particles are 29.1 nm for UA sample, 28.9 nm for PA sample, 29.3 nm for OA sample, and 29.4 nm for DA sample.
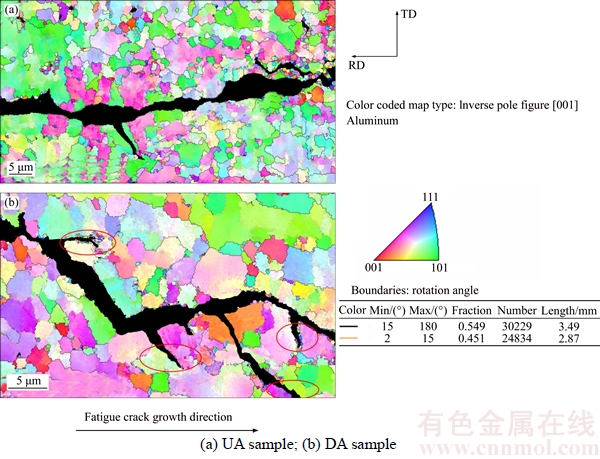
Figure 2 EBSD observations of fatigue crack behavior in Paris region
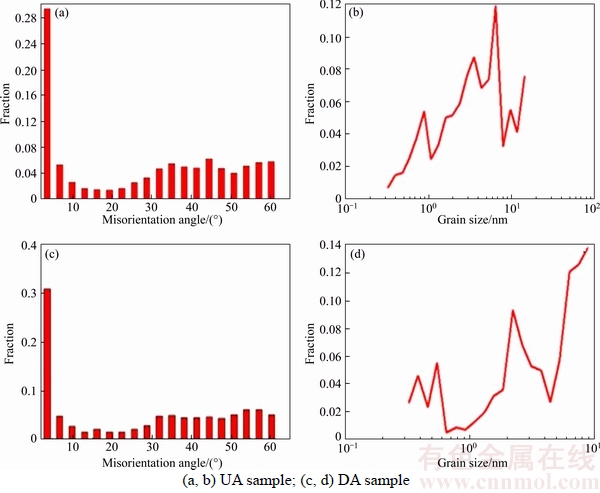
Figure 3 Misorientation angle distribution and grain size statistics
In conclusion, with the degree of aging treatment increasing, the precipitates in the grains became more apparent, which illustrates that GP zones gradually transferred into uniformly dispersed η′ phases and the η′ phase transferred into coarser η phase. The grain boundary also became more and more discontinuous and the PFZ broadened. Meanwhile, the nucleation and growth of GP zones and η′ phase became much more apparent. The size of Al3(Sc,Zr) particles generally remains unchanged with an averaged diameter of about 29 nm.
3.2 Mechanical properties
Table 2 shows the tensile properties of the studied samples. It can be clearly observed that the tensile strength increases first and then decrease slightly with the degree of aging treatment increasing. And the ultimate tensile strength of 581 MPa and yield strength of 561 MPa are obtained for the PA sample. The tensile properties of UA sample are close to those of DA sample, and both of them are lower than samples in PA and OA states.
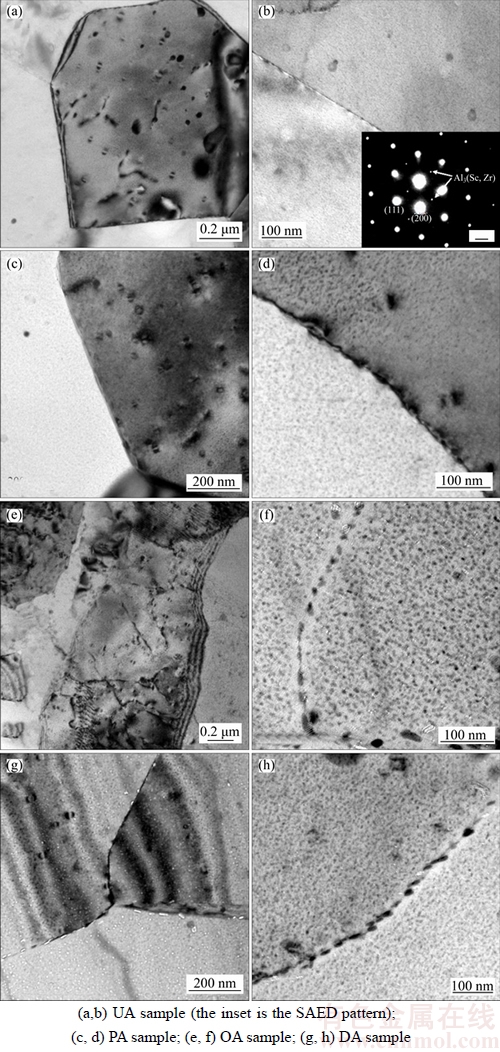
Figure 4 TEM micrographs of Al–Zn–Mg–Sc alloy with different annealing treatments
Table 2 Tensile properties of Al–Zn–Mg–Sc–Zr alloys
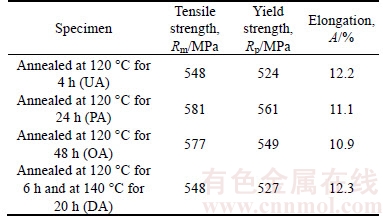
Compared with the properties of peak-aged Al–Zn–Mg–Cu in Ref. [26], the tensile strength and yield strength of peak-aged Al–Zn–Mg–Sc–Zr in this work are 21 MPa and 56 MPa higher, respectively. This improved performance can be attributed to the countless uniformly dispersed fine Al3(Sc,Zr) precipitates in the grains, which can be clearly observed in Figure 4. These Al3(Sc,Zr) precipitates were not only uniformly dispersed but also coherent with the Al matrix, which enabled them to contribute to stabilizing the fine grained microstructure and strengthen the alloys by pinning the grain boundary and hindering the dislocation motion [33].
The fatigue crack growth rates da/dN vs applied stress intensity factor ranges △K of samples with different annealing treatments are compared. In the double logarithmic plot of da/dN against △K is shown in Figure 5, in which the da/dN–△K curve can be divided into three regions, the threshold region, the Paris region and the rupture region.
As Figure 5(a) shows, the UA sample possesses a wider range of △K than the PA state. And when △K<30 MPa·m1/2, the UA sample exhibits a higher resistance to fatigue crack propagation as compared with the PA sample. But when △K>30 MPa·m1/2, the fatigue crack grew more quickly in the UA sample than in the PA sample. Figure 5(b) illustrates that the curves of OA and DA samples are almost identical in the first two regions.
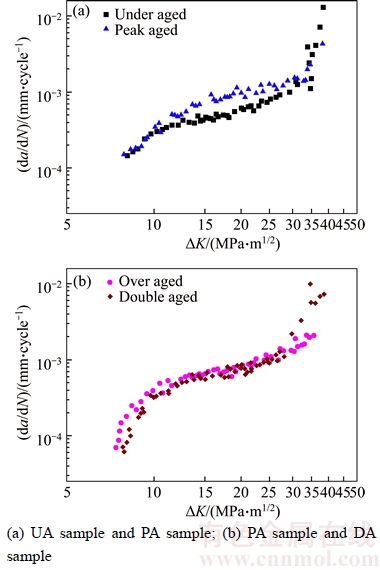
Figure 5 Double logarithmic plots of da/dN against △K
The fatigue crack propagation resistance of DA sample is slightly higher than that of OA sample. However, when △K>27 MPa·m1/2, the curve of DA sample shows a typical curving shape and its crack expanding speed increases more quickly. And the curve of DA sample exhibits a wider range of △K than the OA one.
To quantify fatigue properties of four samples and analyze them more accurately, data fitting of the Paris region is necessary. The Paris region is the linear region in the double logarithmic plot of da/dN against △K, which can be described by the following equation:
 (2)
(2)
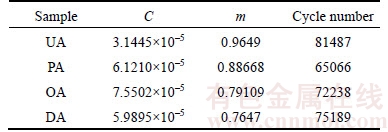
where m is the Paris exponent and C is the Paris constant. The values of these two constants (C and m) can be obtained by data fitting for the Paris region of the plot. The fitted lines are displayed in Figure 6, and the calculated values along with the corresponding fracture cycle numbers are listed in Table 3. According to the results, the DA sample has smaller C and m than the OA sample, which indicates that the DA sample possesses better resistance to fatigue fracture. Although the value of m of UA sample is slightly larger than that of PA sample, the value of C of PA sample is as twice as the UA sample’s. Hence, it can be concluded that the UA sample has the best resistance to fatigue fracture and the PA sample is the poorest. The analysis of fitting result is in good agreement with the da/dN–△K curves and the total cycles.
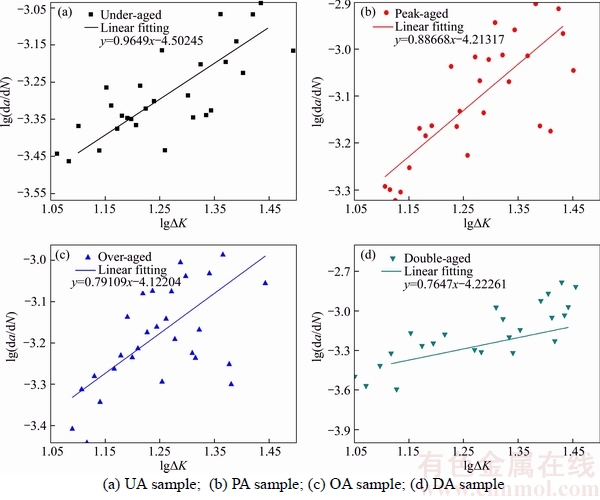
Figure 6 Logarithm of fatigue crack growth rate as a function of logarithm stress intensity factor range
Table 3 Fitting results and total cycle numbers of samples
3.3 Fatigue crack path
The digital images of fracture surfaces and side views are shown in Figure 7 and the fatigue crack growth area is marked by red lines. The fatigue crack growth area of PA sample and DA sample are wider than those of samples in UA and OA states, which is in good agreement with the result of range of samples’ △K (Figure 5). Obviously, the fatigue crack path of the UA sample is the most tortuous while the PA one is the straightest. The OM image in Figure 7(c) shows the crack tip of UA sample at △K=22.157 MPa·m1/2, which evidences significant crack deflection and branching.
To explore the crystallographic relationships between fatigue crack path and the grain morphology and orientation, EBSD observations (Figure 2) were applied on UA sample and DA sample to investigate the differences of their fatigue propagation in Paris region. Second cracks can be clearly observed in both samples. As is well known, crack propagations can be classified into inter-granular mode and trans-granular mode, and the crack tends to deflect when entering into a new grain. However, the crack path deflected even within the grain in the present results. By analyzing the EBSD result of the UA sample, it can be concluded that both the lead crack and the second crack present a trans-granular propagation mode. For the DA sample, the crack still mainly presents a trans-granular extension, but inter-granular cracks can also be observed both in the master crack and second cracks (marked by black ellipses), which differs from the UA sample.
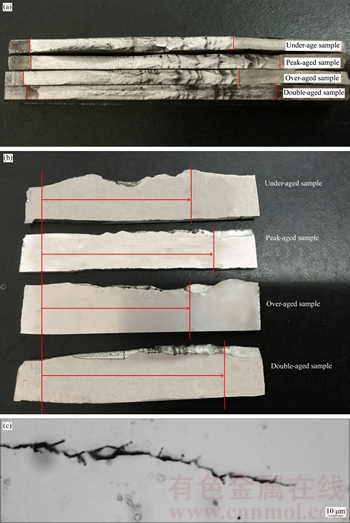
Figure 7 Photos of fracture surfaces (a) and side view of crack paths (b) and OM image crack path of UA sample (c)
In order to investigate the interaction of fatigue crack with particles, SEM and EDS techniques are employed in the analysis of UA sample. As shown in Figure 8(a), the fatigue crack cut the impurity particles and advanced into the alloy matrix, which can be proved by the small fragments left in the crack. However, branching crack observed in Figure 8(b) can be attributed to the deflecting and retarding effect by Al3(Sc,Zr) particles.
The impediment caused by particles is an important factor in fatigue crack growth behavior. The Griffith theory holds that a flaw will propagate in a stressed material only when it brings about a reduction in elastic stored energy more than sufficient to meet the free energy requirements of the newly formed fracture surfaces [21]. The critical stress required to propagate the crack is given by the Griffith equation:
 (3)
(3)
where E is elastic modulus; γ is the surface energy (per unit area) and a is the half-crack length.
According to the Griffith theory, the extension stress at the crack tip would be increased when the fatigue crack tip encounters particles that can be broken easily. Once these particles are broken, the crack will propagate a longer distance than that in a region without stress concentration (Figure 8(a)). In other words, the easily broken particles reduced the critical stress, which results in a sensitive resistance to fatigue crack propagation.
Oppositely, when the crack tip encountered particles that only can be bypassed, like the η phase and Al3(Sc,Zr) particle, it stagnated momentary and then bypasses these particles because the stress is insufficient to break the particles and propagate on (Figure 8(b)). Therefore, the crack propagation was hindered by such particles.
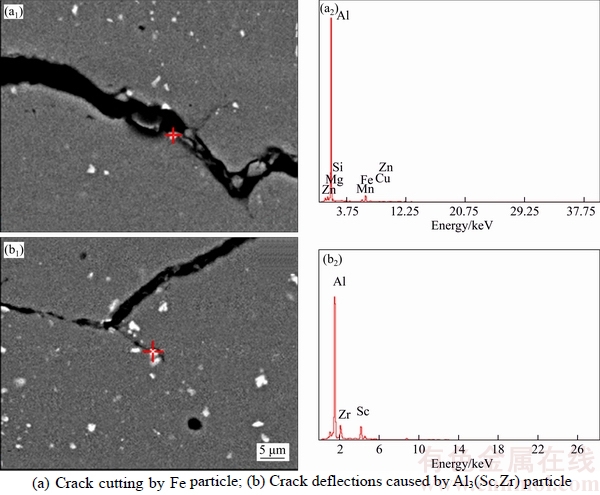
Figure 8 Interaction of fatigue crack with particles of alloy and corresponding EDS patterns
3.4 Fatigue fractographic analysis and mechanism analysis
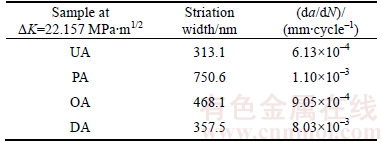
To validate the fatigue properties of the samples further and explore their mechanism at the micro level, fractographs of the Paris region and the rupture region were investigated. Figure 9 displays the fractographs of samples in Paris region (△K=22.157 MPa·m1/2), and all of the fractures show the typical characteristics of striations. The average striation distance and the corresponding fatigue crack growth rate of each sample are shown in Table 4. As is well known, every fatigue cycle produces a fatigue striation in Paris region [34]. That is to say, the narrower the fatigue striation distance is, the slower the fatigue crack grows, which indicates a better resistance to fatigue propagation. Besides, second cracks inside the grain can be clearly observed in the UA sample (Figure 9(a)), which grew perpendicular to the direction of the lead cracks. Second cracks can also be found in DA sample (marked by arrows in Figure 9(d)) although it is along the grain boundary and slighter. In general, the distance of striation is strictly proportional to the crack propagation rate, but in this work this strictly proportional relationship is broken due to the presence of second cracks, which can increase the total crack path. Thus, the slight fluctuation of the ratios between striation width and crack propagation rate is reasonable, and the results are in good agreement with the measured crack propagation rates (Figure 5) and the fitting results (Table 3).
Generally speaking, the fracture of metals is governed by localized deformation that leads to a very poor macroscopic ductility and dimpled fracture surfaces [35]. Figure 10 shows the fractographs in rupture region of these four samples. The presence of countless dimples indicates that all samples had showed a good quality of ductility and their main failure mode was ductile trans-granular mode. Compared with UA sample, PA and OA samples (Figures 10(b) and (c)) have much smaller and more intensive dimples due to prolonged annealing treatments, which is the evidence of higher strength. Additionally, their tear ridges are more obvious. Notably, inter-granular failure along grain boundaries can be observed in OA sample occasionally (pointed out by red arrows), which may explain its higher fatigue crack propagation rate in rupture region. And finally, for the DA sample, its fracture surface possesses the largest dimples, which explains its better elongation. And tear ridges on its fracture surface are even more obvious compared with those of the others. For all samples, many aggregates of second phase particles can be observed at the bottom of dimples, which indicates that coarse particles may facilitate the formation of dimples. Overall, it can be concluded that the result of fractographs analysis in rupture region is in good agreement with the tensile properties.

Figure 9 SEM images of samples in Paris region at condition of △K=22.157 MPa·m1/2
Table 4 Fatigue crack growth data
To explain the fatigue crack behavior, many models have been built based on crystal plasticity. However, the processes and mechanisms involved in fatigue fracture are too complicated that no model can explain all the fatigue behaviors in different conditions until now. It is now accepted that different microstructures can lead to different crack propagation behavior. In general, the fatigue crack propagation rate is intimately bonded to yield strength of materials. The crack tip plastic blunting model put forward by LAIRD et al [36] supports the idea that the crack tip will open under loading and close when unloaded, resulting in the formation of a fatigue strip with each tensile loading. According to the Laird model, it can be deduced that the fatigue crack propagation rate is inversely proportional to the yield strength. However, just like numerous researches reported, the present results do not totally follow this rule.
Actually, since aluminum alloy is a ductile material, its elasticity will lead to the closure of crack tip when the high stress loading suddenly drops to a low stress, which explains the formation of strips during cyclic loading of tensile stress. Moreover, as the crack propagation goes, the crack tip grows faster due to increasing stress intensity (△K). When the maximum stress exceeds the yield strength, the crack tip opens quickly and grows larger, then the effect of crack tip closure becomes invalid, resulting in the unstable propagation process. During this process, the crack propagation rate increases quickly and ends up with fracture when the stress reaches the tensile strength. Simply stated, based on the above discussion, the inversely proportional relationship between yield strength and fatigue crack growth rate only stands in the rupture region. Moreover, with a higher yield strength, the △K needed for arousing the rupture region will be higher, and the fatigue crack will grow slower. And in this study, results of fatigue crack growth rate in rupture region conformed this point. The PA sample possesses a higher yield strength, which is responsible for the wider Paris region and lower fatigue crack growth rate when △K>30 MPa·m1/2. Similarly, compared with DA sample, the fatigue crack growth rate of OA sample in rupture region is lower owing to its higher yield strength.
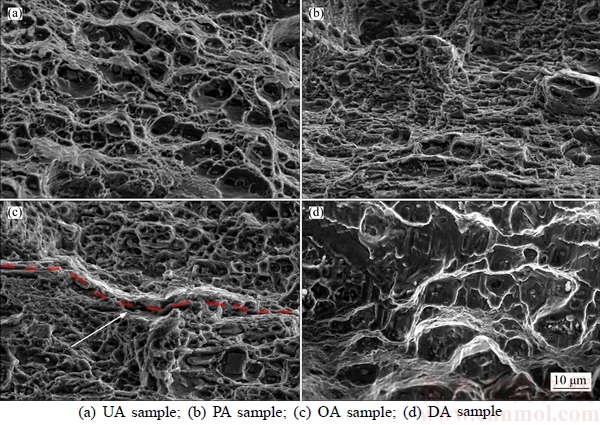
Figure 10 SEM fractographs of samples in rupture region
The results of crack path in EBSD analysis (Figure 2) demonstrate that the trans-granular mode is the main way of the crack propagation in Paris region, so optimizing the microstructure inside the grains is an important method to improve the fatigue properties of alloys. Numerous studies have showed that precipitation hardened aluminum alloys would experience profuse dynamic precipitations inside the grains when they were subjected to cyclic deformation due to the instability of the precipitates’ microstructure [19, 24, 25]. Similarly, in this work, as the cyclic deformation goes, the metastable η′phase formed in PA sample will gradually turn to over-aging state η phase, whose strengthening effect is weaker than the former one. While in the UA sample, the GP zone formation is accelerated during the cyclic deformation. Thus, the cyclic deformation will result in a degradation in the mechanical performance for the PA sample and a promotion for the UA sample. Moreover, crack branching and deflection are also unneglectable factors. The fractographs of crack paths and side views (Figure 7) illustrate that fatigue crack path in UA sample is more tortuous and bifurcated, which can greatly reduce the fatigue crack growth rate. Based on the above points of view, the superiority of fatigue properties of UA sample can be explained.
As shown in Figure 2(b), the wide PFZ adjacent to the grain boundary in the DA sample leads to its inter-granular crack propagation to some degree. There are two opposite theories about the effect of PFZ on mechanical properties. One theory believes that the PFZ is mechanically weaker than the matrix due to its depletion of solute. The other one holds that PFZ is so soft that it enhances the toughness. The results of the present work support that the second one is more suitable for the current fatigue behavior considering the crack blunting. Since the PFZ is almost equivalent to the pure matrix, it is soft enough to relax the stress when the crack tip enters, and it is also beneficial to crack blunting as it can retard the propagation. Therefore, the DA sample possesses a wider Paris region despite of its lower yield strength.
However, compared with the DA sample, the OA sample with the same wide PFZ exhibits a narrower Paris region. This can be explained by their microstructure differences as follows. For the DA sample, it was reported before that the large size and stable GP zone will be formed after pre-aging treated at 120 °C [7]. Then, the η′ phase nucleates and grows at effective GP zone formed before during the final aging at 140 °C. Hence, compared with those of the OA sample, the precipitates inside the grains of DA sample are more uniformly dispersed, which is the reason of its better fatigue properties. Moreover, the precipitates at the grain boundary of OA sample are more disordered and coarser than those of DA sample (Figure 4), resulting in higher fatigue crack growth. And this negative effect depleted the benefit brought by the PFZ.
4 Conclusions
The effect of annealing treatment on the microstructure and fatigue crack growth behavior of Al–Zn–Mg–Sc–Zr alloy has been investigated. The following results can be concluded:
1) During the aging treatments, the size of Al3(Sc,Zr) particles keeps unchanged, maintaining an average diameter of about 29 nm. And these Al3(Sc,Zr) particles bring about a remarkable grain refining effect that for UA sample and DA sample average grain sizes of 4.9 and 4.1 μm are obtained, respectively. Besides, they also impede and deflect the fatigue crack propagation by pinning up the dislocations, greatly improving the tensile properties and fatigue properties.
2) Among these four samples, the UA sample exhibits the best fatigue properties, whose crack is most bifurcated and deflects and propagates trans-granularly through the grains.
3) Compared with the OA sample, DA sample shows better fatigue properties, which can be attributed to its more uniformly dispersed precipitates in the grains and more continuously distributed finer precipitates at the grain boundaries. This work also confirms that the wide PFZs in both DA and OA samples are soft enough to release the stress and arise crack blunting, resulting in improved fatigue properties.
4) This work proves that the inversely proportional relationship between yield strength and fatigue crack growth rate is only tenable in the rupture region.
References
[1] ZHANG Li-hua, YU Jun, ZHANG Xiao-ming. Effect of ultrasonic power and casting speed on solidification structure of 7050 aluminum alloy ingot in ultrasonic field [J]. Journal of Central South University of Technology, 2010, 17: 431–436.
[2] WILLIAMS J C, STARKE E A. Progress in structural materials for aerospace systems [J]. Acta Materialia, 2003, 51(19): 5775–5799.
[3] DURSUN T, SOUTIS C. Recent developments in advanced aircraft aluminium alloys [J]. Materials & Design, 2014, 56: 862–871.
[4] YAN Liang, DU Feng-shan, DAI Sheng-long, YANG Shou-jie. Effect of age condition on fatigue properties of 2E12 aluminum alloy [J]. Journal of Central South University of Technology, 2010, 17: 697–702.
[5] MORRIS D G, MUNOZ-MORRIS M A. Microstructure of severely deformed Al-3Mg and its evolution during annealing [J]. Acta Materialia, 2002, 50(16): 4047–4060.
[6] SMOLA B,  J, NEUBERT V. Annealing effects in Al–Sc alloys [J]. Materials Science and Engineering A, 2007, 462(1, 2): 370–374.
[7] SHI Yun-jia, PAN Qing-lin, LI Meng-jia, HUANG Xing, LI Bo. Influence of alloyed Sc and Zr, and heat treatment on microstructures and stress corrosion cracking of Al–Zn–Mg–Cu alloys [J]. Materials Science and Engineering A, 2015, 621: 173–181.
[8] WEN Kai, FAN Yun-qiang, WANG Guo-jun, JIN Long-bin, LI Xi-wu, LI Zhi-hui, ZHANG Yong-gan, XIONG Bai-qing. Aging behavior and precipitate characterization of a high Zn-containing Al–Zn–Mg–Cu alloy with various tempers [J]. Materials & Design, 2016, 101: 16–23.
[9] FENG Lei, PAN Qing-lin, WEI Li-li, HUANG Zhi-qi, LIU Zhi-ming. Through-thickness inhomogeneity of localized corrosion in 7050-T7451 Al alloy thick plate [J]. Journal of Central South University, 2015, 22(7): 2423–2434.
[10] ZHANG Zhi-ye, PAN Qing-lin, ZHOU Jian. Hot deformation behavior and microstructure evolution of Al–Zn–Mg–0.25Sc–Zr alloy during compression at elevated temperatures [J]. Transaotions of Nonferrous Metals Society of China, 2012, 22(7): 1556–1562.
[11] PEREZ M, DUMONT M, ACEVEDO-REYES D. Implementation of classical nucleation and growth theories for precipitation [J]. Acta Materialia, 2008, 56(9): 2119– 2132.
[12] ROKHLIN L L, DOBATKINA T V, BOCHVAR N R, LYSOVA E V. Investigation of phase equilibria in alloys of the Al–Zn–Mg–Cu–Zr–Sc system [J]. Journal of Alloys and Compounds, 2004, 367(1, 2): 10–16.
[13] SENKOV O N, SHAGIEV M R, SENKOVA S V, MIRACLE D B. Precipitation of Al3(Sc,Zr) particles in an Al–Zn–Mg–Cu–Sc–Zr alloy during conventional solution heat treatment and its effect on tensile properties [J]. Acta Materialia, 2008, 56(15): 3723–3738.
[14] YAN Jie, PAN Qing-lin, ZHANG Xiang-kai, SUN Xue, LI An-de, ZHOU Xun. Characterization of hot deformation behavior of Al–Zn–Mg–Mn–Zr alloy during compression at elevated temperature [J]. Journal of Central South University, 2017, 24(3): 515–520.
[15] ROBSON J D, PRANGNELL P B. Dispersoid precipitation and process modelling in zirconium containing commercial aluminium alloys [J]. Acta Materialia, 2001, 49(4): 599–613.
[16] RIDDLE Y W, SANDERS T H. A study of coarsening, recrystallization, and morphology of microstructure in Al–Sc–(Zr)–(Mg) alloys [J]. Metallurgical and Materials Transactions A: Physical Metallurgy and Materials Science, 2004, 35A(1): 341–350.
[17] HUANG Xing, PAN Qing-lin, LI Bo, LIU Zhi-ming, HUANG Zhi-qi, YIN Zhi-min. Effect of minor Sc on microstructure and mechanical properties of Al–Zn–Mg–Zr alloy metal–inert gas welds [J]. Journal of Alloys and Compounds, 2015, 629: 197–207.
[18] ZHAO Jun-wen, XU Chao, CAI Guang-ze, WU Shu-sen, HAN Jing. Microstructure and properties of rheo-diecasting wrought aluminum alloy with Sc additions [J]. Materials Letters, 2016, 173: 22–25.
[19] OROWAN E. Theory of the fatigue of metals [J]. Proceedings of the Royal Society of London Series A-Mathematical and Physical Sciences, 1939, 171(A994): 0079–0106.
[20] SARHAN A A D, ZALNEZHAD E, HAMDI M. The influence of higher surface hardness on fretting fatigue life of hard anodized aerospace AL7075-T6 alloy [J]. Materials Science and Engineering A, 2013, 560: 377–387.
[21] LI Meng-jia, PAN Qing-lin, WANG Ying, SHI Yun-jia. Fatigue crack growth behavior of Al–Mg–Sc alloy [J]. Materials Science and Engineering A, 2014, 598: 350–354.
[22] PARIS P C. The growth of cracks due to variations in load [D]. Lehigh University, 1962.
[23] GUAN Ming-fei, YU Hao. Fatigue crack growth behaviors in hot-rolled low carbon steels: A comparison between ferrite–pearlite and ferrite–bainite microstructures [J]. Materials Science and Engineering A, 2013, 559: 875–881.
[24] HUTCHINSON C R, de GEUSER F, CHEN Y, DESCHAMPS A. Quantitative measurements of dynamic precipitation during fatigue of an Al–Zn–Mg–(Cu) alloy using small-angle X-ray scattering [J]. Acta Materialia, 2014, 74: 96–109.
[25] HAN W Z, VINOGRADOV A, HUTCHINSON C R. On the reversibility of dislocation slip during cyclic deformation of Al alloys containing shear-resistant particles [J]. Acta Materialia, 2011, 59(9): 3720–3736.
[26] WANG Yin-lin, PAN Qing-lin, WEI Li-li, LI Bo, WANG Ying. Effect of retrogression and reaging treatment on the microstructure and fatigue crack growth behavior of 7050 aluminum alloy thick plate [J]. Materials & Design, 2014, 55: 857–863.
[27] ZHAO Y L, TANG Z Q, ZHANG Z, SU G Y, MA X L. Double-peak age strengthening of cold-worked 2024 aluminum alloy [J]. Acta Materialia, 2013, 61(5): 1624–1638.
[28] WEI Li-li, PAN Qing-lin, HUANG Xing, FENG Lei, WANG Ying. Influence of grain structure and crystallographic orientation on fatigue crack propagation behavior of 7050 alloy thick plate [J]. International Journal of Fatigue, 2014, 66: 55–64.
[29] SHI Yun-jia, PAN Qing-lin, LI Meng-jia, HUANG Xing, LI Bo. Effect of Sc and Zr additions on corrosion behaviour of Al–Zn–Mg–Cu alloys [J]. Journal of Alloys and Compounds, 2014, 612: 42–50.
[30] LI Chen, PAN Qing-lin, SHI Yun-jia, WANG Ying, LI Bo. Influence of aging temperature on corrosion behavior of Al–Zn–Mg–Sc–Zr alloy [J]. Materials & Design, 2014, 55: 551–559.
[31] MARLAUD T, DESCHAMPS A, BLEY F, LEFEBVRE W, BAROUX B. Evolution of precipitate microstructures during the retrogression and re-ageing heat treatment of an Al–Zn–Mg–Cu alloy [J]. Acta Materialia, 2010, 58(14): 4814–4826.
[32] GUO Wei, YANG Meng, ZHENG Yi, ZHANG Xue-shu, LI Hui, WEN Xi-yu, ZHANG Jing-wu. Influence of elastic tensile stress on aging process in an Al–Zn–Mg–Cu alloy [J]. Materials Letters, 2013, 106: 14–17.
[33] LI Gen, ZHAO Nai-qin, LIU Tao, LI Jia-jun, HE Chun-nian, SHI Chun-sheng, LIU En-zuo, SHA Jun-wei. Effect of Sc/Zr ratio on the microstructure and mechanical properties of new type of Al–Zn–Mg–Sc–Zr alloys [J]. Materials Science and Engineering A, 2014, 617: 219–227.
[34] NIKULIN I, KIPELOVA A, MALOPHEYEV S, KAIBYSHEV R. Effect of second phase particles on grain refinement during equal-channel angular pressing of an Al–Mg–Mn alloy [J]. Acta Materialia, 2012, 60(2): 487–497.
[35] CAVALIERE P, CABIBBO M. Effect of Sc and Zr additions on the microstructure and fatigue properties of AA6106 produced by equal-channel-angular-pressing [J]. Materials Characterization, 2008, 59(3): 197–203.
[36] LAIRD C, SMITH G C. Crack propagation in high stress fatigue [J]. Philosophical Magazine, 1962, 7(77): 847–857.
(Edited by YANG Hua)
中文导读
热处理对Al–Zn–Mg–Sc–Zr合金的显微结构及疲劳裂纹扩展行为的影响
摘要:本文采用电子背散射衍射(EBSD)、透射电子显微分析(TEM)、扫描电子显微分析(SEM)、室温拉伸性能测试和疲劳裂纹扩展测试的方法研究了4种时效处理(欠时效、峰时效、过时效和双级时效)对Al–Zn–Mg-Sc–Zr合金的显微组织和疲劳裂纹扩展行为的影响。 结果表明:合金中的Al3(Sc,Zr)粒子能显著地细化合金晶粒、提升拉伸性能和抗疲劳裂纹扩展性能。其中,欠时效样品和双级时效样品的平均晶粒尺寸分别为4.9473 μm和4.1257 μm,峰时效处理后样品达到最高的屈服强度和抗拉强度(561 MPa和581 MPa)。基于Laird 模型和 Griffith理论,本文研究了合金在Paris区域中的裂纹扩展速率、裂纹曲折与分叉、裂纹钝化与裂纹的沿晶和穿晶扩展行为。结果表明,欠时效样品表现出最佳的抗疲劳裂纹扩展性能,其裂纹路径最为曲折、裂纹分叉最多。在高速扩展区域中,所有样品的疲劳裂纹扩展速率均和屈服强度负相关。
关键词:Al–Zn–Mg–Sc–Zr合金;热处理;显微组织;疲劳裂纹扩展速率;疲劳裂纹扩展路径
Foundation item: Project(2012CB691503) supported by the National Key Basic Research and Development Program of China; Project(2016B090931001) supported by Science and Technology Program of Guangdong Province, China
Received date: 2016-11-11; Accepted date: 2017-02-22
Corresponding author: PAN Qing-lin, PhD, Professor; Tel: +86–731–88830933; E-mail: qinglinpan_CSU2016@163.com

