
J. Cent. South Univ. (2018) 25: 1358-1366
DOI: https://doi.org/10.1007/s11771-018-3832-6

Effect of heat input on microstructure and mechanical properties of butt-welded dissimilar magnesium alloys joint
YANG Fang-zhou(���)1, 2, ZHOU Jie(�ܽ�)1, XIONG Yi-bo(���ݲ�)1
1. College of Materials Science and Engineering, Chongqing University, Chongqing 400044, China;
2. The School of Robot Engineering and Mechanical�CElectrical Engineering,Chongqing University of Arts and Sciences, Chongqing 402168, China
 Central South University Press and Springer-Verlag GmbH Germany, part of Springer Nature 2018
Abstract: The effects of heat input on the microstructures and mechanical properties of tungsten inert gas (TIG) butt-welded AZ31/MB3 dissimilar Mg alloys joint were investigated by microstructural observations, microhardness testing and tensile testing. The results reveal that with the increase of heat input, the width of welding seam increases obviously and the grains both in the fusion zone and the heat affected zone coarsen during TIG welding process. The tensile strength of butt-welded joint increases with the increase of heat input and the maximum joining strength of 242 MPa is obtained with welding current of 90 A. However, lots of welding pores occur with the further increase of heat input, which results in the decrease of joining strength. It is experimentally demonstrated that robust joint can be obtained by TIG welding process.
Key words: magnesium alloy; TIG welding; microstructure; mechanical property
Cite this article as: YANG Fang-zhou, ZHOU Jie, XIONG Yi-bo. Effect of heat input on microstructure and mechanical properties of butt-welded dissimilar magnesium alloys joint [J]. Journal of Central South University, 2018, 25(6): 1358�C1366. DOI: https://doi.org/10.1007/s11771-018-3832-6.
1 Introduction
Magnesium is a promising material in vehicles, aircrafts, electronics and other fields as the lightest structural metal available so far with excellent specific strength, high damping capacity, good castability and recycling ability [1�C3]. However, the components of complicated pieces of Mg alloys are usually difficult because of the poor ductility and cold processability at room temperature [4, 5]. This is mainly because Mg alloy has a HCP crystal structure, which owns insufficient slip systems at room temperature. If the complicated components could be divided into several easily-made parts and then combined into one under appropriate welding technology, the above problems will be effectively solved. Therefore, welding technology of Mg alloys plays an important role in expanding the application of Mg alloy structural parts.
However, the reliable joining of Mg alloy is quite challenging due to the special physical and chemical characteristics such as low boiling temperatures, high vapour pressures and solidification shrinkage [6, 7]. In order to improve the joint quality of Mg alloys, a series of joining techniques such as diffusion bonding [8], friction stir welding [9], transient liquid phase (TLP) bonding [10], and laser welding [11, 12] were investigated to achieve the reliable joining of magnesium alloys. However, weldments configurations are restricted by this welding technology and the practical application is limited for the high cost and productivity. Tungsten inert gas (TIG) welding, as an effective bonding technique, is characterized of high efficiency, flexibility and reliable joining quality [13, 14]. This technology offers a potential for the joining of Mg alloys. MIN et al [15] investigated the effects of heat input on the microstructures and mechanical properties of TIG butt-welded AZ61 magnesium alloy plates. The results reveal that the tensile strength of welded joints increased with an increase of the heat input and tensile fracture of the welded joints usually occurred in the heat affected zone. Besides, GOU et al [16] reported that the ultimate tensile strength of TIG welded Mg�C6Al�C1Sn�C 0.3Mn (ATM610) joint reached up to 96.8% of that of base metal. The excellent joining strength of TIG welded joint was mainly attributed to the formation of Mg2Sn, which effectively obstructed the grain coarsening in the heat affected zone and resulted in a relatively fine microstructure.
Since various Mg alloys are used within a given structure, there will definitely be a need to somehow join them. However, the study of dissimilar metals welding for butting magnesium alloys with different compositions is rare and under development.
So, the present study will firstly give an investigation on the weldability of dissimilar magnesium alloys (AZ31 and MB3) with TIG welding process. The microstructure, macrostructure, mechanical properties and fracture mechanism of butt-welded joint were studied and discussed by the experimental observations.
2 Experimental procedures
AZ31 and MB3 wrought magnesium alloy plates with the same size of 50 mm��70 mm��2 mm were selected as the base metal for welding experiment. The filler wire was AZ31 Mg alloy with a diameter of 1.2 mm. Table 1 shows the chemical compositions of base metals and filler wire. Before welding, the top surface and bottom surface of each specimen were cleaned with acetone to remove grease and polished with sand paper to remove oxides.
The welding experiments were performed with a tungsten inert gas welding machine (YC-300WP5HGN). As shown in Figure 1, the samples were butt-welded on top of a copper-backing plate containing a rectangular groove with dimensions of 8 mm in width and 0.8 mm in depth. Table 2 shows the detailed welding parameters.
Table 1 Chemical composition of base metals and filler wire (mass fraction, %)

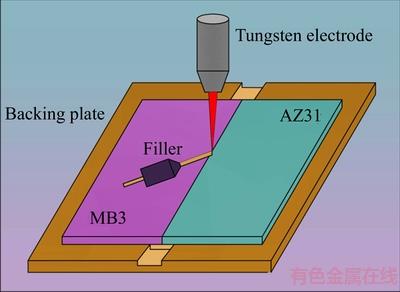
Figure 1 Schematic diagram of experimental set-up for TIG welding
Table 2 Welding parameters used in present study
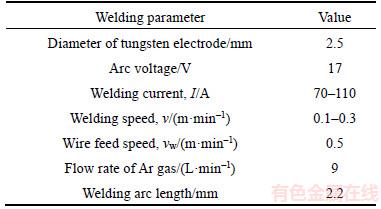
After welding, the metallurgical sample was etched by a solution of supersaturated picric acid, 10 mL acetic acid, 10 mL water and 60 mL ethanol with an etching time of 10 s. The tensile testing specimens with a width of 10 mm were sectioned from the welding seam by a numerically controlled linear cutting machine. The tensile specimens were tested by a tensile testing machine without any surface treatment and the tensile direction was perpendicular to the welding seams. Three specimens were tested for each set of parameter. The microhardness tests on cross-section of joints were performed with a Vickers hardness tester with a period of 10 s, a load of 4.9 N and a step size of 50 ��m. Besides, the cross-sectional microstructure and fracture surface of joint were observed by scanning electron microscopy (SEM). The precipitated phase in the fusion zone and fracture surface of joint was investigated by transmission electron microscope (TEM) with energy dispersive spectrometer (EDS) analyses and X-ray diffraction (XRD).
3 Results and discussion
3.1 Joint appearance
Since the joint appearance is an important reflection of the process stability and can be observed by naked eyes directly, it is used to evaluate the process characterization. Regular and continuous surface denotes a stable process, while irregular and discontinuous surface indicates an unstable process. The appearances of the Mg alloy joints welded with various welding speed are found to be greatly analogical to the ones with various current. Figure 2 shows the overall joint appearance of TIG butt-welded AZ31/MB3 joints with various welding current. It can be seen that there exists some influence of welding current on the joint geometry, which mainly reflects the change of seam width. With welding current of 70 A, the width of top surface and bottom surface of welding seam is small and obvious incomplete penetration appears (zone A). As the welding current increases, the width of welding seam increases obviously and the top surfaces of joint are characterized by crows-feet morphology. Figure 3 shows the cross section macrostructures of joint welded with different currents. It is worth noting that a large number of pores occur at the welding seam with the increase of welding current, which would result in the decrease of joining strength.
The above results indicate that the heat input (welding current) plays an important role in the seam shape and the welding characteristic. With current of 70 A, the filler wire and Mg alloy base metal do not melt completely because of low heat input, which lead to narrow seam shape. As the current increases to 90 A, the enhanced heat input will permit the completely melting of base metal and filler wire. As a result, robust joint with uniform and continuous welding seam can be anticipated. However, when the welding current increases to 100 A and 110 A, catastrophic vaporization of Mg alloy occurs easily owing to the excessive increment in temperature and the evaporable nature of Mg alloy, which leads to the formation of voids.
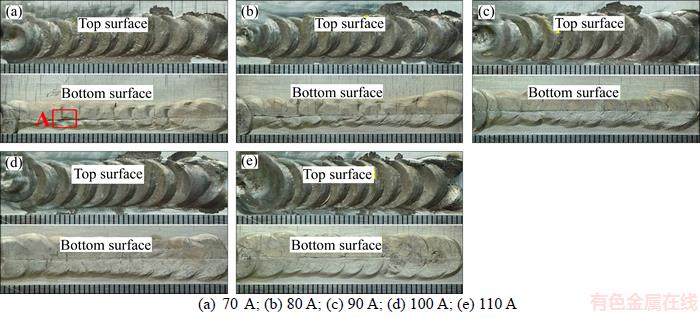
Figure 2 Bead surface morphologies of TIG butt-welded Mg alloy joints with different welding currents:

Figure 3 Cross-sectional macrostructures of TIG butt-welded Mg alloy joints with different currents:
3.2 Microstructure of welding seam
Figure 4 shows the typical microstructure of welding seam. As shown, base metal zone (BM), heat affected zone (HAZ) and fusion zone (FZ) are both observed in the AZ31 side and MB3 side of joint respectively. It can be seen that the HAZ zone of MB3 side and AZ31 side almost have the same width. Figure 5 shows the enlarged diagram of all regions of Figure 4. As shown in Figures 5(a) and (d), the microstructures of MB3 and AZ31 base metal are massive ��-Mg grains with the average grain size of 20 ��m. However, grain growth of HAZ and FZ occurs during the TIG welding process. As illustrated in Figures 5(c) and (f), the average grain size of FZ is 38 ��m and plenty of precipitated phases occur in the FZ. The EDS results indicate that the precipitated phases of both sides are Mg17Al12 phase, as shown in Figure 6.
During the welding process, melting of Mg alloy base metal and filler alloy occurred with the increase of heat input. Subsequently, as the temperature decreases to the solidification point of the Mg alloy, the welding pool started to solidify. The ��-Mg phase was preferred and nucleated and then underwent rapid and non-equilibrium cooling process [17, 18]. Eventually, the molten alloy was quickly solidified and cooled to room temperature.
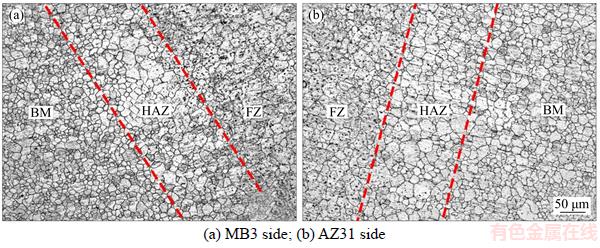
Figure 4 Typical microstructures of Mg alloy joint with current of 90 A:
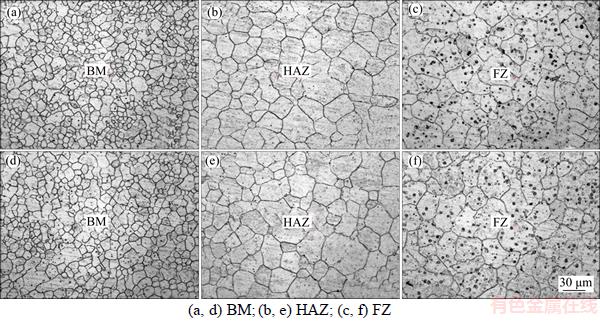
Figure 5 Typical microstructures of BM3 (a, b, c) and AZ31 (d, e, f) of Mg alloy joint with current of 90 A:
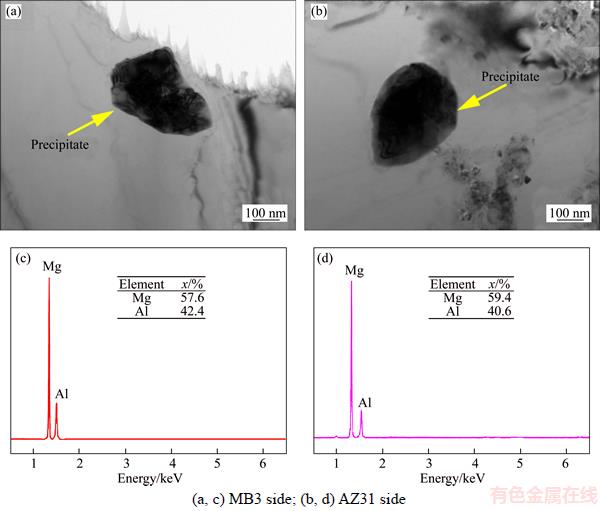
Figure 6 Typical bright-field TEM images (a, b) and EDS results (c, d) of precipitated phase of joint with current of 90 A:
With the maximum solid solubility of Al decreasing immediately from 12.7 wt% to about 2.0 wt%, the residual Al would precipitate the Mg17Al12 phase. Furthermore, during the TIG welding process, the solidification of the molten metal in the welding seam is a relative rapid and non-equilibrium process, so the Mg17Al12 precipitates are distributed both in the grains and at the grain boundaries of ��-Mg.
3.3 Microhardness distribution
Figure 7 shows the typical microhardness distribution of the welding seam with different measurement paths. As shown in Figures 7(a) and (b), the microhardness of AZ31 and MB3 base metal are HV 56.1 and HV 57.2. However, the microhardness of HAZ decreases to about HV 48 (MB3 side) and HV 47.8 (AZ31 side). And the microhardness of FZ increases slightly to HV 51.3. Besides, the microhardness of top zone and bottom zone of welding seam is almost HV 51.3 without obvious change, as illustrated in Figure 7(c).
According to literatures [19�C21], the microhardness distribution of alloy is influenced mainly by two factors. HAN et al [21] reported that the microhardness increases with a decrease of size of the ��-Mg grains and the measured microhardness values can be fitted to a Hall-Petch type relationship as:
 (1)
(1)
where ��0 and ��HP are material constants, and dg is the average grain size of ��-Mg.
Furthermore, the Orowan hardening mechanism indicates that a distribution of second phase strengthening particles in an alloy matrix may improve the hardness of matrix, which can be described by the following equation:
 (2)
(2)
where Gm (shear modulus of the matrix), b (Burgers vector) and r (dispersoid radius of the Mg17Al12 phase) are constants, and ��OR is determined only by �� (dispersoid spacing).
In the present study, the grain size of HAZ increases during the TIG welding process and no precipitated phase forms. According to Eq. (1), the microhardness of HAZ decreases compared with that of BM. On the other hand, the grain size of FZ increases as well and plenty of Mg17Al12 precipitated phases form. As a result, the microshardness of FZ increases to HV 51.3 and is still lower than that of BM. The reason is that, although a large number of the hard Mg17Al12 phases occur in the FZ, the microhardness of the welded joints is dominated by the effect of the ��-Mg grains coarsening [22].
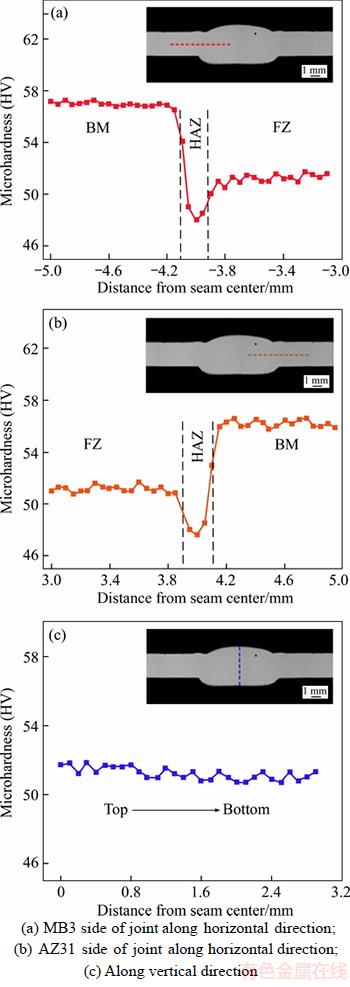
Figure 7 Microhardness distribution of dissimilar AZ31/MB3 Mg alloy welded joint:
3.4 Mechanical properties
The effect of heat input on the mechanical properties of the TIG butt-welded Mg alloy joint is depicted in Figure 8. To evaluate the tensile properties of welded joints, the ultimate tensile strength (UTS) efficiency (EUTS) is calculated by [12, 23]:
 (3)
(3)
It can be found that the Mg alloy joints have excellent mechanical properties with the welding speed of 0.2 m/min, as shown in Figure 8(a). However, the joining strength decreases with the welding speed deviated from the optimized welding parameter, which is caused by deficient heat input and severe burning loss of Mg, respectively. In this work, with the constant welding speed of 0.2 m/min, a partial penetration of bottom surface is observed in the welded seam with the low heat input (70 A), as illustrated in Figure 2(a). In this condition, the tensile strength of the welded seam is 157 MPa, which only accounts for 59.4 % of that of BM (264 MPa). This result indicates that during the TIG welding of Mg alloy, low heat input easily resulted in the presence of welding defects, which seriously decreases the joining strength of the weldments. With the increase of heat input, the UTS of the Mg alloy joints increases. The maximum UTS of 242 MPa, with 91.7% joint efficiency relative to BM, is obtained with welding current of 90 A. It is worth noting that the maximum UTS of joints is slightly lower than that of base metal, which can be explained by the results of macrostructure and microstructure observations. During the welding process, Zn element of base metal evaporates easily at a high temperature due to the lower boiling points and the higher vapor pressures. As a result, the vaporization of Zn weakens the effect of solid solution strengthening by zinc and decreases the UTS of Mg alloy joint [15]. Similar results are reported by QUAN et al [17]. Secondly, the grains in fusion zone get coarser during the TIG welding process, which also decreases the tensile properties of Mg alloy joint. Thirdly, lots of brittle precipitates occur in the fusion zone of joint and will further worsen the mechanical properties of joint, as shown in Figures 5(c) and (f). As the welding current increases to 110 A, catastrophic explosion of Mg alloy occurs and results in lots of welding voids (Figure 3(e)), which leads to the decrease of joining strength.
3.5 Fracture behavior
Figure 9 shows the representative fracture characteristics of Mg alloy joint. As shown in Figure 9(a), the crack tends to initiate and propagate along the interface of AZ31/MB3, due to the partial penetration of bottom surface. With current of 90 A, fracture occurs at the fusion zone of joint and the fracture line is indented, which indicates reliable joining of dissimilar Mg alloy obtained by the TIG welding process. However, with increase of welding current, the fracture line occurs through the welding pores, as illustrated in Figure 9(c). XRD was applied to further confirm the fracture location. As shown in Figure 10, ��-Mg and Mg12Al12 phases are detected by XRD analysis technology, indicating fracture indeed occurs at the FZ of joint. The XRD results are consistent with the above microstructure characteristics (Figure 6).
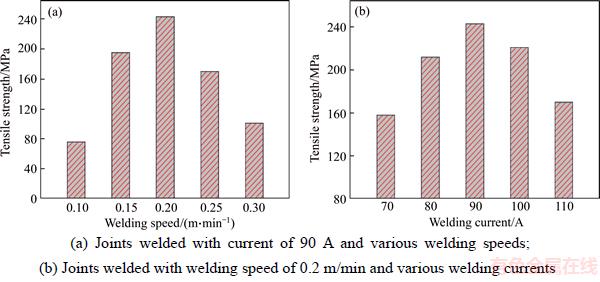
Figure 8 Tensile strength of Mg alloy joints:
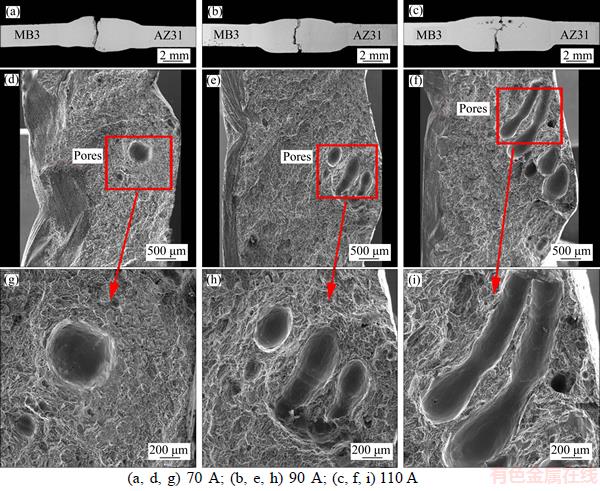
Figure 9 Typical fracture location and fracture morphology of TIG butt-welded joint:
It is worth noting that welding pores occur during the whole TIG welding process with current of 70, 90 and 110 A, respectively. The porosity (P) of the butt-welded joints was measured by an image program (Photoshop CS6) and calculated by the following equation:
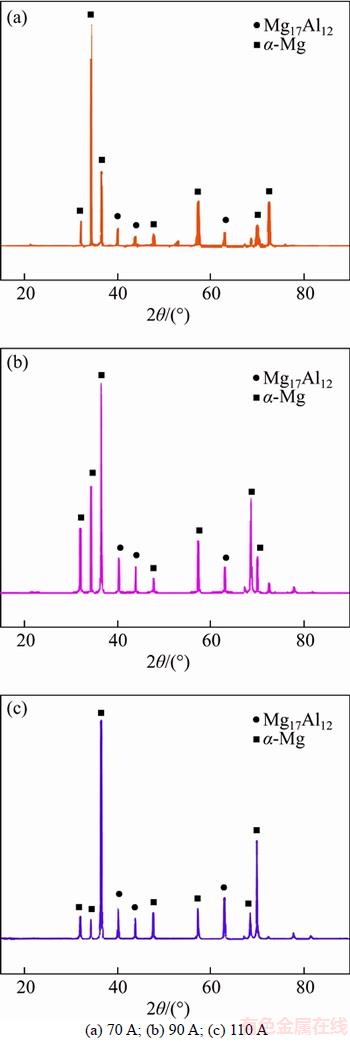
Figure 10 XRD patterns of fracture surfaces of TIG butt-welded joints:
 (4)
(4)
where Ap is the area of pores on the fracture surface and A0 is the area of whole fracture surface.
It can be found that the porosity increases with increasing heat input. As the welding current increases from 70 A and 90 A to 110 A, the porosity increases from 2.4% and 4.5% to 12.5% in sequence, which is attributed to the evaporation of Mg element. These pores act as initial fracture sources and have a negative effect on the mechanical properties of joint.
4 Conclusions
1) The width of welding seam increases with the increase of heat input and the grains both in the fusion zone and the heat affected zone coarsen during TIG welding process.
2) The microhardness of the fusion zone and heat affected zone of welded joints is dominated by the effect of the ��-Mg grains coarsening, which is lower than that of base metal.
3) The tensile strength of the welded joint increases with the increase of heat input and the maximum joining strength of 242 MPa is obtained with current of 90 A.
4) With further increase of heat input, lots of welding pores occur and result in the decrease of joining strength.
References
[1] LIU De-jia, XIN Ren-long, ZHAO Long-zhi, HU Yong. Effect of textural variation and twinning activity on fracture behavior of friction stir welded AZ31 Mg alloy in bending tests [J]. Journal of Alloys and Compounds, 2017, 693: 808�C815.
[2] YANG Fang-zhou, PAN Cheng-hai, HU Xing-hua. Effect of hot forging temperature on microstructure and properties of die repairing layer [J]. Hot Working Technology, 2014, 43(3): 101�C103.
[3] XU Chuan, SHENG Guang-min, WANG Hui, FENG Ke, YUAN Xin-jian. Tungsten inert gas welding-brazing of AZ31B magnesium alloy to TC4 titanium alloy [J]. Journal of Materials Science & Technology, 2016, 32(2): 167�C171.
[4] HE Wen-yuan, XIAO Yi-feng, WU Liang, XU Yan-fei, QIAN Jin-wen, HE Yue-hui, ZHENG Xue-jun. Effects of Mg content on pore structure and electrochemical corrosion behaviors of porous Al-Mg alloys [J]. Journal of Central South University, 2016, 23(10): 2483�C2491.
[5] LIU Xiao-wei, LIU Yong, JIN Bin, LU Yang, LU Jian. Microstructure evolution and mechanical properties of a SMATed Mg alloy under in situ SEM tensile testing [J]. Journal of Materials Science & Technology, 2017, 33(3): 224�C230.
[6] XU Chuan, SHENG Guang-min, WANG Hao-dong, YUAN Xin-jian. Effect of high energy shot peening on the microstructure and mechanical properties of Mg/Ti joints [J]. Journal of Alloys and Compounds, 2017, 695: 1383�C1391.
[7] XU Chuan, SHENG Guang-min, CAO Xue-zhen, YUAN Xin-jian. Evolution of microstructure, mechanical properties and corrosion resistance of ultrasonic assisted welded-brazed Mg/Ti joint [J]. Journal of Materials Science & Technology, 2016, 32(12): 1253�C1259.
[8] AZIZI A, ALIMARDAN H. Effect of welding temperature and duration on properties of 7075 Al to AZ31B Mg diffusion bonded joint [J]. Transactions of Nonferrous Metals Society of China, 2016, 26(1): 85�C92.
[9] LIU De-jia, XIN Ren-long, ZHAO Long-zhi, HU Yong, ZHANG Jian. Evaluation of corrosion and wear resistance of friction stir welded ZK60 alloy [EB/OL]. [2017�C04�C13]. DOI: http://dx.doi.org/10.1080/13621718.2017.1286443.
[10] XIE Rui-shan, CHEN Xiao-guang, LAI Zhi-wei, LIU Lei, ZOU Gui-sheng, YAN Jiu-chun, WANG Wen-xian. Microstructure, mechanical properties and mechanism of ultrasound-assisted rapid transient liquid phase bonding of magnesium alloy in air [J]. Materials and Design, 2016, 91: 19�C27.
[11] LIU Li-ming, XU Rong-zheng. Investigation of the corrosion behaviour of laser-TIG hybrid welded Mg alloys [J]. Corrosion Science, 2010, 52(9): 3078�C3085.
[12] GAO Ming, TANG Hai-guo, CHEN Xiao-feng, ZENG Xiao-yan. High power fiber laser arc hybrid welding of AZ31B magnesium alloy [J]. Materials and Design, 2012, 42: 46�C54.
[13] LIN Y T, WANG D P, WANG M C, ZHANG Y, HE Y Z. Effect of different pre- and post-weld heat treatments on microstructures and mechanical properties of variable polarity TIG welded AA2219 joints [J]. Science and Technology of Welding and Joining, 2016, 21(3): 234�C241.
[14] WU Zhi-quan, ZHANG Xin, SONG Xiao-guo, MA Cheng-yong, QI Yan-chang, CHEN Xin. Microstructure and properties of welded joint for T92 ferritic heat resistant steel [EB/OL]. [2017�C04�C13]. DOI: http://doi.org/10.1016/ j.jallcom.2017.01.156.
[15] MIN Dong, SHEN Jun, LAI Shi-qiang, CHEN Jie. Effect of heat input on the microstructure and mechanical properties of tungsten inert gas arc butt-welded AZ61 magnesium alloy plates [J]. Materials Characterization, 2009, 60(12): 1583�C1590.
[16] GOU Jun, TANG Ai-tao, PAN Fu-sheng, SHE Jia, LUO Su-qin, YE Jun-hua, SHI Da-wei, RASHAD M. Influence of Sn addition on mechanical properties of gas tungsten arc welded AM60 Mg alloy sheets [J]. Transactions of Nonferrous Metals Society of China, 2016, 26(8), 2051�C2057.
[17] QUAN Ya-jie, CHEN Zhen-hua, GONG Xiao-san, YU Zhao-hui. CO2 laser beam welding of dissimilar magnesium- based alloys [J]. Materials Science and Engineering A, 2008, 496(1): 45�C51.
[18] XU Chuan, SHENG Guang-min, DENG Yong-qiang, YUAN Xin-jian, TANG Kun-lun. Microstructure and mechanical properties of tungsten inert gas welded-brazed Mg/Ti lap joints [J]. Science and Technology of Welding and Joining, 2014, 19(5): 443�C450.
[19] HEILMAIER M, SAAGE H, MIRPURI J, ECKERT J, SCHULTZ L, SINGH P. Superposition of grain size and dispersion strengthening in ODS L12-(Al, Cr)3Ti [J]. Materials Science and Engineering A, 2002, 329: 106�C111.
[20] ZHANG Zhe, CHEN Dao-lun. Consideration of Orowan strengthening effect in particulate-reinforced metal matrix nanocomposites: A model for predicting their yield strength [J]. Scripta Materialia, 2006, 54(7): 1321�C1326.
[21] HAN B Q, DUNAND D C. Microstructure and mechanical properties of magnesium containing high volume fractions of yttria dispersoids [J]. Materials Science and Engineering A, 2000, 277: 297�C304.
[22] XU Nan, SHEN Jun, XIE Wei-dong, WANG Lin-zhi, WANG Dan, MIN Dong. Abnormal distribution of microhardness in tungsten inert gas arc butt-welded AZ61 magnesium alloy plates [J]. Materials Characterization, 2010, 61(7): 713�C719.
[23] GAO Ming, MEI Shu-wen, WANG Ze-min, LI Xiang-you, ZENG Xiao-yan. Process and joint characterizations of laser-MIG hybrid welding of AZ31 magnesium alloy [J]. Journal of Materials Processing Technology, 2012, 212(6): 1338�C1346.
(Edited by FANG Jing-hua)
���ĵ���
�������þ�Ͻ�Ժ���ͷ����֯����ѧ���ܵ�Ӱ��
ժҪ��ͨ���۲��۽ṹ��Ӳ�ȼ�����ѧ���ܼ�⣬�о��������AZ31/MB3þ�Ͻ��ټ�벻�����ͷ����֯����ѧ���ܵ�Ӱ�졣ʵ������������������������ӣ���������������ӣ�ͬʱ��ͷ�ۺ�������Ӱ�����ľ���Ҳ���ִֻ���þ�Ͻ�Ժ���ͷ����ѧ����Ҳ������������Ӷ���ǿ�������ӵ���Ϊ90 Aʱ�������ﵽ�������ǿ��242 MPa��Ȼ�������ӵ�������ʱ�����ӿ����֣����½�ͷ����ǿ���½�����������������ͨ���ټ�벻������ջ�ÿɿ���þ�Ͻ��ͷ��
�ؼ��ʣ�þ�Ͻ��ټ�벻������۽ṹ����ѧ����
Foundation item: Project(51575067) supported by the National Natural Science Foundation of China; Project(2012ZX04010-081) supported by the Major and Special Project of Ministry of Science and Technology, China
Received date: 2017-02-27; Accepted date: 2018-03-10
Corresponding author: ZHOU Jie, PhD, Professor; Tel: +86�C23�C65111493; E-mail:cqu_jiezhou@163.com; ORCID: 0000-0001- 7712-6689