��������AA6061-T6/AlNp���ϲ��ϵĸɻ���ĥ����Ϊ
��Դ�ڿ����й���ɫ����ѧ��(Ӣ�İ�)2014���9��
�������ߣ�B. ASHOK KUMAR N. MURUGAN I. DINAHARAN
����ҳ�룺2785 - 2795
Key words��aluminium matrix composite; particle-reinforcement; wear; regression model
ժ Ҫ����AA6061Ϊ���塢AlN����Ϊ��ǿ�壬���ý������칤�յõ�AA6061-T6/AlNp���ϲ��ϣ��о���AA6061-T6/AlNp���ϲ��ϵĸɻ���ĥ����Ϊ�������ع�ģ����Ԥ�⸴�ϲ��ϵ�ĥ���ʡ����������ء���ˮƽ������ʵ������Ż���ʵ�����ذ��������ٶȡ��������롢���ء���ǿ��AlN��������������������SYSTAT 12������ͳ�ƹ��ߣ��緽�����(�������)��tʵ�飬��֤�ع�ģ�͡���������������Ļع�ģ�Ϳ�����ЧԤ�⸴�ϲ��ϵ�ĥ���ʣ����Ŷȴ�95%�����ûع�ģ�ͣ�������ĥ�������ò������Ԥ��ʵ�����ض�AA6061-T6/AlNp���ϲ���ĥ���ʵ�Ӱ�졣�ع�ģ��Ԥ�������������ϲ��ϵ�ĥ����������ǿ��AlN�������������Ӷ����ͣ����Ż����ٶȡ��������롢���ص����Ӷ����ӡ�
Abstract: The dry sliding wear behavior of AA6061 matrix composite reinforced with aluminium nitride particles (AlN) produced by stir casting process was investigated. A regression model was developed to predict the wear rate of the prepared composite. A four-factor, five-level central composite rotatable design matrix was used to minimize the number of experimental runs. The factors considered in this study were sliding velocity, sliding distance, normal load and mass fraction of AlN reinforcement in the matrix. The developed regression model was validated by statistical software SYSTAT 12 and statistical tools such as analysis of variance (ANOVA) and student��s t test. It was found that the developed regression model could be effectively used to predict the wear rate at 95% confidence level. The influence of these factors on wear rate of AA6061/AlNp composite was analyzed using the developed regression model and predicted trends were discussed with the aid of worn surface morphologies. The regression model indicated that the wear rate of cast AA6061/AlNp composite decreased with an increase in the mass fraction of AlN and increased with an increase of the sliding velocity, sliding distance and normal load acting on the composite specimen.
Trans. Nonferrous Met. Soc. China 24(2014) 2785-2795
B. ASHOK KUMAR1, N. MURUGAN2, I. DINAHARAN3
1. Department of Mechanical Engineering, Faculty of Engineering, Erode Builder Educational Trust��s Group of Institutions, Nathakadaiyur, Kangayam �C 638108, Tirupur District, Tamil Nadu, India;
2. Department of Mechanical Engineering, Coimbatore Institute of Technology, Coimbatore�C641014, Tamil Nadu, India;
3. Department of Mechanical Engineering, V V College of Engineering, Tisaiyanvilai�C627657, Tamil Nadu, India
Received 13 November 2013; accepted 28 May 2014
Abstract: The dry sliding wear behavior of AA6061 matrix composite reinforced with aluminium nitride particles (AlN) produced by stir casting process was investigated. A regression model was developed to predict the wear rate of the prepared composite. A four-factor, five-level central composite rotatable design matrix was used to minimize the number of experimental runs. The factors considered in this study were sliding velocity, sliding distance, normal load and mass fraction of AlN reinforcement in the matrix. The developed regression model was validated by statistical software SYSTAT 12 and statistical tools such as analysis of variance (ANOVA) and student��s t test. It was found that the developed regression model could be effectively used to predict the wear rate at 95% confidence level. The influence of these factors on wear rate of AA6061/AlNp composite was analyzed using the developed regression model and predicted trends were discussed with the aid of worn surface morphologies. The regression model indicated that the wear rate of cast AA6061/AlNp composite decreased with an increase in the mass fraction of AlN and increased with an increase of the sliding velocity, sliding distance and normal load acting on the composite specimen.
Key words: aluminium matrix composite; particle-reinforcement; wear; regression model
1 Introduction
Aluminum alloys are extensively used in several engineering fields as structural applications including aerospace, automotive, marine and military [1,2] due to their low density, good stiffness and corrosion resistance. Poor wear resistance of aluminium alloys restricts their applications and when some amount of hard ceramic particles are added in the aluminium alloy, wear resistance of the resultant material will be significantly improved. The obtained material is called as aluminium matrix composites (AMCs). In addition to the wear resistance, mechanical properties such as specific strength, stiffness, damping capacity, thermal and electrical properties of the AMCs are also enhanced considerably. By changing the amount of reinforcement in the matrix, those properties of AMCs can be tailored to meet the specific applications. Hence, due to superior properties and tailorable nature, AMCs are reasonable replacements for monolithic aluminium alloys and steels for achieving energy savings, durability, economic and environmental benefits. Thus AMCs are extensively used in structural applications and automobile brake shoes, piston rings, internal combustion engine cylinder liners, fan exit guide vane in gas turbine engine, etc, where relative motion is manifested [3].
The properties of AMCs are highly influenced by the type, size, shape, spatial distribution and quantity of reinforcements in the matrix. AMCs reinforced with particulate form of ceramics are particularly attractive due to their isotropic properties, higher operating temperature, oxidation resistance and easy fabrication over other geometries of reinforcement such as flake and fiber [4]. SiC, Al2O3, TiC, B4C, ZrB2 etc are some of the hard ceramic reinforcements used to enhance the mechanical properties of aluminium matrix. Among those hard reinforcement particles, aluminium nitride (AlN) has good mechanical properties, high electrical resistivity, low dielectric constant, good compatibility with aluminium alloy and good thermal conductivity of at least 5 to 6 times greater than Al2O3 [5]. Hence, Al/AlN composite is accepted as one of the promising candidate materials for electronic packaging and structural applications [6,7].
AMCs can be produced either by solid state process (powder metallurgy, mechanical alloying) or liquid state process (powder injection moulding process, squeeze casting, stir cast process and so on). Though AMCs are produced by many methods as said above, stir casting method is currently employed to a large extent as it is simple, flexible, economical, and suitable for mass production and production of complex profiled composite components without damaging the reinforcement particles [8].
KUMAR et al [9] studied the wear behavior of AA6351 matrix composite reinforced with ZrB2 reinforcement (0, 3%, 6% and 9%) produced by in-situ process in the as-cast, the solutionized and the solutionized-aged conditions on pin-on-disc apparatus. It was reported that wear resistance of the composite increased with increase in the amount of ZrB2 reinforcement as it increases the hardness of the composite. Hardness and wear resistance of the solutionized-aged composite were greater than those of as-cast or solutionized composite. RAO and DAS [10] investigated the effect of sliding distance and normal load on wear rate of Al alloy and Al/10% SiC composite produced by stir casting technique and found that wear rate of both Al alloy and composite increased with increase in sliding distance and normal load, while the wear rate of composite was less than that of Al alloy. TANG et al [11] examined the dry sliding wear behavior of Al-5083 matrix reinforced with 5% and 10% of B4C produced by powder metallurgy process and it was reported that wear rate of composite containing 10% B4C was 40% less than that of 5% B4C composite and the wear rate of both the composites increased with the increase in sliding distance, sliding velocity and normal load.
NATARAJAN et al [12] investigated the wear behavior of stir cast A356/25%SiCp and compared it with the conventional grey cast iron. A commercial semi-metallic brake shoe lining of a passenger car was used as the pin and it was slid on the A356/25%SiCp composite and grey cast iron under various sliding velocities (2.5, 3.7, 5 and 6.3 m/s) and normal loads (varied in 20-100 kN). The wear rates of both the composite and the grey cast iron were increased with increase in velocity and normal load and at the same time the wear rate of composite was found to be less than that of the grey cast iron. MANDAL et al [13] studied the wear behavior of A356/(0-10%)TiB2 composite by varying the normal load (19.6, 39.2, 58.8 and 78.4 N) at a constant velocity of 1 m/s. It was reported that TiB2 reinforcement significantly decreased the wear rate of the composites and the wear rate of the composite increased with the increase in the normal load irrespective of the mass fraction of reinforcement in the matrix.
DINAHARAN and MURUGAN [14] developed a regression model to predict the wear rate of AA6061/ZrB2 in-situ composite by incorporating the effect of sliding velocity, sliding distance, normal load and mass fraction of ZrB2 reinforcement in the matrix. KUMAR and BALASUBRAMANIAN [15] developed a regression model to predict the wear rate of AA7075/SiCp composite material fabricated by powder metallurgy technique incorporating the effects of volume fraction of reinforcement, reinforcement size, applied load, sliding speed and hardness of the counter face material. It was found from the literatures that many factors influence the wear rate of composites. Those factors include chemical composition of matrix, type of reinforcement and its size, hardness, orientation, volume fraction, hardness of the counter face material, sliding velocity, contact pressure, duration of sliding, lubrication and corrosion [15].
In the present work, an attempt is made to develop a regression model to predict the wear rate of stir cast AA6061/AlNp composite and analyze the influence of parameters such as sliding velocity, sliding distance, normal load and mass fraction of reinforcement in the matrix on the wear rate of AA6061/AlNp composite. A four-factor, five-level central composite rotatable design matrix was adopted to carry out the experiments and to develop the regression model. Pin-on-disc wear testing apparatus was used to analyze the dry sliding wear behavior of the composite. The wear rates were determined using the height loss method.
2 Experimental
2.1 Fabrication of AA6061/AlNp composite
Stir casting technique was employed to fabricate AA6061 matrix composite reinforced with various contents of AlN (viz., 0, 5%, 10%, 15% and 20%, mass fraction). Cleaned extruded aluminium alloy (AA6061�C T6) rods of 25 mm in diameter were placed inside the stainless steel crucible of a electric stir casting furnace having bottom pouring attachment. The chemical composition of AA6061 alloy is presented in Table 1.
Table 1 Chemical composition of AA6061-T6 aluminium alloy (mass fraction, %)

A stainless steel stirrer coupled with an electric motor was used to stir the melt to facilitate both incorporation and uniform distribution of the reinforcement in the molten alloy. The stainless steel stirrer and the inner surface of the crucible were coated with WOLFRAKOAT to avoid contamination at higher temperature. When the temperature of the electric furnace reached 1000 ��C, a predetermined quantity of AlN powder with size of 3-4 ��m and purity of 99.6% preheated to 750 ��C was added to the molten metal on the side of the vortex. Magnesium was added to the melt to increase the wettability between AlN reinforcement and aluminium alloy matrix. AlN was added into the melt in 260 s. The mixture of molten aluminium and AlN was further stirred for 1200 s and then poured into a preheated permanent mould of 100 mm��50 mm��50 mm through the bottom pouring arrangement. Argon gas was supplied at a constant flow rate of 0.033 L/s into the furnace when its temperature reached 650 ��C till the molten composite was poured into the permanent mould. Similarly, AA6061/AlNp composites containing different mass fractions of AlN (ranging from 0 to 20%) were produced. The detailed description of fabrication of AA6061/AlNp composite was reported elsewhere [16].
Specimens were prepared as per the standard metallographic procedure for microstructural analysis. The specimens were polished using various emery papers starting from 280 grit to 1200 grit and fine polished with 6, 3 and 0.5 ��m diamond pastes using a disc polishing machine. The polished specimens were etched with a colour etchant containing 1 g of sodium hydroxide (NaOH) and 4 g of potassium permanganate (KMnO4) in 100 mL distilled water for metallographic study. The microstructure was observed using an optical microscope (OLYMPUS-BX51 M). SEM analysis of AA6061/ 10%AlNp was carried out on a scanning electron microscope (JEOLJSM-6390). X-ray diffraction patterns (XRD) for all the composites containing 0-20% AlN were recorded using a PANalytical X-ray diffractometer.
2.2 Wear test of AA6061/AlNp composite
Specimens of 6 mm��6 mm��50 mm were cut from the cast composites containing various mass fractions of reinforcement to carry out the trail experiments and actual wear test. One square end surface of the specimen was polished as discussed earlier to ensure the effective contact of the specimen with the hard steel disc and better accuracy of measuring the height loss. A pin-on-disc wear testing apparatus (DUCOM TR20-LE) was employed to find the wear rate of AA6061/AlNp composite as per ASTM G99-05 standard at ambient temperature.
Many trail experiments were conducted on AMC specimens to find out the feasible limits of the process parameters such as sliding velocity, sliding distance and normal load in such a way that the lower limit of each parameter was fixed to yield a noticeable wear. The upper limit of each parameter was selected when wear was not severe. In order to have an easy interpretation of results and to understand the effect of each parameter on the response, the lower and upper levels of the parameters are coded as -2 and +2 respectively. The coded values for any intermediate range are calculated using the following relationship.
Xi=2[2X-(Xmax+Xmin)]/(Xmax-Xmin) (1)
where Xi is the required coded value of a variable X; X is any value of the variable from Xmax to Xmin; Xmax is the upper limit of the variable; Xmin is the lower limit of the variable. The chosen levels of the process parameters with their notations and units are presented in Table 2.
2.3 Development of design matrix
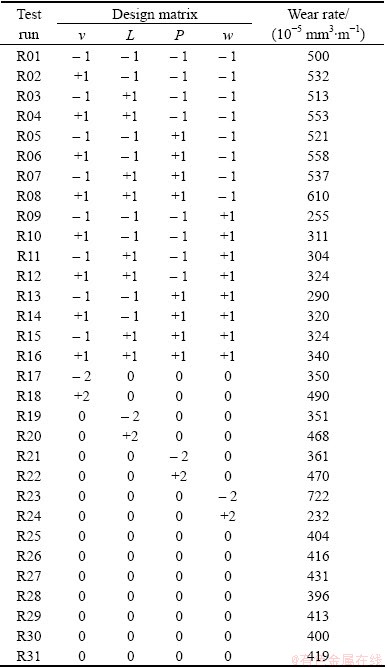
The four-factor, five-level central composite rotatable design with 31 sets of coded conditions shown in Table 3 was selected to conduct the experiments. The first 16 experimental runs were derived from full factorial experimental design matrix (24=16). The next 8 experimental runs comprised a combination of each process variable at either their lowest (-2) or highest (+2) level with the other three variables kept at the intermediate levels (0) constituting the stars points. The remaining 7 experimental runs comprised the variables at the intermediate (0) level constituting the 7 centre points. The detailed description of the central composite design matrix is available elsewhere [17].
Table 2 Process parameters and their levels

Table 3 Design matrix and experimental results
2.4 Recording of responses
Thirty-one wear tests as per the design matrix were conducted randomly to prevent the effects of unknown nuisance variables which may be contaminating the results [17]. The polished surface of the pin was placed on a hardened chromium steel disc with the axial load as per the design matrix. The track radius, rotation speed of the chromium steel disc and duration of the wear test were fixed according to the sliding velocity and sliding distance as per the design matrix given in Table 3. A computer-aided data acquisition system was used to monitor the reduction in height of the specimen. At least two tests were conducted for each experimental run to get representative data. The volumetric loss and wear rate were calculated by the following expressions [18]:
��V=��H��S (2)
��=��V/L (3)
where ��V is the volumetric loss; �� is the wear rate; ��H is the reduction in height; S is the cross sectional area of specimen; L is the sliding distance.
The determined wear rate of each test run is presented in Table 3. The chromium steel disc was polished, cleaned with acetone and dried after carrying out each successive wear test. To analyze the worn surface morphology of specimens tested at the star points R17 to R24, combinations of each process variable at either the lowest or highest level with the other three variables at the intermediate levels were selected to clearly understand the effect of each parameter on worn surface morphology. The selected worn surface of the composites was characterized with the help of a scanning electron microscope.
3 Development of regression model
The wear rate (��) of the AA6061/AlNp composite is a function of sliding velocity (v), sliding distance (L), normal load (P) and mass fraction of AlN reinforcement in the aluminium alloy matrix (w). It can be expressed as
��=f(v, L, P, w) (4)
The second order polynomial regression equation used to represent the response surface ��Y�� is given by [17]
 (5)
(5)
where b0 is the average of responses; bi, bii and bij are the response coefficients which depend on respective main and interaction effects of the parameters. The selected second order polynomial for four factors could be expressed as
��=b0+b1v+b2L+b3P+b4w+b11v2+b22L2+b33P2+b44w2+ b12vL +b13vP+b14vw+b23LP+b24Lw+b34Pw (6)
The coefficients were calculated using the software SYSTAT 12. All the coefficients were tested for their significance at 95% confidence level. The insignificant coefficients on the response were removed without affecting the accuracy of the regression model using student��s t test to avoid the cumbersome mathematical labour [17]. The developed regression model with control parameters in coded form is given below.
��=411.214+24.3v+18.874L+17.704P-118.226w+15.408w2 (7)
4 Checking adequacy of developed model
The statistical results of the developed regression model are presented in Table 4. When the value of R2 is one, the predicted values will ideally match with the experimental results. As the obtained R2 is 0.982 which is near to one, the developed model is quite adequate. Analysis of variance (ANOVA) was also used to test the adequacy of the developed regression model and the results are presented in Table 5. The calculated F ratio of 278.060 is greater than the tabulated F ratio of 2.60 at 95% confidence level, which indicates that the developed model is quite adequate [19]. The regression model was further validated by plotting scatter diagram shown in Fig. 1. The experimental wear rate and predicted wear rate obtained from the regression model are scattered at both sides and are close to 45�� line, which clearly indicates good fitness of the developed regression model.
Table 4 Statistical results of developed regression model

Table 5 ANOVA results of developed regression model

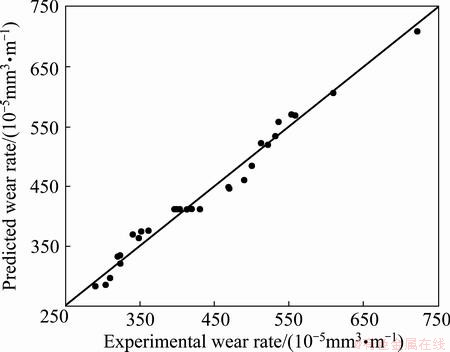
Fig. 1 Scatter diagram for wear rate of AA6061/AlNp composite
5 Validation of regression model
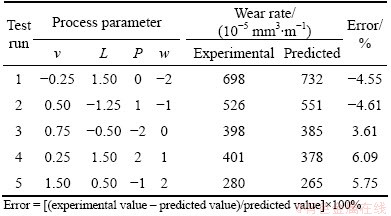
To check the accuracy of the developed regression model, five wear tests were conducted on the AA6061/AlNp composite using different values of sliding velocity, sliding distance and normal load other than those used in the design matrix and their wear rate was determined. For each set of parameter values, at least two tests were conducted to get the representative data. The percentage of error between the predicted and experimental wear rate was calculated and presented in Table 6. It is evident from the table that the accuracy of the model is more than 94%.
Table 6 Results of conformity tests
6 Results and discussion
The developed regression model presented in Eq. (7) correlates the significant parameters such as sliding velocity, sliding distance, normal load and percentage of AlN reinforcement with the wear rate of cast AA6061/AlNp composite. Using the developed regression model, the wear rate has been calculated for different combinations of parameter values by varying one parameter value from its minimum level to maximum level while keeping the other three parameter values at their center levels. The obtained values are presented in graphical form. The possible causes for the effects of each parameter on the wear rate are discussed below. Also, the possible sliding wear mechanisms were examined with the help of SEM micrographs of worn surface.
6.1 Effect of AlN reinforcement
Figure 2 shows the wear rate of AA6061/AlNp composite as a function of mass fraction of AlN in the matrix. It is obvious from the figure that the wear rate decreases with increase in the mass fraction of AlN by keeping other wear process parameters constant.
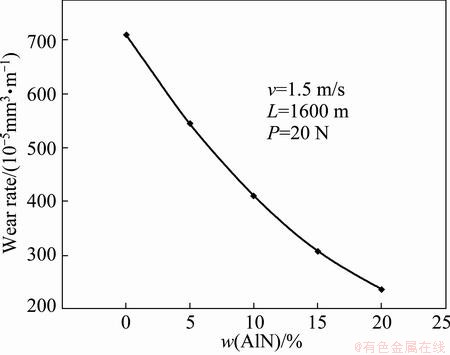
Fig. 2 Effect of mass fraction of AlN reinforcement in AA6061 matrix on wear rate of AA6061/AlNp composite
The XRD patterns of the AA6061 matrix composite containing various (0-20%) amounts of AlN presented in Fig. 3(a) ensure the presence of AlN in the matrix. It is also obvious that AlN particles are thermodynamically stable at the processing temperature of 1000 ��C. The optical microstructure of AA6061/10%AlNp given in Fig. 3(b) shows the uniform distribution of AlN in the aluminium matrix. From the optical microstructure of AMC presented in Fig. 3(c) and SEM micrograph presented in Fig. 3(d), the AlN appearing as spherical shape in the microstructure is a clump of AlN. Wetting of small individual reinforcement particle is difficult due to increase in the surface energy required for the matrix surface to deform to a small radius as the particle begins to penetrate it. The smaller particles are also more difficult to disperse due to their inherently greater surface area. Hence, these smaller particles have a tendency to clump together, resulting in good wetting of particles with molten matrix [20]. The good wetting of reinforcement particles with the matrix and uniform distribution of AlN reinforcement increase the load bearing capacity [21] of the AMC and as the clumped AlN particles are spherical in shape, more shear force is required to initiate the crack. Hence, wear rate of the composite decreases with increase in mass fraction of AlN in the composite.
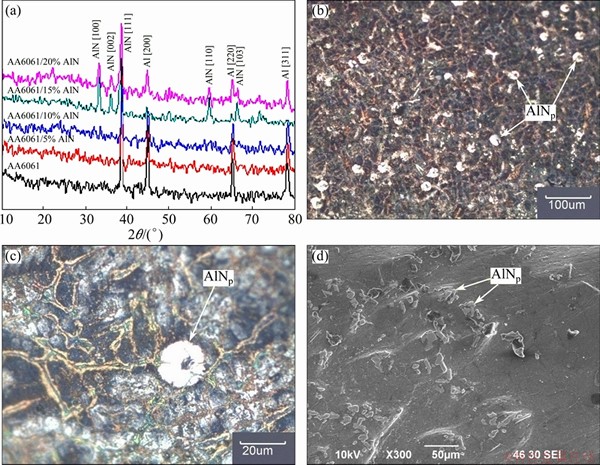
Fig. 3 XRD patterns of AA6061/(0-20%)AlNp composite (a), optical micrograph of AA6061/10%AlNp composite (b), optical micrograph of AA6061/AlNp composite at higher magnification (c) and SEM micrograph of AA6061/10%AlNp composite (d)
Incorporation of ceramic AlN in the composite induces the grain refinement of ��(Al) matrix and reduces its grain size [21]. Hence, more grain boundary per unit area of ��(Al) matrix enables more load bearing capacity over the coarse grain structure, which results in an increase in wear resistance with fine grain structure [22]. Also, the addition of increased ceramic particles in the composite takes more load compared with monolithic aluminium alloy. Addition of AlN reinforcement in the composite increases the ratio of the area of contact of AlN to the matrix alloy against the counter face. As these hard particles are able to resist wear at relatively high load as well as at high velocity and for longer period, the wear rate of the composite decreases with increase in mass fraction of hard reinforcement particles. Hence, wear rate of the cast AMC reduces with the addition of AlN. This can be attributed to the increase in hardness due to the refinement of grain size, reinforcement of hard ceramic particles, precipitation of Mg2Si and dispersion strengthening [23].
The addition of AlN ceramic materials with low coefficient of thermal expansion (4.5��10-6 ��C-1) into the alloy matrix with higher coefficient of thermal expansion (24��10-6 ��C-1) changes microstructural characteristics of the base metal matrix with a concomitant contribution of increased strength. An increase in the volume fraction of the reinforcing ceramic particulate results in an increase in dislocation density around the AlN reinforcement during solidification [24]. The interaction between AlN and dislocations enhances the wear resistance of the composite.
Figure 4 depicts the SEM micrographs of worn surfaces of AA6061 alloy and AA6061/20%AlNp composite at sliding velocity of 1.5 m/s, sliding distance of 1600 m and normal load of 20 kN. The worn surface of Al alloy matrix presented in Fig 4(a) shows deep grooves and craters. More plastic flow in materials can also be seen in the worn surface morphology of aluminium matrix which has occurred due to the plastic deformation of soft aluminium asperities by the frictional heat and shear stress developed at aluminium asperities greater than its yield strength. More plastic deformation is also observed at the edges of the grooves and grooves are also coarsened. The wear debris adheres to the matrix due to its ductile nature. The worn surface morphology of AA6061/20%AlNp presented in Fig. 4(b) shows shallow grooves, and fine and less plastic deformation is observed at the edge of the grooves. It is also observed that the debris is loose in nature and non-adherent with the matrix because of the improved hardness of the matrix due to the incorporation of AlN in the matrix. Debris size in the AA6061/20%AlNp is also less than that of the debris in AA6061 matrix due to the enhanced hardness of the matrix. Fine grooves are found in the worn surface of AA6061/20%AlNp composite presented in Fig. 4(b), which is attributed to the enhanced hardness of matrix. From the SEM micrographs, it is clear that adhesive wear mechanism is dominated in unreinforced aluminium alloy, whereas abrasive wear is predominant in AlN reinforced AMCs.
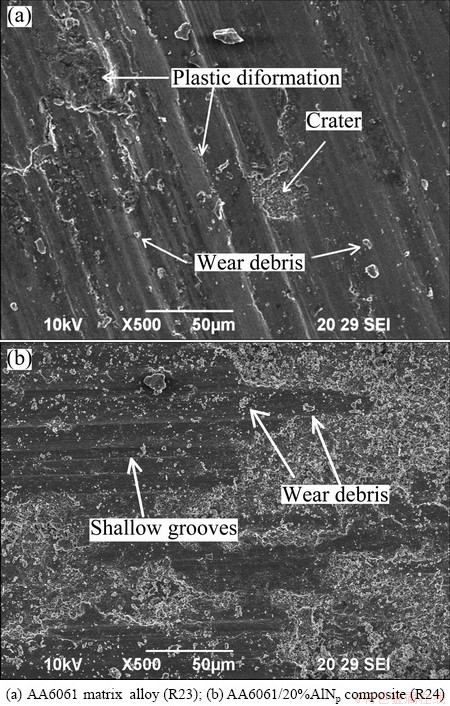
Fig. 4 SEM micrographs of worn surfaces
6.2 Effect of sliding velocity
The effect of sliding velocity on the wear rate of AA6061/10%AlNp composite is shown in Fig. 5. It is obvious from the figure that the wear rate linearly increases with the increase in sliding velocity.
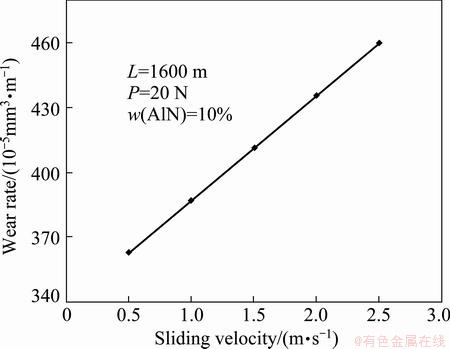
Fig. 5 Effect of sliding velocity on wear rate of AA6061/AlNp composite
Sliding velocity influences the frictional heat developed in the area of contact between the test pin and counter face. More frictional heat is developed in the contact area when sliding velocity is increased [25]. Thus micro thermal softening of matrix material may take place which lowers the bonding strength of AlN with aluminium matrix alloy [15]. Hence, at higher sliding velocity, the extended AlN can be easily pulled out from the matrix as a result of micro thermal softening of matrix and higher shearing force developed on the contact surface. Those pulled-out AlN particles may act as wear debris between test pin and counter face and form the third body abrasive wear mechanism. Further, the hard asperities of the counter face can plough the softer pin material. At higher sliding velocity, materials are delaminated from the pin due to the higher shear stress. As a result, wear rate is more at higher sliding velocities. At lower sliding velocity, material removal rate is less. This may be attributed to less ploughing of matrix material by the asperities of counter face. No or less AlN pull-out takes place due to less shearing force developed on the contact surface. Thus the higher load bearing area due to higher ratio of hard ceramic AlN area to matrix area reduces the wear rate.
Figure 6 shows the SEM micrographs of the worn surface of the cast AA6061/10%AlNp composite at sliding velocities of 0.5 m/s and 2.5 m/s respectively with the normal load of 20 kN and sliding distance of 1600 m. The worn surface of composite at lower velocity (0.5 m/s) presented in Fig. 6(a) shows the continuous shallow grooves and ploughing of particles. Small craters are also visible, maybe due to ploughing of hard asperities of counter face. The worn surface of the composite at higher velocity (2.5 m/s) presented in Fig. 6(b) shows deep grooves. The delamination and larger craters are visible on the worn surface. Cracks are propagated in both transverse and longitudinal directions due to higher shear force on the sliding surfaces. Cracks are also propagated on the subsurface, leading to the loss of material from the worn surface in the form of flakes. Hence, at higher sliding velocity, the dominant wear mechanisms are ploughing, abrasive and delamination. It is obvious from the worn surface morphology of composite at lower and higher sliding velocities presented in Fig. 6 that wear rate increases with the increase in the sliding velocity.
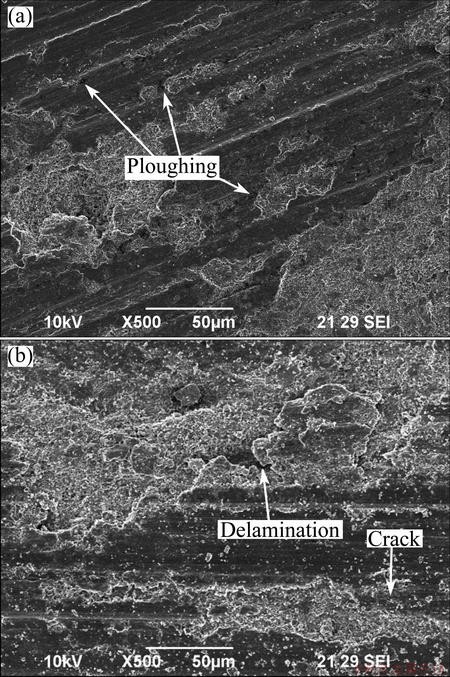
Fig. 6 SEM micrographs of worn surface of AA6061/10%AlNp composite tested at sliding velocity of 0.5 m/s (R17) (a) and 2.5 m/s (R18) (b)
6.3 Effect of sliding distance
Figure 7 shows the effect of sliding distance on the wear rate of cast AA6061/10%AlNp composite. It is obvious from the figure that when the sliding distance increases, the wear rate also increases linearly.
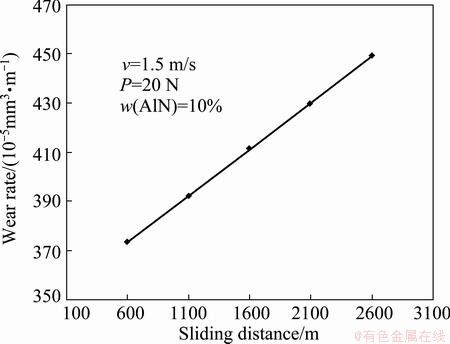
Fig. 7 Effect of sliding distance on wear rate of AA6061/AlNp composite
Sliding wear can be related to asperity-to-asperity contact. At the initial stage of sliding, some of the asperities in the test pin are not able to resist the shear force and hence they get deformed and detached. Due to shear force and micro-cutting by the hard asperities of the counter face material, some of the asperities of matrix alloy get deformed. All those detached and deformed asperities fill the valleys and part of the asperities get fractured and added to the wear debris. Some of the long projected AlN particles are also fractured or detached from the matrix and added to wear debris. All these loose debris present between the two sliding surfaces act as an abrasive medium and form three-body wear and eventually the mechanism changes from two-body to three-body abrasive wear. These hard ceramic reinforcement debris and asperities of hard counter face plough the soft surface of the test pin. When the sliding distance increases, frictional heat on the contact surface also increases. As the raised temperature in the contact surface decreases, the resistance offered by the matrix against the shear force, the rate of deformation as well as pull-out of AlN from the matrix are increased. This leads to subsurface cracks which nucleate at the interfaces between AlN and aluminium alloy matrix [26]. As a result, the wear rate increases with the increase of the sliding distance.
Figure 8 depicts the SEM micrographs of the worn surface of the cast AA6061/10%AlNp composite at the sliding distances of 600 m and 2600 m respectively with the normal load of 20 kN and the sliding velocity of 1.5 m/s. The worn surface at shorter sliding distance of 600 m is shown in Fig. 8(a) which reveals shallow and continuous grooves and ploughing of pin surface, confirming the abrasive action of asperities of hard counter face on the test pin surface. Small craters are visible on the worn surface. The worn surface of the composite with longer sliding distance (2600 m) shown in Fig. 8(b) reveals continuous deep grooves. The edges at the grooves are plastically deformed, due to the generation of higher frictional heat. The cracks are propagated in both transverse and longitudinal directions. A large crater is also visible. Severe delamination of subsurface is also visible on the worn surface of the composite with longer sliding distance. Hence, delamination and abrasive are the dominant wear mechanisms at longer sliding distance. It is obvious from the worn surface morphology of composite tested at shorter and longer sliding distance presented in Fig. 8 that the wear rate of the composite increases with increase of the sliding distance.
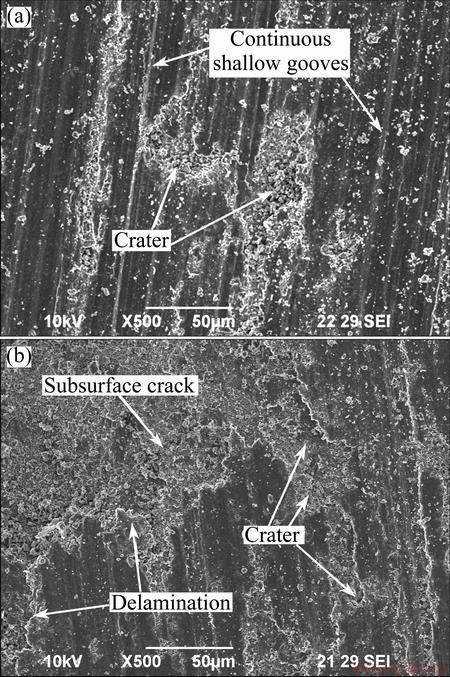
Fig. 8 SEM micrographs of worn surface of AA6061/10%AlNp composite tested at sliding distance of 600 m (R19) (a) and 2600 m (R20) (b)
6.4 Effect of normal load
Figure 9 shows the effect of normal load on the wear rate of cast AA6061/10%AlNp composite. It is obvious from the figure that the wear rate increases linearly with the increase of the normal load. This result has good accordance with the Archard��s law of wear equation [27], which states that wear rate increases with an increase in applied pressure. The applied pressure will increase either by increasing normal load per contact area or decrease of contact area (more sharpened asperities) for the given load. Under the influence of normal load and relative motion, large number of asperities of the test pin (including both matrix and AlN) and counter face get contact. In general, asperities are plastically deformed when the stress developed at the asperities exceeds its yield strength. At the lower axial load, some of the soft asperities may deform plastically or remain in elastic contact depending upon the cross- sectional area at the contact of asperities to asperities during sliding. Plastically deformed material may detach from the matrix due to sliding of faying surfaces and fill the valleys of the material of pin and the counter face. At the initial stages of the loading, the hard asperities of the counter face may plough the soft test pin material (micro-groove formation). Thus the abrasive kind of wear may take place and the asperities may get deformed at the contact and sharper asperities may get fractured.
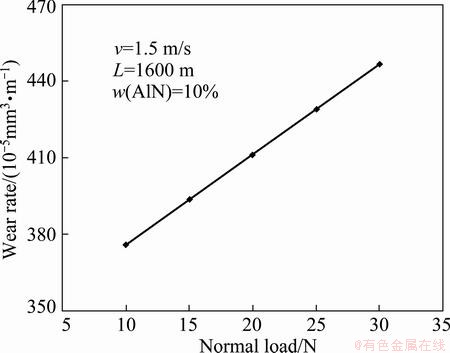
Fig. 9 Effect of normal load on wear rate of AA6061/AlNp composite
The normal load influences the contact area between the counter surface test pin, which in turn influences the frictional heat generated [28]. As the normal load increases, frictional heat developed on the contacting surface increases. Thus matrix material gets softened. At the same time, the stress developed at long projected AlN exceeds its fracture strength and thus gets fractured and fragmented. The brittle fracture of AlN in an irregular manner leads to the formation of new edges. Hence, the number of sharp contact increases further. As compressive strength of the AlN or counter face asperities is higher than that of matrix alloy, all those fragmented hard AlN and asperities of counter face penetrate into the softer matrix and plough the material from the test pin. Hence, as normal load increases, material removal rate from the surface of the test pin increases due to delamination, micro-cutting and micro-fracturing.
Figure 10 depicts the SEM micrographs of the worn surface of cast AA6061/10%AlNp composite at normal loads of 10 N and 30 N respectively with the sliding distance of 1600 m and the sliding velocity of 1.5 m/s. The worn surface of AA6061/10%AlNp composite tested at lower load (10 N) presented in Fig. 10(a) shows more number of grooves and more debris. At lower normal load, asperities of soft aluminium matrix are broken due to the fact that the shear force and more loose wear debris are formed on the worn surface. The worn surface of AA6061/10%AlNp composite tested at the normal load of 30 N presented in Fig. 10(b) shows deeper grooves and craters than the worn surface slid at the load of 10 N. Due to higher frictional heat generated at higher load, plastic deformation at the edges of the grooves is caused. Initial craters are formed due to the delamination and tearing of surface materials. In the course of time, crater is progressed along the perimeter of the crater due to the shear force. Due to higher applied pressure, cracks nucleated due to the ploughing of hard asperities of counter face are propagated in both longitudinal and transverse directions. The deformation of subsurface is also seen on the worn surface. Hence, at a higher normal load, materials are removed from the surfaces by the delamination and micro cutting mechanisms. It is obvious from the worn surface morphology presented in Fig. 10 that the wear rate increases with increase of the normal load.
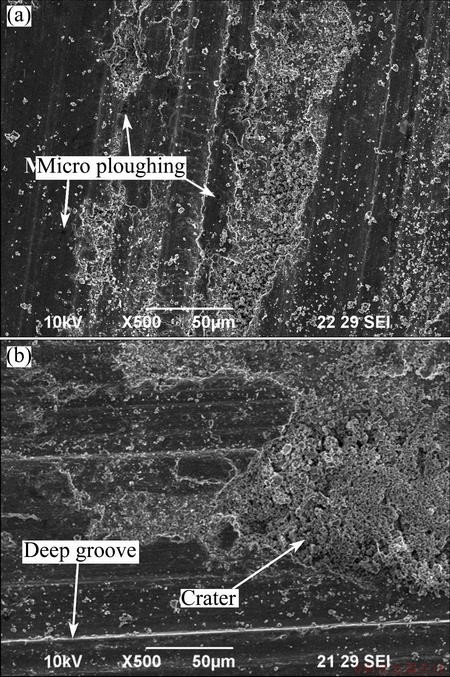
Fig. 10 SEM micrographs of worn surface of AA6061/ 10%AlNp composite tested at normal load of 10 N (R21) (a) and 30 N (R22) (b)
7 Conclusions
1) The developed regression model can be effectively used to predict the wear rate of cast AA6061/AlNp composite at 95% confidence level within the range of investigation.
2) Conformity tests were conducted to validate the developed regression model. It is found that the accuracy of prediction of wear rate of AA6061/AlNp composites is within ��6% of their experimental values.
3) The wear rate of the composite linearly increases with increase in sliding velocity, sliding distance and normal load.
4) The wear rate of the composite decreases with increase in AlN reinforcement in the matrix.
5) At higher sliding velocity, delamination is the primary wear mechanism along with ploughing and abrasive mechanisms.
6) At higher sliding distance and normal load, the dominant wear mechanism involved during material removal on sliding is delamination.
7) Adhesive wear mechanism is dominant in AA6061 alloy, whereas abrasive wear is predominant in AA6061/AlNp composites.
Acknowledgements
The authors wish to place their sincere thanks to the Management and Department of Mechanical Engineering, Coimbatore Institute of Technology, Coimbatore, India for extending the facilities of Welding Research Laboratory to carry out this investigation. The authors also wish to thank Karunya University, Coimbatore, India for providing SEM facility. The Authors are also thankful to Mr. S. J. VIJAY, Mr. R. SATHISKUMAR, Mr. R.D. VASUDEVAN, Mrs. S. SUGANYA and Mr. K. RAJA for their assistance to execute this work.
References
[1] MILLER W S, ZHUANG L, BOTTEMA J, WITTEBROOD A J, SMET P D, HASZLER A, VIEREGGE A. Recent development in aluminium alloys for the automotive industry [J]. Materials Science and Engineering A, 2000, 280: 37-49.
[2] BROWN K R, VENIE M S, WOODS R A. The increasing use of aluminium in automotive applications [J]. Journal of the Minerals, Metals & Materials Society, 1995, 47: 20-23.
[3] SURAPPA M K. Aluminium matrix composites: Challenges and Opportunities [J]. Sadhana, 2003, 28(1-2): 319-334.
[4] KAW A K. Mechanics of composite materials [M]. New York: Taylor & Francis Group, 2006.
[5] LII D F, HUANG J L, CHANG S T. The mechanical properties of AlN/Al composites manufactured by squeeze casting [J]. Journal of the European Ceramic Society, 2002, 22: 253-261.
[6] LIU Z Y, KENT D, SCHAFFER G B. Powder injection moulding of an Al-AlN metal matrix composite [J]. Materials Science and Engineering A, 2009, 513-514: 352-356.
[7] TANG Y B, LIU Y Q, SUN C H, CONG H T. AlN nanowires for Al-based composites with high strength and low thermal expansion [J]. Journal of Materials Research, 2007, 22(10): 2711-2718.
[8] HASHIM J, LOONEY L, HASHMI M S J. Metal matrix composites: Production by the stir casting method [J]. Journal of Materials Processing Technology, 1999, 92-93: 1-7.
[9] KUMAR G N, NARAYANASAMY R, NATARAJAN S, BABU S P K, SIVAPRASAD K, SIVASANKARAN S. Dry sliding wear behaviour of AA6351-ZrB2 in situ composite at room temperature [J]. Materials and Design, 2010, 31: 1526-1532.
[10] RAO R N, DAS S. Effect of sliding distance on the wear and friction behavior of as cast and heat-treated Al-SiCp composites [J]. Materials and Design, 2011, 32: 3051-3058.
[11] TANG F, WU X, GE S, YE J, ZHU H, HAGIWARA M, SCHOENUNG J M. Dry sliding friction and wear properties of B4C particulate-reinforcedAl-5083 matrix composites [J]. Wear, 2008, 264: 555-561.
[12] NATARAJAN N, VIJAYARANGAN S, RAJENDRAN I. Wear behaviour of A356/25SiCp aluminium matrix composites sliding against automobile friction material [J]. Wear, 2006, 261: 812-822.
[13] MANDAL A, MURTY B S, CHAKRABORTY M. Sliding wear behaviour of T6 treated A356-TiB2 in-situ composites [J]. Wear, 2009, 266: 865-872.
[14] DINAHARAN I, MURUGAN N. Dry sliding wear behavior of AA6061/ZrB2 in-situ composite [J]. Transactions of Nonferrous Metals Society of China, 2012, 22: 810-818.
[15] KUMAR S, BALASUBRAMANIAN V. Developing a mathematical model to evaluate wear rate of AA7075/SiCp powder metallurgy composites [J]. Wear, 2008, 264: 1026-1034.
[16] ASHOK KUMAR B, MURUGAN N. Metallurgical and mechanical characterization of stir cast AA6061-T6-AlNp composite [J]. Materials and Design, 2012, 40: 52-58.
[17] MONTGOMERY D G. Design and analysis of experiments [M]. New York: John Wiley & Sons, 2001.
[18] MANDAL A, CHAKRABORTY M, MURTY B S. Effect of TiB2 particles on sliding wear behaviour of Al�C4Cu alloy [J]. Wear, 2007, 262: 160-166.
[19] MURUGAN N, ASHOK KUMAR B. Prediction of tensile strength of friction stir welded stir cast AA6061-T6/AlNp composite [J]. Materials and Design, 2013, 51: 998-1007.
[20] HASHIM J, LOONEY L, HASHMI M S J. The wettability of SiC particles by molten aluminium alloy [J]. Journal of Materials Processing Technology, 2001, 119: 324-328.
[21] DINAHARAN I, MURUGAN N, PARAMESWARAN S. Influence of in situ formed ZrB2 particles on microstructure and mechanical properties of AA6061 metal matrix composites [J]. Materials Science and Engineering A, 2011, 528(18): 5733-5740.
[22] RAO A K P, DAS K, MURTY B S, CHAKRABORTY M. Effect of grain refinement on wear properties of Al and Al-7Si alloy [J]. Wear, 2004, 257: 148-153.
[23] KUMAR, S, SARMA V S, MURTY B S. High temperature wear behavior of Al-4Cu-TiB2 in situ composites [J]. Wear, 2010, 268: 1266-1274.
[24] GUPTA M, SRIVATSAN T S. Interrelationship between matrix microhardness and ultimate tensile strength of discontinuous particulate-reinforced aluminum alloy composites [J]. Materials Letters, 2001, 51(3): 255-261.
[25] RAO R N, DAS S. Effect of SiC content and sliding speed on the wear behaviour of aluminium matrix composites [J]. Materials and Design, 2011, 32: 1066-1071.
[26] ALPAS A T, EMBURY J D. Sliding and abrasive wear behavior of an aluminum (2014)-SiC particle reinforced composite [J]. Scripta Metallurgica et Materialia, 1990, 24: 931-935.
[27] ARCHARD J F. Contact and rubbing of flat surface [J]. Journal of Applied Physics, 1953, 24: 981-988.
[28] RAO R N, DAS S. Effect of applied pressure on the tribological behaviour of SiCp reinforced AA2024 alloy [J]. Tribology International, 2011, 44: 454-462.
B. ASHOK KUMAR1, N. MURUGAN2, I. DINAHARAN3
1. Department of Mechanical Engineering, Faculty of Engineering, Erode Builder Educational Trust��s Group of Institutions, Nathakadaiyur, Kangayam �C 638108, Tirupur District, Tamil Nadu, India;
2. Department of Mechanical Engineering, Coimbatore Institute of Technology, Coimbatore �C 641014, Tamil Nadu, India;
3. Department of Mechanical Engineering, V V College of Engineering, Tisaiyanvilai �C 627657, Tamil Nadu, India
ժ Ҫ����AA6061Ϊ���塢AlN����Ϊ��ǿ�壬���ý������칤�յõ�AA6061-T6/AlNp���ϲ��ϣ��о���AA6061-T6/AlNp���ϲ��ϵĸɻ���ĥ����Ϊ�������ع�ģ����Ԥ�⸴�ϲ��ϵ�ĥ���ʡ����������ء���ˮƽ������ʵ������Ż���ʵ�����ذ��������ٶȡ��������롢���ء���ǿ��AlN��������������������SYSTAT 12������ͳ�ƹ��ߣ��緽�����(�������)��tʵ�飬��֤�ع�ģ�͡���������������Ļع�ģ�Ϳ�����ЧԤ�⸴�ϲ��ϵ�ĥ���ʣ����Ŷȴ�95%�����ûع�ģ�ͣ�������ĥ�������ò������Ԥ��ʵ�����ض�AA6061-T6/AlNp���ϲ���ĥ���ʵ�Ӱ�졣�ع�ģ��Ԥ�������������ϲ��ϵ�ĥ����������ǿ��AlN�������������Ӷ����ͣ����Ż����ٶȡ��������롢���ص����Ӷ����ӡ�
�ؼ��ʣ��������ϲ��ϣ�������ǿ�壻ĥ�𣻻ع�ģ��
(Edited by Hua YANG)
Corresponding author: B. ASHOK KUMAR; Tel: +91-4257-241935; Fax: +91-4257-242007; E-mail: ashokbkumar@ yahoo.com
DOI: 10.1016/S1003-6326(14)63410-5

