���弤�⺸��/�����ֽ�ͷ��֯������
��Դ�ڿ����й���ɫ����ѧ��(Ӣ�İ�)2016���4��
�������ߣ���� ������ �Ż�
����ҳ�룺994 - 1002
�ؼ��ʣ����弤�⺸���֣�������֯����ѧ����
Key words��pulsed laser welding; steel; aluminum; microstructure; mechanical property
ժ Ҫ���������弤��Դ����Ͳ���ֽ��д�Ӻ����о������������ͷ��ѧ�����뺸������������е���ϵ��Ϊ�ˣ���������ͬ������ȵĽ�ͷ�������о������������Ϊ354 ��mʱ�������ۻ����Ľ�������˸��������������仯��������ƣ���ͷǿ��Ϊ(27.2��1.7) N/mm���������ۻ������洦������3�ֲ�ͬ�Ķ���ģʽ�����������Ϊ108 ��mʱ�������ۻ����Ľ���������˸��������������仯���δ�۲쵽�κ�ȱ�ݡ�����ͷǿ��Ϊ(46.2��1.9) N/mmʱ���������ۻ������洦��������һ�ֶ���ģʽ��
Abstract: Pulsed laser welding was used in joining pure aluminum to stainless steel in a lap joint configuration. It is found that the mechanical properties of the laser joints were closely correlated with the bead geometry, i.e., penetration depth. In order to study the correlation, two typical laser welds with different penetration depths were analyzed. In high penetration depth (354 ��m) joint, Al-rich Fe-Al IMCs with microcracks were formed at the Al/fusion zone (FZ) interface. The joint strength was found to be (27.2��1.7) N/mm and three failure modes were observed near the Al/FZ interface. In low penetration depth (108 ��m) joint, Fe-rich Fe-Al IMCs without any defect were formed at the Al/FZ interface. The joint strength was found to be (46.2��1.9) N/mm and one failure mode was observed across the FZ.
Trans. Nonferrous Met. Soc. China 26(2016) 994-1002
Jin YANG, Yu-long LI, Hua ZHANG
Key Laboratory for Robot and Welding Automation of Jiangxi Province, School of Mechanical and Electrical Engineering, Nanchang University, Nanchang 330031, China
Received 10 April 2015; accepted 27 July 2015
Abstract: Pulsed laser welding was used in joining pure aluminum to stainless steel in a lap joint configuration. It is found that the mechanical properties of the laser joints were closely correlated with the bead geometry, i.e., penetration depth. In order to study the correlation, two typical laser welds with different penetration depths were analyzed. In high penetration depth (354 ��m) joint, Al-rich Fe-Al IMCs with microcracks were formed at the Al/fusion zone (FZ) interface. The joint strength was found to be (27.2��1.7) N/mm and three failure modes were observed near the Al/FZ interface. In low penetration depth (108 ��m) joint, Fe-rich Fe-Al IMCs without any defect were formed at the Al/FZ interface. The joint strength was found to be (46.2��1.9) N/mm and one failure mode was observed across the FZ.
Key words: pulsed laser welding; steel; aluminum; microstructure; mechanical property
1 Introduction
In order to reduce fuel consumption and decrease air pollution, lightweight metals and alloys have been suggested in many industrial applications, such as spacecraft, airplane and automotive [1-5]. Among various lightweight metals and alloys, aluminum is one of the most popularly used materials due to its virtues of low density, good corrosion resistance, excellent workability and machinability. Therefore, many conventional all-steel components have been replaced by steel-aluminum hybrid structures, making the joining of steel to aluminum inevitable.
Although Fe/Al hybrid joints have been widely used, direct joining of steel to aluminum is still a challenge due to their disparity in thermal expansion coefficient, as well as rapid formation of harmful Fe-Al intermetallic compounds (IMCs) [6]. Fe-Al IMCs are hard and brittle phases, which tend to embrittle the joint because of their low critical stress intensity factor and high crack propagation rate [7]. Therefore, many joining technologies were applied to joining steel to aluminum, such as friction stir brazing [8], friction stir welding [9], explosive welding [10], diffusion bonding [11], magnetic pulse welding [12] and welding-brazing [4].
By virtue of high energy density, high heating/ cooling rates and high speed, laser welding is regarded as a desirable method for joining Fe/Al dissimilar materials. SIERRA et al [13] reported a steel-on-aluminum overlap configuration, which inhibited the formation of IMCs by controlling steel penetration in aluminum. They also pointed out that the critical penetration depth is around 500 ��m. KOUADRI-DAVID and PSM [14] studied metallurgic and mechanical properties of laser welded galvanised steel to Al alloy, and they mentioned that the penetration depth should be less than 600 ��m to achieve a robust laser Al/steel joint. TORKAMANY et al [15] also used the penetration depth as a criterion for obtaining a sound laser welded Al/steel joint, where the penetration depth should be limited between 1560 and 1630 ��m. Similarly, CHEN et al [16] revealed the relationship between bead parameters, i.e., weld width, penetration depth and joint strength in the investigation of laser keyhole welding of Al alloy to stainless steel. MATHIEU et al [17] used the ratio of bead length to wetting angle as the bead geometrical criterion and established their relationship with joint strength in laser joining of aluminum to steel. In our previous study [18], aspect ratio was used to characterize the bead geometry in the optimization of laser Al/steel joint. From the literature above, bead geometry, such as penetration depth, width and aspect ratio, was normally used as a criterion for the quality of laser joints assessment during process parameters optimization. No matter what kind of geometric criterion is used, it is apparently a simple, accessible and time-saving approach, by which researchers are able to get a rough idea on the laser joint quality without conducting any standard mechanical testing and microstructure characterization. However, as mentioned above, the mechanical properties of laser Al/steel joint are also affected by the formation of hard and brittle Fe-Al IMCs. The correlation between the microstructure (thickness, type, morphology of the Fe-Al IMCs) and joint mechanical properties has been extensively studied [1,2,4,5,19-22], most of which ignored the influence of bead geometry on the joint mechanical properties. Thus, it is of importance and interest to investigate the relationship among the bead geometry, microstructure and mechanical properties of laser Al/steel joints.
In this study, the process parameters of laser welding were optimized using Taguchi method. Penetration depth was chosen as the bead geometrical criterion and two typical laser joints with different penetration depths were selected. They were then analyzed by stereoscope, optical microscope (OM), scanning electron microscope (SEM) and energy dispersive X-ray spectrometer (EDS) to investigate the weld appearance and microstructure. At last, the mechanical properties of the joints, i.e., joint strength and microhardness, were given. The aim of this work is to systematically investigate relationship among bead geometry, microstructure and joint mechanical properties of laser Al/steel joint.
2 Experimental
2.1 Setup
The laser welder was a Nd:YAG laser (JHM-1GY- 300F). The maximum mean output power of the laser was 300 W of pulsed laser emitting at 1064 nm. The waveform of the pulsed laser was square. The laser beam was generated from the Nd:YAG laser source and transported through collimation lenses, then came to a focusing lens with the focal length of 75 mm. Through the lens, the laser beam was vertically transmitted on the workpiece surface with spot diameter of (0.8��0.1) mm (Fig. 1(a)). The laser beam was defocused above the workpiece 0.6 mm because a better weld surface appearance can be achieved. A laser keyhole welding mode was used and the process parameters were selected as 265-295 W of laser mean power (Pm), 4.0-5.5 ms of pulse duration (D), and 4-10 mm/s of welding speed (S). Pulse frequency (f) was held at constant as 15 s-1.
2.2 Materials
The chemical compositions of 316L stainless steel, 1060 pure aluminum alloy are shown in Table 1. 50 mm �� 20 mm coupons were cut from 0.8 mm-thick sheets used as base metals. Prior to welding, the stainless steel coupons were ground using SiC abrasive paper with 1200 grit and then degreased in acetone. While, the aluminum sheets were degreased using acetone and methanol, immersed in a 5% NaOH solution heated to 70 ��C for 2 min, rinsed in cold water, immersed in as-received HNO3 solution for 1 min, rinsed with hot water, dried, and then manually brushed stainless steel wire. After cleaning, the specimens were immediately clamped in a lap joint configuration on the welding fixture and then laser welded. The lap distance was set to be 10 mm. In order to prevent the oxidation in fusion zone (FZ), high purity argon shielding gas (99.99%) was employed with flow rate of 15 L/min in the front, back and side with respect to the welds (Fig. 1(a)).
2.3 Metallurgical and mechanical characterization
After welding, the specimens were produced by wire-cutting and followed by standard grounding and polishing process. The weld appearances and cross sections were first examined using stereoscope and OM. Then, the cross sections were analyzed using a JEOL JSM-6460 SEM with EDS analysis.
Vickers microhardness values were measured at the force of 25 g and the duration of 15 s to evaluate microhardness of the joints. Tensile-shear testing specimens with the dimensions of 60 mm �� 10 mm were cut in the welds. The lap distance of the specimens was 10 mm. The specimens were estimated by tensile-shear testing with 1 mm/min crosshead speed using Instron 5548 Micro tester, in the vertical direction to the welding line. The joint strength was presented in fracture load because the difference in the FZ morphologies produced under various process parameters (Fig. 1(b)). Finally, SEM and EDS were employed to analyze the fracture surfaces.
Table 1 Chemical composition of materials (mass fraction, %)


Fig. 1 Schematic illustration of experimental setup of Nd:YAG pulsed laser keyhole welding (a) and tensile shear testing (b)
3 Results and discussion
3.1 Process parameters optimization and macrostructure
To optimize the process parameters, laser welding experiments were performed using the Taguchi design method. As mentioned earlier, P, D and S were chosen as variables. The index considered for each test was the joint strength (T). L16 orthogonal array was used as shown in Table 2. The joint strength varies from 15.6 to 46.2 N/mm. Figure 2 presents the penetration depth versus joint strength profile. Basically, the joint strength increased with the increase of penetration depth when the penetration depth was less than 108 ��m approximately, then it decreased with the further increasing penetration depth. Obviously, low penetration depth (<108 ��m) meant relatively small bonding area, which could result in a poor joint strength. To understand the decrease of joint strength with the further increasing penetration depth, samples 5, 9 and 13 were analyzed. Figure 3 presents the weld appearance and cross section of the laser joints. It was obvious that many welding defects, such as spatter, longitudinal crack, cavity and loss of molten material, tended to become severe with the increase of penetration depth, which had negative effect on the mechanical properties of joint. Those defects were found closely related to the laser welding stability [12,23]. Thus, control of the penetration depth could improve the laser welding stability to suppress the welding defects, and therefore enhance the joint strength.
Table 2 L16 orthogonal array and experimental results
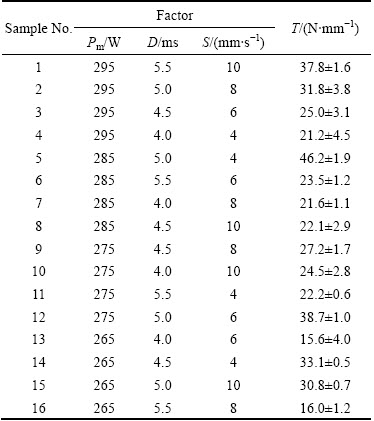

Fig. 2 Profile of joint strength versus penetration depth (Red circles represent sample number)
Since very severe welding defects were formed in sample 13, only samples 5 and 9 were selected to perform the further analysis and discussion. It was noted that the joint strengths of samples 5 and 9 were (46.2��1.9) N and (27.2��1.7) N, respectively (Table 2). For convenience, samples 5 and 9 were denoted as low penetration depth and high penetration depth, respectively.
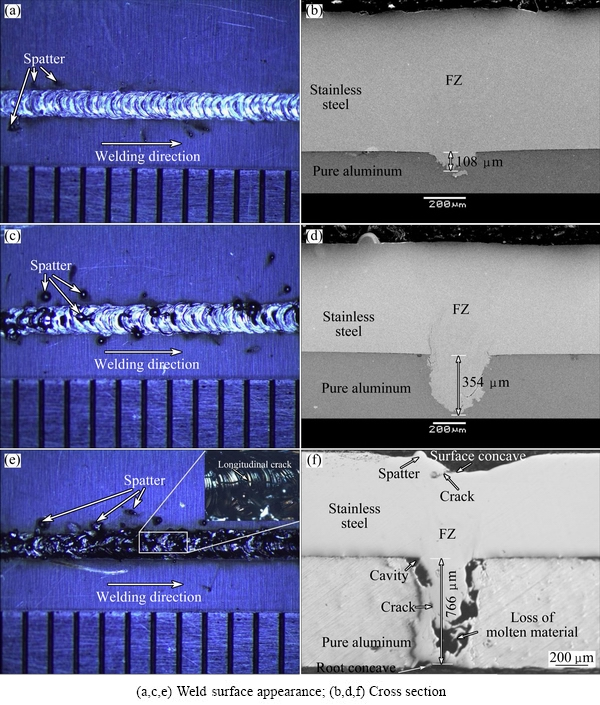
Fig. 3 Optical and SEM images of samples 5, 9 and 13 obtained under different conditions indicating welding defects
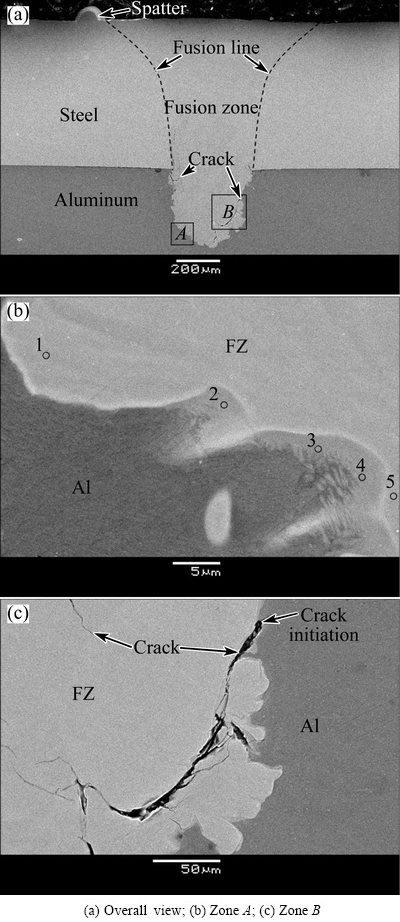
Fig. 4 SEM images of high penetration depth joint
3.2 Microstructure
Figure 4 shows the SEM images of high penetration depth (354 ��m) joint. As shown in Fig. 4(a), the ligulate FZ was protruded into Al. According to EDS area analysis, FZ had the average composition of 18.9% Al, 15.6% Cr, 57.5% Fe and 8.0% Ni (mole fraction). The Al composition was found to increase along the depth of the FZ, which was consistent with the result in Ref. [24]. According to Fe-Al phase diagram, the solid solubility of Al in Fe was up to 44% at room temperature. Thus, the Al atoms in FZ were thought to exist as solid solution in Fe. Figure 4(b) shows enlarged view of zone A in Fig. 4(a). As shown, a crack-free bonding was found in this local region where some needle-like structures were observed near FZ. EDS point analysis (Table 3) shows that the possible phases of those structures are a mixture of FeAl3 and Fe2Al5, which can also be termed as Al-rich Fe-Al IMCs [25]. It was noted that Ni and Cr had large solid solubility in Fe-Al IMCs because they were able to substitute Fe atoms in the IMCs forming (Fe,Ni,Cr)-Al IMCs. As a result, all the Fe-Al IMCs in this study can be written as (Fe,Ni,Cr)-Al IMCs and those modified IMCs were less hard and brittle than Fe-Al IMCs [9]. The formation and growth of those IMCs were controlled by reaction diffusion process [2,4]. It was then confirmed by EDS line scan as discussed later. Figure 4(c) presents enlarged view of zone B in Fig. 4(a). Microcrack was evident at the FZ/Al interface and in FZ, and it seemed that the crack initiated from the FZ/Al interface and then propagated into the middle of FZ. According to EDS analysis, Fe2Al5 was detected near the microcrack. Fe2Al5, HV 1013, was the hardest and most brittle phase among the Fe-Al IMCs [26]. With this in mind, it was considered that the brittle nature of IMCs was combined with the mismatch in thermal expansion coefficient between IMCs and Al under the condition of rapid cooling, making a favorable crack initiation and propagation near Fe2Al5. Besides, the cross section of a solidified spot caused by welding spatter was clearly observed near the FZ, which suggests that the welding process may be not very stable under this condition.
Table 3 EDS results at different points near Al/FZ interface (mole fraction, %)

In low penetration depth (108 ��m) joint, not only the penetration depth but also the FZ morphology was changed, as illustrated in Fig. 5. The shallow tongue-like FZ without any defect was observed in Fig. 5(a). According to EDS, FZ had the average composition of 6.8% Al, 19.0% Cr, 64.1% Fe and 9.1% Ni. Figure 5(b) presents the enlarged view of zone C. As shown, unlike the high penetration depth, a wavy interface was surrounded by peninsular- and needle-like structures. According to EDS analysis and Fe-Al phase diagram, those needle-like structures were expected to be composed of FeAl and FeAl2 as shown in Table 3. It was reported that FeAl and FeAl2 could be formed in laser Al/steel joints [19]. To reveal the formation and growth mechanism of the IMCs, EDS line scan was applied across one of the peninsular structures. As shown in Fig. 5(c), the content of Al gradually decreased from edge to middle, suggesting that Al atoms diffused from Al base metal into FZ. The Al atoms at the edge reacted with Fe, Cr and Ni atoms, forming hard and brittle IMCs, which was then confirmed by microhardness results in the following section. In the middle of the peninsular structures, the content of Al basically kept at constant which existed as solid solution in Fe. More importantly, two diffusion layers (DL) were found between IMC and Al, suggesting that elements diffusion occurred at the FZ/Al interface. Hence, the presented experimental findings substantiated this; the reaction diffusion process dominated the formation and growth of IMCs. It also provided an explanation for the difference in IMCs at interface in the low and high penetration depth joints. It may be due to less Al atom diffusion towards FZ in the low penetration depth joint. It caused the enrichment of Fe atom at FZ/Al interface. As a result, the rich-Fe Fe-Al IMCs tended to form.
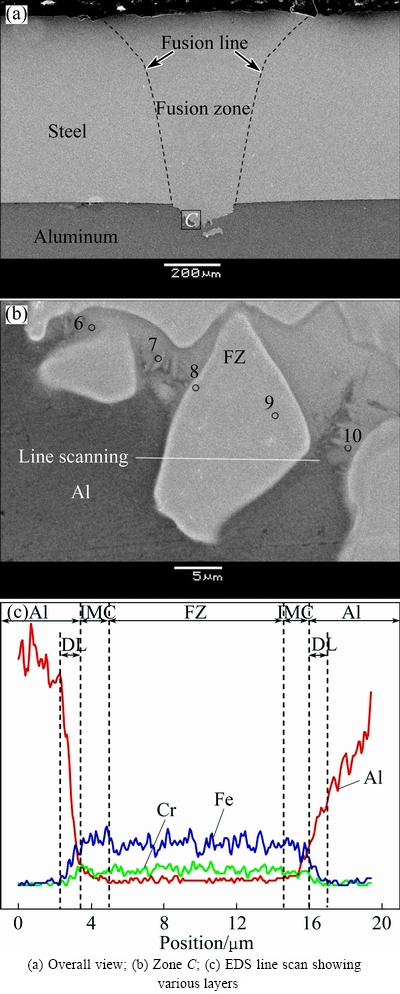
Fig. 5 SEM images and EDS analysis in low penetration depth joint
3.3 Microhardness
The microhardness testing was carried out on the cross sections with 25 g load force and 15 s dwell time. The measurements were performed in the latitudinal and longitudinal directions in FZ, as displayed in Figs. 6(a) and (b), respectively.
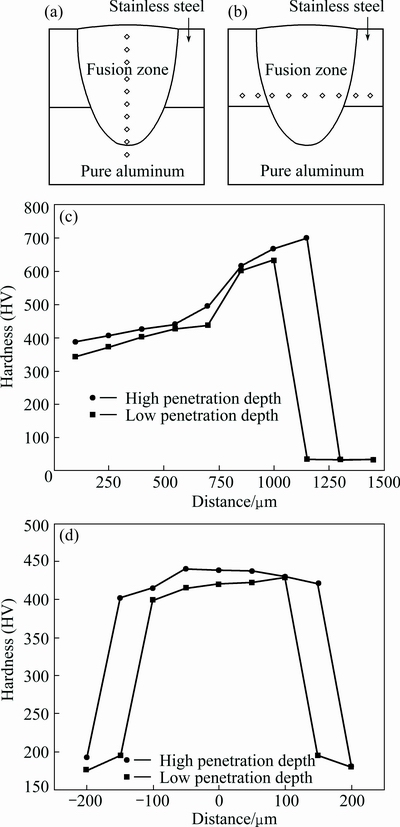
Fig. 6 Schematic illustration of indentation distribution along longitudinal direction (a), indentation location along latitudinal direction (b), microhardness profiles of low and high penetration depth joints along longitudinal direction (c) and microhardness profiles of low and high penetration depth joints across FZ (d)
The microhardness profiles of the low and high penetration depth joints along longitudinal direction are presented in Fig. 6(c). In both cases, it was evident that the microhardness gradually increases from top to bottom of the FZ on steel side. The microhardness results show a sharper increase on Al side than that on steel side, as illustrated in Fig. 6(c). This was likely due to more pronounced solid solution hardening on Al side than that on steel side due to the fact that more Al atoms were available on Al side to transport into Fe lattice to induce the lattice deformation. The maximum hardness was up to around HV 700 in the high penetration depth joint. The typical hardness values of Fe-Al IMCs were as follows: Fe2Al5-HV 1013, FeAl3-HV 892, FeAl2- HV 1060, FeAl-HV 470, and Fe3Al-HV 350 [19]. It was evident that the currently reported hardness values of IMCs were much lower than the typical values which can be understood as follows: on one hand, as mentioned earlier, (Fe,Ni,Cr)-Al IMCs were less hard than Fe-Al IMCs; on the other hand, the pure Al substrate was quite soft with only HV 35 which also could decrease the measured microhardness. Comparing the microhardness of the high and low penetration depth joints, it was found that the microhardness of high penetration depth was higher.
Figure 6(d) shows the microhardness profiles across the FZ in the low and high penetration depth joints. In both cases, the microhardness increased from around HV 200 to HV 400 and reached a plateau around HV 420. It was evident that the FZ presented a higher microhardness than steel which was expected because of the solid solution hardening. Comparing the microhardness of the high and low penetration depth joints, it appeared that a higher microhardness was attained in the high penetration depth joint, indicating a stronger solid solution hardening.
From the microstructure, tensile shear and microhardness characterization, it was concluded that the formation of Al-rich Fe-Al IMCs in high penetration depth joint was harder than that of Fe-rich Fe-Al IMCs in low penetration depth joint, which was prone to initiate microcracks in the joint during cooling (Fig. 4(c)). Those microcracks could act as fracture propagation paths during tensile shearing testing, leading to a deduction in joint strength.
3.4 Fractography
Figure 7 shows the fracture morphologies of the high penetration depth joint on the steel side. As shown in Fig. 7(a), three typical fracture modes were observed in different welding spots including shear brittle failure, cleavage brittle failure and mixed failure. The fracture surface of shear brittle failure characterized quite smooth plane without any obvious fluctuation (Fig. 7(b)). However, the fracture surface of cleavage brittle failure exhibited a mass of river patterns and smooth planes with tearing ridges, as shown in Fig. 7(c). The variety in failure mode indicated the inhomogeneity in microstructure of each weld spot which likely resulted from an unsteady welding process. In addition, evident variation in weld spot sizes (indicated by yellow circles) was presented in Fig. 7(a), which also substantiates an unsteady laser welding process. The failure occurred near Al/FZ interface as shown in Fig. 7(d).
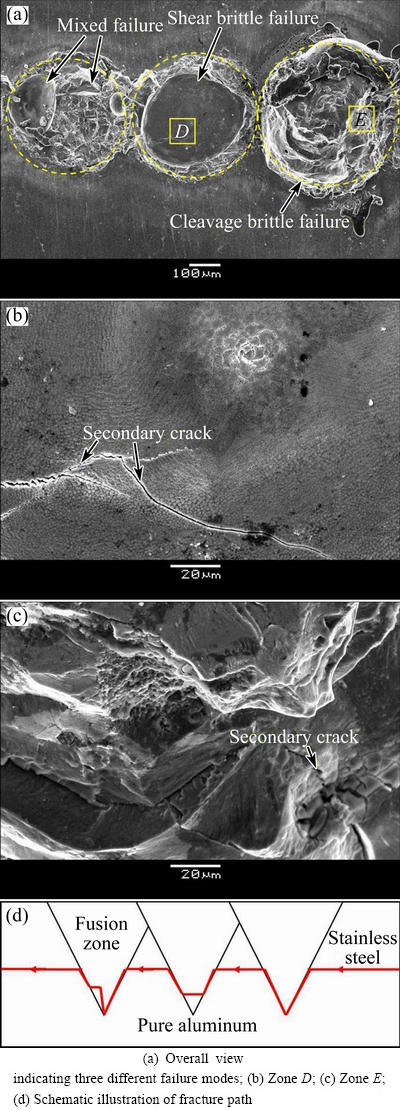
Fig. 7 Fracture morphologies of high penetration depth joint and schematic illustration of fracture path
Figure 8 presents the fracture morphologies of the low penetration depth joint on the steel side. As shown in Figs. 8(a) and (b), only cleavage brittle failure was found on a relatively uniform fracture surface showing lots of tearing ridges and river patterns. It was indicative of a relatively steady welding process. The failure occurred across FZ at the Al/steel interface (Fig. 8(c)). Many secondary cracks were observed on the fracture surfaces shown in Figs. 7 and 8. It was considered that the hard and brittle nature of Fe-Al IMCs was responsible for the generation of the secondary cracks during either cooling or tensile shear testing process. Besides, the fracture surface characterization could be used to identify the process stability in laser keyhole welding.
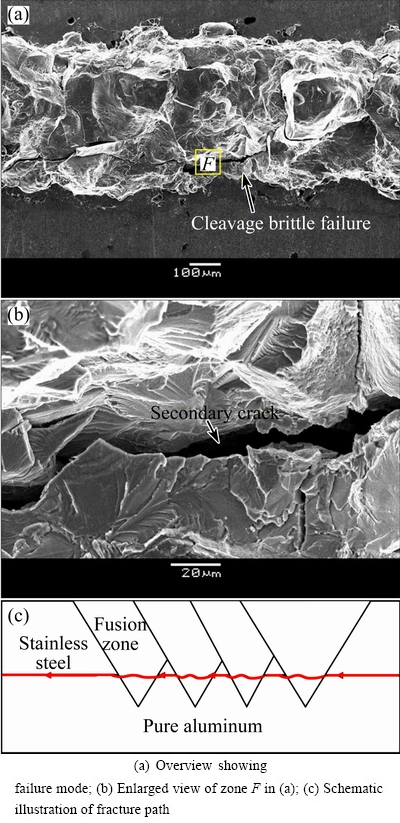
Fig. 8 Fracture morphologies of low penetration depth joint and schematic illustration of fracture path
4 Conclusions
1) The penetration depth should be controlled around 108 ��m, otherwise the welding defects will be significantly increased, which could result in the decrease of joint strength.
2) In low and high penetration depth joints, Fe-rich and Al-rich Fe-Al IMCs are formed, respectively. Compared with Fe-rich Fe-Al IMCs in low penetration depth joint, Al-rich Fe-Al IMCs in high penetration depth joint is harder, which could initiate microcracks and deteriorate the mechanical properties of joint.
3) According to fracture surface analysis, it is suggested that the low penetration depth joint is obtained during a more stable laser welding process than that of high penetration depth joint. An unstable welding process also has negative effect on the mechanical properties of joint.
References
[1] SHI Y, ZHANG H, TAKEHIRO W, TANG J G. CW/PW dual-beam YAG laser welding of steel/aluminum alloy sheets [J]. Optics and Lasers in Engineering, 2010, 48(7): 732-736.
[2] ZHANG Wei-hua, SUN Da-qian, HAN Li-jun, LIU Dong-yang. Interfacial microstructure and mechanical property of resistance spot welded joint of high strength steel and aluminium alloy with 4047 AlSi12 interlayer [J]. Materials & Design, 2014, 57: 186-194.
[3] DEHGHANI M, AMADEH A, AKBARI M S A A. Investigations on the effects of friction stir welding parameters on intermetallic and defect formation in joining aluminum alloy to mild steel [J]. Materials & Design, 2013, 49: 433-441.
[4] CAO R, YU G, CHEN J H, WANG P C. Cold metal transfer joining aluminum alloys-to-galvanized mild steel [J]. Journal of Materials Processing Technology, 2013, 213(10): 1753-1763.
[5] SHAH L H, ISHAK M. Review of research progress on aluminum-steel dissimilar welding [J]. Materials and Manufacturing Processes, 2014, 29(8): 928-933.
[6] ZHANG M J, CHEN G Y, ZHANG Y, WU K R. Research on microstructure and mechanical properties of laser keyhole welding�Cbrazing of automotive galvanized steel to aluminum alloy [J]. Materials & Design, 2013, 45: 24-30.
[7] TRAN V X, PAN J. Fatigue behavior of dissimilar spot friction welds in lap-shear and cross-tension specimens of aluminum and steel sheets [J]. International Journal of Fatigue, 2010, 32(7): 1167-1179.
[8] ZHANG Gui-feng, SU Wei, ZHANG Jian-xun, WEI Zhong-xin. Friction stir brazing: A novel process for fabricating Al/steel layered composite and for dissimilar joining of Al to steel [J]. Metallurgical and Materials Transactions A, 2011, 42(9): 2850-2861.
[9] UZUN H, DALLE D C, ARAGNOTTO A, GHIDINI T, GAMABARO C. Friction stir welding of dissimilar Al 6013-T4 to X5CrNi18-10 stainless steel [J]. Materials & Design, 2005, 26(1): 41-46.
[10] SUN Xian-jun, TAO Jie, GUO Xun-zhong. Bonding properties of interface in Fe/Al clad tube prepared by explosive welding [J]. Transactions of Nonferrous Metals Society of China, 2011, 21(10), 2175-2180.
[11] HE P, YUE X, ZHANG J H. Hot pressing diffusion bonding of a titanium alloy to a stainless steel with an aluminum alloy interlayer [J]. Materials Science and Engineering A, 2008, 486(1): 171-176.
[12] YU H, XU Z, FAN Z, ZHAO Z, LI C. Mechanical property and microstructure of aluminum alloy-steel tubes joint by magnetic pulse welding [J]. Materials Science and Engineering A, 2013, 561: 259-265.
[13] SIERRA G, PEYRE P, DESCHAUX B F, STUART D, FRAS G. Steel to aluminium key-hole laser welding [J]. Materials Science and Engineering A, 2007, 447(1): 197-208.
[14] KOUADRI-DAVID A, PSM T. Study of metallurgic and mechanical properties of laser welded heterogeneous joints between DP600 galvanised steel and aluminium 6082 [J]. Materials & Design, 2014, 54: 184-195.
[15] TORKAMANY M J, TAHAMTAN S, SABBAGHZDEH J. Dissimilar welding of carbon steel to 5754 aluminum alloy by Nd: YAG pulsed laser [J]. Materials & Design, 2010, 31(1): 458-465.
[16] CHEN Shu-hai, HUANG Ji-hua, YANG Dong-dong, MA Ke, ZHANG Hua. The effect of nickel intermediate layer on stainless steel and aluminum alloy of laser key-hole welding [J]. Transactions of the China Welding Institution, 2012, 33(8): 9-12. (in Chinese)
[17] MATHIIEU A, SHABADI R, DESCHAMPS A, MICHEL S, SIMONE M, DOMINIQUE G, EUGEN C. Dissimilar material joining using laser (aluminum to steel using zinc-based filler wire) [J]. Optics & Laser Technology, 2007, 39(3): 652-661.
[18] YANG Jin, ZHANG Hua, LI Yu-long. Optimization of Nd:YAG laser welding of aluminum alloy to stainless steel thin sheets via Taguchi method and response surface methodology (RSM) [J]. Lasers in Engineering, 2015, 31(3-4): 141-159.
[19] SIERRA G, PEYRE P, BEAUME F D, KATAYAMA S. Steel to aluminium braze welding by laser process with Al-12Si filler wire [J]. Science and Technology of Welding & Joining, 2008, 13(5): 430-437.
[20] SONG J L, LIN S B, YANG C L, FAN C L. Effects of Si additions on intermetallic compound layer of aluminum-steel TIG welding-brazing joint [J]. Journal of Alloys and Compounds, 2009, 488(1): 217-222.
[21] CHEN S, HUANG J, MA K, ZHAO X, VIVEK A. Microstructures and mechanical properties of laser penetration welding joint with/without Ni-foil in an overlap steel-on-aluminum configuration [J]. Metallurgical and Materials Transactions A, 2014, 45(7): 3064-3073.
[22] CHEN S, HUANG J, MA K, ZHANG H, ZHAO X. Influence of a Ni-foil interlayer on Fe/Al dissimilar joint by laser penetration welding [J]. Materials Letters, 2012, 79: 296-299.
[23] ZHAO Y, ZHANG Y, HU W, LAI X. Optimization of laser welding thin-gage galvanized steel via response surface methodology [J]. Optics and Lasers in Engineering, 2012, 50(9): 1267-1273.
[24] MA J, HAROONI M, CARLSON B, KOVACEVIC R. Dissimilar joining of galvanized high-strength steel to aluminum alloy in a zero-gap lap joint configuration by two-pass laser welding [J]. Materials & Design, 2014, 58: 390-401.
[25] RATHOD M J, KUTSUAN M. Joining of aluminum alloy 5052 and low-carbon steel by laser roll welding [J]. Welding Journal, 2004, 83(1): 16S-23S.
[26] KOBAYASHI S, YAKOU T. Control of intermetallic compound layers at interface between steel and aluminum by diffusion- treatment [J]. Materials Science and Engineering A, 2002, 338(1): 44-53.
�� 誣����������� ��
�ϲ���ѧ ���繤��ѧԺ ����ʡ�����˼������Զ����ص�ʵ���ң��ϲ� 330031
ժ Ҫ���������弤��Դ����Ͳ���ֽ��д�Ӻ����о������������ͷ��ѧ�����뺸������������е���ϵ��Ϊ�ˣ���������ͬ������ȵĽ�ͷ�������о������������Ϊ354 ��mʱ�������ۻ����Ľ�������˸��������������仯��������ƣ���ͷǿ��Ϊ(27.2��1.7) N/mm���������ۻ������洦������3�ֲ�ͬ�Ķ���ģʽ�����������Ϊ108 ��mʱ�������ۻ����Ľ���������˸��������������仯���δ�۲쵽�κ�ȱ�ݡ�����ͷǿ��Ϊ(46.2��1.9) N/mmʱ���������ۻ������洦��������һ�ֶ���ģʽ��
�ؼ��ʣ����弤�⺸���֣�������֯����ѧ����
(Edited by Xiang-qun LI)
Foundation item: Project (51265035) supported by the National Natural Science Foundation of China; Project (20151BAB206042) supported by the Natural Science Foundation of Jiangxi Province, China; Project (GJJ150020) supported by the Jiangxi Provincial Department of Education, China
Corresponding author: Yu-long LI; Tel: +86-791-3969629; Fax: +86-791-3969630; E-mail: liyulong1112ster@gmail.com
DOI: 10.1016/S1003-6326(16)64196-1

