Trans. Nonferrous Met. Soc. China 25(2015) 552-558
Evolution of stresses in metal injection molding parts during sintering
Wei FANG1, Xin-bo HE1, Rui-jie ZHANG 1, Shi-di YANG 1, Xuan-hui QU 1, 2
1. Institute for Advanced Materials and Technologies, University of Science and Technology Beijing, Beijing 100083, China;
2. State Key Laboratory for Advanced Metal and Materials, University of Science and Technology Beijing, Beijing 100083, China
Received 17 March 2014; accepted 14 July 2014
Abstract: The evolution of stresses due to inhomogeneity in metal injection molding (MIM) parts during sintering was investigated. The sintering model of porous materials during densification process was developed based on the continuum mechanics and thermal elasto-viscoplastic constitutive law. Model parameters were identified from the dilatometer sintering experiment. The real density distribution of green body was measured by X-ray computed tomography (CT), which was regarded as the initial condition of sintering model. Numerical calculation of the above sintering model was carried out with the finite element software Abaqus, through the user-defined material mechanical behavior (UMAT). The calculation results showed that shrinkages of low density regions were faster than those of high density regions during sintering, which led to internal stresses. Compressive stresses existed in high density regions and tensile stresses existed in low density regions. The densification of local regions depended on not only the initial density, but also the evolution of stresses during the sintering stage.
Key words: metal injection molding; CT detection; sintering; densification; stress; numerical simulation
1 Introduction
Metal injection molding (MIM) is a net-shape- forming technology that provides advantages when making complex-shape parts with high-performance of engineering materials. Typically, there are four steps involved in MIM process, namely mixing, injection molding, debinding and sintering. Different mass densities and flow behavior between powder and binder led to phase segregation during injection molding [1]. The powder-binder segregation in green body could induce internal stresses during sintering due to mismatch of densification rates for different densities regions.
In recent years the microscopic models [2,3] and macroscopic models [4,5] of sintering have been carried out to understand the sintering mechanism. SHABANA et al [4] used the thermal elasto-viscoplastic constitutive model to describe the thermo-mechanical behavior of the nickel-alumina graded structures. The result showed that cracks were present where the stresses reached the critical value. SCHOENBERG et al [5] predicted the stress distribution in a bi-layer structure consisting of a high-density layer and a low-density layer, and found that a highly stressed region between two layers led to edge cracking during sintering. However, density distribution in MIM green bodies was more complex than that of graded structures or layer structures. Hence, the prediction of stresses distribution in MIM compacts depended strongly on the accuracy of the initial density variations in the green body. SONG et al [6], HEANEY and SPINA [7] and QUINARD et al [8] developed the sintering model based on thermal elasto-viscoplastic constitutive law equations that could predict the shrinkage of MIM compacts, which was useful to determining the die cavity geometry. However, SONG et al [6] used the simulation results of injection stage as the initial density distribution, and QUINARD et al [8] used an assumed uniform green density distribution.
In this work, the complex density distribution of sample was measured by X-ray computed tomography (CT), and the actual powder volume fraction in local region was obtained by CT image processing analysis, which was regarded as the initial condition of sintering. The evolution of densification and stresses in inhomogeneous MIM parts during sintering was investigated.
2 Experimental
2.1 Process of MIM
The metallic powder used in this work was 316L SS (Handan ASL Atomized Powder Co., China), with a particle average diameter of about 9.2 μm, and pycnometric density of 7.93 g/cm3. The selected binder system was composed of 69% paraffin wax (PW), 30% polypropylene (HDPE) and 1% stearic acid (SA) (mass fraction). The mixture was prepared in the XSM1/20-80 rubber mixer, with approximately 56% powder loading. The feedstock was injection molded on the horizontal CJ80E molding machine with the proper parameters. The injection pressure was 100 MPa, the injection temperature was 170 °C, the injection rate was 60 cm3/s and the mold temperature was 60 °C. The parts molded were bricks with dimensions of 28 mm×20 mm×6 mm. The complex density distribution of the green body was measured by X-ray CT. Then, samples were doused in heptane solvent at 60 °C for 6 h, completely dried in the constant temperature oven and sintered at 1360 °C for 60 min in 90% Ar+10% H2 (volume fraction). The heating rate and cooling rate were 10 °C/min. A green body before and after sintering was shown in Fig. 1. Meanwhile, the shrinkage curve of 316L SS powders during sintering was obtained in the horizontal dilatometer DIL 402PC to investigate the shrinkage in length associated to the small cylindrical specimens. The dimensions of specimens were 15 mm in length and 6 mm in diameter approximately.
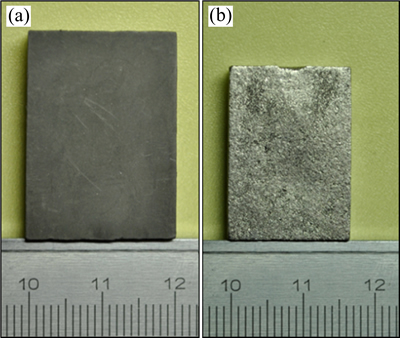
Fig. 1 Green bodies before (a) and after (b) sintering
2.2 Process of CT detection
X-ray CT is an extension of conventional projection radiography and the technique can readily produce a two-dimensional image of an object’s internal structure. In these images, gray value can be used to quantitatively evaluate the density variations because of the variations in X-ray absorption between different materials [9]. HELDELE et al [10] and BUSIGNIES et al [11] have successfully used CT to determine the particle density and the defect distribution in compacts.
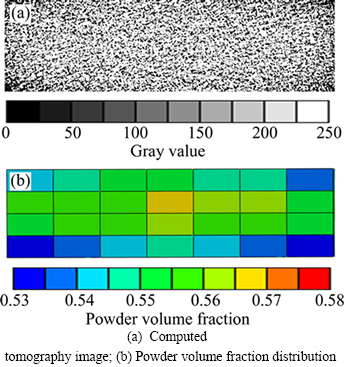
Fig. 2 Powder volume fraction in local region obtained by computed tomography and image processing
In this work, the green bodies were scanned by the combination set up of the 130 keV micro-focus X-ray tube and image intensifier/charged coupled device (CCD) camera detector, with the tube energy of 120 keV and current of 0.235 mA. As shown in Fig. 2(a), gray value distribution through a cross section was determined using X-ray CT. In the computed tomography image, the gray value is proportional to the density of regions as expressed in Eq. (1):
G=kρ (1)
where G is the gray value; ρ is the relative density; and k is proportionality coefficient.
 (2)
(2)
 (3)
(3)
where ρp and ρb are the densities of powder and binder, respectively; φp and φb are the powder and binder volume fractions of regions, respectively.
 (4)
(4)
where ,
,  is the average density of the whole green body,
  and
and  are the average powder and binder volume fractions of the whole green body, respectively, and
  is the average gray value of the whole green body, which can be obtained by CT detection. Inputting Eqs. (2) and (3) into Eq. (4), we can get
 (5)
(5)
Figure 2(a) was the computed tomography image, which was divided into 4×7 grids, and gray value of each grid was determined. By using Eq. (5), powder volume fraction of each region can be obtained, as shown in Fig. 2(b). The powder volume fraction was used to be input data for the numerical calculation of sintering model.
3 Sintering model
The sintering model of the green body has been developed based on the continuum mechanics and thermal elasto-viscoplastic constitutive law. The total strain rate  of this model is
 (6)
(6)
where  ,
, ,
, are the elastic strain rate, thermal strain rate and viscoplastic strain rate, respectively. The stress rate
  can be expressed as
 (7)
(7)
where De is the elastic stiffness matrix. For the isotropic materials, De is defined as
 (8)
(8)
where E and  are the elastic modulus and Poisson ratio of porous materials, respectively. It has been a common practice to consider the thermo-mechanical properties of porous materials to be a function of the relative density [12-15]:
 (9)
(9)
 (10)
(10)
where E0 and  are the elastic modulus and Poisson ratio of the fully dense material, respectively; b0 is a constant [13]; and ρ is the relative density of the porous material. According to the elastic-plastic mechanics, ρ can be expressed as
 (11)
(11)
where ρ0 is the theoretical density of the fully dense materials; ε11, ε22 and ε33 are the normal strains. The thermal strain rate is mainly due to thermal expansion that can be expressed as
 (12)
(12)
where α is the thermal expansion coefficient obtained by experiment, and  is the temperature increment rate.
BORDIA and SCHERER [16] and OLEVSKY [12] suggested that it was more appropriate to use a constitutive equation based on linear viscous deformation.  can be expressed as
 (13)
(13)
where σd, σm and σs are the deviatoric stress, spherical stress and sintering stress, respectively; G is the shear viscosity modulus; K is the bulk viscosity modulus; and I is the second order identity tensor.
 (14)
(14)
 (15)
(15)
where ηp is the uniaxial viscosity of the porous materials, and ηp can be expressed as
 (16)
(16)
where A and B are the important parameters that can be identified from the dilatometer sintering experiment. In this study, paremeters A and B are listed in Table 1. As shown in Fig. 3, thermal expansion existed at the beginning of the curve, and thermal shrinkage existed at the end of the curve. Besides these two periods, there were three stages during sintering, the sintering began in the initial stage, and then subjected to the rapid shrinkage in the intermediate stage. Afterwards the shrinkage was much slower in the final stage. In order to fit the curves obtained from dilatometer experiments, different values were chosen in three stages. Figure 3 shows the shrinkage curves obtained by dilatometer test and numerical calculation. There was a good agreement between the experimental data and calculated results, which assured obtaining reliable results of the numerical simulation.
Table 1 Model parameters in different stages of sintering

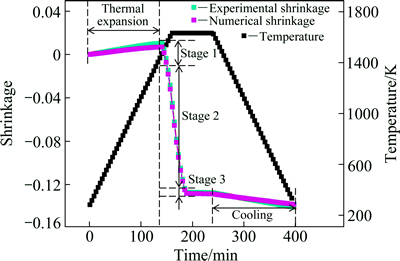
Fig. 3 Shrinkage curves obtained by dilatometer test and numerical simulation
4 Numerical simulation
The numerical calculation based on the above sintering model was carried out with the finite element software Abaqus, through the user subroutine UMAT. The geometry used for the simulation was the same as the experiment, as shown in Fig. 4. For 316L stainless powders, the thermal expansion coefficient is 1.1×10⁻⁵ K-1, the elastic modulus E0 is 200 GPa, and the Poisson ratio ( ) is 0.3.
Figure 4 shows schematic diagram of the boundary conditions. There was Coulomb friction between the body and the substrate, and friction coefficient was 0.2. The surfaces were exposed in the sintering atmosphere. The sintering process was performed under gravity. The temperature of the sintering body changed with the same thermal cycle in the furnace, as shown in Fig. 3. The powder volume fraction distribution of the green body measured by X-ray CT was regarded as the initial condition of sintering model. And the tested green bodies were prepared at the condition parameters mentioned in Section 2.1.
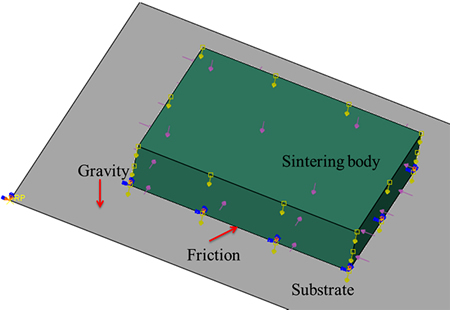
Fig. 4 Schematic diagram of boundary conditions of sintering body
5 Results and discussion
The density distribution in MIM green bodies was complex. Ten evenly distributed CT reconstructed slices were selected to obtain the overall powder volume fraction distribution of the green body. By using the method mentioned in Section 2.2, the initial powder volume fractions of local regions can be obtained, as shown in Fig. 5. Along directions L, the powder volume fractions at the beginning were lower than those at the end. Powder contents along direction L2 were higher than those along directions L1 and L3, and powder contents along directions L1 and L3 were in symmetric distribution. Along directions W, the powder volume fractions in the edge area were lower than those in the center. And powder contents were higher where the regions were close to the bottom. Along directions H, the powder contents in the edge area were lower and became much higher in the center. Powder contents along direction H2 were higher than those along directions H1 and H3, and powder contents along directions H1 and H3 were in symmetric distribution. As we all know, the phase segregation was caused by the difference of the density and viscosity between powder and binder. SHIVASHANKAR et al [17] indicated that the viscosity of the material changed with the flow rate through the die, and the powder tended to accumulate along the original flow path in the cavity when the flow direction changed. There were more powder particles in the central part where the powders reached the compact loading earlier. Hence, the powders gathered at the bottom of the green body, and the powder contents increased gradually from the surface to the interior.
The powder volume fraction distribution of the green body measured by X-ray CT was regarded as the initial condition of sintering model. The numerical calculation was carried out with the finite element software Abaqus. The final shrinkages of the sintered body in three directions are shown in Fig. 6. Along directions L, the shrinkage of sintering body gradually decreased and reached the minimum about 0.134 at the bottom. Along directions W and H, the shrinkage in the center was lower than that on the two sides. It can be observed that shrinkage in each direction was inversely proportional to powder volume fraction. The low density regions were found to sinter faster than the high density regions, which led to internal stresses. The final density may also depend on the evolution of internal stresses. Therefore, as shown in Fig. 7, the sintering simulation results of homogeneous and inhomogeneous green body were compared to study the effect of internal stresses on the densification. The stresses in Figs. 7(e) and (f) represent the maximum principal stresses in sintered body.
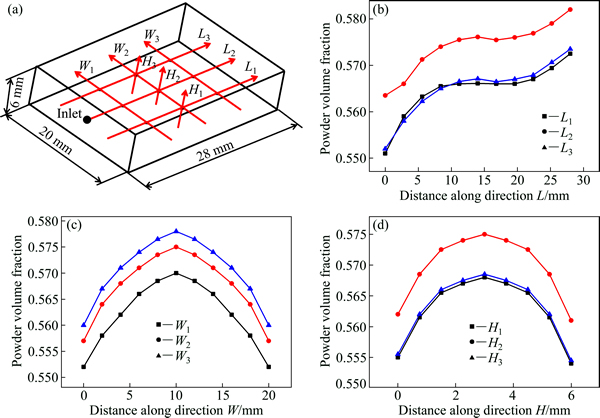
Fig. 5 Directions selected in green body (a) and powder volume fraction along directions L (b), W (c) and H (d)
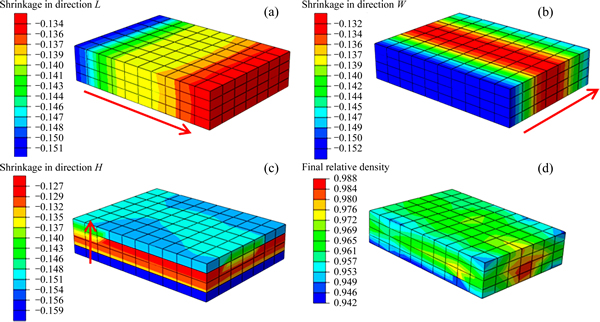
Fig. 6 Final shrinkages of sintering body in directions L (a), W (b) and H (c) and final relative density distribution (d)
As shown in Figs. 7(a), (c) and (e), when the initial density distribution was homogeneous, the shrinkages of regions were uniform, and the internal stresses hardly existed. Gravitational effect resulted in uneven shrinkage in the thickness direction, but the effect was slight. However, the effect may be significant when the part was complex and had hollow structure. When the green density distribution was inhomogeneous, the shrinkage of regions was non-uniform, resulting in the internal stresses, as shown in Figs. 7(b), (d) and (f). The results showed that the final relative density distribution did not quite match with the initial relative density distribution. The compressive stresses existed in the high density regions and tensile stresses existed in the low density. Three nodes 1, 2 and 3 in Figs. 7(a) and (b) with the same initial relative density were chosen to trace the evolution of stresses and relative density during the sintering process, and their positions were shown in Fig. 8. Three nodes had the same initial relative density but different final relative density after sintering. After sintering, node 2 with tensile stress had a lower density, and node 3 with compressive stress had a higher density. As shown in Fig. 7, the internal stresses reached the maximum during the rapid shrinkage stage, and fell slowly in the later stage. Due to the uniform shrinkages of regions, internal stresses hardly existed in node 1, with a value of 0.03 MPa. The results showed that the densification of regions depended on not only the initial density, but also the evolution of internal stresses during the sintering stage.
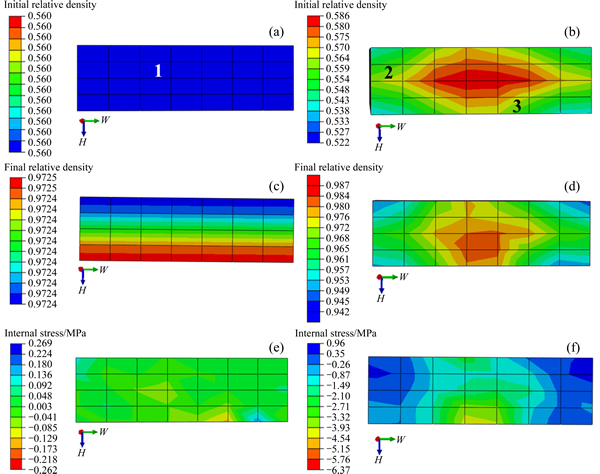
Fig. 7 Initial relative density distribution of homogeneous (a) and inhomogeneous (b) green body, final relative density distribution of homogeneous (c) and inhomogeneous (d) green body after sintering, internal stress distribution of homogeneous (e) and inhomogeneous (f) green body after sintering
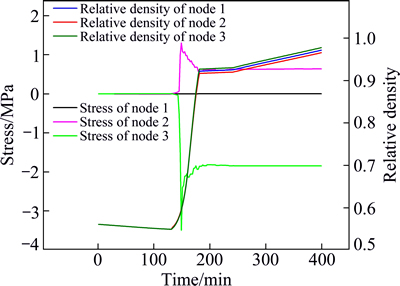
Fig. 8 Evolution of relative density and stress in sintering process at selected nodes with FEM model
6 Conclusions
1) This study focused on the evolution of shrinkage and stresses in MIM parts during sintering. The sintering model of porous structures was developed based on the continuum mechanics and thermal elasto-viscoplastic constitutive law.
2) The complex density distribution of the green body was measured by X-ray CT, which was regarded as the initial condition of sintering model. The powders gathered at the bottom of green bodies, and the powder contents increased gradually from surface to interior.
3) Shrinkages of low density regions are faster than those of high density regions during sintering, which leads to internal stresses. The compressive stresses exist in the high density regions and tensile stresses exist in the low density regions.
4) The densification of regions depends on not only the initial density, but also the evolution of internal stresses during the sintering stage. The prediction of shrinkage is important to control dimensional accuracy of MIM parts.
References
[1] BARRIERE T, GELIN J C, LIU B. Improving mould design and injection parameters in metal injection moulding by accurate 3D finite element simulation [J]. Journal of Materials Processing Technology, 2002, 125: 518-524.
[2] ZHANG Rui-jie, CHEN Zhong-wei, FANG Wei, QU Xian-hui. Thermodynamic consistent phase field model for sintering process with multiphase powders [J]. Transactions of Nonferrous Metals Society of China, 2014, 24: 783-789.
[3] ZHANG Shou-zhou, ZHANG Rui-jie, QU Xian-hui, FANG Wei, LIU Ming-zhi. Phase field simulation for non-isothermal solidification of multicomponent alloys coupled with thermodynamics database [J]. Transactions of Nonferrous Metals Society of China, 2013, 23: 2361-2367.
[4] SHABANA Y M, BRUCK H A, PINES M L, KRUFT J G. Modeling the evolution of stress due to differential shrinkage in powder-processed functionally graded metal-ceramic composites during pressureless sintering [J]. International Journal of Solids and Structures, 2006, 43: 7852-7868.
[5] SCHOENBERG S E, GREEN D J, SEGALL A E, MESSING G L, GRADER A S, HALLECK P M. Stresses and distortion due to green density gradients during densification [J]. Journal of the American Ceramic Society, 2006, 89: 3027-3033.
[6] SONG J, GELIN J C, BARRI R E T, LIU B. Experiments and numerical modelling of solid state sintering for 316L stainless steel components [J]. Journal of Materials Processing Technology, 2006, 177: 352-355.
[7] HEANEY D F, SPINA R. Numerical analysis of debinding and sintering of MIM parts [J]. Journal of Materials Processing Technology, 2007, 191: 385-389.
[8] QUINARD C, SONG J, BARRIERE T, GELIN J C. Elaboration of PIM feedstocks with 316L fine stainless steel powders for the processing of micro-components [J]. Powder Technology, 2011, 208: 383-389.
[9] LANDIS E N, KEANE D T. X-ray microtomography [J]. Materials Characterization, 2010, 61: 1305-1316.
[10] HELDELE R, RATH S, MERZ L, BUTZBACH R, HAGELSTEIN M, HAU ELT J. X-ray tomography of powder injection moulded micro parts using synchrotron radiation [J]. Nuclear Instruments and Methods in Physics Research (Section B): Beam Interactions with Materials and Atoms, 2006, 246: 211-216.
[11] BUSIGNIES V, LECLERC B, PORION P, EVESQUE P, COUARRAZE G, TCHORELOFF P. Quantitative measurements of localized density variations in cylindrical tablets using X-ray microtomography [J]. European Journal of Pharmaceutics and Biopharmaceutics, 2006, 64: 38-50.
[12] OLEVSKY E A. Theory of sintering: from discrete to continuum [J]. Materials Science and Engineering R, 1998, 23: 41-100.
[13] ZHANG B, GASIK M M. Stress evolution in graded materials during densification by sintering processes [J]. Computational Materials Science, 2002, 25: 264-271.
[14] GASIK M, ZHANG B. A constitutive model and FE simulation for the sintering process of powder compacts [J]. Computational Materials Science, 2000, 18: 93-101.
[15] MONTASSER M D, KHALIL A K, LIM J K. Processing and mechanical properties of porous 316L stainless steel for biomedical applications [J]. Transactions of Nonferrous Metals Society of China, 2007, 17: 468-473.
[16] BORDIA R K, SCHERER G W. Constitutive model for a sintering body [J]. Acta Metallurgica, 1988, 36: 2393-2397.
[17] SHIVASHANKAR T S, ENNETI R K, PARK S J, GERMAN R M, ATRE S V. The effects of material attributes on powder-binder separation phenomena in powder injection molding [J]. Powder Technology, 2013, 243: 79-84.
粉末注射成形坯体在烧结过程中的应力演化
方 伟1,何新波1,张瑞杰1,杨诗棣1,曲选辉1, 2
1. 北京科技大学 新材料技术研究院,北京 100083;
2. 北京科技大学 新金属材料国家重点实验室,北京 100083
摘 要:研究金属粉末注射成形坯体在烧结过程中由于不均匀性导致的应力演化过程。基于连续介质模型和热弹粘塑性本构关系,建立描述孔体材料烧结致密化过程的模型。通过热膨胀试验得到模型中的材料参数,通过CT断层成像技术得到坯体的真实断面密度分布,并以此作为烧结模型的粉体含量初始分布。在有限元软件Abaqus中调用用户材料子程序(UMAT)子程序实现上述模型的数值计算。计算结果表明:烧结过程中低密度区域的烧结收缩速率大于高密度区域的收缩速率,从而导致产生内应力;高密度区域存在压应力,低密度区域存在拉应力;局部区域的致密化状态不仅与初始粉体含量相关,而且与烧结过程中的应力演化有关系。
关键词:金属粉末注射成形;CT检测;烧结;致密化;应力;数值模拟
(Edited by Wei-ping CHEN)
Foundation item: Project (2011CB606306) supported by the National Basic Research Program of China; Project (FRF-TP-10-003B) supported by the Fundamental Research Funds for the Central Universities, China; Project (51274040) supported by the National Natural Science Foundation of China
Corresponding author: Xin-bo HE; Tel: +86-10-82377296; E-mail: xb_he@163.com
DOI: 10.1016/S1003-6326(15)63637-8