Trans. Nonferrous Met. Soc. China 22(2012) s619-s623
Friction stir butt welding of A5052-O aluminum alloy plates
Sung-Ook YOON1, Myoung-Soo KANG1, Hyun-Bin NAM1, Yong-Jai KWON1, Sung-Tae HONG2, Jin-Chun KIM1, Kwang-Hak LEE1, Chang-Yong LIM3, Jong-Dock SEO3
1. School of Materials Science and Engineering, University of Ulsan, Ulsan 680-794, Korea;
2. School of Mechanical Engineering, University of Ulsan, Ulsan 680-794, Korea;
3. Technical Research Laboratories, Shin Young Co., Ltd., Yeongcheon 683-360, Korea
Received 21 May 2012; accepted 5 November 2012
Abstract: Friction stir butt welding (FSW) between A5052-O aluminum alloy plates with a thickness of 2 mm was performed. The rotation speeds of the welding tool were 2000 and 3000 r/min, respectively. The traverse speed was ranged from 100 mm/min to 900 mm/min. The defect-free welds with the very smooth surface morphology were successfully obtained, except for at the welding condition of 3000 r/min and 100 mm/min. The onion ring structure was observed in the friction-stir-welded zone (SZ) at the condition of 2000 r/min and 100 mm/min. For all the welding conditions, the grain size of the SZ was smaller than that of the base metal, and was decreased with the decrease of the tool rotation speed and with the increase of the tool traverse speed. The stir zone exhibited higher average hardness than the base metal. The decrease of the tool rotation speed and the increase of the tool traverse speed resulted in the increase in the average hardness of the SZ. The tensile strength of the FSWed plates was similar to that of the base metal, except for at the welding condition of 3000 r/min and 100 mm/min. The total elongation of the FSWed plates was lower than that of the base metal.
Key words: friction stir butter welding; A5052-O aluminum alloy; microstructure; mechanical property
1 Introduction
Friction stir welding (FSW) is one of the attractive technologies for welding of a wide variety of metallic materials, especially for aluminum [1-3] and magnesium [4-5] alloys. The FSW was actively studied as a new solid state welding technique, since it was invented by The Welding Institute (TWI) in 1991 [6].
In this study, A5052-O aluminum alloy plates were friction-stir-welded (FSWed). And then, the influences of the tool rotation speed and the tool traverse speed on surface appearance, microstructure and mechanical properties of the FSWed plates were experimentally investigated.
2 Experimental
Figure 1 shows the schematic illustration of the FSW process in this study. The dimensions of A5052-O aluminum alloy plate were 30 mm (W) × 160 mm (L) × 2 mm (T). The shoulder diameter of the welding tool was 10 mm. The probe had a diameter of 4 mm and a height of 1.7 mm. The tool was rotated in a clockwise direction at speeds of 2000 and 3000 r/min, respectively, and then the probe was inserted into the materials on the weld line. The rotating tool was traversed at speeds ranging from 100 mm/min to 900 mm/min along the weld line perpendicular to the rolling direction (Y-axis direction) of the base metals. The tool rotation axis (Z-axis) was tilted by 3 degrees to the tool traverse direction (X-axis direction).
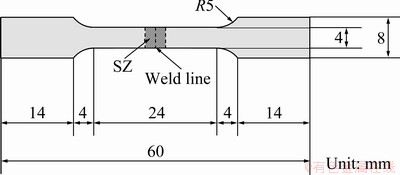
Microstructural observations and Vickers micro- hardness tests were performed on a Y―Z plane which was a cross-section perpendicular to the tool traverse direction. The hardness test was carried out with a load of 0.98 N for a duration time of 10 s. Figure 2 shows the geometry and dimensions of the tensile test specimen. For the tensile test, the FSWed plates were cut perpendicularly to the tool traverse direction, and then machined into the tensile test specimens with a parallel portion of 4 mm (W) × 24 mm (L) and a fillet radius of 5 mm, which had the as-welded surfaces. The friction-stir- welded zone (SZ) was located at the center of the parallel portion. The tensile test was carried out at room temperature with a constant crosshead speed of 1 mm/min.

Fig. 1 Schematic representation of friction stir welding process
3 Results and discussion
3.1 Surface appearance
Figure 3 shows the surface appearances of the FSWed plates. No large defects were formed in and near the SZ. The welds exhibited very smooth surface morphologies, although the semicircular trace was observed in the SZ for 2000 r/min and 900 mm/min (Fig. 3(d)). Namely, the sound SZ with very smooth surface morphology was successfully obtained for the relatively low traverse speeds ranging from 100 r/min to 500 r/min. This result shows that there are optimum tool traverse speeds in order to obtain defect-free welds with smooth surface for the FSW of A5052-O alloy plates.

Fig. 2 Geometry and dimensions of tensile test specimen

Fig. 3 Surface morphologies of aluminum alloy plates friction-stir-welded under various FSW conditions

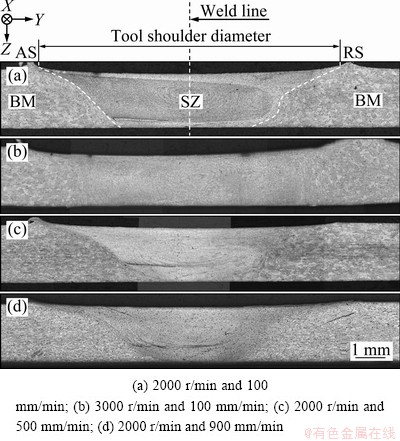
Fig. 4 Optical macrographs of cross-sections perpendicular to tool traverse direction of aluminum alloy plates friction-stir welded under various FSW conditions
3.2 Macro- and micro-structures
Figure 4 shows the optical macrographs of the cross-sections perpendicular to the tool traverse direction of the FSWed plates. Defects such as voids, cracks and unbonded zones were not observed in and near the SZ, showing that defect-free welds were successfully obtained at all the welding conditions. Onion ring structure was formed at the welding condition of 2000 r/min and 100 mm/min (Fig. 3(a)). The area of the SZ was decreased with the increase of the tool traverse speed, but was increased with the increase of the tool rotation speed. This result shows that the increase of the tool rotation speed and the decrease of the tool traverse speed resulted in the increase in the volume of material stirred by the welding tool during the FSW process.

Fig. 5 Optical micrographs of base metal plate, and central regions of SZ on cross-section perpendicular to tool traverse direction of aluminum alloy plates friction-stir-welded at various FSW conditions
Figure 5 shows the optical micrographs of the base metal (BM), and the SZ on the cross-section perpendicular to the tool traverse direction of the FSWed plate. In the BM, the grain size was not uniform (Fig. 5(a)). Namely, the BM was composed of non-equiaxed large grains which were over 100 μm in size. In contrast, the SZ was composed of smaller and equiaxed grains. This result suggests that the SZ was severely plastically deformed by mechanical stirring action of the rotating probe during the FSW process, and then grain refinement occurred as a consequence of dynamic recrystallization. As shown in Figs. 5(b) and (c), the grain size was increased with the increase of tool rotation speed. In general, the size of dynamically recrystallized grains decreases with the increase of strain and/or strain rate [7-9]. However, in this study, the grain size increased in spite of the increase of the tool rotation speed, which was expected to lead to the increase of the strain and strain rate. On this phenomenon, KWON et al [10] reported that some additional static grain growth occurred in the SZ during cooling after severely plastically deformed by the rotating probe, because the maximum temperature of the SZ increased with the increase of tool rotation speed. On the other hand, as shown in Figs. 5(b), (d) and (e), the grain size was decreased with the increase of the tool traverse speed. It is believed that this phenomenon resulted from the decrease of the maximum temperature of the SZ during the FSW by the increase of the tool traverse speed.
3.3 Hardness properties
Figure 6 shows the average Vickers micro-hardness of the BM and SZ on the cross-section perpendicular to the tool traverse direction of the FSWed aluminum alloy plates. At all the welding conditions, the SZ exhibited higher average hardness than that of the BM (HV0.1 55), which resulted from the very small grain size, as shown in Fig. 5. In addition, the hardness of the SZ was increased with the decrease of the tool rotation speed and with the increase of the tool traverse speed. It was noteworthy that, at the welding condition of 200 r/min and 900 mm/min, the average hardness of the SZ increased remarkably, and reached a level about 29% greater than that of the base metal.

Fig. 6 Average Vickers micro-hardness of SZ on cross-section perpendicular to tool traverse direction of aluminum alloy plates friction-stir-welded under various FSW conditions
3.4 Tensile properties
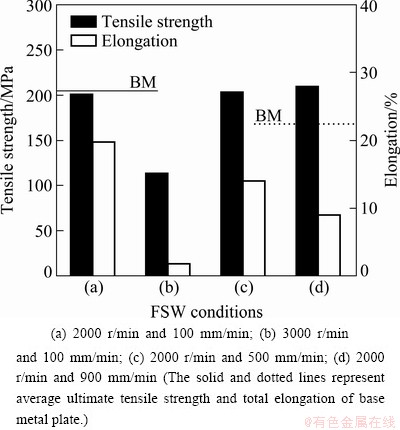
Figure 7 shows the average ultimate tensile strength and total elongation of the FSWed aluminum alloy plates. The tensile strength of the FSWed plates was similar to that of the base metal (about 204 MPa), except for at the welding condition of 3000 r/min and 100 mm/min. This result suggests that there are the optimum welding conditions in order to obtain sound welds with high tensile strength for the FSW of A5052-O alloy plates. On the other hand, the total elongation of the FSWed aluminum alloy plates was lower than that of the base metal. Especially for the welding condition of 3000 r/min and 100 mm/min, the total elongation exhibited the lowest value of about 2%, with the lowest tensile strength of about 114 MPa.

Fig. 7 Ultimate tensile strength and total elongation of aluminum alloy plates friction-stir-welded under various FSW conditions
Figure 8 shows the X-ray CT scanning results for the aluminum alloy plate friction-stir-welded under the condition of the tool rotation speed of 3000 r/min and the tool traverse speed of 100 mm/min. There was not defect on the upper plane near the top surface (Fig. 8(a)). However, the tunnel-type defect was observed on the AS in the weld for the lower plane near the bottom surface (Fig. 8(b)). The formation of this tunnel-type defect was attributed to the excess heat input and plastic flow under this FSW condition. In addition, this result shows that, at the welding condition of 3000 r/min and 100 mm/min, the very low tensile strength and total elongation resulted from the formation of the tunnel-type defect in the weld of the FSWed aluminum alloy plate.

Fig. 8 Nondestructive test results of aluminum alloy plate friction-stir-welded at tool rotation speed of 3000 r/min and tool traverse speed of 100 mm/min
4 Conclusions
1) Defect-free welds with very smooth surface morphology were successfully obtained, except for at welding condition of 3000 r/min and 100 mm/min.
2) Onion ring structure was formed in the SZ at the welding condition of 2000 r/min and 100 mm/min.
3) The grain size in the SZ was, for all the welding conditions, smaller than that of the base metal, and was decreased with the decrease of the tool rotation speed and with the increase of the tool traverse speed.
4) At all the welding conditions, the SZ exhibited higher average hardness than the BM. The decrease of the tool rotation speed and the increase of the tool traverse speed resulted in the increase of the average hardness of the SZ.
5) The tensile strength of the FSWed plates was similar to that of the base metal, except for at the welding condition of 3000 r/min and 100 mm/min. The total elongation of the FSWed plates was lower than that of the base metal.
Acknowledgement
This research was financially supported by the Ministry of Education, Science Technology (MEST) and National Research Foundation of Korea (NRF) through the Human Resource Training Project for Regional Innovation, and by the development program of local science park funded by the ULSAN Metropolitan City and the Ministry of Education, Science and Technology (MEST).
References
[1] THOMAS W M, NICHOLAS E D. Friction stir welding for the transportation industries [J]. Mater Design, 1997, 18(4-6): 269-273.
[2] SHIGEMATSU I, KWON Y J, SUZUKI K, IMAI T, SAITO N. Joining of 5083 and 6061 aluminum alloys by friction stir welding [J]. J Mater Sci Lett, 2003, 22(5): 353-356.
[3] SHIGEMATSU I, SUZUKI K, IMAI T, KWON Y J, SAITO N. Friction stir welding of recycled A6061 aluminum plates fabricated by hot-extrusion of machined chips [J]. J Mater Sci, 2005, 40(11): 2971-2974.
[4] KANNAN M B, DIETZEL W, ZENG R, ZETTLER R, SANTOS J F D. A study on the SCC susceptibility of friction stir welded AZ31 Mg sheet [J]. Mater Sci Eng A, 2007, 460-461: 243-250.
[5] DARRAS B M, KHRAISHEH M K, ABU-FARHA F K, OMAR M A. Friction stir processing of commercial AZ31 magnesium alloy [J]. J Mater Proc Tech, 2007, 191(1-3): 77-81.
[6] THOMAS W M, NICHOLAS D E, NEEDHAM J C, MURCH M G, TEMPLESMITH P, DAWES C J. Friction stir butt welding [P]. GB Patent Application No. 9125978.8, December 1991; US Patent No. 5460317, October 1995.
[7] KIM H Y, SOHN W H, HONG S H. High temperature deformation of Ti- (46-48)Al-2W intermetallic compounds [J]. Mater Sci Eng A, 1998, 251(1-2): 216-225.
[8] FURU T, SHERCLIFF H R, BAXTER G J, SELLARS C M. The influence of transient deformation conditions on recrystallization during thermomechanical processing of an Al-1%Mg alloy [J]. Acta Mater, 1999, 47(8): 2377-2389.
[9] KIM S I, YOO Y C. Dynamic recrystallization behavior of AISI 304 stainless steel [J]. Mater Sci Eng A, 2001, 311(1-2): 108-113.
[10] KWON Y J, SHIGEMATSU I, SAITO N. Production of ultra-fine grained aluminum alloy using friction stir process [J]. Mater Trans, 2003, 44(7): 1343-1350.
(Edited by HE Xue-feng)
Corresponding author: Yong-Jai KWON; Tel: +82-52-259-1294; E-mail: yongjaikwon@ulsan.ac.kr
DOI: 10.1016/S1003-6326(12)61774-9