����ͷ��״�����ʽ���Ħ����ͭ����ͷ���ܵ�Ӱ��
��Դ�ڿ����й���ɫ����ѧ��(Ӣ�İ�)2017���1��
�������ߣ�Kush P. MEHTA Vishvesh J. BADHEKA
����ҳ�룺36 - 54
�ؼ��ʣ�ͭ����ͷ�����ʽ���Ħ����������ͷ���Σ����ܣ������仯����
Key words��Cu-Al joint; dissimilar friction stir welding; pin profiles; properties; intermetallic
ժ Ҫ������Ĺ��ղ������ֲ�����������о���9�ֲ�ͬ��״����ͷ�����ʽ���Ħ����ͭ����ͷ���ܵ�Ӱ�졣���ú����֯������֯���������顢Ӳ�ȡ�ɨ����������͵���X���߹����ǵ���ѧ��ұ���������ʽ�ͷ�����ܡ��������������ֱ��Ϊ8 mm��Բ���ν���ͷ�õ��Ľ�ͷǿ������⣬������ν���ͷ�ı�������ʱ����мȱ�����ӣ���ˣ�����ν�ͷ���ʺ����ʽ���Ħ�����Խӽ�ͷ�����ң�������ν����ͷ��������ʱ������ǿ��Ҳ��֮����ͬһ������棬�����Բ���εĽ���ͷ������ν���ͷ�Ľ�������Ӳ�ࡣ���ö���ν���ͷ�õ��ĺ�������Ӳ��ΪHV 283���ڽ��������Դ���Ӳ������仯���������ͭ����ͷ���������ڽ����仯�����CuAl��CuAl2��Cu3Al ��Cu9Al4��
Abstract: Dissimilar friction stir welding (FSW) of copper and aluminum was investigated by nine different tool designs, while the rest of the process parameters were kept constant. Mechanical and metallurgical tests such as macrostructure, microstructure, tensile test, hardness, scanning electron microscope and electron X-ray spectrographs were performed to assess the properties of dissimilar joints. The results exhibited that, the maximum joint strength was achieved by the tool of cylindrical pin profile having 8 mm pin diameter. Besides, the fragmental defects increased as the number of polygonal edges decreased, hence the polygonal pin profiles were unsuitable for dissimilar FSW butt joints. Furthermore, the tensile strength increased as the number of polygonal edges increased. Stir zone of polygonal pin profiles was hard and brittle relative to cylindrical tool pin profiles for same shoulder surface. Maximum hardness of HV 283 was obtained at weld made by the polygonal square pin profile. The hard and brittle intermetallic compounds (IMCs) were prominently presented in the stir zone. Phases of IMCs such as CuAl, CuAl2, Cu3Al and Cu9Al4 were presented in the stir zone of dissimilar Cu-Al joints.
Trans. Nonferrous Met. Soc. China 27(2017) 36-54
Kush P. MEHTA, Vishvesh J. BADHEKA
Department of Mechanical Engineering, School of Technology, Pandit Deendayal Petroleum University, Raisan, Gandhinagar 382007, India
Received 7 December 2015; accepted 5 May 2016
Abstract: Dissimilar friction stir welding (FSW) of copper and aluminum was investigated by nine different tool designs, while the rest of the process parameters were kept constant. Mechanical and metallurgical tests such as macrostructure, microstructure, tensile test, hardness, scanning electron microscope and electron X-ray spectrographs were performed to assess the properties of dissimilar joints. The results exhibited that, the maximum joint strength was achieved by the tool of cylindrical pin profile having 8 mm pin diameter. Besides, the fragmental defects increased as the number of polygonal edges decreased, hence the polygonal pin profiles were unsuitable for dissimilar FSW butt joints. Furthermore, the tensile strength increased as the number of polygonal edges increased. Stir zone of polygonal pin profiles was hard and brittle relative to cylindrical tool pin profiles for same shoulder surface. Maximum hardness of HV 283 was obtained at weld made by the polygonal square pin profile. The hard and brittle intermetallic compounds (IMCs) were prominently presented in the stir zone. Phases of IMCs such as CuAl, CuAl2, Cu3Al and Cu9Al4 were presented in the stir zone of dissimilar Cu-Al joints.
Key words: Cu-Al joint; dissimilar friction stir welding; pin profiles; properties; intermetallic
1 Introduction
Joining of dissimilar materials such as copper (Cu) and aluminum (Al) is economically advantageous, and in addition yields exceptional mechanical, thermal and electrical properties [1]. Welding of these materials is challenging because of difference in its melting temperature, chemical compositions, physical properties and flow stress that in turn lead to the defects such as residual stresses, cracking and formation of large amount of brittle intermetallic compounds (IMCs) [1,2]. Although, solid state processes are potential techniques to join Cu-Al materials [2]. Friction stir welding (FSW) is an advance technology that falls under the category of solid state processes, and is reliable in dissimilar joints. As the name implies, friction as well as stirring action form the weld through non-consumable rotating tool having specially designed shoulder and pin, leading to sound joint [3]. The important elements of FSW tool are material of pin and shoulder, shoulder to pin diameter ratio, pin geometries, pin length, shoulder features and individual diameters of pin and shoulder. Variations in these elements consequently influence the heating, plastic deformation, axial load, torque and material flow of welding [1-5].
In the available literatures, most of the research works have been carried out to elucidate the effects of process parameters such as rotational speed [1,6,7], welding speed [1,8,9], tool pin offset [1,7,10], workpiece material positioning [1,7] and tilt angle [11] on the properties of dissimilar Cu-Al FSW. Apart from these parameters, the tool design significantly affects the joint properties of dissimilar FSW [2,12,13]. However, the studies on tool design for Cu-Al FSW system are limited. AKINLABI et al [12] showed that the shoulder diameter influences the heat generation and material flow of dissimilar C11000-AA5754 FSW system that subsequently affects properties as well as the formation of IMCs. Additionally, they obtained acceptable joint properties by shoulder diameters of 15 and 18 mm relative to 25 mm.  et al [13] concluded that the shoulder geometry strongly influences the material flow and the formation of IMCs in dissimilar Cu-Al materials. They recommended concave shoulder profile for dissimilar Cu-Al FSW system. MEHTA et al [2] recommended cylindrical tool pin profile instead of tapered profile for dissimilar Cu-Al FSW system. Moreover, they reported that an increase in shoulder diameter leads to higher plunge load with sufficient heat which helps to eliminate internal joint defects.
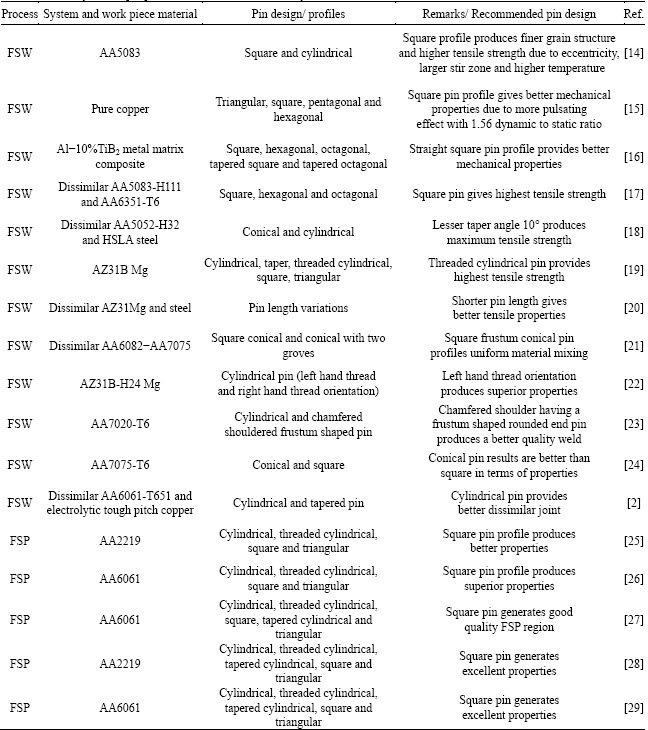
Besides, the tool pin design significantly influences the properties of different friction stir welding and processing (FSW/P) regions (see Table 1). Furthermore, the polygonal pin profiles have an important role to change the properties of FSW/P region. The square tool pin profile produces better properties due to its pulsating effect for the similar FSW systems. To the best of the author��s knowledge, investigations on tool pin design for dissimilar Cu-Al system are limited hitherto. Therefore, it is worthwhile to study the influence of pin designs on the properties of dissimilar Cu-Al FSW system. The influence of different pin profiles, including triangular, square, hexagonal and cylindrical along with different pin diameters on the properties of dissimilar FSW was elucidated.
Table 1 Summary of tool pin profiles for different FSW/FSP systems
2 Experimental
The experiments were carried out on 6.3 mm-thick dissimilar materials such as electrolytic touch pitch (ETP) Cu and AA6061-T651 (see Table 2). Experimental work was carried out in three sets of experiments wherein nine different tool designs were used, while the rest of the FSW parameters were kept constant (see Table 3). The tool material and shoulder diameter ds were kept constant at tool steel M2 grade and 26.64 mm, respectively. The process parameters and tool designs were chosen based on previous Refs. [1,2,7,11,30]. Three different pin dp such as 6 mm, 8 mm and 10 mm were used in the first set of experiment. Accordingly, the tool pin offset was varied in such a way that the contact of the pin with the Cu base material remained constant at 2 mm (see Fig. 1). Therefore, the offsets were kept at 1 mm, 2 mm and 3 mm towards Al base material for tool having pin diameters of 6 mm, 8 mm and 10 mm, respectively. After the welding, the samples were subjected to mechanical and metallurgical characterizations such as visual checking, metallographic analysis, microstructural examination, tensile testing, microhardness, scanning electron microscopy (SEM) and energy dispersive X-ray spectrographic (EDX) testing for assessing its quality after each set of experiment. Based on results of the first set of experiment, the next sets of experiments were conducted. Polygonal tool pin profiles such as triangular, square and hexagonal designs were chosen to perform the second and third sets of experiments based on its static and dynamic cross sectional areas respectively (see Table 3). In the second set of experiment, the different shoulder surfaces of tools were in frictional action due to the constant static area of the pin, which was decided based on a simple equation of circular section as Eq. (1). On the other hand, the same shoulder surfaces of tools were in frictional action in case of dynamic area of pin for the third set of experiment based on the same equation.
A=��(r1-r2)2 (1)
where A is the area of tool in frictional action, r1 is the radius of shoulder, r2 is the dynamic radius of pin.
Table 2 Chemical compositions of base materials (mass fraction, %)

Table 3 Tool designs and process parameters

to be continued
continued
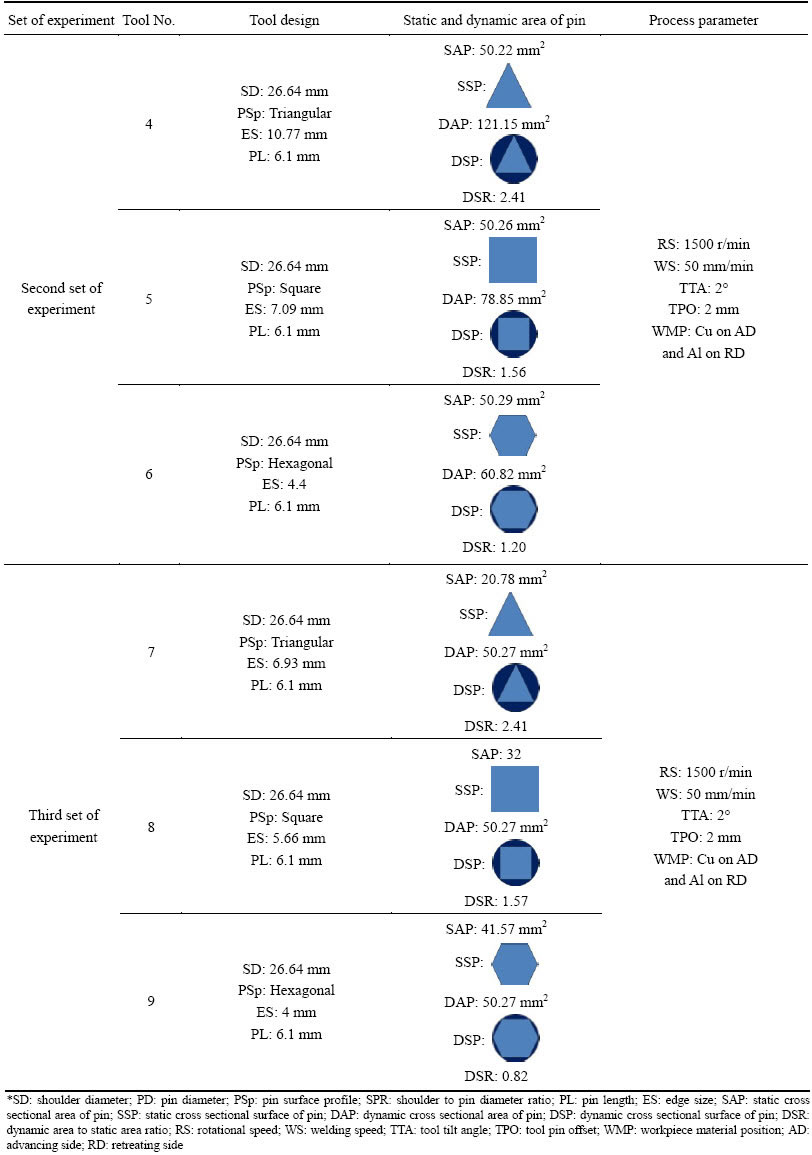
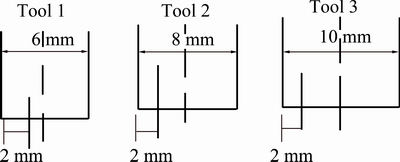
Fig. 1 Different tool pin offsets according to tool pin diameter
Metallographic analysis and microstructural examinations were performed on welded samples after mechanical grinding and polishing on 120, 320, 800, 1000, 5000 grit silicon carbide followed by etching solution FeCl + HCl + H2O (Cu side) and Keller��s reagent 5 mL HNO3 + 3 mL HCl + 2 mL HF (Al side). The tensile testing was executed on transverse specimens as per ASTM E8 standards (see Fig. 2). Minimum three tensile specimens were prepared from the welds and their average values are presented. Vickers hardness (VHN) variations were measured from the middle of the specimen along the transverse cross section after every 1 mm indentation at 500 g load with dwell time of 20 s. SEM and EDX were performed to observe the distribution of Cu particles and IMCs in Al matrix.
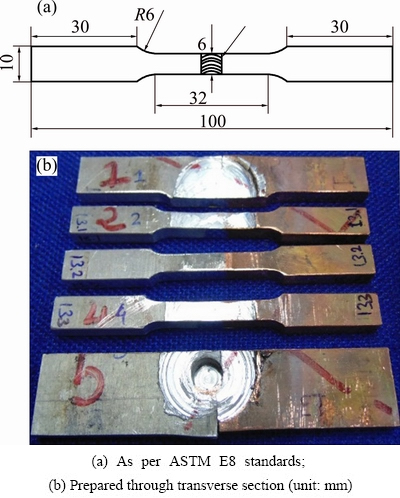
Fig. 2 Tensile specimen
3 Results and discussion
Visual examination of the weld surfaces under the first set of experiment is shown in Fig. 3. Defect-free surface was observed for joint made by Tool 2 while defects such as excess flash and lack of surface fill were observed at joints of Tool 1 and Tool 3, respectively. The excess flash effect was attributed to the hot conditions while the reason behind the formation of a lack of surface fill was cold conditions [1,4,7,11,30,31]. The shoulder surface was reported as a primary contributing parameter for heat input that in turn generated the hot or cold conditions from rotating tool [2,12,30-32]. As the Tool 1 had a smaller pin diameter of 6 mm, the shoulder surface was covering more area of 2116.05 mm2, which led it to higher heat input and subsequently resulted in the excess flash formation. Besides, less heat was generated in the case of Tool 3 due to the larger pin diameter of 10 mm and smaller shoulder surface of 1915.035 mm2 in action. This less heat may have produced improper material flow that may have resulted in lack of surface fill. Adequate heat input was supplied by Tool 2 with an appropriate pin diameter of 8 mm along with shoulder surface of 2028.111 mm2, which have produced a defect-free weld surface.

Fig. 3 Welds made by Tool 1 (a), Tool 2 (b) and Tool 3 (c, d) (first set of experiment)
Macrostructure results for the first set of experiment are shown in Fig. 4. Defected stir zone was noticed for weld made by Tool 1 while defect-free stir zone was observed for weld of Tool 2. One of the reasons for the defect on the bottom part of the stir zone was reported as an improper vertical flow of material [2,11,30,31]. It was reported that, the Cu particles got scratched from Cu base material and their size and shape affected the mixing with Al matrix [1,2,7,11]. Here, it can be seen from Fig. 4(a) that, the large Cu particles were scratched from Cu base material and caused difficulty to flow in Al matrix. Furthermore, the smaller pin diameter led to forming small stir zone that in turn resulted in difficulties to roam these Cu particles in Al matrix, and caused an improper material flow. Furthermore, at higher heat input, Cu experienced higher deformation and that consequent- ly reasoned in scratching of large Cu particles [7]. There were small Cu particles scratched from the Cu base material in the case of weld made by Tool 2. These small particles were distributed horizontally and vertically in a random manner that in turn caused an appropriate material flow and resulted in defect-free weld (see Fig. 4(b)). Apart from this, weld of Tool 3 was not examined by macrostructure due to the presence of major surface defect (see Figs. 3 (c) and (d)).

Fig. 4 Macrostructure of welds made by Tool 1 (a) and Tool 2 (b)
Microstructural examinations for the first set of experiment are presented in Fig. 5. Stir zone consisted of the composite structure of Cu and Al materials. Different sizes of Cu particles were found in Al matrix seemed like islands. Usually, mixing of these Cu particles in Al matrix was difficult and formed IMCs because of incompatibilities in chemical compositions, melting points, physical properties and holding time [1]. Figures 5(a-f) and (g-l) show different microstructures of welds made by Tool 1 and Tool 2, respectively. Improper tool design concerning larger shoulder surface and small pin diameter of Tool 1 attributed scratching of large Cu particles due to higher heat input. The higher heat may have caused greater softening of Cu material that may result in scratching of large Cu particles. Additionally, the small pin diameter was responsible for smaller width of stir zone. Therefore, large scratched Cu particles were unable to mix with Al matrix due to a smaller area of stir zone that eventually resulted in defected stir zone at the bottom area (see Fig. 5(d)), while other parts of stir zone were defect-free. Figure 5(c) shows proper mixing of Cu and Al material at the middle portion of stir zone. On the other hand, small Cu particles were scratched in the case of a joint made by Tool 2, which were mixed with the Al matrix properly and resulted in defect-free stir zone (Figs. 5(f-g)). Furthermore, Cu particles in Al matrix may form large and brittle IMCs such as CuAl, CuAl2, Cu9Al4 due to an unusual plastic and physical combination [2,7,10,12]. Here, the presence of IMCs has been confirmed by SEM and EDX through analysing chemical compositions at different locations. An obvious interface between Cu base material and stir zone was found, as shown in Figs. 6(a) and (b) for Tool 1 and Tool 2, respectively. The IMCs phases such as CuAl, CuAl2, Cu3Al and Cu9Al4 were presented at S1, S2, S3 and S4 locations as shown in Figs. 6(e-h), respectively, based on mole fraction. It was reported that, the solubility of Cu in Al was limited in an order of magnitude less than that of Al in Cu, and solid solution of CuAl was expected to saturate fast that consequently resulted in the formation of CuAl2. The CuAl2 needed more than twice the amount of Al required for the generation of CuAl and more than 4 times the Al needed for Cu9Al4 for the same amount of consumed Cu. This depends on heat input conditions [37]. Therefore, in this study, there are different phases of IMCs with respect to different tool pin diameters because of different heat input caused through individual shoulder surfaces in contact. Here, the intense plastic deformation has caused these IMCs instead of solidification and liquation due to solid state diffusion mechanism. Moreover, the formation of these IMCs generally was found around the Cu particles or at the interface in a layer form for weld made by Tool 2. On the other hand, IMCs were mixed in the stir zone without any layer form for weld of Tool 1.
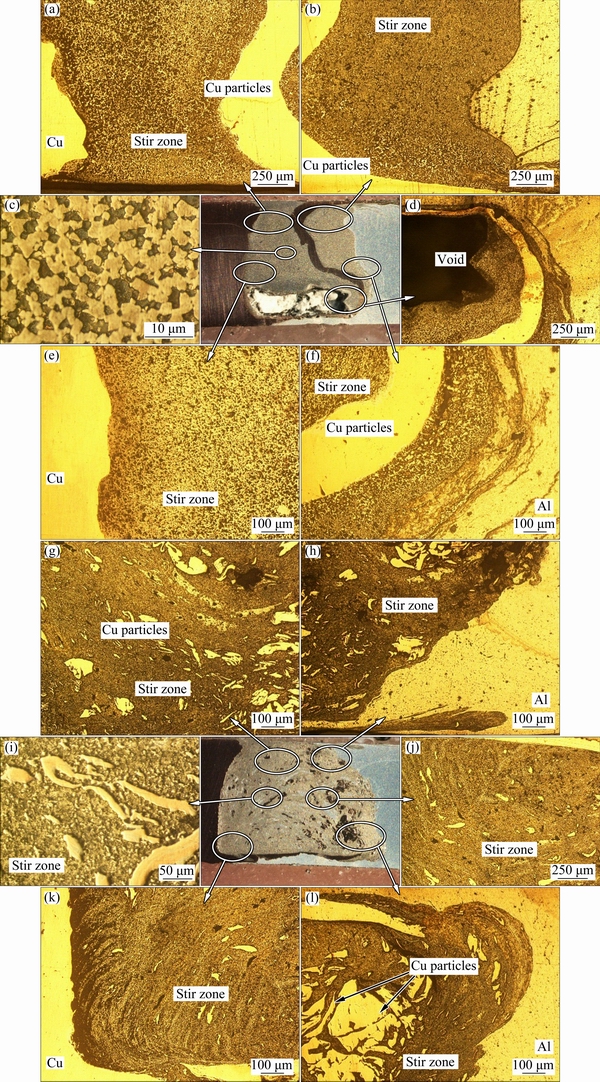
Fig. 5 Microstructures at different stir zone areas for Tool 1 (a-f) and Tool 2 (g-l) (first set of experiment)
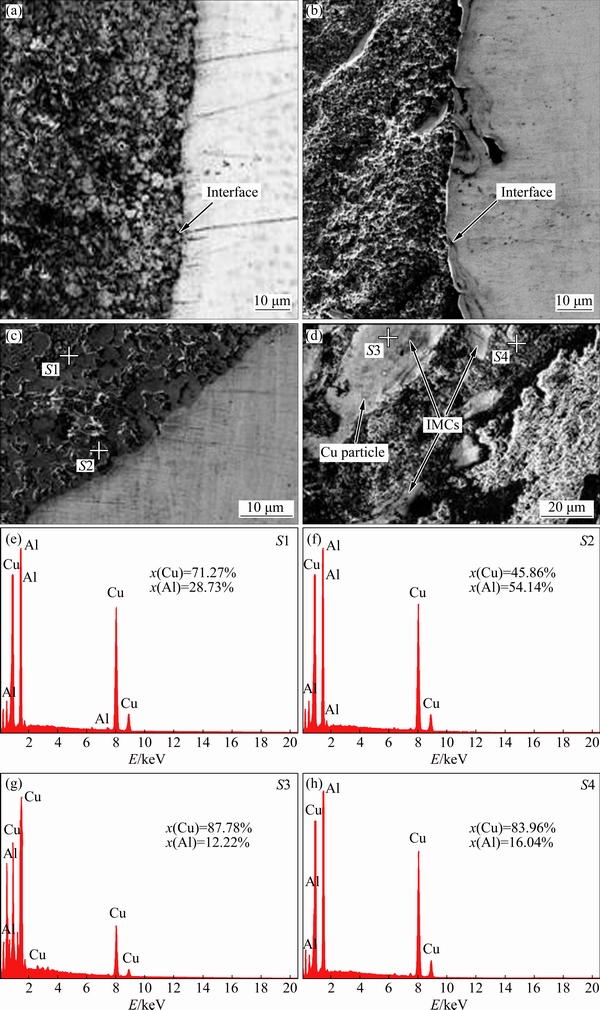
Fig. 6 SEM images at stir zone/Cu interface of weld made by Tool 1 (a, c), stir zone/Cu interface of weld made by Tool 2 (b), stir zone of weld made by Tool 2 (d), EDX spectra at S1 (e), S2 (f), S3 (g) and S4 (h)

Fig. 7 Tensile strength and fracture to elongation for first set of experiment
The tensile test and fracture to elongation for the first set of experiment are shown in Fig. 7. Tensile strength of welds under Tool 1 and Tool 2 were reported as 49 MPa and 89 MPa, respectively. The tensile strength of weld made by Tool 1 was low due to major defect observed in the stir zone (see Fig. 4(a) and Fig. 5(d)). The fracture was initiated through this defect which ultimately led to the low tensile value. On the other hand, weld made by Tool 2 was defect-free which resulted in the maximum tensile strength of 89 MPa. The presence of IMCs may lower down the strength of the joint due to its hard and brittle nature [1,7,10,11]. Here, the fracture was initiated from Cu-stir zone interface, which may be because of the presence of IMCs at interface according to XUE et al [7] and  et al [10]. The fracture to the elongation was low, such as 4.86% and 4.4% for welds of Tool 1 and Tool 2, respectively. The defects of the stir zone were responsible for the low fracture to elongation [1,7,10,11]. In addition, the presence of large and brittle IMCs was equally responsible for low fracture to the elongation [1,7,11]. Brittle features of fractured surfaces were noticed as shown in Table 4 for Tool 1 and Tool 2. In addition, the fracture initiation was reported through defects in the case of specimens with defects (Table 4, Tool 1). The presence of IMCs was also responsible for peak in hardness of stir zone (see Fig. 8). Here, the hardness value was higher in the stir zone for both the cases. The maximum hardness values were HV 251.5 and HV 144.2 for Tool 1 and Tool 2, respectively. Higher hardness was noticed in weld made by Tool 1 relative to weld made by Tool 2. Similar results were reported by AKINLABI et al [12] and MEHTA et al [2] under the high heat input conditions. Variations of hardness in a stir zone show that IMCs were present in a non-continuous form and also in different phases.
The second set of experiment was conducted by Tools 4-6, based on the results of the first set of experiment. These tools were designed by keeping the static area of pin constant with Tool 2 while the rest of the FSW parameters were kept constant as listed in Table 3. This means that the static polygonal area was kept at 50.22 mm2 for each tool of the second set of experiment. Visual examinations of weld surfaces under the second set of experiment are shown in Fig. 9. The surface defects (such as voids and cracks) were noticed on weld made by Tool 4, while no defects were observed on the welds of Tool 5 and Tool 6. These defects were attributed to cold conditions, due to covering of a lesser shoulder surface area [4,31,32]. Further, the Tool 4 consisting of the triangular shape of a pin had a bigger edge size, which in turn, caused a larger dynamic area of the pin. Because of this larger pin area, the smaller shoulder surface of 1848.60 mm2 was covered and that generated the cold conditions [4]. On the other hand, the rest of the tools such as Tool 5 and Tool 6 had relatively large shoulder surfaces of 1981.4671 mm2 and 2038.0994 mm2, respectively, which in turn resulted as no defects.
Macrostructure results for the second set of experiment are presented in Fig. 10. Defected stir zones were observed in all the welds of the second set of experiment. Major fragmental defects such as voids were noticed in the stir zone of Tool 4 (see Fig. 10(a)) while minor voids and cracks were reported in the stir zone of Tool 5 (Fig. 10(b)) and Tool 6 (Fig. 10(c)). The prominent reason behind these defects was cold or hot conditions, which was due to improper tool design [1,2,30]. The cold conditions under Tool 4 were caused by a lesser area of shoulder surface. Additionally, the sharp edges of the tool pin were responsible for scratching of large Cu particles from Cu-base material.
Table 4 Fracture features of tensile specimens under different tool designs

to be continued
continued
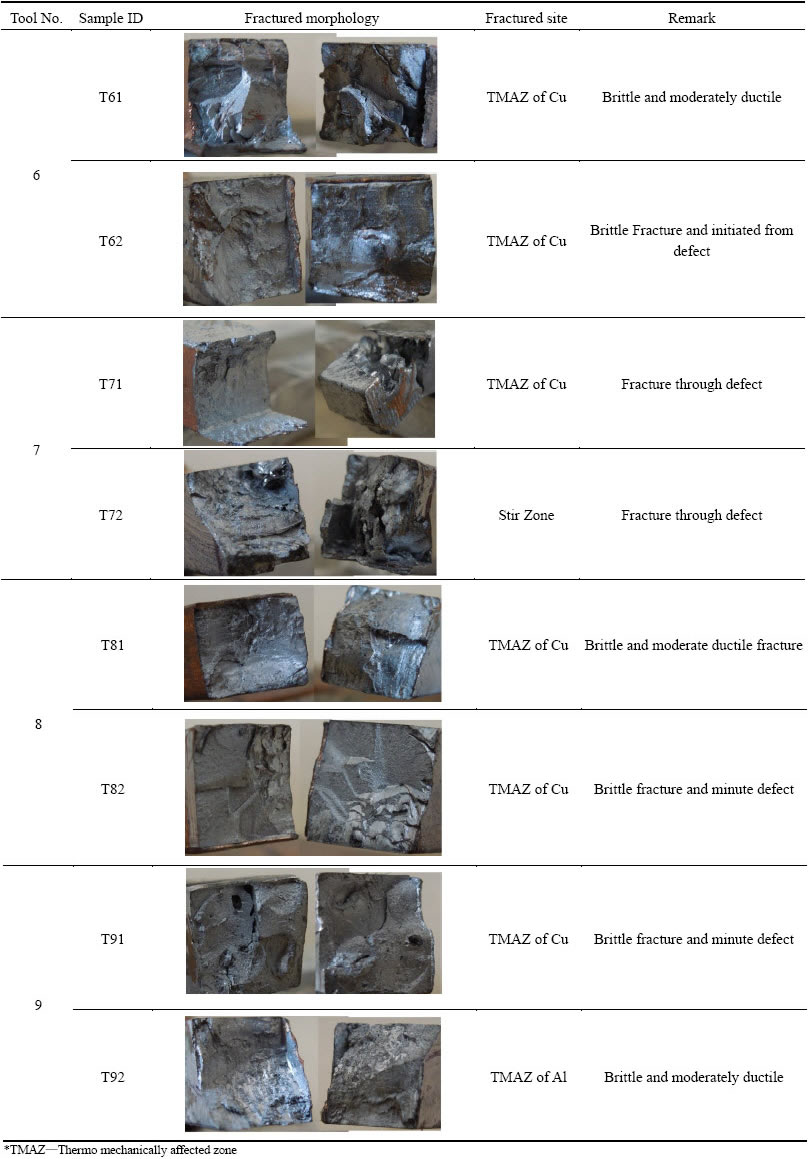
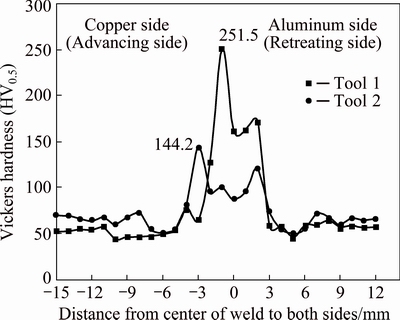
Fig. 8 Hardness profile for first set of experiment
These large Cu particles were difficult to mix with the Al matrix in cold conditions. Therefore, these difficulties may have caused the defects such as voids and cracks. On the other hand, less defects were reported in the case of welds made by Tool 5 and Tool 6. The square and hexagonal pins having a larger shoulder surface were observed to be the better tool designs than the tool having triangular pin. This larger shoulder surface has given relatively high heat input. At the same time, increase in the number of edges of polygonal pin resulted in scratching of small Cu particles, which consequently resulted in better joints. However, minor defects were generated in the stir zone, which may be because of uneven scratching of Cu particles. These particles were difficult to mix with Al matrix because of its uneven shape [1,7]. The polygonal sharp edges were responsible for uneven scratching of Cu particles from Cu-base material.

Fig. 9 Welds made by Tool 4 (a), Tool 5 (b) and Tool 6 (c) (second set of experiment)

Fig. 10 Macrostructures of welds made by Tool 4 (a), Tool 5 (b) and Tool 6 (c)
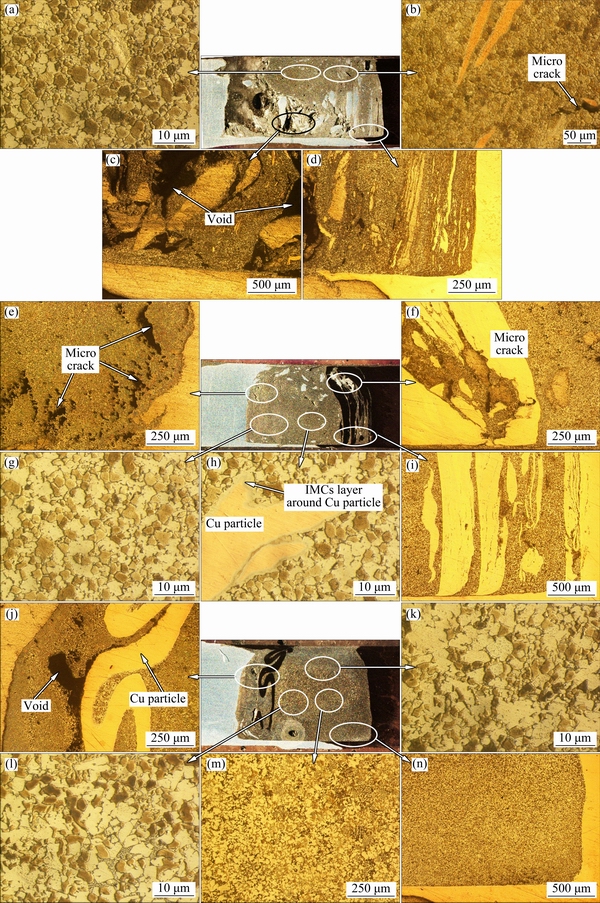
Fig. 11 Microstructural examination at different stir zone areas for Tool 4 (a-d), Tool 5 (e-i) and Tool 6 (j-n) (second set of experiment)

Fig. 12 Tensile strength and fracture to elongation for second set of experiment

Fig. 13 Hardness profile of second set of experiment
Microstructural examinations for the second set of experiment are presented in Fig. 11. It shows that, the Cu particles were distributed unevenly in Al matrix in all the welds of the second set of experiment. It was also found that the fragmental defects increase as the number of edges of polygonal pin decreases due to scratching of large and uneven Cu particles. Most of the defects were found around the Cu particles (see Figs. 11(b, c, e, f, j)). The improper material flow occurred when large Cu particles were scratched [1,2,7,11]. These defects were responsible for poor tensile properties (see Fig. 12). Maximum tensile strength of 58.83 MPa was reported for weld made by Tool 6, while tensile strength of 27.56 MPa was the lowest for weld made by Tool 4 under the second set of experiment. Similarly, low fracture to elongation was found in the range of 4.33%-5.86%. Major defects and the likely presence of IMCs were attributed to this low fracture to the elongation. Evidence of these brittle fractures through major defects was presented in Tables 4-6. Here, the fracture through defects were dominant in all cases. However, some part of the stir zone was defect-free. Microstructure at these parts showed excellent bonding between Cu particles and Al matrix (see Figs. 11(a, g, h, i, k, m, n)). These composite structures may have formed IMCs in the stir zone. Figure 11(h) shows layers of IMCs around the Cu particle while another part of the stir zone was observed with excellent bonding of Cu-Al materials. Similar layers of IMCs were found around the Cu particles [7,33,34]. The hardness profiles were similar to the previous set of experiment. Maximum peak was reported in the stir zone for all the welds of the second set of experiment (Fig. 13), which again shows the presence of hard and brittle IMCs. Here, the larger Cu particles were scratched that have formed IMCs in a large amount. Uneven trend of hardness for weld made by Tool 4 was due to the presence of defects and large Cu particles in the stir zone. If the indentation for hardness was on Cu particle or on defect, it has reduced the hardness drastically, even in the stir zone. Maximum peak hardness of HV 283.5 was reported in the weld of Tool 5 that may be because of higher heat input of square pin profile [14-29]. Furthermore, higher heat input caused large amount of hard and brittle IMCs which increased hardness of stir zone [31-35].
Here, the dynamic area of the tool pin was different for all the cases, because the tools were designed based on static area (Table 3). Therefore, the area covered by shoulder was changed accordingly and resulted in different heat input conditions. It was recommended to analyze polygonal pin profiles by keeping dynamic area of pin constant.
The third set of experiment was conducted by Tools 7-9 based on the results of the first and second sets of experiments. These tools were designed by keeping dynamic area of pin constant with Tool 2 while the rest of the FSW parameters were kept constant (Table 3). This means that the dynamic polygonal area was kept at 50.27 mm2 for each tool of the third set of experiment. Visual examinations of weld surfaces are shown in Fig. 14 under the third set of experiment. Defect-free surfaces were noticed for all the welds. It was noted that, the area of shoulder surface remained same for all tool designs as the dynamic area of the pin was same. Therefore, almost similar heat input was provided through all the tools and consequently resulted in defect-free weld surface similarly like weld of Tool 2 (see Fig. 3(b)) as heat input was governed by the shoulder surface remarkably [36].
Macrostructure results for the third set of experiment are presented in Fig. 15. Major defects were found in the weld made by Tool 7 (Fig. 15(a)) and Tool 8 (Fig. 15(b)), mostly at the bottom area. As discussed earlier in the second set of experiment, the less number of edges of polygonal pin were responsible for scratching of large Cu particles. These particles were difficult to mix in Al matrix that in turn forms major fragmental defects such as big voids and cracks. It can be stated that, decrease in fragmental defects was reported as the number of polygonal edges increased (see Fig. 15). The reason behind this was scratching of large sized Cu particles which were not able to mix with Al matrix in a proper manner (see Figs. 15 (a) and (b)). The improper mixing has attributed to fragmental defects [1].
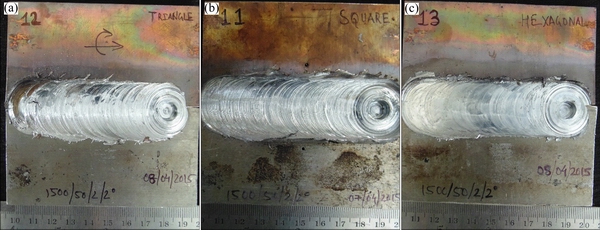
Fig. 14 Welds made by Tool 7 (a), Tool 8 (b) and Tool 9 (c) (third set of experiment)
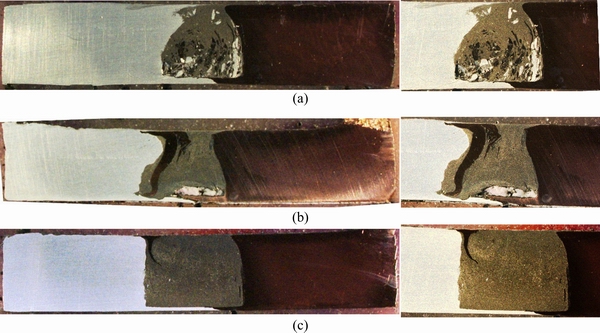
Fig. 15 Macrostructures of welds made by Tool 7 (a), Tool 8 (b) and Tool 9 (c)

Fig. 16 Microstructural examination at different stir zone areas for Tool 7 (a-e), Tool 8 (f-j) and Tool 9 (k-o) (third set of experiment)
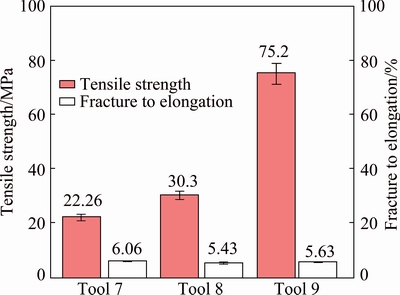
Fig. 17 Tensile strength and fracture to elongation for second set of experiment
Microstructural examinations for the third set of experiment are presented in Fig. 16. It shows that Cu particles were distributed unevenly similarly like a second set of experiment for the weld of Tool 7 and Tool 8 (Figs. 16(a-j)). Besides, proper mixing between Cu and Al matrix was noticed for weld of Tool 9 (Figs. 16 (k-o)). Here, the shoulder surface was same for all the cases. Therefore, there was no influence of heat input in scratching of large Cu particles. It was affected by sharp polygonal edges. In the previous literature, the polygonal pins were found to give better properties due to pulsating effect in the case of similar materials [14-29]. On the contrary, in dissimilar materials, pulsating effect had caused scratches of large Cu particles due to sharp edges of polygonal pins. Maximum Cu particles were scratched in the case of weld made by Tool 7, while minimum particles of Cu were scratched at the weld of Tool 9. So, the defects in the stir zone were increased as the number of polygonal edges decreased due to scratching of large Cu particles. These defects have caused the welds with poor tensile strengths such as 22.26 MPa and 30.3 MPa by Tool 7 and Tool 8 respectively as shown in Fig. 17, while comparatively better tensile strength of 75.2 MPa was reported for the weld of Tool 9. Furthermore, it was clearly observed that the tensile strength increased as polygonal edges increased. Fracture to elongation was in the range of 5.43% to 6.06% due to the brittle nature of stir zone. Here again, the brittle features of fracture such as flat surface, were noticed for welds of Tools 7-9 as presented in Table 4. The brittle nature of the stir zone was found because of the presence of IMCs, which was conformed approximately by SEM and EDX analyses as shown in Fig. 18. The presence of IMCs such as CuAl2, Cu3Al and Cu9Al4 in the stir zone was generally found around Cu particles at S1, S2 and S3 respectively (see Figs. 18(c,d,f)). However, the presence of IMCs was uneven similar as previous cases and aforementioned conditions with different tool designs may have caused these phases of IMCs due to change in tool pin profiles.
Additionally, the hardness profiles were again found uneven similar like previous two sets of experiments due to the presence of IMCs in non-uniform manner. Maximum peaks in hardness were reported in the stir zone for all the welds of the third set of experiment (see Fig. 19). Furthermore, similar variations of the hardness like drastic reduction in hardness at some area were observed because of the indentation on large Cu particle and a peak at some area was because of the indentation on particular phases of IMCs. Moreover, the maximum hardness at the stir zone of Tool 8 may be because of higher heat input. The reason behind higher heat input of square pin was its pulsating effect. It was reported that, the square pin profile was the maximum heat input among all polygonal pins [14,15,17]. Higher heat input was mainly responsible for giving rise to the formation of IMCs, which was responsible for brittle and hard nature of stir zone [2,12].

Fig. 18 SEM images of stir zone made by Tool 7 (a), stir zone made by Tool 8 (b), stir zone made by Tool 9 (c) and EDX at S1 (d), S2 (e), and S3 (f)
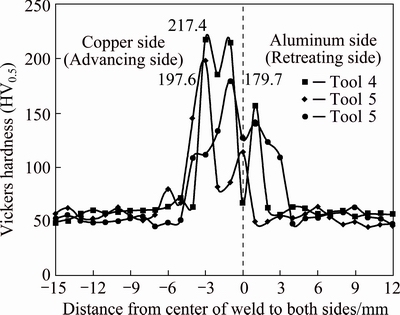
Fig. 19 Hardness profile of third set of experiment
4 Conclusions
1) Dissimilar materials such as electrolytic-tough- pitch Cu and AA6061-T651 of 6.3 mm in thickness were successfully FS welded at process parameters such as tool with cylindrical pin profile of 8 mm pin diameter and 26.64 mm shoulder diameter, rotational speed of 1500 r/min, welding speed of 50 mm/min, tilt angle of 2��, tool pin offset of 2 mm and placement of Cu-base material at advancing side.
2) The polygonal tool pin profiles were responsible for major defects in the stir zone due to uneven scratching of Cu particles from Cu-base material. Fragmental defects were increased as the number of polygonal edges decreased. Therefore, polygonal pins were found to be unsuitable for dissimilar butt joint.
3) The tensile strength of dissimilar Cu-Al joint was increased as the number of polygonal edges increased. Maximum tensile strength of 89 MPa was observed at joint made by cylindrical tool pin profile of 8 mm pin diameter.
4) Stir zone of weld made by polygonal pin profiles was hard and brittle relative to cylindrical tool pin profiles for same shoulder surface. Maximum hardness of HV 283 was reported at weld made by Tool 5 (i. e., square pin profile). The presence of IMCs was found to be the prominent reason for hard and brittle stir zone. Phases of IMCs such as CuAl, CuAl2, Cu3Al and Cu9Al4 were presented in the stir zone of dissimilar Cu-Al joints.
Acknowledgements
The authors would like to appreciate the funding support provided by the Board of Research in Fusion Science and Technology (BRFST), Gandhinagar and Office of Research and Sponsored Projects (ORSP), Pandit Deendayal Petroleum University (PDPU), Gandhinagar under projects of NFP/MAT/A 10/04 and ORSP/R&D/SRP/2014/RDKM respectively. Additionally, authors are thankful to Mr. Prashant Meena, Mr. Dipen Patel, Mr. Razin Desai and Mr. Dhaval Patel (team members of ORSP/R&D/SRP/2014/RDKM).
References
[1] MEHTA K P, BADHEKA V J. A review on dissimilar friction stir welding of copper to aluminum: process, properties, and variants [J]. Materials and Manufacturing Processes, 2016, 31(3): 233-254.
[2] MEHTA K P, BADHEKA V J. Influence of tool design and process parameters on dissimilar friction stir welding of copper to AA6061-T651 joints [J]. Int J Adv Manuf Technol, 2015, 80(9): 2073-2082.
[3] MISHRA R S, MA Z. Friction stir welding and processing [J]. Materials Science and Engineering: R: Reports, 2005, 50(1): 1-78.
[4] LOHWASSER D, CHEN Z. Friction stir welding: From basics to applications [M]. Elsevier, 2009.
[5] RAI R, DE A, BHADESHIA H, DEBROY T. Review: Friction stir welding tools [J]. Science and Technology of Welding and Joining, 2011, 16(4): 325-342.
[6] ESMAEILI A, RAJANI H Z, SHARBATI M, GIVI M B, SHAMANIAN M. The role of rotation speed on intermetallic compounds formation and mechanical behavior of friction stir welded brass/aluminum 1050 couple [J]. Intermetallics, 2011, 19(11): 1711-1719.
[7] XUE P, NI D, WANG D, XIAO B, MA Z. Effect of friction stir welding parameters on the microstructure and mechanical properties of the dissimilar Al-Cu joints [J]. Materials Science and Engineering A, 2011, 528(13): 4683-4689.
[8] MUTHU M F X, JAYABALAN V. Tool travel speed effects on the microstructure of friction stir welded aluminum�Ccopper joints [J]. Journal of Materials Processing Technology, 2015, 217: 105-113.
[9] AKINLABI E T, ELS-BOTES A, MCGRATH P J. Effect of travel speed on joint properties of dissimilar metal friction stir welds [C]// Proceedings of 2nd International Conference on Advances in Engineering and Technology (AET). Uganda, 2011.
[10]  I, LOUREIRO A, VERDERA D, GESTO D, RODRIGUES D M. Influence of tool offsetting on the structure and morphology of dissimilar aluminum to copper friction-stir welds [J]. Metall and Mat Trans A, 2012, 43(13): 5096-5105.
[11] MEHTA K P, BADHEKA V J. Effects of tilt angle on the properties of dissimilar friction stir welding copper to aluminum [J]. Materials and Manufacturing Processes, 2016, 31(3): 255-263.
[12] AKINLABI E. Effect of shoulder size on weld properties of dissimilar metal friction stir welds [J]. J of Materi Eng and Perform, 2012, 21(7): 1514-1519.
[13]  I, OLIVEIRA J, LOUREIRO A, RODRIGUES D. Formation and distribution of brittle structures in friction stir welding of aluminium and copper: Influence of shoulder geometry [J]. Intermetallics, 2012, 22: 122-128.
[14] MARZBANRAD J, AKBARI M, ASADI P, SAFAEE S. Characterization of the influence of tool pin profile on microstructural and mechanical properties of friction stir welding [J]. Metallurgical and Materials Transactions B, 2014, 45(5): 1887-1894.
[15] KUMAR A, RAJU L S. Influence of tool pin profiles on friction stir welding of copper [J]. Materials and Manufacturing Processes, 2012, 27(12): 1414-1418.
[16] VIJAY S, MURUGAN N. Influence of tool pin profile on the metallurgical and mechanical properties of friction stir welded Al-10wt.% TiB 2 metal matrix composite [J]. Materials & Design, 2010, 31(7): 3585-3589.
[17] PALANIVEL R, MATHEWS P K, MURUGAN N, DINAHARAN I. Effect of tool rotational speed and pin profile on microstructure and tensile strength of dissimilar friction stir welded AA5083-H111 and AA6351-T6 aluminum alloys [J]. Materials & Design, 2012, 40: 7-16.
[18] RAMACHANDRAN K, MURUGAN N, KUMAR S S. Effect of tool axis offset and geometry of tool pin profile on the characteristics of friction stir welded dissimilar joints of aluminum alloy AA5052 and HSLA steel [J]. Materials Science and Engineering A, 2015, 639: 219-233.
[19] PADMANABAN G, BALASUBRAMANIAN V. Selection of FSW tool pin profile, shoulder diameter and material for joining AZ31B magnesium alloy�CAn experimental approach [J]. Materials & Design, 2009, 30(7): 2647-2656.
[20] CHEN Y, NAKATA K. Effect of tool geometry on microstructure and mechanical properties of friction stir lap welded magnesium alloy and steel [J]. Materials & Design, 2009, 30(9): 3913-3919.
[21] AVAL H J. Influences of pin profile on the mechanical and microstructural behaviors in dissimilar friction stir welded AA6082�CAA7075 butt Joint [J]. Materials & Design, 2015, 67: 413-421.
[22] CHOWDHURY S, CHEN D, BHOLE S, CAO X. Tensile properties of a friction stir welded magnesium alloy: Effect of pin tool thread orientation and weld pitch [J]. Materials Science and Engineering A, 2010, 527(21): 6064-6075.
[23] KUMAR K, KAILAS S V, SRIVATSAN T S. Influence of tool geometry in friction stir welding [J]. Materials and Manufacturing Processes, 2008, 23(2): 188-194.
[24] SURESHA C, RAJAPRAKASH B, UPADHYA S. A study of the effect of tool pin profiles on tensile strength of welded joints produced using friction stir welding process [J]. Materials and Manufacturing Processes, 2011, 26(9): 1111-1116.
[25] ELANGOVAN K, BALASUBRAMANIAN V. Influences of pin profile and rotational speed of the tool on the formation of friction stir processing zone in AA2219 aluminium alloy [J]. Materials Science and Engineering A, 2007, 459(1): 7-18.
[26] ELANGOVAN K, BALASUBRAMANIAN V, VALLIAPPAN M. Effect of tool pin profile and tool rotational speed on mechanical properties of friction stir welded AA6061 aluminium alloy [J]. Materials and Manufacturing Processes, 2008, 23(3): 251-260.
[27] ELANGOVAN K, BALASUBRAMANIAN V, VALLIAPPAN M. Influences of tool pin profile and axial force on the formation of friction stir processing zone in AA6061 aluminium alloy [J]. Int J Adv Manuf Technol, 2008, 38(3-4): 285-295.
[28] ELANGOVAN K, BALASUBRAMANIAN V. Influences of tool pin profile and welding speed on the formation of friction stir processing zone in AA2219 aluminium alloy [J]. Journal of Materials Processing Technology, 2008, 200(1): 163-175.
[29] ELANGOVAN K, BALASUBRAMANIAN V. Influences of tool pin profile and tool shoulder diameter on the formation of friction stir processing zone in AA6061 aluminium alloy [J]. Materials & Design, 2008, 29(2): 362-373.
[30] MEHTA K P, BADHEKA V J. Effects of tool pin design on formation of defects in dissimilar friction stir welding [J]. Procedia Technology, 2016, 23: 513-518.
[31] MEHTA K, BADHEKA V. Investigations on friction stir welding defects for dissimilar copper to aluminum materials under different process parameters [C]//Proceedings of International Conference on Friction Based Processes. IISc-Bangalore, India, 2014.
[32] NANDAN R, DEBROY T, BHADESHIA H. Recent advances in friction-stir welding�Cprocess, weldment structure and properties [J]. Progress in Materials Science, 2008, 53(6): 980-1023.
[33] BAREKATAIN H, KAZEMINEZHAD M, KOKABI A. Microstructure and mechanical properties in dissimilar butt friction stir welding of severely plastic deformed aluminum AA 1050 and commercially pure copper sheets [J]. Journal of Materials Science & Technology, 2014, 30(8): 826-834.
[34] BEYGI R, KAZEMINEZHAD M, KOKABI A. Microstructural evolution and fracture behavior of friction-stir-welded Al-Cu laminated composites [J]. Metall and Mat Trans A, 2014, 45(1): 361-370.
[35] BHATTACHARYA T K, DAS H, PAL T K. Influence of welding parameters on material flow, mechanical property and intermetallic characterization of friction stir welded AA6063 to HCP copper dissimilar butt joint without offset [J]. Transactions of Nonferrous Metals Society of China, 2015, 25: 2833-2846.
[36] MEHTA K P, BADHEKA V J. Experimental investigation of process parameters on defects generation in copper to AA6061-T651 friction stir welding [J]. International Journal of Advances in Mechanical & Automobile Engineering, 2016, 3(1): 55-58.
Kush P. MEHTA, Vishvesh J. BADHEKA
Department of Mechanical Engineering, School of Technology, Pandit Deendayal Petroleum University, Raisan, Gandhinagar 382007, India
ժ Ҫ������Ĺ��ղ������ֲ�����������о���9�ֲ�ͬ��״����ͷ�����ʽ���Ħ����ͭ����ͷ���ܵ�Ӱ�졣���ú����֯������֯���������顢Ӳ�ȡ�ɨ����������͵���X���߹����ǵ���ѧ��ұ���������ʽ�ͷ�����ܡ��������������ֱ��Ϊ8 mm��Բ���ν���ͷ�õ��Ľ�ͷǿ������⣬������ν���ͷ�ı�������ʱ����мȱ�����ӣ���ˣ�����ν�ͷ���ʺ����ʽ���Ħ�����Խӽ�ͷ�����ң�������ν����ͷ��������ʱ������ǿ��Ҳ��֮����ͬһ������棬�����Բ���εĽ���ͷ������ν���ͷ�Ľ�������Ӳ�ࡣ���ö���ν���ͷ�õ��ĺ�������Ӳ��ΪHV 283���ڽ��������Դ���Ӳ������仯���������ͭ����ͷ���������ڽ����仯�����CuAl��CuAl2��Cu3Al ��Cu9Al4��
�ؼ��ʣ�ͭ����ͷ�����ʽ���Ħ����������ͷ���Σ����ܣ������仯����
(Edited by Xiang-qun LI)
Corresponding author: Kush P. MEHTA; Tel: +91-8140009588; E-mail: kush_2312@yahoo.com; vishvesh79@gmail.com
DOI: 10.1016/S1003-6326(17)60005-0

