
Joint performance of laser-TIG double-side welded 5A06 aluminum alloy
CHEN Yan-bin(陈彦宾), MIAO Yu-gang(苗玉刚), LI Li-qun(李俐群), WU Lin(吴 林)
State Key Laboratory of Advanced Welding Production Technology,
Harbin Institute of Technology, Harbin 150001, China
Received 25 January 2008; accepted 28 April 2008
Abstract: The influence of welding parameters on mechanical properties and microstructure of the welds of laser-TIG double-side welded 5A06 aluminum alloy was investigated. The results show that the weld cross-sectional shape has an intimate relation with the mechanical properties and microstructure of the welds. The symmetrical “X” cross-section possesses a relatively higher tensile strength and elongation than the others, about 91% and 58% of those of base metal, respectively. The good weld profiles and free defects are responsible for the improvement of tensile properties. Due to low hardness of the fusion zone, this region is the weakest area in the tensile test and much easier to fracture. The loss of Mg element is responsible for the decrease of mechanical properties of the joints. The microstructure of “X” cross-section has an obvious difference along the direction of weld depth, and that of the “H” cross-section is consistent and coarse.
Key words: laser-TIG double-side welding; mechanical property; microstructure; aluminum alloy
1 Introduction
Laser welding is a widely prospect technique for joining aluminum alloys, owing to the high depth-to-width ratio, little welding distortion, narrow heat affected zone and high welding rate[1-4]. However, laser welding of aluminum alloys also faces the problems of high reflectivity, high thermal conductivity, heavy porosity and crack in the weld metal[5-9]. If these problems cannot be solved, the mechanical properties of laser welded joints are difficult to keep stable[10-11]. Based on the previous work, a technology of laser-TIG double-side welding (LTDSW) was developed. Especially, for aluminum alloys, a stable welding process, high quality appearance and high productivity can be obtained[12-14].
Compared with the common laser welding, the weld cross-section of the LTDSW is formed under the heated action of laser beam and TIG arc simultaneously. With the variation of power ratios of laser beam to TIG arc, the weld profiles take on the different shape. Moreover, under the different heat-input, the microstructure characteristics of the welds have an obvious difference. In the case of typical welding parameters, the LTDSW possesses a special weld profile: a broad top and bottom and a narrow middle. Especially, for the minimum width at the middle of the cross-section, it signifies the penetration degree of the LTDSW, which has an important effect on the mechanical properties and microstructure of the welds.
Based on the results of a lot of experimental investigations, the influence of the weld profiles on the mechanical properties and microstructure is evaluated.
2 Experimental
Fig.1 shows the schematic drawing of laser-TIG double-side welding. Experiments were carried out by combining a CO2 laser with the maximum power of 3.0 kW (German Rofin-sinar) and an inverter argon arc welding equipment of WX300 (Panasonic). During the experimental process, the laser beam and the TIG torch were on the opposite sides of a workpiece, and kept fixed, while the workpiece was moved by a vertical work table. The workpiece material used was 5A06 aluminum alloy (containing 6.0%-6.8% Mg, 0.5%-0.8% Mn, ≤0.4% Fe, ≤0.4% Si, balance Al) in the form of plates having dimensions of 150 mm×50 mm×4 mm. Before the experiments, the surface of the specimen was professionally cleaned and degreased. The LTDSW was performed by varying laser power and arc current, and fixed welding speed (1.0 m/min).
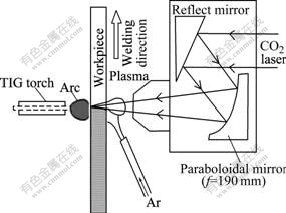
Fig.1 Schematic diagram of LTDSW experimental system
After the LTDSW, the welded specimens were sectioned, ground and polished. The microstructure characteristics were observed by optical microscopy (OLYMPUS SZX12) after etching with Keller’s solution. A universal testing machine (INSTRON 5569) was used for measuring the ultimate tensile strength of the specimens. The measured tensile properties were the averaged values of five samples. The fracture was analyzed by HITACHI-S4700 scanning electron microscope(SEM). Vickers micro-hardness measurements were conducted across the mid-depth longitudinal section of welds with a load of 1 N for 10 s. The chemical compositions of the joints were analyzed by energy dispersive X-ray spectroscopy (EDS) technique.
3 Results and discussion
3.1 Cross-sectional characteristics
Fig.2 shows the typical weld profiles of joints under different heat-input, where Pl and Pa are laser power and arc power, respectively.
From Fig.2(a), at a low heat-input condition, the weld cross-section takes on a dissymmetrical “X” shape. With the increase of heat-input, when the power ratio of laser beam to TIG arc is nearly equal to 1.0, a symmetrical “X” cross-sectional shape is formed, as illustrated in Fig.2(b). With the further increase of the heat-input, a consistent “H” cross-section is formed, where the defects of excessive penetration and undercut are serious because of too much heat-input, as indicated in Fig.2(c).
3.2 Tensile properties
According to the National Standard GB2651-89, the standard tensile specimen of the welds is shown in Fig.3. The fracture locations of tensile specimens are indicated in Fig.4. The tensile results of typical cross-sections are illustrated in Fig.5.

Fig.2 Weld cross-section at different power ratios (v=1 m/min): (a) Dissymmetrical “X” cross-section(Pl=1.0 kW, Pa=0.8 kW); (b) Symmetrical “X” cross-section(Pl=1.2 kW, Pa=1.2 kW); (c) Consistent “H” cross-section (Pl=1.2 kW, Pa=1.5 kW)

Fig.3 Tensile test specimen
It is found that the fracture of dissymmetrical “X” shape happens nearby the welds (Fig.4(a)), and the average tensile strength and elongation are 325 MPa and 7.5%, respectively, about 81% and 47% of those of base metal. The fracture of symmetrical “X” cross-section arises nearby the borderline, about 45? of tensile direction (Fig.4(b)), being a typical ductility rupture. The tensile strength and elongation of the specimen are 362 MPa and 9.4%, about 91% and 58% of those of base metal, respectively. The fracture of “H” shape happens in the centre of the welds, and the tensile strength and elongation are 304 MPa and 5.5% respectively, about 76% and 34% of those of base metal.

Fig.4 Fracture location of tensile specimens: (a) Dissymmetrical “X” cross-section; (b) Symmetrical “X” cross-section; (c) Consistent “H” cross-section
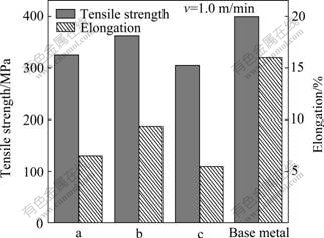
Fig.5 Tensile results of typical cross-sections: (a) Dissymmetrical “X” cross-section; (b) Symmetrical “X” cross-section; (c) Consistent “H” cross-section
Fig.6 shows the macro-morphologies of the fracture by SEM. Fig.7 illustrates the micro-morphologies of the fracture.
It is found that the fracture of dissymmetrical “X” cross-section has the problems of heavy porosity and poor penetration degree, which results in a low tensile strength. For the “H” cross-section, though the porosity is eliminated, the defects of seriously excessive penetration and undercut are responsible for the poor strength. It is important to note that the symmetrical “X” cross-section produces a relatively higher tensile strength and elongation than the others. The good weld profiles and free defects are responsible for the improvement of the tensile mechanical property.
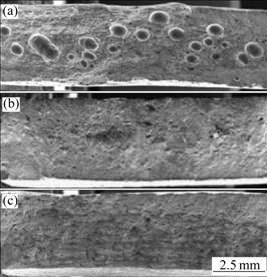
Fig.6 Marco-fracture morphologies of tensile samples: (a) Dissymmetrical “X” cross-section; (b) Symmetrical “X” cross- section; (c) Consistent “H” cross-section

Fig.7 Micro-fracture morphologies of tensile samples: (a) Dissymmetrical “X” cross-section; (b) Symmetrical “X” cross-section; (c) Consistent “H” cross-section
From Fig.7, a great number of large and deep dimples distribute uniformly on the fracture surface of symmetrical ”X” cross-section and consistent ”H” cross-section, which features the indication of toughness failure. The uneven dimples exist in the fracture of dissymmetrical “X” cross-section, with a little brittle morphology, which has a great relation with its heavy porosity.
3.3 Hardness measurement
To further investigate the cause of tensile fracture behaviors, the analysis of hardness distribution was carried out across the mid-thickness welds. The hardness testing results of typical cross-sections are summarized in Fig.8.
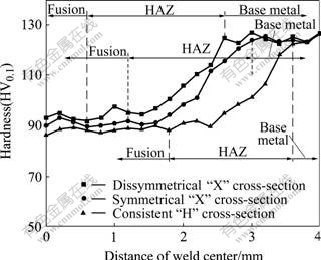
Fig.8 Hardness distribution of different cross-section
There are three regions along the welds, including fusion zone, heat affected zone(HAZ), and base metal. For the dissymmetrical “X” cross-section, the lowest hardness happens on the fusion zone, which shows an average hardness of HV93. For the symmetrical “X” cross-section, the softened regions occur on the fusion zone and HAZ, especially at the interface between the HAZ and fusion zone. For the “H” cross-section, the average hardness of fusion zone is lower than that of HAZ or base metal.
Generally, with the decrease of hardness, the tensile strength decreases since they are both indicators of a material’ resistance to plastic deformation[15]. Due to the low hardness of fusion zone, this region is the weakest area in the tensile test and much easier to fracture, which is consistent with the tensile results. Similarly, the fracture of symmetrical “X” cross-section happens on the borderline, which has a close relation with the soften regions.
To investigate the cause of low hardness within the fusion zone, the chemical compositions were analyzed by EDS, with specific attention given to Mg content. Fig.9 shows the variation of Mg content along the weld regions.
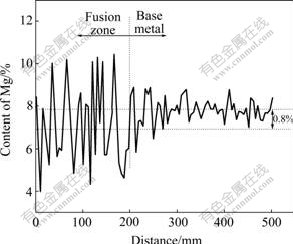
Fig.9 Variation of Mg content in welds
Compared with the Mg content of base metal, that of fusion zone has a rather decrease (about 0.8%), which is caused by the evaporation of Mg (tvap=1 090 ℃) during the LTDSW process. The loss of Mg element is responsible for the decrease of hardness within the fusion zone[16]. In addition, the fluctuation of Mg content is impetuous within the fusion zone, which has an intimate relation with the diffusion and segregation of Mg element during solidification. It is also one of the reasons that the joint performances decrease within this region[17].
3.4 Microstructure characteristics
Fig.10 shows the typical microstructure of the welds. The microstructure of the welds consists of fusion zone and HAZ. Due to the effect of heat recycle process and material of workpiece, the microstructure is fine in the fusion zone, while the crystal grain is remarkably coarse in the HAZ. The microstructure of “X” cross-section has an obvious difference along the direction of weld depth, while that of “H” cross-section is consistent and coarse because of too much heat-input. Due to the coarse crystal grain within the HAZ, the mechanical properties of this region are lower than those of base metal.
It is important to notice that the microstructure characteristics of “X” cross-section are obviously different along the direction of weld depth. Fig.11 shows the microstructure of top, middle and bottom of the “X” cross-section. There is a relatively narrow HAZ and fine microstructure on the top and bottom. At the middle of joints, the microstructure of HAZ is board and coarse, which has a relation with the phenomenon of heat accumulated zone. The further investigations need to be carried out based on the welding characteristics, and the correlation results are reported in other papers.
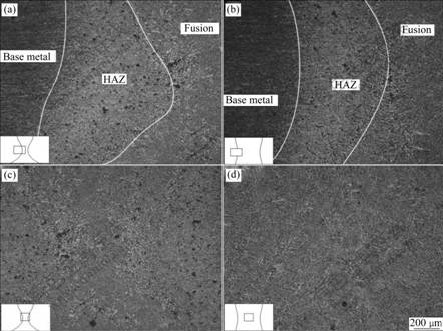
Fig.10 Influence of cross-sectional shape on microstructure of welds: (a) HAZ of “X” cross-section; (b) HAZ of “H” cross-section; (c) Fusion of “X” cross-section; (d) Fusion of “H” cross-section
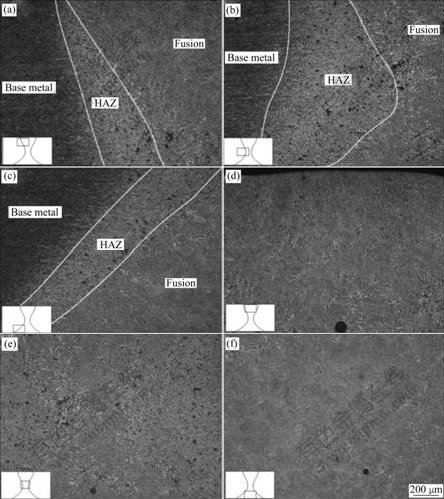
Fig.11 Microstructures of “X” cross-section along direction of weld depth: (a) HAZ of top (laser side); (b) HAZ of middle (minimum width); (c) HAZ of bottom (TIG side); (d) Fusion of top (laser side); (e) Fusion of middle(minimum width); (f) Fusion of bottom(TIG side)
4 Conclusions
1) The weld cross-sectional shape has an intimate relation with the tensile properties and microstructure of the welds. The symmetrical “X” shape possesses a relatively higher tensile strength and elongation than the others, about 91% and 58% of those of base metal, respectively. The good weld profiles and free defects are responsible for the improvement of the tensile properties. Due to the low hardness of fusion zone, this region is the weakest area in the tensile test and much easier to fracture. The loss of Mg element is responsible for the decrease of mechanical properties of the joints.
2) The microstructure of “X” cross-section has an obvious difference along the direction of weld depth, while that of “H” cross-section is consistent and coarse. There is a relatively narrow HAZ and fine microstructure on the top and bottom of “X” cross-section. At the middle of the joints, the microstructure of HAZ is board and coarse, which has a relation with the phenomenon of heat accumulated zone.
References
[1] HUNTINGTON C A, ENGAR T W. Laser welding of aluminum and aluminum alloys [J]. Welding Journal, 1990, 45(4): 105-107.
[2] SCHUBERT E, KLASSEN M, ZERNER I, WALZ C, SEPOLD G. Light-weight structures produced by laser beam jointing for future applications in automobile and aerospace industry [J]. Journal of Materials Processing Technology, 2001, 115: 2-8.
[3] AKHTER R, IVANCHEV L, BURGER H P. Effect of pre/post T6 heat treatment on the mechanical properties of laser welded SSM cast A356 aluminium alloy [J]. Materials Science and Engineering A, 2007, 447: 192-196.
[4] QI Jun-feng, ZHANG Dong-yun, XIAO Rong-shi, CHEN Kai, ZUO Tie-chuan. Joint performance of CO2 laser beam welding 5083-H321 aluminum alloy [J]. China Welding, 2007, 16(2): 40-45.
[5] KATAYAMA S, MATSUNAWA A, KOJIMA K. CO2 Laser weldability of aluminium alloys (2nd Report): Defect formation conditions and causes [J]. Welding International, 1998, 12(10): 774-789.
[6] YU Shu-rong, FAN Ding, XIONG Jin-hui, CHEN Jian-hong. CO2 laser welding of 5A06 aluminum alloy plates with different thickness [J]. Trans Nonferrous Met Soc China, 2006, 16(6): 1407-1410.
[7] CHEN Yan-bin, LI Li-qun, PENG Xiao-yun, FANG Jun-fei, ZHANG Ya-li. Joint performance in laser welding Al alloy with filler wire [J]. Trans Nonferrous Met Soc China, 2005, 15(s2): 87-91.
[8] CRETTEUR L, MARYA S. Development and application of flux-paste for laser welding of aluminium alloys [J]. Welding International, 2000, 14(2): 12-25.
[9] MATSUNAWA A. Problems and solutions in deep penetration laser welding [J]. Science and Technology of Welding and Joining, 2001, 6(6): 351-354.
[10] KATAYAMA S, YAMAGUCHI Y. Effect of porosity and mechanical properties of CO2 laser-welded aluminium alloy [J]. Welding Research Supplement, 2000, 5: 70-73.
[11] ANCONA A, LUGARA P M, SORGENTE D, TRICARICO L. Mechanical characterization of CO2 laser beam butt welds of AA5083 [J]. Journal of Materials Processing Technology, 2007, 191: 381-384.
[12] CHEN Yan-bin, MIAO Yu-gang, LI Li-qun, WU Lin. Characteristics of laser-TIG double-side welding for aluminum alloys [J]. Chinese Journal of Lasers, 2007, 34(12): 1716-1720. (in Chinese)
[13] MIAO Yu-gang, LI Li-qun, CHEN Yan-bin, WU Lin. Joint characteristics of laser-arc double sides welding for aluminum alloy [J]. Trans Chin Weld Inst, 2007, 28(12): 85-88.
[14] MIAO Yu-gang, LI Li-qun, CHEN Yan-bin, WU Lin. Study on heat efficiency of laser-TIG double-side welding [J]. China Welding, 2008, 17(1): 64-70.
[15] BAKER H. Metals handbook: Properties and selection: nonferrous alloys and pure metals [M]. America: American Society of Metals, 1979: 327-327.
[16] LIU C, NORTHWOOD D, BHOLE S. Tensile fracture behavior in CO2 laser beam welds of 7075-T6 aluminum alloy [J]. Material and Densign, 2004, 25: 573-577.
[17] HABOUDOU A, PEYRE P, VANNES A B, PEIX G. Reduction of porosity content generated during Nd:YAG laser welding of A356 and AA5083 aluminium alloys [J]. Materials Science and Engineering A, 2003, 363: 40-52.
Foundation item: Project (41318.3.1.2) supported by the National Defence Pre-research Foundation of China
Corresponding author: MIAO Yu-gang; Tel: +86-451-86415506; E-mail: miao0906@gmail.com
DOI: 10.1016/S1003-6326(08)60223-X
(Edited by YUAN Sai-qian)