Friction stir welding of 5052 aluminum alloy plates
Yong-Jai KWON1, Seong-Beom SHIM2, Dong-Hwan PARK2
1. School of Materials Science and Engineering, University of Ulsan, Ulsan, Korea;
2. Institute of E-Vehicle Technology, University of Ulsan, Ulsan, Korea
Received 2 March 2009; accepted 30 May 2009
Abstract:
Friction stir welding between 5052 aluminum alloy plates with a thickness of 2 mm was performed. The tool for welding was rotated at speeds ranging from 500 to 3 000 r/min under a constant traverse speed of 100 mm/min. The results show that at all tool rotation speeds, defect-free welds are successfully obtained. Especially at 1 000, 2 000 and 3 000 r/min, the welds exhibit very smooth surface morphologies. At 500, 1 000, and 2 000 r/min, onion ring structure is clearly observed in the friction-stir-welded zone (SZ). In addition, the onion ring structure region becomes wider as the tool rotation speed is increased. The gain size in the SZ is smaller than that in the base metal, and is decreased with a decrease of the tool rotation speed. In all tool rotation speeds, the SZ exhibits higher average hardness than the base metal. Especially at 500 r/min, the average hardness of the SZ reaches a level about 33% greater than that of the base metal. At 500, 1 000 and 2 000 r/min, the tensile strength of the friction stir welded (FSWed) plates is similar to that of the base metal (about 204 MPa). The elongation of the FSWed plates is lower than that of the base metal (about 22%). However, it is noticeable that the maximum elongation of about 21% is obtained at 1 000 r/min.
Key words:
friction stir welding; aluminum alloy; microstructure; mechanical properties;
1 Introduction
Recently, requirements for the automotive industry have been increasing due to its reduction in mass, fuel consumption and environmental impact. Much attention, therefore, has been focused on aluminum and magnesium alloys because of a wide variety of unique properties, especially low density properties. For their practical applications, bonding and welding technologies should also be established aside from alloy design, microstructure control, plastic forming, casting, surface treatment, etc. Friction stir welding (FSW) is one of the attractive technologies for welding of a wide variety of metallic materials. Especially for aluminum[1-3] and magnesium[4-5] alloys, the FSW has been actively studied as a new solid state welding technique, since it was invented by The Welding Institute (TWI) in 1991[6].
In this study, A5052-O aluminum alloy plates were friction-stir-welded (FSWed). And then, the influences of the tool rotation speed on surface appearance, microstructure and mechanical properties of the FSWed plates were experimentally investigated.
2 Experimental
Fig.1 shows the schematic illustration of the FSW process. The dimensions of A5052-O aluminum alloy plate were 30 mm in width, 160 mm in length and 2 mm in thickness. The shoulder diameter of the tool for FSW was 10 mm. The probe had a diameter of 4 mm and a height of 1.7 mm. The tool was rotated in a clockwise direction at speeds ranging from 500 to 3 000 r/min, and then the probe was inserted into the materials on the weld line. The rotating tool was traversed at a constant speed of 100 mm/min along the weld line perpendicular to the rolling direction (Y-axis direction) of the base metals. The tool rotation axis (Z-axis) was tilted by 3? to the tool traverse direction (X-axis direction).

Fig.1 Schematic representation of friction stir welding (FSW) process (Friction-stir-welded zone, advancing side and retreating side labeled as SZ, AS and RS, respectively. And then, X, Z and Y representing tool traverse direction, tool rotation axis direction and rolling direction of base metal, respectively)
Microstructural observations and Vickers micro- hardness tests were performed on a Y-Z plane which was a cross-section perpendicular to the tool traverse direction. The hardness tests were carried out with a load of 0.98 N for a duration time of 10 s. Fig.2 shows the geometry and dimensions of the tensile test specimen. For the tensile tests, the FSWed plates were cut perpendicularly to the tool traverse direction, and then machined into the tensile test specimens with a parallel portion with 4 mm in width, 24 mm in length and a fillet radius of 5 mm, which had the as-welded surfaces. The friction-stir-welded zone (SZ) was located at the center of the parallel portion. The tensile tests were carried out at room temperature with a constant crosshead speed of 1 mm/min.

Fig.2 Geometry and dimensions of tensile test specimen
3 Results and discussion
3.1 Surface appearance
Fig.3 shows the surface appearances of the FSWed plates. No large defects were formed in and near the SZ. Although semicircular trace is observed in the SZ for 500 r/min, the surface morphology becomes smoother with an increase in the tool rotation speed. Namely, the sound SZ with very smooth surface morphology is successfully obtained at the relatively high rotation speeds ranging from 1 000 to 3 000 r/min. This result shows that there are optimum tool rotation speeds in order to obtain defect-free welds with smooth surface for the FSW of A5052-O alloy plates.

Fig.3 Surface appearances of aluminum alloy plates friction-stir-welded at the tool rotation speeds of 500(a), 1 000(b), 2 000(c) and 3 000(d) r/min (BM representing base metal zone)
3.2 Macro- and micro- structures
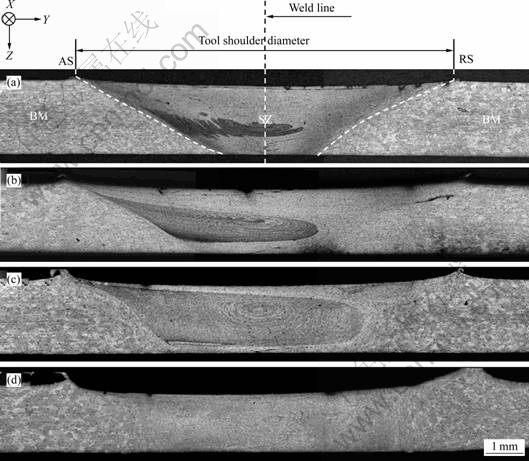
Fig.4 shows the optical macrographs of the cross- sections perpendicular to the tool traverse direction of the FSWed plates. Defects such as voids, cracks and unbonded zones are not observed in and near the SZ, showing that defect-free welds are successfully obtained at all tool rotation speeds. The area of the SZ is increased with the tool rotation speed. Onion ring structure is formed in the tool rotation speeds ranging from 500 to 2 000 r/min. In addition, the increase of the tool rotation speed leads to the increase in the region of the onion ring structure.

Fig.4 Optical macrographs of the cross-sections perpendicular to the tool traverse direction of the aluminum alloy plates friction-stir-welded at the tool rotation speeds of 500(a), 1 000(b), 2 000(c) and 3 000(d) r/min
Fig.5 shows the optical micrographs of the base metal zone (BM), and the SZ on the cross-sections perpendicular to the tool traverse direction of the plates friction-stir-welded at tool rotation speeds of 500, 1 000, 2 000 and 3 000 r/min. In the BM(Fig.5(a)), the grain size is not uniformed. Namely, non-equiaxed large grains are over 100 ��m in size. In contrast, the SZ is composed of smaller and equiaxed grains. This result suggests that the SZ is severely plastically deformed by mechanical stirring action of the rotating probe during the FSW process, and then grain refinement occurs as a consequence of dynamic recrystallization. The grain size, however, increases with the tool rotation speed. In general, the size of dynamically recrystallized grains decreases with the increase of strain and/or strain rate[7-9]. However, in this study, the grain size increases in spite of the increase in the tool rotation speed, which is expected to lead to the increase in the strain and strain rate. On this phenomenon, KWON et al[10] reported that some additional static grain growth occurred in the SZ during cooling after severely plastically deformed by the rotating probe, because the maximum temperature of the SZ increased with the increase of tool rotation speed.

Fig.5 Optical micrographs of base metal plate(a), and central regions of friction-stir-welded zone on cross-sections perpendicular to tool traverse direction of aluminum alloy plates friction-stir-welded at tool rotation speeds of 500(b), 1 000(c), 2 000(d) and 3 000(e) r/min
3.3 Hardness properties
Fig.6 shows the average Vickers micro-hardness of the BM and SZ on the cross-section perpendicular to the tool traverse direction of the FSWed aluminum alloy plates. At all tool rotation speeds, the SZ exhibits higher average hardness than the BM (HV0.1), which results from the very small grain size, as shown in Fig.5. It is noteworthy that, at 500 r/min, the average hardness increases remarkably, and reaches a level about 33% greater than that of the base metal.

Fig.6 Influence of tool rotation speed on average Vickers micro-hardness of friction-stir-welded zone on cross-sections perpendicular to tool traverse direction of friction-stir-welded aluminum alloy plates (Broken line represents average hardness of base metal plate)
3.4 Tensile properties
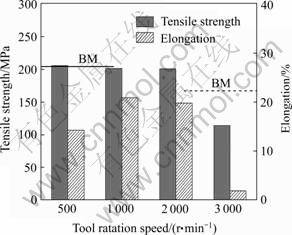
Fig.7 shows the average ultimate tensile strength and total elongation of the FSWed aluminum alloy plates. At 500, 1 000 and 2 000 r/min, the tensile strength of the FSWed plates is similar to that of the base metal (about 204 MPa). However, at 3 000 r/min, the tensile strength is lower than that of the base metal, suggesting that there are optimum tool rotation speeds in order to obtain sound welds with high tensile strength for the FSW of A5052-O alloy plates. The elongation of the FSWed plates is lower than that of the base metal (about 22%). However, it is noticeable that the maximum elongation of about 21% is obtained at 1 000 r/min.

Fig.7 Influence of tool rotation speed on ultimate tensile strength and total elongation of friction-stir-welded aluminum alloy plates (Solid and broken lines represent average ultimate tensile strength and total elongation of base metal plate)
4 Conclusions
1) Defect-free weld is successfully obtained at all tool rotation speeds. Especially at 1 000, 2 000 and 3 000 r/min, the welds exhibit very smooth surface morphologies.
2) Onion ring structure is formed in the SZ at 500, 1 000 and 2 000 r/min. In addition, the onion ring structure region becomes wider, as the tool rotation speed is increased.
3) At all tool rotation speeds, the gain size in the SZ is smaller than that in the base metal, and is decreased with increase of the tool rotation speed.
4) At all tool rotation speeds, the SZ exhibits higher average hardness than the BM. Especially at 500 r/min, the average hardness of the SZ reaches a level about 33% greater than that of the BM.
5) At 500, 1 000 and 2 000 r/min, the tensile strength of the FSWed plates is similar to that of the base metal (about 204 MPa). The elongation is lower than that of the base metal (about 22%). However, it is noticeable that the maximum elongation of about 21% is obtained at 1 000 r/min.
References
[1] THOMAS W M, NICHOLAS E D. Friction stir welding for the transportation industries[J]. Mater Design, 1997, 18(4/6): 269-273.
[2] SHIGEMATSU I, KWON Y J, SUZUKI K, IMAI T, SAITO N. Joining of 5083 and 6061 aluminum alloys by friction stir welding[J]. J Mater Sci Lett, 2003, 22(5): 353-356.
[3] SHIGEMATSU I, SUZUKI K, IMAI T, KWON Y J, SAITO N. Friction stir welding of recycled A6061 aluminum plates fabricated by hot-extrusion of machined chips[J]. J Mater Sci, 2005, 40(11): 2971-2974.
[4] KANNAN M B, DIETZEL W, ZENG R, ZETTLER R, SANTOS J F D. A study on the SCC susceptibility of friction stir welded AZ31 Mg sheet[J]. Mater Sci Eng A, 2007, 460/461: 243-250.
[5] DARRAS B M, KHRAISHEH M K, ABU-FARHA F K, OMAR M A. Friction stir processing of commercial AZ31 magnesium alloy[J]. J Mater Proc Tech, 2007, 191(1/3): 77-81.
[6] THOMAS W M, NICHOLAS D E, NEEDHAM J C, MURCH M G, TEMPLESMITH P, DAWES C J. Friction stir butt welding. GB Patent Application. US Patent, 5460317[P]. 1995.
[7] KIM H Y, SOHN W H, HONG S H. High temperature deformation of Ti-(46-48)Al-2W intermetallic compounds[J]. Mater Sci Eng A, 1998, 251(1/2): 216-225.
[8] FURU T, SHERCLIFF H R, BAXTER G J, SELLARS C M. The influence of transient deformation conditions on recrystallization during thermomechanical processing of an Al-1%Mg alloy[J]. Acta Mater, 1999, 47(8): 2377-2389.
[9] KIM S I, YOO Y C. Dynamic recrystallization behavior of AISI 304 stainless steel[J]. Mater Sci Eng A, 2001, 311(1/2): 108-113.
[10] KWON Y J, SHIGEMATSU I, SAITO N. Production of ultra-fine grained aluminum alloy using friction stir process[J]. Mater Trans, 2003, 44(7): 1343-1350.
Corresponding author: Yong-Jai KWON; Tel: +82-52-259-1294; E-mail: yongjaikwon@ulsan.ac.kr
(Edited by CHEN Can-hua)


