J. Cent. South Univ. (2017) 24: 1977-1985
DOI: https://doi.org/10.1007/s11771-017-3606-6

Measurement and evaluation of strain fields in T23 steel based on digital image correlation method
LIN Lie-xiong(������)1, XU Meng-jia(���ϼ�)1, 2, XU Ji-jin(��ý�)1, LU Hao(½�)1,
YE Cheng-hui(Ҷ�ϻ�)1, YU Chun(�ഺ)1, CHEN Jun-mei(�¿�÷)1
1. School of Materials Science and Engineering, Shanghai Jiao Tong University, Shanghai 200240, China;
2. School of Mechanical Engineering, Shanghai Dianji University, Shanghai 201306, China
 Central South University Press and Springer-Verlag GmbH Germany 2017
Abstract:
Surface strain fields of the designed compact tension (CT) specimens were investigated by digital image correlation (DIC) method. An integrative computer program was developed based on DIC algorithms to characterize the strain fields accurately and graphically. Strain distribution of the CT specimen was predicted by finite element method (FEM). Good agreement is observed between the surface strain fields measured by DIC and predicted by FEM, which reveals that the proposed method is practical and effective to determine the strain fields of CT specimens. Moreover, strain fields of the CT specimens with various compressive loads and notch diameters were studied by DIC. The experimental results can provide effective reference to usage of CT specimens in triaxial creep test by appropriately selecting specimen and experiment parameters.
Key words:
1 Introduction
Creep crack initiation and growth can occur in components operating at high temperature due to residual stress relief [1]. The creep crack will reduce the remained service life of the components and may lead to destructive accident [2]. Therefore, it is significant to have a detailed comprehension on the effect of residual stress on crack initiation and growth. In most studies, the effect of residual stress on crack initiation and growth behavior was investigated using a designed compact tension (CT) specimen [3-5]. In their experiments, residual stresses were generated ahead of the notch root by loading in compression beyond the yield strength and then unloading. Many scholars used variable notch diameters and other processing to study the effect of residual stress on crack initiation and growth. Different strain fields of the specimens could be obtained at the same compressive load. Therefore, it is quite important to obtain accurate strain fields of the CT specimens at different loads in order to acquire the same maximum residual stress.
Effects of compressive loads and notch diameters on residual stresses of the designed CT specimens have been studied by the finite element method (FEM) [1, 2]. However, there were few researches reported experimental studies of the influence of compressive loads and specimen notch diameters on surface strain fields of CT specimens. In situ neutron diffraction and synchrotron X-ray diffraction were commonly used to experimentally characterize the strain fields of CT specimens [6-8]. Nevertheless, the operation of the diffraction method was somewhat complex. As far as the author��s knowledge, there are seldom reports about the method to quickly obtain strain fields of the CT specimen.
Digital image correlation (DIC) method provides the possibility to measure strain fields of the CT specimen fast and accurately. DIC is a non-contact optical measurement method used to obtain the full-field deformation information by analyzing the image of the specimen surface before and after deformation. A reference image of the specimen should be captured before the load is applied on the specimen. During the experiment, images at different loads should be recorded as target images. The core step of DIC method is image analysis, which contains many image processing algorithms. The key to measure the strain fields fast is to develop an integrative computer program to analyze these images quickly.
In the past few years, DIC has been widely accepted and commonly used as a powerful and flexible tool for the surface deformation measurement in the field of experimental solid mechanics [9]. For example, DIC was used to measure full-field deformation during metal sheet welding processes [10]. In order to obtain contact-free coefficient of thermal expansion, a contrast enhanced microscopy DIC was proposed [11]. DIC and FEM were applied to investigating the effects of local variations on the behavior of a high pressure, die cast aluminum alloy [12]. DIC has been also employed to investigate the strain accumulation in fatigue crack growth [13]. While there were few works of measuring the strain fields of CT specimens during compression. From what has been discussed above, the application of DIC to strain field measurement of the CT specimens has great significance.
The aim of this work is to introduce DIC to measure the surface strain fields of the CT specimens with different initial states at different compressive loads. An integrative computer program was developed based on DIC algorithms, which enables fast measurement of the strain fields of the CT specimen. The experimental setup and procedure for measuring strain fields of the CT specimens by DIC were proposed. Strain distribution of the CT specimen was predicted by FEM and measured by DIC. Furthermore, strain fields of the CT specimens with various compressive loads and notch diameters were investigated by DIC.
2 Principles of DIC
In a general way, the implementation of DIC consists of the following steps: 1) preparing specimen and experimental setup; 2) capturing reference image and target images of the specimen; 3) processing these images by using a pre-programmed program to obtain the strain fields. The basic principle of DIC is schematically illustrated in Fig. 1. Typically, a subset of (2M+1)��(2M+1) pixels centered at point A(x0, y0) from the reference image is chosen and used to find its corresponding location in the target image. In Fig. 1, a set of neighboring points in the reference subset is assumed to remain as neighboring points in the target subset. When the subset is small enough, we can assume that each of these points B(xi, yj) around subset center A(x0, y0) in the reference subset is mapped to B(xi, yj) in the target subset according to the following shape function, which can be used to describe translation, rotation, shear and their combinations [14].
 (1)
(1)
where u and v are the displacement components for the subset center A in the directions, respectively. The terms ��x and ��y are the distance from A to point B��, and ux, uy, vx and vy are the displacement gradient components.
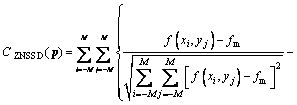
Specifically, a correlation function is predefined to assess the similarity degree between reference subset and target subset. Most popular correlation criteria include the zero-normalized cross-correlation (ZNCC) and zero-normalized sum of squared differences (ZNSSD), which are unaffected by changes in illumination [15]. The matching procedure is completed through searching the peak position of the distribution of the correlation coefficients [16].


 (2)
(2)
 (3)
(3)
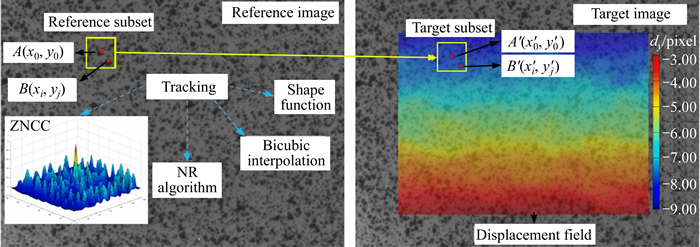
Fig. 1 Basic principle of DIC: tracking same point in reference and target image
where p denotes the deformation vector; M is the number of pixels in the subset in two orthogonal directions; f(xi, yj) is the gray level intensity at coordinates (xi, yj) in the reference subset of the reference image; g(x��i, y��j) is the gray level intensity at coordinates (x��i, y��j) in the target subset of the target image, and (xi, yj) and (x��i, y��j) are the coordinates of the pixel in the reference and target image, respectively, fm and gm are the mean intensity values of reference and target subsets, respectively:
 (4)
(4)
 (5)
(5)
It is worth noting that the ZNSSD coefficient is actually related to the ZNCC coefficient according to the following equation [17]:
 (6)
(6)
There are many search algorithms that have been employed to find the location of subsets in the target image, such as peak-finding algorithm [18], coarse�Cfine search algorithm [19], genetic algorithm [20], iterative spatial domain cross-correlation algorithm [21] and finite element method [22]. It is worth noting that the most widely used algorithm in various literature is the iterative spatial domain cross-correlation algorithm, which can provide both high accuracy and high computational efficiency [23]. It is quite important to note that the Newton-Raphson (NR) algorithm is a classic iterative spatial domain cross-correlation in DIC. By using the NR algorithm to get the deformation vector, the solution can be written as [16]
 (7)
(7)
where p0 is the initial guess of the solution; p is the next iterative approximation solution;  is the gradients of correlation criteria and
  is the second-order derivation of correlation criteria, commonly called the Hessian matrix.
In the realization of the iterative spatial domain cross-correlation algorithm, an interpolation scheme is needed to improve the displacement accuracy. Various interpolation schemes such as the bicubic interpolation, B-spline interpolation and biquintic-spline interpolation have been proposed [24]. The bicubic interpolation used to determine the gray values and first-order gray gradients at sub-pixel locations is as follows [17]:
 (8)
(8)
where a00, a01, ��, a33 are unknown coefficients, which can be determined by the gray intensity of the neighboring 4��4 pixels centered at the sub-pixel location. It should be emphasized that, the 16 unknown coefficients remain the same for each interpolation block, regardless of the specific sub-pixel locations within it [17].
Currently, the DIC using an iterative spatial domain cross-correlation algorithm (e.g., a NR algorithm), combined with a robust matching criterion (e.g., a ZNSSD) and a high-accuracy sub-pixel interpolation algorithm (e.g., a bicubic interpolation scheme), has been considered as a gold standard for accurate sub-pixel displacement tracking [17]. A fast DIC method was proposed by PAN et al [17, 25] to optimize the conventional NR-algorithm-based DIC method by effectively eliminating the repeating redundant calculations. Specifically, a reliability-guided (RG) displacement tracking scheme was utilized to avoid the computational cost involved in integer-pixel displacement searching, and a pre-computed global interpolation coefficient look-up table was employed to entirely eliminate repetitive interpolation calculation at sub-pixel locations.
Based on the sub-pixel full-field displacement field, many algorithms can be used to estimate the strain field. A practical algorithm for strain estimation is the point-wise least-squares proposed by PAN et al [26]. A square window centered at the current point, which containing (2m+1)��(2m+1) discrete points (i.e., strain calculation window) was selected firstly. If the strain calculation window is small enough, the displacement distributions in it can be approximated as a linear plane, thus we have
 (9)
(9)
where (i, j) is the coordinate of the current point within the strain calculation window; u(i, j) and v(i, j) are the displacements at the point of (i, j) in x and y directions; a0, a1, a2, b0, b1 and b2 are the undetermined coefficients.
Equation (9) can be rewritten into the form of matrix. For instance, the first formulation of Eq. (9) can be rewritten as
 (10)
(10)
The undetermined coefficients can be solved by the least-square method. After we get the undetermined coefficients, the strain can be calculated through the formulas as follow:
 (11)
(11)
Based on the optimized NR-algorithm-based DIC algorithms and the point-wise least-squares, an integrative program was programmed in this work for the following DIC analysis.
3 Materials and methods
3.1 Materials and specimens
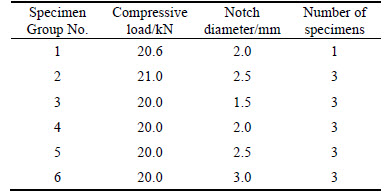
Figure 2 shows the geometry and dimensions of the designed CT specimen adopted. The CT specimens were machined from a T23 steel plate. The chemical compositions are summarized in Table 1. The tensile properties of the steel are given in Table 2. In this work, strain fields of six groups of specimens with different notch diameters at variable compressive loads were investigated by DIC. And the parameters of these specimens are given in Table 3. The compressive load in Table 3 stands for the maximum compressive load applied to the group of specimens. It is worth noting that group 1 has one specimen and other groups contain three specimens. In the following sections, specimens i-j represent the specimen j in the group i.
3.2 Experimental setup
The experimental setup used to determine the surface strain fields of CT specimens is shown in Fig. 3. The test system mainly contains a camera (DH-HV3102UC, Daheng Image Co., Ltd), a light source, a computer, a set of homemade clamps and a Zwick/Roell 100 electronic universal testing machine. During the test, the CT specimens were held on the electronic universal testing machine by the homemade clamps, and compressive loads were loaded on the specimens. An adjustable light source is fixed on the camera to ensure the illumination with uniform distribution and sufficient intensity in most measurement environment. The image recording system used for real-time display and capturing image consists of a camera and a computer.
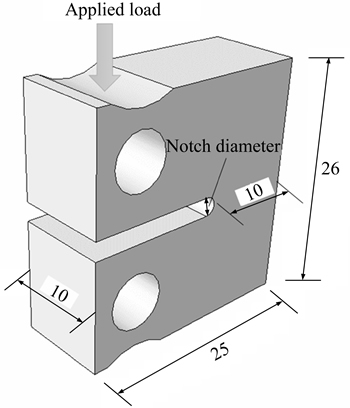
Fig. 2 Geometry and dimension of designed CT specimen (all dimensions in mm)
Table 1 Chemical composition of T23 steel (mass fraction, %)

Table 2 Mechanical properties of T23 steel

Table 3 Specimens prepared in experiments
3.3 Experimental procedure
The experimental procedure mainly contains the following steps. First of all, the test specimen with artificial speckle patterns on its surface was fixed on the electronic universal testing machine with the homemade clamps. It is worth noting that the speckle pattern on the specimen must have a random gray intensity distribution. The speckle pattern was obtained by spraying black and/or white paints. Then the camera was placed where its optical axis was vertical to the test specimen surface (the lens is parallel to the specimen surface), and the focus was adjusted to get a clear image of the specimen surface. The blue light source was adjusted to a suitable brightness to obtain moderate-brightness image. After that, the corresponding image was captured as a reference image without any load. Then the specimen was compressed by progressive increasing load. The load was applied to the specimen at a displacement rate of 0.1 mm/min. When the compression load reached preset values, it would be held for 5 s to record the image as target image. All of the images were 8-bit gray images with a spatial resolution of 1024��768 pixels. Finally, the reference image and target images were analyzed to extract the strain fields. During the analysis of these images, a subset size of 41��41 pixels and a grid step of 5 pixels were used. A strain calculation window of 21��21 sets of displacement data was applied to obtaining the strain fields.
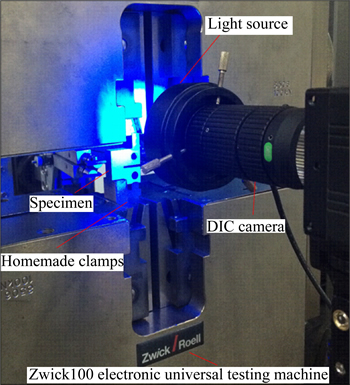
Fig. 3 Experimental setup for measuring strain fields of CT specimens
3.4 FE modeling
FEM simulation was carried out to obtain the strain field in the vicinity of the notch of the CT specimen with notch diameter of 2 mm. The commercial FEM software ABAQUS was used for FEM analyses. A three- dimensional (3-D) FE modeling was undertaken using a one-quarter geometry 3-D mesh (as seen in Fig. 4) and symmetric boundary conditions. The model used first order (linear) interpolation 8-node hexahedral brick elements with reduced integration and hourglass control (ABAQUS C3D8R). The restraint condition in this model was U2=0 U3=0 respectively on the symmetrical plane and U1=0 at the corner to avoid rigid translation as shown in Fig. 4. Boundary condition type was displacement/rotation. The FE mesh was refined in the vicinity of notch root to obtain accurate results and to eliminate mesh dependency effects, where the smallest size is 10 ��m. The stress versus strain curve was assumed to be expressed by isotropic hardening. The rigid cylinder was used to simulate the punch tool to apply the compression load. The rigid circle was constrained in horizontal direction, and it could move only in vertical direction during loading process. The peak load applied on the punch tool is 10.3 kN.
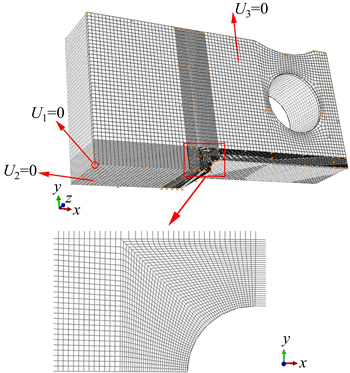
Fig. 4 3-D FE model of CT specimen with notch diameter of 2 mm
4 Results and discussion
4.1 Strain fields obtained from DIC and FE modelling
The DIC measurement region is shown in Fig. 5(a) in the red dashed box. Figure 5(b) shows the comparison between the surface strain predicted by the 3-D FE model and the actual DIC measurement of specimen 1-1. Good agreement is observed between the surface strain fields measured by DIC method and the 3-D FE model. It is necessary to note that the maximum strain in the notch root region is one of the most concerned problems in the previous studies [1, 2, 27]. The strain field obtained by DIC is also consistent with the predicted strain fields in Refs. [1, 27], which verifies the feasibility and accuracy of the present method.
The DIC contours can provide much information, such as the full-field strain distribution, the specific location where the strain aggregated, and the maximum strain in the notch root region. As shown in Fig. 5(b),both of the strain fields show lobes of compressive strain emanating from the notch at approximately ��40�� above and below the central ligament. And the maximum strain in the notch root region is about -4%. The gradient of strain near the notch root is relatively dense, which means the stress concentration near the notch root is higher than other region. Strain is mainly concentrated in a rectangle, called concentrated strain region. The rectangle starts from the notch root, extending to the left direction with the distance of a radius and extending to the up and down direction with the distance of a diameter. Strain distribution in the region outside the rectangle is relatively uniform and spare, and called this region as uniform strain region. The strain contour in this region protrudes to the notch root. The strain where a diameter is away from the notch root is about 15% of the strain in the notch root. The above strain distribution characteristics are basically the same in the 3-D FE model and the DIC measurement. It is worth noting that the corresponding magnification of the DIC imaging system is about 8.6 ��m/pixel. While the smallest size in the 3-D FE model is 10 ��m. Therefore, there will have some differences in detail between the strain fields predicted by the 3-D FE model and the actual DIC measurement. In conclusion, DIC is verified as a practical and accurate method to measure the surface strain fields of the CT specimens.
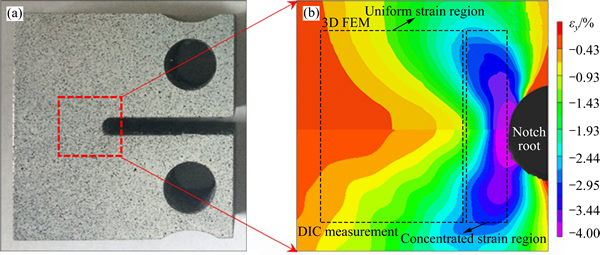
Fig. 5 Schematic diagram of the DIC measurement region (a), strain (��y) fields of specimen 1 predicted by 3-D FE model and actually measured by DIC (b)
4.2 Effect of compressive loads on strain fields
Specimens in group 2 were applied to studying the effect of compressive loads on strain fields in the notch root. The compressive loads range from 12 to 21 kN with an interval of 1 kN. The strain fields of specimen 2-1 in the notch root region at the load of 12, 15, 18 and 21 kN are shown in Fig. 6. With the increase of compressive load, the half-cylinder pressure heads and arc-shape seats no longer perfectly match, which lead to the load on the top and bottom faces no longer perfectly parallel. Therefore, the strain fields have asymmetrical distribution. With the increase of compressive load, plastic deformation took place in the specimen. Due to the notch, compressive load was mainly concentrated around the notch. And the plastic deformation was mainly concentrated on the notch root. Due to plastic deformation, direction of the compressive load received by the specimen change from vertical downward to slopping downward with increasing compressive load. Therefore, with the increase of compressive load, the strain concentrated at the center of the notch root region become more obvious, and the concentrated strain has a tendency to spread from the center to both sides. And the extension direction of the concentrated strain spread from near vertical to ��40��. Strain distribution in the region about a radius away from the notch root is relatively uniform and spare. Due to the strain concentration effect, the raised strain in this region become obvious and protrudes to the notch root.
The maximum strain in the notch root region at different loads is shown in Fig. 7. The maximum strain in the notch root region increases with the increase of the compressive load. It is noteworthy that the strain at different load in Fig. 7 was the average value of three specimens in group 2. Error bars represent the standard deviation from the strain of three specimens in group 2. The growth of the maximum strain along with the compressive load is nonlinear under loads from 17 to 21 kN, because the compressive loads have surpassed the yield strength of this steel. The nonlinear is especially obvious under loads from 19 to 21 kN since plastic deformation of the specimen is very obvious in this load range. Error bars under loads from 12 to 18 kN are significantly shorter than that under loads from 19 to 21 kN. It means that the fluctuation of measured strain under loads from 19 to 21 kN is larger than that under loads from 12 to 18 kN. The larger the plastic deformation, the more unstable the specimen was on the clamps, which leads to the instability of the measurement strain.
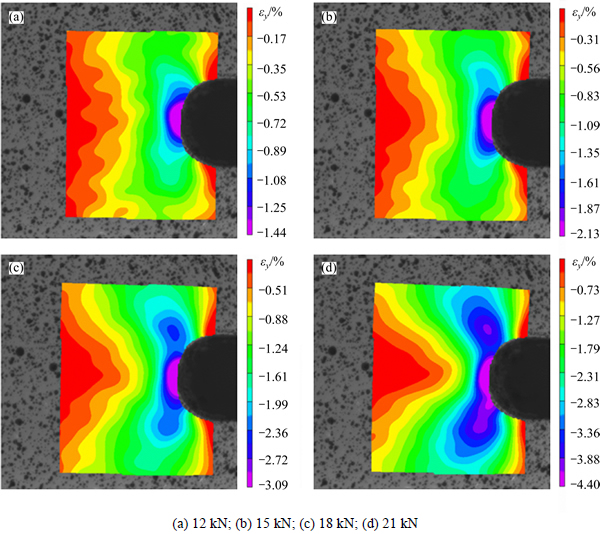
Fig. 6 Strain (��y) fields of specimen 2-1 at different compressive loads:
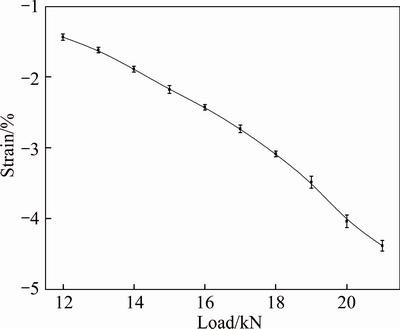
Fig. 7 Effect of compressive loads on maximum strain (��y) in notch root region (Error bars indicate standard deviation (n=3))
4.3 Effect of notch diameters on strain fields
Specimens from group 3 to group 6 were used to investigate the effect of notch diameters on strain fields in the notch root. The diameters of these specimens are 1.5, 2.0, 2.5 and 3.0 mm, respectively. Strain fields in the notch root region of specimen 3-1, 4-1, 5-1 and 6-1 at the load of 16 kN are shown in Fig. 8. The smaller the notch diameter, the more strain concentrated on the region near the notch root, which leads to smaller maximum strain in the notch root and higher concentration degree of strain in the notch root region. Therefore, with the increase of the diameter, the maximum strain will increase, while the concentrated degree of the strain in the notch root region is reduced. And concentrated degree of the strain out of the concentrated strain region also reduces with the increase of notch diameter. From the point of strain distribution, diameter of 2.0 mm is a relatively good choice to generate residual strain in CT specimen.
The maximum strain in the notch root region at the load from 13 to 20 kN with the interval of 1 kN are shown in Fig. 9. It is noteworthy that the strain at different load in Fig. 9 was the average value of three specimens in corresponding group. Error bars represent the standard deviation from the strain of three specimens in corresponding group. It is obvious that the maximum strain in the notch root region of group 6 is much larger than that of other three groups. The notch diameter of 3.0 mm is a threshold to generate residual strain in CT specimen. The compressive load versus the maximum strain curve under loads from 17 to 20 kN is nonlinear, which is similar to Fig. 7. The nonlinear is especially obvious under loads from 19 to 20 kN. Error bars under loads from 13 to 18 kN are significantly shorter than that under loads from 19 to 20 kN. It means that the fluctuation of measured strain under loads from 19 to 20 kN is larger than that under loads from 13 to 18 kN. The larger the plastic deformation, the more unstable the specimen was on the clamps, which leads to the instability of the measurement results. As can be seen from Fig. 9, diameters of 2.0 mm and 2.5 mm are relatively good choice to generate residual strain in CT specimen for smaller error bars and moderate evolution of the maximum strain.
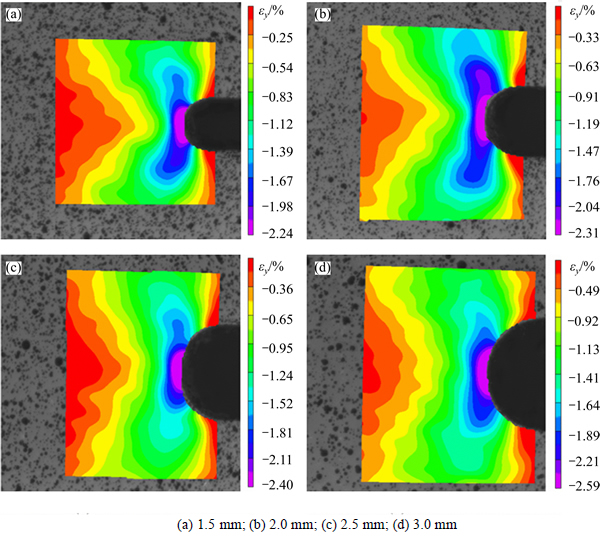
Fig. 8 Strain (��y) fields of specimens 3-1, 4-1, 5-1 and 6-1 at compressive load of 16 kN with different notch diameters:
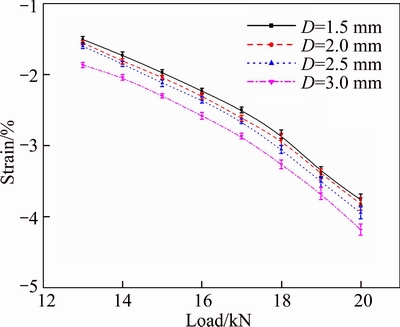
Fig. 9 Effect of notch diameters on maximum strain (��y) in notch root region (Error bars indicate standard deviation (n=3))
5 Conclusions
1) DIC is a practical and accurate method to determine the strain fields of the CT specimens. The experimental setup in the proposed method is simple and inexpensive. The specimen preparation is simple and the strain field acquisition is fast.
2) With the increase of compressive load, the strain concentrated at the center of the notch root region become more obvious, and the strain fields show lobes of compressive strain emanating from the notch root above and below the central ligament. The maximum strain in the notch root region increases with the increase of the compressive load, while it becomes nonlinear when the compressive loads surpass the yield strength of this steel. The larger the plastic deformation, the more unstable the specimen is on the clamps, which leads to larger error bars of the measurement strain.
3) The maximum strain in the notch root increases with increasing notch diameter, while the concentrated degree of the strain in the notch root region reduces with increasing notch diameter. Diameters of 2.0 mm and 2.5 mm are relatively good choice to generate residual strain in CT specimen for smaller error bars and moderate evolution of the maximum strain.
References
[1] CHEN L Y, WANG G Z, TAN J P, XUAN S T, TU S T. Effects of residual stress on creep damage and crack initiation in notched CT specimens of a Cr�CMo�CV steel [J]. Engineering Fracture Mechanics, 2013, 97: 80-91.
[2] ZHAO Lei, JING Hong-yang, XU Lian-yong, HAN Yong-dian, XIU Jun-jie. Effect of residual stress on creep crack growth behavior in ASME P92 steel [J]. Engineering Fracture Mechanics, 2013, 110: 233-248.
[3] HOSSAIN S, TRUMAN C E, SMITH D J. Generation of residual stress and plastic strain in a fracture mechanics specimen to study the formation of creep damage in type 316 stainless steel [J]. Fatigue & Fracture of Engineering Materials & Structures, 2011, 34(9): 654-666.
[4] XU Wei-ya, WANG Ru-bin, WANG Wei, ZHANG Zhi-liang, ZHANG Jiu-chang, WANG Wen-yuan. Creep properties and permeability evolution in triaxial rheological tests of hard rock in dam foundation [J]. Journal of Central South University, 2012, 19: 252-261.
[5] JIANG Wen-chun, ZHANG Wei-ya, ZHANG Guo-dong, LUO Yun, ZHANG Y C, WOO W, TU S T. Creep damage and crack initiation in P92�CBNi2 brazed joint [J]. Materials & Design, 2015, 72: 63-71.
[6] STEUWER A, DANIELS J E. In-situ stress and strain measurements around cracks using synchrotron X-ray diffraction [J]. The Journal of Strain Analysis for Engineering Design, 2011: 0309324711408501.
[7] CHEN B, SKOURAS A, WANG Y Q, KELLEHER J F, ZHANG S Y, SMITH D J, FLEWITT P E J, PAVIER M J. In situ neutron diffraction measurement of residual stress relaxation in a welded steel pipe during heat treatment [J]. Materials Science and Engineering A, 2014, 590: 374-383.
[8] LOPEZ-CRESPO P, STEUWER A, BUSLAPS T, TAI Y H, LOPEZ-MORENO A, YATES J R, WITHERS P J. Measuring overload effects during fatigue crack growth in bainitic steel by synchrotron X-ray diffraction [J]. International Journal of Fatigue, 2015, 71: 11-16.
[9] PAN Bing, QIAN K, XIE Hui-min, ASUNDI A. Two-dimensional digital image correlation for in-plane displacement and strain measurement: A review [J]. Measurement Science and Technology, 2009, 20(6): 062001.
[10] HU Hao, LIANG Jin, TANG Zheng-zong, LU Gang. Image correlation method for full-field deformation measurements during metal sheet welding processes [J]. Optik-International Journal for Light and Electron Optics, 2013, 124(21): 5193-5198.
[11] DIAZ J A, MOON R J, YOUNGBLOOD J P. Contrast enhanced microscopy digital image correlation: a general method to contact-free coefficient of thermal expansion measurement of polymer films [J]. ACS Applied Materials & Interfaces, 2014, 6(7): 4856-4863.
[12] OLOFSSON J, SVENSSON I L, LAVA P, DEBRUYNE D. Characterisation and investigation of local variations in mechanical behaviour in cast aluminium using gradient solidification, digital image correlation and finite element simulation [J]. Materials & Design, 2014, 56: 755-762.
[13] CARROLL J D, ABUZAID W, LAMBROS J, SEHITOGLU H. High resolution digital image correlation measurements of strain accumulation in fatigue crack growth [J]. International Journal of Fatigue, 2013, 57: 140-150.
[14] SCHREIER H W, SUTTON M A. Systematic errors in digital image correlation due to undermatched subset shape functions [J]. Experimental Mechanics, 2002, 42(3): 303-310.
[15] GENCTURK B, HOSSAIN K, KAPADIA A, LABIB E, MO Y L. Use of digital image correlation technique in full-scale testing of prestressed concrete structures [J]. Measurement, 2014, 47: 505-515.
[16] PAN Bing, XIE Hui-min, GUO Zhi-qing, HUA Tao. Full-field strain measurement using a two-dimensional Savitzky-Golay digital differentiator in digital image correlation [J]. Optical Engineering, 2007, 46(3): 033601.
[17] PAN Bing, LI Kai. A fast digital image correlation method for deformation measurement [J]. Optics and Lasers in Engineering, 2011, 49(7): 841-847.
[18] PAEPEGEM W V, SHULEV A A, ROUSSEV I R, PAUW S D, DEGRIECK J, SAINOV V C. Study of the deformation characteristics of window security film by digital image correlation techniques [J]. Optics and Lasers in Engineering, 2009, 47(3): 390-397.
[19] ZHANG Zhi-feng, KANG Yi-lan, WANG Huai-wen, QIN Qing-hua, QIU Yu, LI Xiao-qi. A novel coarse-fine search scheme for digital image correlation method [J]. Measurement, 2006, 39(8): 710-718.
[20] PILCH A, MAHAJAN A, CHU T. Measurement of whole-field surface displacements and strain using a genetic algorithm based intelligent image correlation method [J]. Journal of Dynamic Systems, Measurement, and Control, 2004, 126(3): 479-488.
[21] ZHOU Peng, GOODSON K E. Subpixel displacement and deformation gradient measurement using digital image/speckle correlation (DISC) [J]. Optical Engineering, 2001, 40(8): 1613-1620.
[22] BESNARD G, HILD F, ROUX S. ��Finite-element�� displacement fields analysis from digital images: application to Portevin�CLe  bands [J]. Experimental Mechanics, 2006, 46(6): 789-803.
[23] PAN Bing, XIE Hui-min, XU Bo-qin, DAI Fu-long. Performance of sub-pixel registration algorithms in digital image correlation [J]. Measurement Science and Technology, 2006, 17(6): 1615.
[24] SCHREIER H W, BRAASCH J R, SUTTON M A. Systematic errors in digital image correlation caused by intensity interpolation [J]. Optical Engineering, 2000, 39(11): 2915-2921.
[25] PAN Bing. Reliability-guided digital image correlation for image deformation measurement [J]. Applied Optics, 2009, 48(8): 1535-1542.
[26] PAN Bing, ASUNDI A, XIE Hui-min, GAO Jian-xin. Digital image correlation using iterative least squares and pointwise least squares for displacement field and strain field measurements [J]. Optics and Lasers in Engineering, 2009, 47(7): 865-874.
[27] TURSKI M, BOUCHARD P J, STEUWER A, WITHERS P J. Residual stress driven creep cracking in AISI type 316 stainless steel [J]. Acta Materialia, 2008, 56(14): 3598-3612.
(Edited by HE Yun-bin)
Cite this article as:
LIN Lie-xiong, XU Meng-jia, XU Ji-jin, LU Hao, YE Cheng-hui, YU Chun, CHEN Jun-mei. Measurement and evaluation of strain fields in T23 steel based on digital image correlation method [J]. Journal of Central South University, 2017, 24(9): 1977�C1985.
DOI:https://dx.doi.org/https://doi.org/10.1007/s11771-017-3606-6Foundation item: Projects(51575347, 51405297, 51204107) supported by the National Natural Science Foundation of China
Received date: 2016-04-05; Accepted date: 2016-10-06
Corresponding author: LU Hao, Professor, PhD; Tel: +86-21-34202548; E-mail: shweld@sjtu.edu.cn
Abstract: Surface strain fields of the designed compact tension (CT) specimens were investigated by digital image correlation (DIC) method. An integrative computer program was developed based on DIC algorithms to characterize the strain fields accurately and graphically. Strain distribution of the CT specimen was predicted by finite element method (FEM). Good agreement is observed between the surface strain fields measured by DIC and predicted by FEM, which reveals that the proposed method is practical and effective to determine the strain fields of CT specimens. Moreover, strain fields of the CT specimens with various compressive loads and notch diameters were studied by DIC. The experimental results can provide effective reference to usage of CT specimens in triaxial creep test by appropriately selecting specimen and experiment parameters.


