
Stud welding for fixation of cryogenic insulation of membrane tanks in LNG ship building
Jeong-Soo LEE1, Young-Soo RYU1, Nam-In KIM1, Bong-Joon KIM1, Yoo-Kyung KIM1, Myung-Hyun KIM2
1. Hanjin Heavy Industries & Construction Co. Ltd, Jungang-dong, Busan, Korea;
2. Department of Naval Architecture and Ocean Engineering, Pusan National University, Jangjeon-dong, Busan, Korea
Received 2 March 2009; accepted 30 May 2009
Abstract��The support plates including all of the inner hulls such as E grade steel, weld seams and SUS304L were considered to establish the optimal stud welding condition in LNG ship building. The stainless steel plate was especially applied to the bracket on the liquid dome. The polished and etched surfaces of the welded stud and support plate were examined if the bead was properly formed. With the micrographic examination, the fusion boundary of metal weld zone formed by stud welding was analyzed to optimize the welding parameters. And also the analysis of the unacceptable welding faults such as cold and hot weld were performed. The mechanical tests such as tensile tests and bending tests were carried out to reveal any abnormal variation in the relationship of process parameters and the strength.
Key words:
stud welding; cold weld; SUS304L;
1 Introduction
The support plates including all of the inner hulls such as E grade steel, weld seams and SUS304L were considered to establish the optimal stud welding condition in LNG ship building[1]. The cryogenic insulation, which forms the barrier of the LNG cargo tank, is adhesively bonded directly to the inside of the inner hull of the ship (Fig.1). Additional to the load-bearing mastic patches, the stud bolt should be applied to holding the insulation panel and foam plug in Mark-�� membrane type[2]. Stud welding is a form of spot welding and a bolt or specially formed nut is joined to a flat plate by using the stud as one of the electrodes. Stud welding can reduce costs by saving labor and material where end joined components are required by speed up design and layout time and installation rates. Spot pacing, drilling and tapping and riveting inserts can be often totally eliminated. Yet in most cases, the welded joint is stronger than that by other joining methods. However, in the case of the stud welding, the improper process parameters can cause significant defects such as the lack of fusion, cracks and harmful inclusions of slag[3]. So, the welded zone of each stud should be carefully examined for the purpose of detecting the presence of possible cracks. In this study, the stud welding was conducted to analyze the effects of the process parameters such as the welding current and time, and to determine the optimal process parameters. The bead shape and metallography of the macroscopic weld were observed, and tensile test and bending test were performed to evaluate the welding condition.
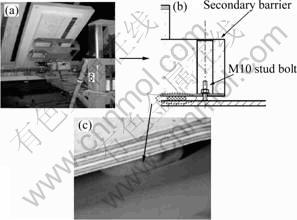
Fig.1 Positioning and fixation of panel for LNG cargo containment system: (a) Panel positioning; (b) Fixation of panel; (c) Mastic
2 Experimental
Stud and base plate material should be compatible with the stud welding process. In the case of stainless 304L studs of the diameter (10 mm), a stamped-in aluminum cap can be provided at the stud tip which has conical end face. In Table 1, the aluminum serves as a flux to deoxidize the weld metal and to stabilize the arc[4].
Table 1 Composition of aluminum cap (mass fraction, %)

Welding the stud bolt to the base plate material was carried out by fusing the base metal and the stud bolt through arc discharge and electric resistance heat which were generated between both of them. The process for welding the stud bolt on the base plate material by means of the electrode element comprises the steps are as follows[5].
1) Producing the pilot arc by making the electrode element contact with the base metal surface.
2) Lifting the stud bolt from the base metal surface in an instant for a distance of 1.5 mm (lift-setting). The lift is the distance that the gun pills the stud away from the base material. Lift creates an air gap that the electric current should bridge. The current flow crosses the resistance of this gap, which creates the arc heat to melt the stud and base material.
3) Pressing and driving in the stud bolt by a spring.
The tests were carried out at the electricity current of 500, 520, 540 and 580 A under the welding time of 0.25, 0.3, 0.35 and 0.4 s. And the test setup can be shown in Fig.2.
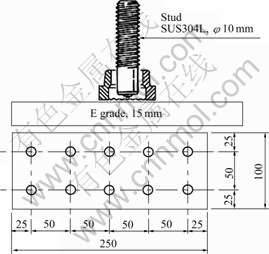
Fig.2 Test setup for stud welding
The studs welding operation must be realized in identical position with the actual position encountered in the tank (which is built by the E-grade steel): bottom, lower and upper chamfer, vertical and top position.
3 Results and discussion
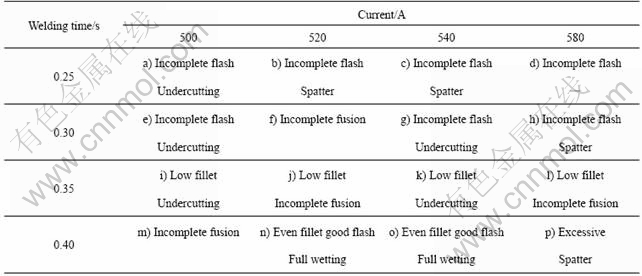
As shown in Fig.3, the fillet (flash) is separately formed according to the electricity current and welding time. In Fig.3(p), hot weld which is made with too much time and electricity current can cause excessive spatter and undercutting of stud (Table 2). The frequent fault is plunging impediment[6]. It occurs whenever the plunging movement of the stud is cut short and the stud comes to a halt above the welding pool. And low heat input due to low ampere and welding time can also cause this defect. This impediment can cause the cold weld in Figs.3(a)-(d). In this case, an incomplete connection may result, without any defect showing on the outside. Therefore, the final assessment of a weld should never be made on the basis of visual tests alone, without mechanical test and macro test. Following the satisfactory visual inspection, tensile tests are carried out under the load of 17 kN and this condition is maintained for 30 min (Fig.4). And the studs are 90? bend under the conditions shown in Fig.5. The MARK-�� type LNG ship building should be controlled under license by GAZTRANSPORT & TECHNIGAZ(GTT) and this test condition is determined by it[7]. Totally, the results of the tensile tests are satisfied with the specification of GTT. However, in the case of the cold weld, even if there is bent only by a small angle, the stud breaks off at the welding zone (Fig.6). At the edge of the stud and the welding zone blank spots are visible (lack of fusion). In Fig.7, a good (Normal) weld at 520-540 A, Lift of 1.5 mm, time of 0.4 s is characterized by even flash formation, a shiny to the flash surface, a good height in flash, and full wetting. To obtain good weld results, there needs a proper relationship between the lift, plunge, time and amperage[8]. A cold weld is made with low fillet height, incomplete fillet formation, a number of spatters on the surface. To solve this problem, it requires more time and amperage. Austenitic stainless steels such as SUS304L and 316L represent the largest of general groups of stainless steels[9]. They have good corrosion resistance and 210 MPa minimum yield strength at room temperature. Low-temperature impact properties are good for this alloy due to a good ductility and toughness. Elements promote the formation of austenite, so, most notably nickel is added to steel in order to retain the FCC structure at room temperature and below[10]. Chromium
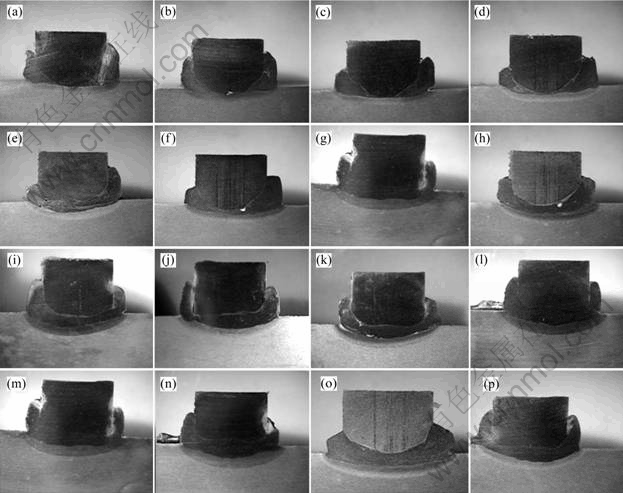
Fig.3 View of macro-structure: (a) Current of 500 A, welding time of 0.25 s; (b) Current of 520 A, welding time of 0.25 s; (c) Current of 540 A, welding time of 0.25 s; (d) Current of 580 A, welding time of 0.25 s; (e) Current of 500 A, welding time of 0.30 s; (f) Current of 520 A, welding time of 0.30 s; (g) Current of 540 A, welding time of 0.30 s; (h) Current of 580 A, welding time of 0.30 s; (i) Current of 500 A, welding time of 0.35 s; (j) Current of 520 A, welding time of 0.35 s; (k) Current of 540 A, welding time of 0.35 s; (l) Current of 580 A, welding time of 0.35 s; (m) Current of 500 A, welding time of 0.40 s; (n) Current of 520 A, welding time of 0.40 s; (o) Current of 540 A, welding time of 0.40 s; (p) Current of 580 A, welding time of 0.40 s
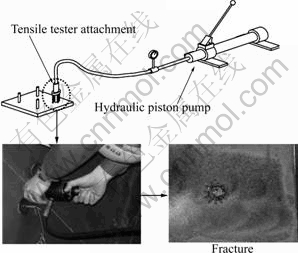
Fig.4 Test setup for tensile tests

Fig.5 Test setup for bending tests
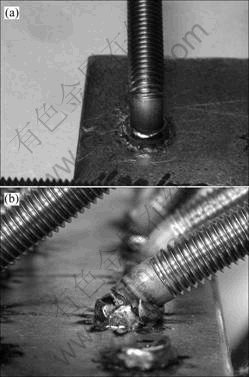
Fig.6 Test results for bending tests under good condition(a) and bad condition(b)
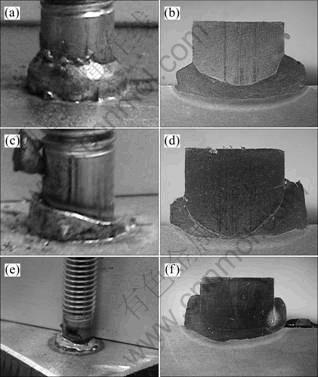
Fig.7 Welding condition according to the process parameters: (a), (b) Normal weld (540 A, 0.4 s); (c), (d) Cold weld (below 500 A, 0.4 s); (e), (f) Hot weld (580 A, 0.4 s)
Table 2 Results of welding tests (SUS 304L Bolt+E grade, plunge depth of 1.5 mm)
alloy enhances corrosion resistance. However, in certain dissimilar combinations, martensite shows present along the fusion boundary in transient region in HAZ of base metal due to the transition in composition between a carbon steel and stainless steel (304L) and in fast cooling rate (Fig.8). As the base metal has higher carbon content than weld metal, carbon diffuses from the HAZ to the fusion zone during welding, narrow martensitic region appears at the fusion boundary. This phenomenon can easily occur as the heat input increases (hot weld), which causes the brittle property of this region.
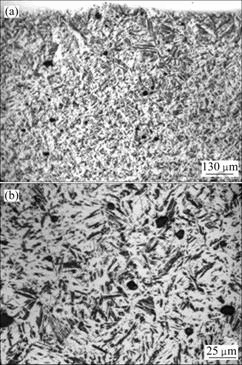
Fig.8 Base-metal (E-grade) HAZ (a) and fusion line+1mm in Base-metal (b)
4 Conclusions
1) A good (normal) weld at 520-540 A, Lift of 1.5 mm, time of 0.4 s is characterized by even flash formation, a shiny to the flash surface, a good height in flash, and full wetting.
2) In the case of cold weld which is made with low fillet height and incomplete fillet formation, it requires more time and amperage.
3) As the base metal has higher carbon content than weld metal, carbon diffuses from the HAZ to the fusion zone during welding, narrow martensitic region appears at the fusion boundary.
References
[1] KIM B J. RYU Y S, LEE J S. A study on the fatigue strength of lap joint between AISI 304L membrane sheets for Mark-�� type LNG tank[C]//International Conference of the International Institute of Welding. Graz, Austria, 2008: 131-136.
[2] TOSHIHARU K. Process for stud welding and stud bolt for welding: EP85108074[P]. 1986.
[3] CHI Qiang, ZHANG Jian-xun, FU Ji-fei. Effects of shield ferrules on the arc behavior in stepping arc stud welding[J]. Process of Mechanical Engineering of China, 2005, 16(21): 1962-1965.
[4] ANDERSON N S. Design criteria for headed stud group in shear: Part 1[J]. PCI Journal, 2000, 45(5): 46-75.
[5] O��BRIEN A. Welding handbook[R]. American Welding Society, 1991: 393-434.
[6] ASTM A 493-82a: American Society for Testing and Materials, 1991.
[7] Stud Welding to the Inner Hull: Gaztransport & Technigaz, Specification M1204.
[8] CHI Qiang, ZHANG Jian-xun, FU Ji-fei, ZHANG You-quan. Realization of slow stud plunge in arc stud welding[J]. Transactions of the China Welding Institution, 2005, 26(5): 23-26.
[9] YANG J L, HUANG W R. Precise laser welding of austenitic stainless steel[J]. Trans Nonferrous Met Soc China, 2005, 15(3): 353-358.
[10] KIM B J. SON Y R, YUN J O, LEE J S. Effects of the process parameters on beads by plasma arc welding of the membrane for LNG ships[J]. Advanced Materials Research,2007, 26/28: 507-510.
Corresponding author: Myung-Hun KIM; Tel: +82-51-510-2486; E-mail: kimm@pusan.ac.kr
[2] TOSHIHARU K. Process for stud welding and stud bolt for welding: EP85108074[P]. 1986.
[5] O��BRIEN A. Welding handbook[R]. American Welding Society, 1991: 393-434.
[6] ASTM A 493-82a: American Society for Testing and Materials, 1991.
[7] Stud Welding to the Inner Hull: Gaztransport & Technigaz, Specification M1204.


