
Tensile properties of as-deformed 2A50 aluminum alloy in semi-solid state
DU Zhi-ming(��֮��)1, 2, CHEN Gang(�� ��)1, LIU Jun(�� ��)1, XIE Shui-sheng(лˮ��)2
1. School of Materials Science and Engineering, Harbin Institute of Technology, Harbin 150001, China;
2. State Key Laboratory for Fabrication and Processing of Nonferrous Metals,
General Research Institute for Nonferrous Metals, Beijing 100088, China
Received 13 May 2010; accepted 20 June 2010
Abstract:
Tensile properties of as-deformed 2A50 aluminum alloy were investigated in the high temperature solid and semi-solid states. The results show that temperature has almost no effect on the maximum tensile stress between 500 ��C and 530 ��C, and the maximum tensile stress decreases rapidly when the temperature is above 532 ��C. The ductility decreases with increasing temperature and has an obvious fall when the temperature is above solidus temperature. This alloy almost has no ductility above 537 ��C, and cannot sustain tensile stress above 550 ��C. A brittle temperature range in which this alloy is prone to form microcracks was derived. The relation between microstructure, fraction solid and tensile properties were also investigated by examining the metallograph and fracture surface morphology of tested specimens, which could provide reference for forecasting the microcracks in this alloy occurring in semi-solid processing.
Key words:
tensile properties; aluminum alloy; semi-solid; microcracks; forecast;
1 Introduction
Aluminum alloys are widely used in automotive and aerospace industries because of their high strength and specific rigidity. In recent years, more and more aluminum alloys prepared by forging have been adopted instead of the steel constructions. With the development of light weight in transportation industry and weapon parts, traditional manufacturing technology cannot completely satisfy the requirements for manufacturing some important aluminum alloy parts. Therefore, new advanced technologies are required to meet both preparation and properties of aluminum alloy parts. Semi-solid processing (SSP) is the most promising technology because its forming temperature is lower compared with casting and the forming stress is lower compared with forging[1-6]. Workpieces with complex shapes could be prepared by SSP in one working procedure, and the mechanical properties are better compared with casting and forging workpieces[7-9]. The application of SSP is largely restricted, because few investigations have been made about the mechanism of hot cracks occurring in semi-solid processing[10].
Much work has been done to realize the mechanism of hot cracks occurring in alloy casting[11-13]. Hot cracks are thought to occur in the terminal stage of solidification (in high solid fraction and/or high temperature solid states), while the capability of ductility cannot sustain the tensile strains caused by the temperature gradients and/or mechanical constraints[14]. It is the general rule of hot tears occurring in casting. The mechanism of hot cracks occurring in SSP is consequentially different from casting because some solid particles exist in billets before forming.
The microcracks of SSP workpieces are thought to occur in the high temperature solid state and/or semi-solid state at low liquid fraction. Considerable tensile stress appears at high solid fraction because of inhomogeneous solidification and mechanical constraints. The microcracks occur when the stress surpasses the tensile strength, in combination with limited liquid feeding and low ductility. In this work, tensile tests of as-deformed 2A50 aluminum alloy were conducted at temperatures between 500 ��C and 540 ��C, which contains the high temperature solid and semi-solid states.
The stresses and strains that can be sustained by 2A50 aluminum alloy in the semi-solid state were tested, and the mechanism of microcracks occurring in SSP was investigated. A brittle temperature range in which this alloy is prone to hot tearing was derived. A database about the maximum tensile stresses and ductility of 2A50 aluminum alloy in the high temperature solid and semi-solid states was established, so it could provide reference for forecasting the microcracks of this alloy occurring in semi-solid processing.
2 Experimental
The composition of 2A50 aluminum alloy investigated in this work is provided in Table 1. The solidus and liquidus temperatures for 2A50 alloy were obtained to be 521 ��C and 615 ��C from a differential thermal analysis (DTA) at 10 ��C/min, as shown in Fig.1. The aluminum alloy billets were extruded from d50 mm to d13 mm at 300 ��C. Considerable distortion energy was stored due to large deformation. Semi-solid structure with globular solid particles would be obtained when the billets were reheated above solidus temperature[15]. Microstructure of as-extruded samples after isothermal holding for 10 min at semi-solid temperature of 575 ��C is shown in Fig.2. The microstructure consists of fine and almost globular solid particles. Cylindrical tensile specimens with a gauge length of 120 mm and a diameter of 10 mm were machined from as-extruded billets with their long axis parallel to the extrusion direction. Each specimen contained a central reduced region (l=25 mm, d=6 mm).
The semi-solid tensile tests were conducted using a Gleeble 1500 thermomechanical simulator. Tensile specimens were reheated using electric-resistivity method with which the temperature could distribute homogeneously. The temperature was controlled by two thermocouples welded on the specimens. Tests were conducted between 500 ��C and 540 ��C at a strain rate of 10-3 s-1. The force ? and current length L of the gauge region were recorded. The true strain was derived based on the standard equation of ��=ln(L/L0), where L0 is the initial length. The true stress was derived based on the equation of ��=4?/ (��D2), where D is the current diameter obtained from volume constancy.
Table 1 Composition of 2A50 aluminum alloy (mass fraction, %)
![]()
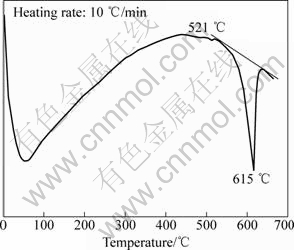
Fig.1 DTA curve of 2A50 aluminum alloy
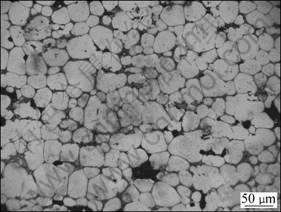
Fig.2 Microstructure of as-extruded sample after isothermal holding for 10 min at 575 ��C
After the tensile tests, some samples were sectioned from tensile specimens for optical metallography and scanning electron microscopy. The samples for optical metallography were mechanically ground, polished and then etched for about 20 s with 2.5% HNO3, 1.5% HCl and 1% HF aqueous solution to reveal the microstructure [16].
3 Results and discussion
Fig.3 shows the true stress-true strain response of as-deformed 2A50 aluminum alloy at five different temperatures (500, 519, 530, 532 and 540 ��C) with a strain rate of 10-3 s-1.
As shown in Figs.3(a), (b) and (c), when the temperature is below 530 ��C, the stress increases rapidly with deformation until reaching the yield point, then it presents a stable value (the stress changes little with increasing strain), lastly followed by a rapid decreasing. This alloy has no or little liquid phase when the temperature is below 530 ��C, the liquid exists as isolated pockets between solid particles, and has almost no effect on the mechanical properties[17]. The stress presents a stable value with increasing strain due to time-dependent creep effects, and the response of true stress-true strain is similar to that of the full solid material because it is mainly influenced by the behavior of solid.
As shown in Figs.3(d) and (e), when the temperature is above 532 ��C, the stress decreases with deformation immediately when the yield point is reached. With temperature increasing above 532 ��C, the liquid pockets begin to combine together to form a continuous film around the grains, and the solid particles become isolated from each other. Stress drops rapidly with increasing strain, because some voids appearing between solid particles and liquid film cannot sustain any tensile stress.
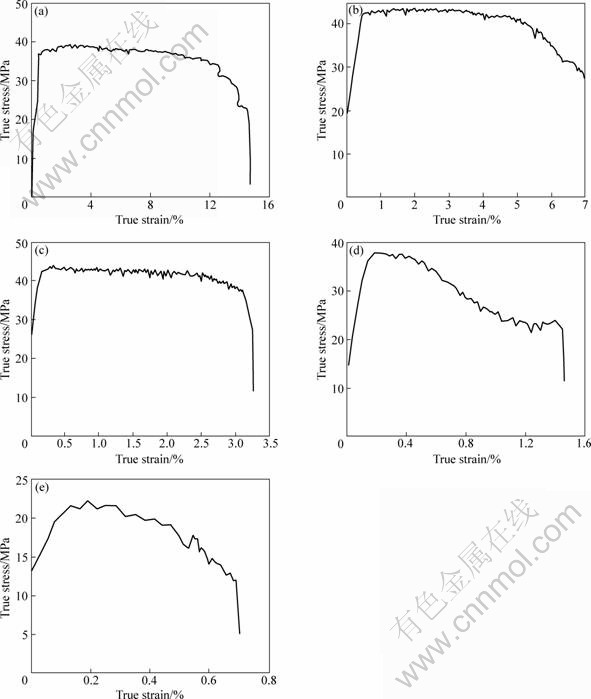
Fig.3 True stress-true strain response at five different temperatures with strain rate of 10-3 s-1: (a) 500 ��C; (b) 519 ��C; (c) 530 ��C; (d) 532 ��C; (e) 540 ��C
Fig.4 shows the variation in ultimate tensile strength and failure strains as a function of temperature. As shown in Fig.4, the UTS changes little when temperature is between 500 ��C and 515 ��C, then moves to stable stage after a slight increase between 515 ��C and 530 ��C, and lastly drops rapidly when temperature is above 530 ��C. The failure strain decreases generally with increasing temperature, and has an obvious falling above 525 ��C. The UTS increases slightly when temperature approaches the solidus, because eutectic phase is melted and it needs some activation energy. The liquid which exists as isolated pockets at grain boundaries has almost no effect on the UTS at temperature between 521 ��C and 530 ��C. With increasing liquid phase fraction above 525 ��C, failure strain is affected heavily, and this alloy almost loses all ductility at 537 ��C (the failure strain is lower than 0.01), and it is defined as the critical ductility temperature T1. The UTS of this material is about 30 MPa at 537 ��C, and the temperature at which this material cannot sustain any stress is defined as the critical stress temperature T2 (about 550 ��C according to Fig.4). The temperature region between T1 and T2 is defined as the brittle temperature range (537-550 ��C), in which the material could still sustain some stress with little ductility, so it is prone to form microcracks in this range[18].

Fig.4 Variations in UTS and failure strain as function of temperature
The optical micrographs of specimens tested at 521 ��C and 536 ��C are shown in Fig.5. The loading direction was horizontal. Sample tested at 521 ��C was at the solidus temperature and that tested at 536 ��C contained more liquid phase.
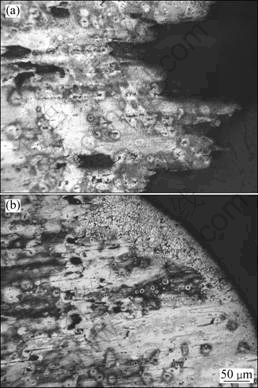
Fig.5 Optical micrographs of tensile specimens tested at 521 ��C (a) and 536 ��C (b)
As shown in Fig.5(a), there are a number of cracks close to the fracture surface, and some small voids also exist along the grain boundaries far away from the fracture surface. At a higher temperature in Fig.5(b), the cracks and voids become much smaller and more evenly distributed. This is because there are more liquid at grain boundary to feed the voids at a high temperature. The fracture surface in Fig.5(a) is rough compared with that in Fig.5(b). There are almost no liquid at 521 ��C, so the rough fracture surface is similar to that of the full solid material. At 536 ��C, the smooth fracture surface is dominated by the liquid phase. The fracture surface in Fig.5(b) appears to be covered with a film with a much finer microstructure. This film is considered to be formed by liquid when the specimen fails. The sample surface is melted locally due to rapid heating and then it is quickly quenched, so the grains in this region are much finer than others.
The fracture surfaces of specimens tested at 525 ��C and 540 ��C were examined by scanning electron microscopy, as shown in Fig.6. It can be seen in Fig.6(a) that most of the surface is dominated by complex topography, which shows typical ductile fracture features. A few regions appear smooth, showing partial melting of the fracture surface. As shown in Fig.6(b), most of the surface is dominated by a smooth topography, indicating liquid plays a more important role. The grain boundaries are clearly evident where almost each surface is covered with a smooth and thin liquid film.
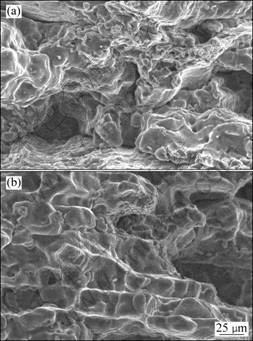
Fig.6 SEM images showing fracture surface morphologies of specimens tested at 525 ��C (a) and 540 ��C (b)
4 Applications
The ultimate tensile strength and failure strain of 2A50 aluminum alloy close to its solidus temperature were derived. Hot cracks of one kind of bogie wheel thixoforged by 2A50 aluminum alloy were forecasted using numerical simulation software (ProCAST) based on this research.
Fig.7 shows the distribution of first principal stress in the terminal stage of solidification, and half wheel was shown for its symmetrical characteristic. As shown in Fig.7, thermal stress at the corner is the largest.
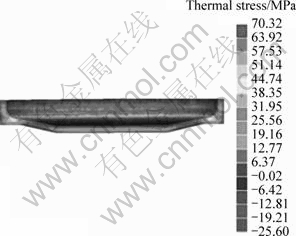
Fig.7 Distribution of first principal stress in terminal stage of solidification
The ultimate tensile strengths and failure strains of 2A50 aluminum alloy were input in the simulation software, and hot cracks appear probably in the region where thermal stress surpasses the ultimate tensile stress. As shown in Fig.8, the hot cracks are forecasted to appear probably at the corner.
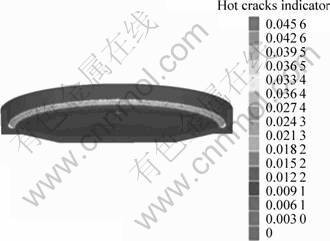
Fig.8 Forecast of distribution of hot cracks
As shown in Fig.9, hot cracks are detected at the corner of bogie wheel, and it is anastomotic with the forecast.
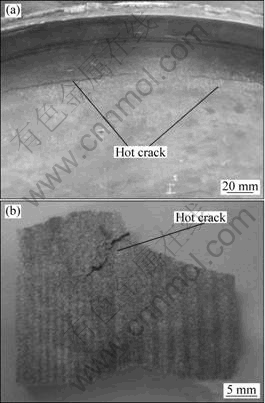
Fig.9 Hot cracks at corner of bogie wheel: (a) Macroscopic crack; (b) Crack propagation
5 Conclusions
1) Tensile tests of 2A50 aluminum alloy conducted close to its solidus temperature (500-540 ��C) show that the mechanical properties of 2A50 aluminum alloy are similar to those of the full solid material bellow 530 ��C, and the liquid begins to play an obvious role at 532 ��C.
2) The 2A50 aluminum alloy almost loses all ductility at 537 ��C, and it cannot sustain any stress at a higher temperature about 550 ��C. A brittle temperature range is obtained, and this alloy is prone to form microcracks in this range.
3) The microstructure and fracture surfaces morphology show that a number of cracks and small voids appear close to the fracture surface, and the cracks and voids become much smaller and more evenly distributed with increasing temperature.
4) Hot cracks of 2A50 aluminum alloy prepared by SSP could be forecasted using numerical simulation based on the tensile tests in the high temperature solid and semi-solid states.
References
[1] PARK H N, GOVENDER G, IVANCHEV L. Opportunities and challenges for use of SSM forming in the aerospace industry [J]. Solid Stat Phenomena, 2006, 116/117: 92-95.
[2] COLEA E T, CAD?B D, BENAMEUR H. Challenges and opportunities in the encapsulation of liquid and semi-solid formulations into capsules for oral administration [J]. Advanced Drug Delivery Reviews, 2008, 60(6): 747-756.
[3] KIRKWOOD D H. Encyclopedia of materials: Semisolid processing [M]. New York: Elsevier Publishers, 2008: 8432-8437.
[4] JORSTAD J L. Encyclopedia of materials: Casting of semisolid metals [M]. New York: Elsevier Publishers, 2008: 1016-1020.
[5] KAPRANOS P, WARD P J, ATKINSON H V, KIRKWOOD D H. Near net shaping by semi-solid metal processing [J]. Materials & Design, 2000, 21(4): 387-394.
[6] WITULSKI T, HEU��EN J M M, WINKELMANN A, HIRT G, KOPP R. Near net shape forming of particulate reinforced Al-alloys by isothermal forming compared to semi solid forming [J]. Journal of Materials Processing Technology, 1994, 45(1/2/3/4): 415-420.
[7] FLEMINGS M C. Behaviour of metal alloys in the semi-solid state [J]. Metall Trans, 1991, 22A(5): 957-981.
[8] Ube Industries Ltd. Method and apparatus for shaping semisolid metals. EPO 745694A1 [P]. 1996-03-30.
[9] KAUFMANN H, MUNDI A, UGGOWITZER P J, ISHIBASHI N. An update on the new rheocasting development work for Al- and Mg-alloys [J]. Die Casting Engineer, 2002, 46(4): 16-19.
[10] DU Zhi-ming, SHAN Wei-wei, CUI Yun-tao, PENG Qiu-cai. Numerical simulation of pressure influence on workpiece properties during thixoforging [J]. Solid State Phenomena, 2006, 116/117: 167-172.
[11] PHILLION A B, COCKCROFT S L, LEE P D. X-ray micro-tomographic observations of hot tear damage in an Al-Mg commercial alloy [J]. Scripta Materialia, 2006, 55: 489-492.
[12] PHILLION A B, COCKCROFT S L, LEE P D. A new methodology for measurement of semi-solid constitutive behavior and its application to examination of as-cast porosity and hot tearing in aluminum alloys [J]. Material Science and Engineering A, 2008, 491: 237-247.
[13] RANGEL-ORTIZ T, ALCALA F C, L?PEZ HIRATA V M. Microstructure and tensile properties of a continuous-cast Al-Li-Hf alloy [J]. Journal of Materials Processing Technology, 2005, 159(2): 164-168.
[14] SAKLAKOGLU N, ETEM SAKLAKOGLU I, METIN T. Mechanical properties and microstructural evaluation of AA5013 aluminum alloy treated in the semi-solid state by SIMA process [J]. Journal of Materials Processing Technology, 2004, 148(1): 103-107.
[15] LUO Shou-jing, CHEN Qiang, ZHAO Zu-de. An investigation of microstructure evolution of RAP processed ZK60 magnesium alloy [J]. Materials Science and Engineering A, 2009, 501: 146-152.
[16] de FREITAS E R, FERRACINI E Jr, FERRANTE M. Microstructure and rheology of an AA2024 aluminium alloy in the semi-solid state, and mechanical properties of a back-extruded part [J]. Journal of Materials Processing Technology, 2004, 146(2): 241-249.
[17] HU K, PHILLION A B, MAIJER D M, COCKCROFT S L. Constitutive behavior of as-cast magnesium alloy Mg-Al3-Zn1 in the semi-solid state [J]. Scripta Materialia, 2009, 60: 427-430.
[18] PHILLION A B, THOMPSON S, COCKCROFT S L, WELLS M A. Tensile properties of as-cast aluminum alloys AA3104, AA6111 and CA 31218 at above solidus temperatures [J]. Materials Science and Engineering A, 2008, 497: 388-394.
(Edited by YANG Bing)
Foundation item: Projects(50774026, 50875059) supported by the National Natural Science Foundation of China; Project(20070420023) supported by the China Postdoctoral Science Foundation; Project(2008AA03A239) supported by the National High-tech Research and Development Program of China
Corresponding author: DU Zhi-ming; Tel: +86-451-86415464; E-mail: duzm@263.net
DOI: 10.1016/S1003-6326(09)60345-9


