
Preparation, mechanical properties and wear behaviors
of novel aluminum bronze for dies
LI Wen-sheng(������)1, WANG Zhi-ping(����ƽ)1, LU Yang(· ��)1,
GAO Yong(�� ��)2, XU Jian-lin(�콨��)1
1. State Key Laboratory of Advanced Nonferrous Materials, Lanzhou University of Technology,
Lanzhou 730050, China;
2. Gansu Electric Power Research Institute, Lanzhou 730050, China
Received 5 July 2005; accepted 20 September 2005
Abstract:
A modified single melt technique involving joint charging was developed for preparation of aluminum bronze, Cu-14%Al-X(mass fraction) alloy, which could be used as die materials. The mechanical properties and wear behavior of the developed alloy under boundary-lubrication conditions was investigated. The results demonstrate that all the phases disperse homogeneously in the bronze matrix with a significant amount of discrete and spherical brittle and hard ��2 phase, moreover, the dispersed �� phase are the dominant factor that improves the anti-deformation properties of the soft matrix, after a solution treatment at 920 �� for 2 h and followed by aging at 580 �� for 3 h, thus remarkably improves the mechanical properties and wear resistance of the developed alloy. The Cu-14%Al-X alloy can be used as materials for static precise stretching and squeezing dies.
Key words:
aluminum bronze; joint charging melt; heat-treatment; wear behavior; mechanical properties;
1 Introduction
The materials currently used for precise stretching and squeezing dies are the cast-iron alloys, such as Cr12, W18Cr4V, 35CrMo steels and other hardened alloys. However, a bonding phenomenon often occurs during the squeezing and stretching process, which causes vestiges and defects on the product surface, resulting in a coarse appearance and poor quality. Product with vestiges and defects is considered waste, although many researches has been devoted to solve this problem, there still lack optimal materials[1-4].
As far as we know, relatively few reports concern the use of the aluminum bronze as precise stretching and squeezing dies. Aluminum bronze, can be classified into two kinds, the binary aluminum bronze and the multi-component aluminum bronze (QAl10-3-1.5, QAl10-4-4)[5-8]. Previous studies[9-12] have shown that the solubility of nonferrous metals, such as Al, Cu, Mg, Zn in Fe, is very low and the tendency of adherence is negative. On the other hand, the solubility of Cr, Ni in Fe is very high and the tendency of adherence is positive. This demonstrates that the materials with a hard and wear-resistant nonferrous metal matrix are more suitable for stretch and squeeze processing of stainless ferrous utensils. Based on the previous researches[1, 3, 4], a high-strength wear-resistant complex aluminum bronze die material, designated as Cu-14%Al-X, was developed by adding trace elements such as Zn, Co and RE. Specimens were prepared in this study with a casting technique. Mechanical properties and tribological behavior of the material were evaluated.
2 Experimental
The raw materials were pure copper (purity ��99.95%, mass fraction, the same below of not mentioned), aluminum (purity ��99.9%), electrolytic nickel (purity ��99.95%), manganese (purity ��99.95%), zinc (purity ��99.95%), cobalt (purity ��99.95%) and cerium (purity ��99.95%). Additionally, de-oiled ferrous nails and/or threads with good polished surface were used to provide ferrous source for the alloys. The nominal chemical compositions of the Cu-14%Al-X alloys are listed in Table 1.
A joint charging single melt way was developed for the preparation of the Cu-%14Al-X alloys. The preparation procedures are listed in Fig.1. The low melting point Al and the high melting point Cu were first alternatively charged into the furnace. Subsequently, trace elements, such as Co, Ni, Fe and Mn were uniformly inserted into the gaps between the copper and aluminum pieces. Approximately 5% Al reserved as pre-deoxygenating and temperature-tuning reagents. After all the raw materials were charged into the furnace, the furnace was pre-heated for 5-8 min using low power load in order to eliminate oil and gases, thereafter, high power load was used to make all raw materials melt as quickly as possible. After all the raw materials were melted completely, a layer of charcoal with thickness of 20-30 mm was used to cover the melt surface. A blowing device shown in Fig.2 was used to carry out dynamical degassing, using inert gases of nitrogen or argon. After dynamic degassing, pre-deoxygenating process were carried out using the residual 5% Al. The melt temperature was adjusted to 1 200-1 260 ��. C2Cl6 and/or C2Cl4 were used as refining agents then followed by final deoxygenating process. Before the pouring process, a gas check procedure was used to ensure the melt quality. Finally, the melt was poured into sand moulds at 1 180-1 240 ��.
Table 1 Chemical compositions of investigated novel Cu- 14%Al-X die material (mass fraction, %)
![]()
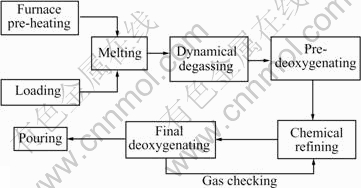
Fig.1 Flow chart of joint charging single-melt technique
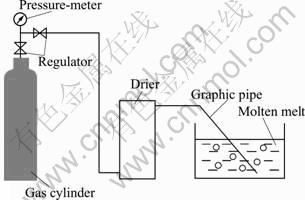
Fig.2 Schematic diagram of degassing process
X-ray diffraction(XRD) was used to identify the phases. Scanning electron microscope(SEM) with energy dispersive spectroscope(EDS) was used to analyze the topographical features, the microstructures and the micro-constituents of the worn surfaces and debris. Specimens for optical microscope and SEM were polished using conventional procedures and etched in a solution composed of 1 g FeCl3 and 20 mL HCl dissolved in 100 mL distilled-water.
A column-on-block RFT-III friction-meter was employed to measure the friction coefficient of the alloy under a boundary lubricating condition. The lubricant was the commonly used No.20 engine oil. Column specimens has a diameter of 8 mm. The block was made of 1Cr18Ni9Ti steel with hardness of HB 204. The wear loss of the specimen was evaluated after the surface was worn for 60 min, which corresponded to a sliding distance of about 720 m. Under wear load of 784 N and the pressure (the ratio of the load to the cross section area of the specimen) of 15.6 MPa, which would be the application scenario of the alloy, the wear loss was calculated by measuring the mass loss of the specimen using a sensitive balance with an error within 0. 1 mg.
Mechanical properties such as Rockwell Hardness, tensile strength and impact toughness were measured by using HD1-187.5 sclerometer, 40 t multi-purpose hydrau- lically tensile machine and CIEM-30D-CPC testing machine, respectively. For each measurement, more than three specimens were tested in order to obtain reliable average values.
In addition to as-cast state(CA), specimens were also solution treated at 920 �� for 2 h and then oil quenched(QU). Following that, three different heat treatments were also carried out. The first (HT1) was ageing at 450 �� for 3 h, the second (HT2) was ageing at 580 �� for 3 h and the third (HT3) was ageing at 640 �� for 3 h.
3 Results and discussion
Fig.3 shows the effects of pouring temperature on the mechanical properties of the studied alloy. It can be seen that when the pouring temperature is higher than 1 250 ��, the mechanical properties are obviously decreased due to the appearance of blowhole and fissure defects[4]. When the pouring temperature is lower than 1 170 ��, the mechanical properties are also obviously decreased due to the appearance of cold-laps and mis-running defects[4]. Based on these experimental results, pouring temperature of subsequent experiments was 1 180 to 1 240 ��.
Table 2 shows the mechanical properties of the
alloys treated under different conditions. It can be seen that heat-treatments can obviously change the mechanical properties of the Cu-14%Al-X alloys. For the alloys under QU state, the hardness of the alloy is the lowest with the largest elongation. For the HT2 alloys, the hardness and tensile strength are 27.3% and 21.7%, respectively, higher than that of the CA alloys, however, the elongation is only 62.9% of that of the CA alloys. For the HT1 alloys, the hardness is 48.5% higher than that of the CA alloys, however, the elongation and tensile strength are only 31.4% and 46.2% of that of the CA alloys. Moreover, the hardness, the tensile strength and the compression strength of the HT3 alloys are seriously deteriorated compared with that of the HT2 alloys. Based on the experimental results, it is suggested that the alloys quenched and aged at 580 �� (HT2) have the best mechanical properties.
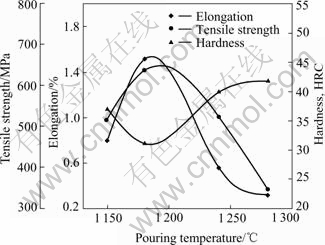
Fig.3 Effect of pouring temperature on mechanical properties
Fig.4 shows the friction and wear properties of the alloys prepared by different treatments under the load of 784 N (the pressure is no less than 15.6 MPa). It can be seen that the friction coefficient of the alloys are about the same. However, as for the wear resistance��there exits an obvious difference for different alloys. Wear resistance of the CA alloys and the HT3 alloys is obviously worse than that of the HT1 alloys. The lowest friction coefficient and wear rate are found in the HT2 alloys, indicating that the alloys have rather good tribological behaviors.
XRD, SEM and optical microscope experiments were carried out to check the microstructures of the Cu-14%Al-X alloys under different treatment states. The equilibrium phase diagram predicts that, microstructure of the studied alloys should be made up of ��2 phase and the (��+��2) eutectoid phase, but in reality, microstructure of the as-cast alloys consisted of �� phase, �¡� phase, ��2 phase, (��+��2) eutectoid and the �� phase, as shown in Fig.5(a), XRD analysis by different authors reported the same results[2,3,13]. Light areas are �� phase, gray phases are ��2 phase, the dark regions are the so-called ��retained �¡� or �¡� phase and the fine dots dispersed in the alloy are intermetallic �� phases. Characteristics of the ��, ��2, �¡� and �� phases in bronze alloy are listed in Table 3, and �¡� phase is the allotrop of �� phase.

Fig.4 Wear rate and friction coefficient of Cu-14%Al-X alloy under different heat-treatment states
When the alloys are quenched in oil, microstructure of the alloys transforms from ��+�¡�+(��+��2)+�� phases under the as-cast state into the mixture of �� phase and ��2 phase, indicating that all the Al, Mn and Ni atoms were dissolved into the copper matrix resulting in the microstructure as shown in the Fig.5(b). The homo- geneous and super-saturated solid solution is unstable; in the ageing process, precipitating of the excess dissolved atoms out of the copper matrix to form a controllable non-equilibrium structure, indicating that the tensile strength and hardness can be improved through the simple aging treatments. Moreover, the aging temperature should be higher than the eutectoid transformation temperature or lower than the martensite formation temperature in order to prevent the eutectoid transformation (�¡���+��2), which may decrease the properties of the alloys.
Table 2 Mechanical properties of Cu-14%Al-X alloy

Table 3 Equilibrium phases in investigated Cu-14%Al-X alloy

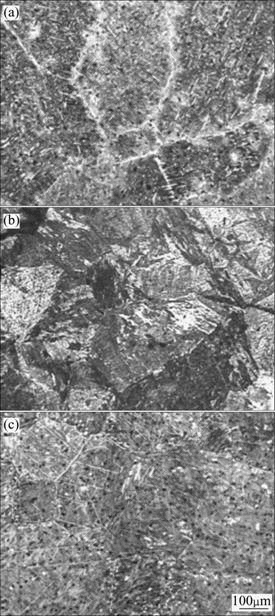
Fig.5 Microstructures of as-cast Cu-14%Al-X alloy: (a) CA; (b) QU; (c) HT2
XRD results show that there were more ��2 phase and less �� phase present in the HT1 specimen, more �¡� and �� phase in the HT2 specimen, and more �� in the HT3 specimen, than in the CA specimen. It can be concluded that there is a trend, more �� phase and less ��2 phase present in the alloy with the aging temperature increased from HT1 (450 ��), HT 2 (580 ��), to HT 3 (640 ��).
Fig.5(c) shows the optical microstructure results of HT 2 alloy, aged at 580 ��, it can be seen that all the phases disperse homogeneously in the bronze matrix and
the ��2 phase presents a discrete and spherical structure; meanwhile, soluble atoms such as Al, Fe and Ni forming clusters and separate from the matrix, and transformed into the dispersion strengthening �� phase, resulting in the higher mechanical properties for the alloys. While the alloy is aged at 460 �� (HT1), the ��2 phase exhibits a taper and knitted structure, as shown in Table 2, resulting in high hardness and brittleness. However, when aging temperature is increased to 640 �� (HT3), due to the lack of the dispersive strengthening of �� phase and the increase in soft �� phase[13, 14], the alloy has low tensile strength and hardness, the wear resistance of the alloy is also very low, as shown in Fig.4. Severe adhesive and abrasive wear occurred because deep wearing scars and plough grooves were found in the HT3 alloy surface, as shown in Fig.6.
As for the relationship between the mechanical properties and tribological behaviors, the wear surfaces of the alloys were observed and the results are shown in Fig.6. In Fig.6(a), it can be seen that for the CA alloy the microstructure on the surface is not homogenous. The hard particles verified to be �� phase through EDS tend to tear out from the matrix[14], meanwhile, the anti-deformation properties of the matrix is not strong enough to prevent the severe abrasive wear which results in plough rivers and fatigue concaves on the wear surface, indicating that the dominant wear mechanisms of the CA alloy are mild adhesive, abrasive and fatigue wear. Compared with the CA alloy, the QU alloy has a homogenous microstructure and the �� phase has higher strength and hardness, there is no hard particles torn out from the wear surface indicating that the main wear mechanisms of the quenched alloy are adhesive and slight fatigue wear. For the HT 2 alloy, all the phases homogeneously disperse in the bronze matrix with a significant amount of discrete and spherical brittle and hard ��2 phase, moreover, the dispersed �� phases are the dominant factor that improves the anti-deformation properties of the soft matrix, thus resulting in the wear resistance improvement. The dominant wear mechanisms under this state are mild adhesive and slight fatigue wear. While for the HT1 alloy, the matrix consists of the continuously knitted eutectoid ��2 phase which makes the alloy hard and brittle. From Fig.6(c), it can be seen that big concaves are on the wear surface, and the main wear mechanisms of the alloy under this state are suggested to be fatigue wear. The increase in soft �� and �¡� phases of the HT3 alloy lowers hardness and increases elongation, and thus adhesive and plough wear occurs[14].
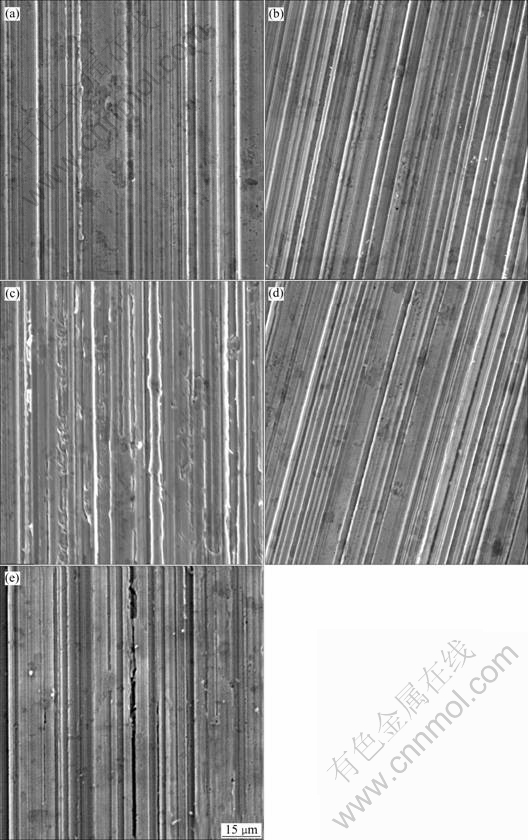
Fig.6 Wear surfaces of Cu-14%Al-X alloy alloys: (a) CA; (b) QU; (c) HT1; (d) HT2; (e) HT3
On the other hand, the HT2 alloy has lower wear loss than that of the CA, QU and HT3 alloys, as shown in Fig.4. The mechanical properties play a decisive part on the tribological properties of the alloy. According to adhesive theory for the sliding friction that given by Archard[15,16]:
Vw=CF/H (1)
where Vw is the wear volume of the material removed per unit sliding distance and unit load, C is a constant, F is the normal load and H is the hardness. Similar expression for friction coefficient due to adhesive force is[15, 16]:
��=s/H (2)
where �� is the friction coefficient and s is the shear strength.
As discussed above, due to the homogeneous second phase dispersing in the matrix, Cu-14%Al-X alloy has high strength and hardness. From Eqns.(1) and (2), it is clear that the higher the hardness and strength of a material, the stronger the anti-seizure ability and the better the wear resistance.
Although the HT2 alloy is excellent for the wear resistance, the plasticity of the alloy is poor. This means that the Cu-14Al-X alloy is not suitable for the case of wear accompanied with heavy impact and/or shock. This alloy is good for static precise stretching and squeezing dies attributed to its anti-friction property to ferrous utensile and/or counter parts.
4 Conclusions
1) A new aluminum complex bronze alloy, Cu-14%Al-X, for stretching and squeezing dies has been developed by adding trace elements and aluminum content. And a modified joint charging single melt technique was successfully developed for preparation of the aluminum bronze alloys.
2) Mechanical properties of the developed alloy can be improved remarkably by solution treatment at 920 �� for 2 h followed by aging at 580 �� for 3 h. The prepared alloys also possess good wearing behavior, such as high wear resistance and low friction coefficient at this state.
3) The Cu-14%Al-X alloys could be used as materials for static precise stretching and squeezing dies attributed to its anti-friction and wear resistance.
References
[1] LI Wen-sheng, WANG ZHi-ping, LU Yang, XU Jian-lin, YANG De-shou. Reviews of applications and researches on high-strength properties copper-based alloy [J]. Nonferrous Metals, 2002, 54(2): 30-34.(in Chinese)
[2] LI Wen-sheng, WANG ZHi-ping, LU Yang. Research on heat-treatment process of high-strength wear-resistance aluminum alloy [J]. Journal of Gansu University of Technology, 2002, 28(2): 26-29. (in Chinese)
[3] LU Yang, LI Wen-sheng, WANG ZHi-ping. New developed aluminum bronze alloy for die [J]. Hot Working Technology, 2002(3): 45-47.(in Chinese).
[4] LI Wen-sheng, JIANG Jie, WANG Zhi-ping, LU Yang. Causes and preventive measures of the gas holes in the Cu-14Al-X bronze castings [J]. Foundry, 2003, 52(9): 682-686. (in Chinese)
[5] Sullivan J L, Wong L F. Wear of aluminum bronze on steel under condition of boundary lubrication [J]. Tribology International, 1985, 118(5): 275-281.
[6] WERT J J. The influence of stacking fault energy and adhesion on the wear of copper and aluminum bronze [J]. Wear, 1988, 123: 171-192.
[7] Reid J V, Schey J A. The iffect of surface hardness on friction [J]. Wear, 1987, 118: 113-125.
[8] ZHANG Wei-weng, NGAI Tungwai Leo, XIA Wei, WEI Lan-ai. Influence of heat treatment on tribological behaviors of novel wrought aluminum bronze [J]. Trans Nonferrous Met Soc China, 2002 12(4): 770-774.
[9] LI Yuan-yuan, ZHANG Da-tong, NGAI Tungwai Leo. Diffusion couple between high strength wear-resisting aluminum bronze and machining tools materials [J]. Trans Nonferrous Met Soc China, 1999, 9(1): 6-10.
[10] LI Yuan-yuan, NGAI Tungwai Leo, ZHANG Da-tong. Elements inter-diffusion in the turning of wear-resistance aluminum bronze [J]. Journal of University of Science and Technology Beijing, 2002, 9(6): 461-465.
[11] NGAI Tungwai Leo, XIA Wei, ZHANG Da-tong. Tool wear mechanism in turning of novel wear-resisting aluminum bronze [J]. Trans Nonferrous Met Soc China, 2002, 12(6): 165-169.
[12] Hasan F, Jahanafrooz A, Lorimer G W. The morphology, crystallography and chemistry of phases in as-cast nickel-aluminum bronze [J]. Met Trans A, 1982, 13A: 1337-1345.
[13] XU Jian-lin, WANG Zhi-ping, CHEN Chao, LAI Pei-qing. Research onto a new high-strength aluminum bronze alloy [J]. International Journal of Materials and Product Technology, 2004, 21(3): 443-453.
[14] LI Wen-sheng, LU Yang, JIN Yu-hua, WANG Zhi-ping, YUAN Li-hua. Tribological properties of a novel aluminum bronze [J]. Materials Review, 2005, 19(4): 121-124.
[15] Archard J F. Contact and rubbing of flat surface [J]. J Appl Phys, 1953, 24(8): 981-988.
[16] Hutchings I M. Tribology: Friction and Wear of Engineering Materials [M]. London: Edward Arnold Press, 1992.
Foundation item: Project(GS992-A52-052) supported by the Natural Science Foundation of Gansu Province, China
Corresponding author: LI Wen-sheng; Tel: +86-931-2976640; E-mail: wensheng-li@sohu.com
Abstract: A modified single melt technique involving joint charging was developed for preparation of aluminum bronze, Cu-14%Al-X(mass fraction) alloy, which could be used as die materials. The mechanical properties and wear behavior of the developed alloy under boundary-lubrication conditions was investigated. The results demonstrate that all the phases disperse homogeneously in the bronze matrix with a significant amount of discrete and spherical brittle and hard ��2 phase, moreover, the dispersed �� phase are the dominant factor that improves the anti-deformation properties of the soft matrix, after a solution treatment at 920 �� for 2 h and followed by aging at 580 �� for 3 h, thus remarkably improves the mechanical properties and wear resistance of the developed alloy. The Cu-14%Al-X alloy can be used as materials for static precise stretching and squeezing dies.


