
Optimum condition by mechanical characteristic evaluation in friction stir welding for 5083-O Al alloy
Min-Su HAN1, Seung-Jun LEE1, Jae-Cheul PARK1, Seok-Cheol KO2, Yong-Bin WOO1, Seong-Jong KIM1
1. Division of Marine Engineering, Mokpo Maritime University, Mokpo City, Jeonnam 530-729, Korea;
2. Chungnam Regional Innovation Agency, Cheonan-si, Chungnam 330-816, Korea
Received 2 March 2009; accepted 30 May 2009
Abstract:
The mechanical characteristies for friction stir welding (FSW) of 5083-O Al alloy were evaluated. The results show that in FSW at 800 r/min and 124 mm/min, a weld defect is observed at the start point. However, the button shape at the end point is good and the stir zone has a soft appearance. At 267 mm/min, a void occurs at the button. A slight weld defect and rough stir zone are seen both at the start and end points at 342 mm/min. Moreover, at the bottom, a tunnel-type void is observed from an early stage to the end point, and at 1 800 r/min, a weld defect can be found from an early stage to the end point. These defects are rough with imperfect joining due to excessive rotation speed and high physical force. Weld fractures relative to rotational and travel speeds are observed at the stir zone. The optimum FSW conditions are a welding speed of 124 mm/min and a rotational speed of 800 r/min.
Key words:
Al alloy; optimum condition; FSW; defect; stir zone;
1 Introduction
The construction of fiber-reinforced plastic (FRP) boats has decreased since the introduction of international regulations on the control of marine environmental pollution, which have recommended the use of environmentally friendly materials. In addition, composite FRP materials are susceptible to fire and are prohibited from use in high-speed passenger and cargo boats with a gross tonnage in excess of 500 t, such as those commonly used in coastal navigation. Moreover, FRP boats tend to be small, and with wooden vessels, larger craft cannot detect them on radar because their composite materials reflect radar waves poorly. According to data collected by the Ministry of Maritime Affairs and Fisheries, a large percentage of shipping incidents involve these types of vessels and comprise 72.4% of all marine accidents and approximately 58% of all collisions involving fishing boats[1]. In light of these findings, aluminum (Al) is a superior material for shipbuilding than FRP because it is environmentally friendly, easy to recycle, and provides a high added value to fishing boats[2]. Moreover, Al craft requires less fuel, and thus it is estimated that the changeover from FRP to Al vessels will be accelerated. However, the welding for Al materials has many problems, such as deformation by welding heat and the working environment. The development of welding technology such as friction stir welding (FSW), which does not adversely affect the welding technician or the working environment, is very important[3-4].
In this investigation, the optimum conditions for FSW of an 5083-O Al alloy were determined by evaluating the mechanical characteristics.
2 Experimental
The main material used in the experiments was 5083-O (Si 0.122%, Fe 0.250%, Cu 0.024%, Mg 4.528%, Cr0.076%, Zn 0.023%, Ti 0.011%, Al Bal. mass fraction) Al alloy, the most commonly used material for vessel construction among the 5000-series of Al alloys.
The probe used for FSW was tool-grade steel (SK). The full-screw probe had a shoulder of 20 mm, a plunging depth of 4.5-4.7 mm, and a length and diameter of 4.5 and 5.0 mm, respectively. The pitch of the screw was 2.0 mm and the tilting angle when advancing was 2?. Welding was carried out at various rotational (500, 800, and 1 800 r/min) and travel speeds (124, 267, and 342 mm/min). The tensile specimens consisted of a parallel part of 65 mm, a width of 15 mm, and shoulder of diameter of 15 mm. The strain rate was 0.2 mm/min. It was carried out three times for all conditions.
3 Results and discussion
Fig.1 shows the effects of travel speed for the top (weld) side at 500 r/min. The weld end point is visible on the left side of the photograph; and the start point is on the right. At a travel speed of 124 mm/min, a welding defect occurred at an early stage. The button appearance was good at the end point, and we estimated that mechanical properties under this condition were excellent. At 267 mm/min, a slight defect was observed at an early stage and the weld appeared rough compared with a travel speed of 124 mm/min. A void at the end point is also evident. At a travel speed of 342 mm/min, voids were present at the start and end points. The weld had a good rough appearance compared with other travel-speed conditions. No significant difference was observed between the top and bottom side in terms of travel speed. Based on topside observations, the optimum mechanical properties were obtained at a travel speed of 124 mm/min. In general, the most important factors for weld evaluation in FSW are roughness of the topside and button appearance at the end point. Under the optimum welding conditions, the button shape should be a perfect circle. If a void is observed at the button, it is evident from the start to the end points. Weld defects, such as voids in 6061-T651 Al alloy, have been reported at high rotational and low travel speeds. The mechanical properties of materials are affected by heating-decreasing with increasing temperature and exposure time[5]. In current welding methods, such as tungsten inert gas (TIG) and metal inert gas (MIG) welding, mechanical properties are reduced considerably due to melting. The heat flow during melting results in a weakened solidification microstructure, and thus, reduced mechanical characteristics[6]. In addition, Al has high heat conductivity and melting is difficult due to the generation of a high melting-point oxide film at the surface. Consequently, weldability in Al alloys is problematic, whereas TIG welding is carried out on thin plates with inconsistent welding and MIG welding is performed on thick plates with continuous welding [7-8].
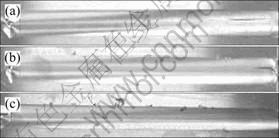
Fig.1 Effects of traveling speed for top side at 500 r/min: (a) 124 mm/min; (b) 267 mm/min; (c) 342 mm/min
The stress��elongation curves at various travel speeds and 500 r/min, are shown in Fig.2. The yield strength at a traveling speed of 124 mm/min was nearly constant. Stress to an elongation of 11.2% was similar, and in general, the elongations at 124 mm/min were higher. The elongation to 0.8% at 267 mm/min was constant, but the fluctuations in stress with elongation were large, with a maximum at an elongation of approximately 2.6%. At 342 mm/min, the fluctuations in stress were constant until an elongation of 1.2%. Thereafter, the fluctuation in stress increased with increasing elongation. The large fluctuations in stress at 267 and 342 mm/min were due to void formation in parts of the weld. Void formation, which causes the decreased elongation and stress, are due to insufficient heat input and irregular plasticity flow. At excessively low rotational speeds (insufficient heat input), the shape of the stir zone is the same under all applied conditions. However, at excessively high rotational speeds (abnormal plasticity flow), the material flow in stir welding does not give a smooth surface on the advancing side of the weld. The optimum welding conditions were experienced at a travel speed of 124 mm/min.
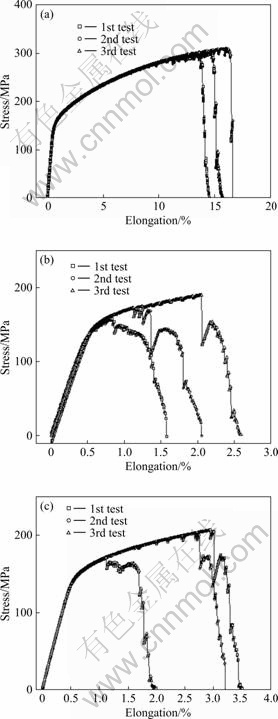
Fig.2 Stress��elongation curves with traveling speed of 500 r/min: (a) 124 mm/min; (b) 267 mm/min; (c) 342 mm/min
Under all welding conditions in 500 r/min, the fracture was located close to the stir zone. At 124 mm/min, the fracture deviated from the stir zone and the topside showed a characteristic softness. However, the fracture at travel speeds of 267 and 342 mm/min were located at the center of the stir zone, and no softness was evident due to void formation in the stir zone. Thus, it can be concluded that when fracture time is short, elongation is low.
Fig.3 compares the mechanical property for the base metal at various travel speeds and 500 r/min rotational speed. Yield strength ratios for base metal do not differ greatly with travel speed. At 124 mm/min, the maximum tensile strength and elongation ratios were significantly higher than those at other travel speeds.
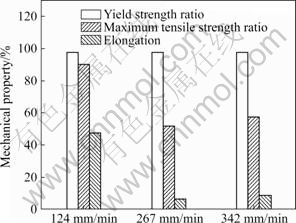
Fig.3 Mechanical property for base metal at various travel speeds and 500 r/min rotational speed
Fig.4 shows the effects of travel speed at 800 r/min rotational speed. At 124 mm/min, defects occurred at an early welding stage but the button shape was good at the end point. In addition, a smooth surface was observed in the stir zone. At 267 mm/min, slight defects were seen at an early welding stage. The shape of the stir zone at 267 and 124 mm/min was similar, but a void was evident at the button at the end point. The slight weld defects at 342 mm/min were observed at both the start and end points. Although the topside of the stir zone was rough, the defect on the bottom side at 124 and 267 mm/min was not noticeable. However, at 342 mm/min, a tunnel-type void was formed from the start to the end points on the bottom side. Stress-elongation curves for various traveling speeds and 800 r/min rotational speed are shown in Fig.5. The yield strength at 124 mm/min was nearly constant. Stress to an elongation of 11.2% was also constant, and in general, the elongations at 124 mm/min were higher. At 267 mm/min, stress to an elongation of 8.5% was constant, but above 8.5%, stress fluctuated greatly, with a maximum value of elongation at approximately 10%. A constant trend in stress was observed to an elongation of 4.2% at a travel speed of 342 mm/min. Thereafter, stress fluctuated with elongation. The large stress fluctuations at travel speeds of 267 and 342 mm/min were due to defects such as voids in the stir zone, and the large differences in elongation and stress were caused by void formation.
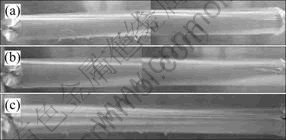
Fig.4 Effects of traveling speed at 800 r/min: (a) 124 mm/min; (b) 267 mm/min; (c) 342 mm/min
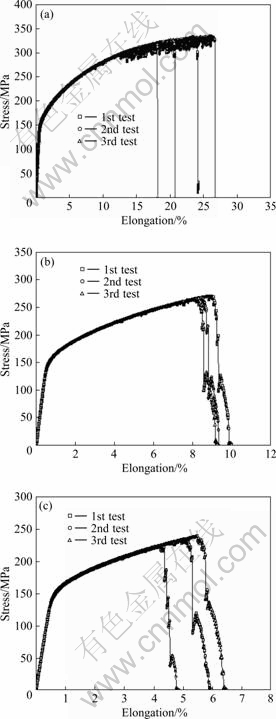
Fig.5 Stress��elongation curves with travel speed of 800 r/min: (a) 124 mm/min; (b) 267 mm/min; (c) 342 mm/min
Fig.6 compares the mechanical property for the base metal with various travel speeds and 800 r/min rotational speed. Yield strength ratios for the base metal did not differ greatly with travel speed. At 124 mm/min, the maximum tensile strength and elongation ratios were significantly higher than those at other travel speeds. Fracture was observed at the stir zone under all welding conditions, and was at the center of the specimen at all travel speeds. At 124 mm/min, softness was evident at the bottom of the fractured part, but was not observed in the fractured parts at travel speeds of 267 and 342 mm/min. Fracture in the stir zone was due to void formation where the stress was concentrated.
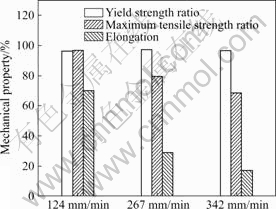
Fig.6 Mechanical property for base metal at various travel speeds and 800 r/min rotational speed
At various travel speeds and 1 800 r/min rotational speed, the stir zone at 124 mm/min was rough and defects were observed at an early welding stage. A void at the end point was evident at the topside. At the bottom side, a void occurred under all conditions.
In addition, a rough surface on the topside was observed at 267 and 342 mm/min compared with 124 mm/min. At 267 and 342 mm/min, a tunnel-type void was evident on the bottom side from the start to the end points. The very rough stir zone was formed due to excessive rotational speeds and high physical force. The most important factors for weldability evaluation in FSW are roughness of the topside in the stir zone and the appearance of the button at the end point, which should be a perfect circle. If a void is observed at the button during FSW, it occurs from the start to the end points.
Fig.7 shows stress��elongation curves for various travel speeds and 1 800 r/min rotational speed. At 1 800 r/min, maximum tensile strength and elongation were low due to the rough stir zone and continuous void. Fluctuations in stress with increasing elongation were observed under all conditions. Elongation was below 3%. This rotational speed gives the lowest mechanical properties, and specimen fracture occurs at the stir zone regardless of weld conditions. Fracture was indicated by softness for a travel speed of 124 mm/min at the other rotational speeds, which was not observed at 1 800 r/min. Two possible reasons exist. The first involves insufficient heat input with material flow during FSW and a fast cooling rate. In general, the heat input at a low rotational speed of probe is small and the cooling rate of the weld is rapid with increasing travel speed. Defects occur due to insufficient heat input and plasticity of flow. The second reason involves the stir of material in the weld due to an excessive rotational speed of probe, when the pressure of the probe shoulder is ineffective. The defect in the weld is generated through chip formation caused by excessive heat[9].
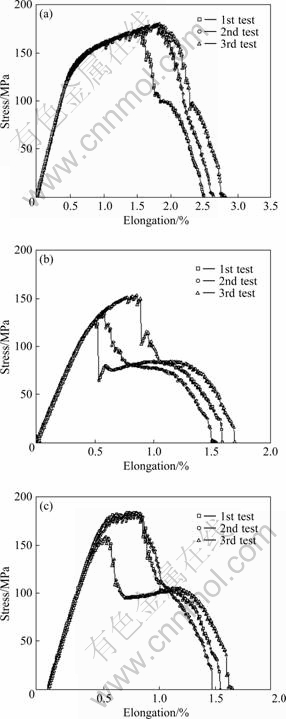
Fig.7 Stress��elongation curves with traveling speed in 1 800 r/min: (a) 124 mm/min; (b) 267 mm/min; (c) 342 mm/min
Fig.8 compares the mechanical property for the base metal at various travel speeds and 1 800 r/min rotational speed. In general, the yield strength ratio for the base metal is high, whereas the maximum tensile strength and elongation ratios were very low. A travel speed of 124 mm/min provided the highest value. For experimental results under varying conditions, a travel speed of 124 mm/min at various rotational speeds gave the best stir zone, button shape at the end point, and appearance of the bottom side. Mechanical properties at 124 mm/min and all rotational speeds were also superior.
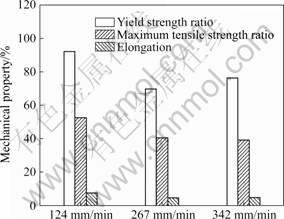
Fig.8 Mechanical property for base metal at various travel speeds and 1 800 r/min
Thus, subsequent investigations were carried out at a travel speed of 124 mm/min. Mechanical property ratios for the base metal at various rotational speeds and a 124 mm/min travel speed are shown in Fig.9. The yield strength ratio did not differ greatly. In addition, yield strength was maximal at 500 r/min, and the maximum tensile strength and elongation ratios at 800 r/min were higher. Therefore, in FSW, optimum conditions were obtained at rotational speed of 800 r/min and travel speed of 124 mm/min. In a previous investigation, the mechanical properties for base metal were compared under optimum conditions for TIG, MIG, and robot welding. The findings showed that the mechanical properties were excellent in MIG- compared with TIG- welded specimens. Using robot welding, the mechanical properties in welded 5083-O were superior to those for 5456-H116. In addition, a high elongation ratio was demonstrated in robot welding with ER 5556 for 5083-O [10].
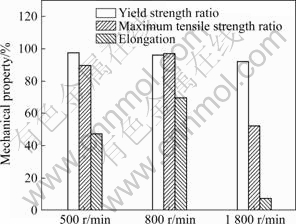
Fig.9 Mechanical property ratios for base metal at various rotational speeds and 124 mm/min travel speed
4 Conclusions
1) In FSW at 500 r/min and 124 mm/min, defects occur at an early welding stage. Button shape at the end point is good and mechanical characteristics are excellent. At 267 mm/min, a slight defect at an early welding stage is observed, presenting a rough stir zone; and a void at the end point is evident. At 342 mm/min, the stir zone is very rough.
2) At 800 r/min and 124 mm/min, a weld defect is observed at the start point. However, the button shape at the end point is good and the stir zone has a soft appearance. At 267 mm/min, a void occurs at the button. At 342 mm/min, a slight weld defect and rough stir zone are evident at both the start and end points. Moreover, a tunnel-type void at the bottom side is observed from an early welding stage to the end point.
3) At 1 800 r/min, a rough stir zone is observed at all travel speeds. A weld defect occurs from an early welding stage to the end point. These defects are rough with imperfect joining due to excessive rotational speeds and high physical force.
4) Fractures in welds at various rotational and travel speeds occur at the stir zone. At 124 mm/min and 500 r/min and 800 r/min, the fracture is evident as softness.
5) The optimum FSW conditions are a welding speed of 124 mm/min and rotational speed of 800 r/min.
References
[1] KIM S J, KO J Y, JANG S K, KIM J I. Electrochemical and mechanical characteristics of Al alloy for ship in marine environment [C]// Autumn Conference Proceeding of Marine Environment & Safety Society, 2005: 161-165.
[2] Sky Al Products Corporation. Foundation of Al alloy ship projects [J]. Light Metal Welding of Japan, 2003, 41(11): 544-545.
[3] KANG B Y, CHO J H. Consideration for structure and fabrication procedure of aluminum boat [J]. The Korean Journal of Welding Society, 2004, 22(3): 39-44.
[4] LIM S G, KIM S S, LEE C K, KIM S J. Tensile behavior of friction stir welded Al 6061-T651 [J]. Journal of Metal and Material International, 2004, 42(1): 29-36.
[5] SATO Y S. Investigation on microstructure of friction stir welding part for Al alloy [D]. Sendai: Touhuku University, 2001.
[6] PARK S T, JEONG J P, SEO C J. Weldablities of 7000 aluminum alloys(��) [J]. The Korean Journal of Welding Society, 1994, 12(1): 38-43.
[7] PARK S T, JEONG J P, SEO C J. Weldablities of 7000 aluminum alloys(��) [J]. The Korean Journal of Welding Society, 1994, 12(2): 64-75.
[8] LEE W B, KIM S W, LEE C Y, YEON Y M, JANG W S, SEO C J, JEONG S B. Effects of welding parameters on the friction stir weldablitiy of 5052 Al alloy [J]. The Korean Journal of Welding Society, 2004, 22(3): 265-272.
[9] KIM S J, WOO Y B, HAN M S, KIM J I, KIM J S. Investigation on friction stir welding of 6061-T6 material for upper structure of Al ship [J]. The Korean Society of Marine Environment & Safety, 2007, 13(3): 269-271.
[10] KIM S J, JANG S K, HAN M S. Mechanical characteristic in various welding technique of Al alloy for ship [J]. The Korean Society of Marine Environment & Safety, 2007, 13(3): 223-228.
Foundation item: Project supported by the Ministry of Education, Science Technology (MEST); Project supported by Korea Industrial Technology Foundation (KOTEF) through the Human Resource Training Program for Regional Innovation
Corresponding author: Seong-Jong KIM; Tel: +82-61-2407226; Fax; +82-61-2407201; E-mail: ksj@mmu.ac.kr
(Edited by ZHAO Jun)


