J. Cent. South Univ. (2017) 24: 1063-1072
DOI: 10.1007/s11771-017-3509-6

Automatic three-dimensional reconstruction based on four-view stereo vision using checkerboard pattern
XIONG Jie(�ܽ�)1, ZHONG Si-dong(��˼��)1, LIU Yong(����)1, TU Li-fen(�����)2
1. School of Electronic Information, Wuhan University, Wuhan 430079, China;
2. School of Physics and Electronic Information Engineering, Hubei Engineering University,
Xiaogan 432000, China
 Central South University Press and Springer-Verlag Berlin Heidelberg 2017
Abstract:
An automatic three-dimensional (3D) reconstruction method based on four-view stereo vision using checkerboard pattern is presented. Mismatches easily exist in traditional binocular stereo matching due to the repeatable or similar features of binocular images. In order to reduce the probability of mismatching and improve the measure precision, a four-camera measurement system which can add extra matching constraints and offer multiple measurements is applied in this work. Moreover, a series of different checkerboard patterns are projected onto the object to obtain dense feature points and remove mismatched points. Finally, the 3D model is generated by performing Delaunay triangulation and texture mapping on the point cloud obtained by four-view matching. This method was tested on the 3D reconstruction of a terracotta soldier sculpture and the Buddhas in the Mogao Grottoes. Their point clouds without mismatched points were obtained and less processing time was consumed in most cases relative to binocular matching. These good reconstructed models show the effectiveness of the method.
Key words:
three-dimensional reconstruction; four-view stereo vision; checkerboard pattern; dense point��
1 Introduction
With the rapid development of computer technology and sensing technology, 3D digitization of objects has attracted extensive attention over the past decade. 3D modeling technologies have been widely used in cultural heritage conservation [1], landscape ecology [2], computer-aided medical procedures [3], cavity detection [4] and many other applications. For 3D modeling of most valuable objects in close range, like cultural relics, non-contact and non-destructive measure approaches are generally taken to acquire surface shape and texture information. According to practical need, an automatic, fast and low-cost 3D reconstruction method with high precision is required.
A number of technologies [5] are developed for automatically reconstructing 3D models, mainly including laser scanning techniques [6] and vision-based methods [7]. The most important advantage of laser scanning is high precision in geometry measurements. But texture information is difficult to be extracted directly and such devices have a high cost generally. Vision-based methods have the ability to extract both geometry and texture information from images, requiring less expensive devices. According to the amount of cameras, vision-based methods are divided into monocular vision methods, binocular vision methods and multi-view stereo vision methods. Monocular vision methods gain the depth information from a sequence of images from different views (shape from motion) [8] or the two-dimensional (2D) characteristics of a single image or multiple images from a single view, such as shape from shading [9], shape from silhouettes [10], and shape from focus [11]. The main disadvantage of these monocular vision methods is the low resolution and accuracy in geometry measurements. Binocular vision methods are based on acquiring geometry information from a pair of photographs taken from known angles and relative position. Binocular vision systems are commonly used for 3D modeling of the target surface with its high automation, portability and stable reconstruction effects. Nevertheless, they can present some mismatches due to the repeatable or similar features of binocular images [12]. In order to solve this problem, some researchers have tried to developed 3D measurement systems based on multi-view stereo vision by adding cameras [13, 14]. In most multi-view systems, the cameras can form multiple binocular subsystems and give the stronger constraints which leads to fewer mismatches than in the case of two views. Generally, these binocular subsystems are simply symmetrically distributed. More time is consumed in feature matching based on the more constraints from the subsystems. So, the structure of many multi-view systems can be further optimized to improve the matching efficiency. Moreover, structured light is widely applied in vision measurement systems for 3D shape measurement [15]. This method often works in dense stereo matching by projecting a specific time or space coded pattern on the surface of the objects for detecting dense feature points from the textureless region.
In this work, an automatic 3D reconstruction method using a four-view 3D measurement system is developed. The 3D measurement system consists of a four-camera measurement system (FMS) and a portable projector. The FMS composed of four cameras is portable for the 3D measurement. During capturing the images of the object, a series of checkerboard patterns are projected onto its surface to gain dense feature points. On one hand, the FMS can constitute six binocular vision systems which add extra matching constraints relative to traditional binocular measurement systems, thus resulting in reducing the probability of mismatching greatly and improving the measure precision. On the other hand, the introduction of checkerboard pattern projection benefits the dense stereo matching and the removal of very few mismatched points by feature points matching in multiple pattern texture images. The 3D measurement system can offer the high-precision 3D measurement for static objects at a cost of relative short processing time.
2 3D reconstruction scheme
The 3D reconstruction process is illustrated with the modeling of a terracotta soldier sculpture, including four-view images acquisition, four-view images matching, Delaunay triangulation and texture mapping.
2.1 Four-view images acquisition
Figure 1(a) shows the schematic view of the four- view 3D measurement system. As shown in Fig. 1(b), the FMS consists of four cameras with a high image resolution of 6016��4000, which generally observes the object at a distance of 3.0-9.0 m. Its overall structure is similar to a common binocular vision system and the difference is that the two cameras with upper-lower distribution are substitute for the left and right cameras of the binocular system respectively. The four cameras have rectangular distribution and their optical axes are parallel to each other to minimize the impact of perspective distortion on feature matching. Besides, the four images are on a same plane, denoted by IMGUL, IMGLL, IMGUR and IMGLR��OUL, OLL, OUR and OLR represent the optical centers of the four cameras, respectively.
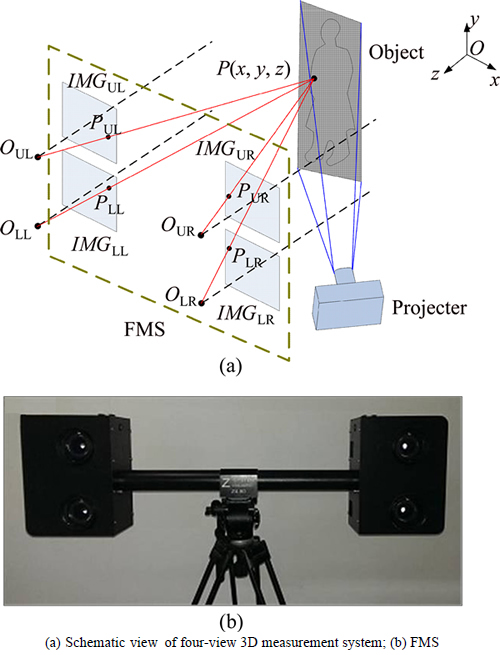
Fig. 1 Four-view 3D measurement system:
In structure, the baseline between the upper-left (UL) camera and the lower-left (LL) camera is short, the same as the baseline between the upper-right (UR) camera and the lower-right (LR) camera. The length of the short baseline is about 0.15 m. As a result, the very small difference between the left or right two images can help to improve the accuracy and efficiency of feature matching. On the other hand, the left and right cameras form four binocular vision systems with the long baseline to be used to calculate the space position of feature points. Thus, every point can be measured four times to improve precision. The length of the long baseline between the UL and UR camera is about 0.75 m.
In addition, there is a portable projector with the resolution of 800��600 placed near the FMS. During the measurement, a series of checkerboard patterns is projected toward the object via the projector and captured by the FMS simultaneously. The checkerboard pattern has a high contrast and its internal corners can be extracted easily as matched feature points. For some objects with less texture information like a white wall, the patterns can add identifiable features to the surface of the object and it is conducive to dense stereo matching.
Figure 2 shows the checkerboard patterns projected toward the object. For an original checkerboard pattern, it can be moved a certain short range in the horizontal direction at a time before the current pattern is offset by the length of a unit grid from it. Several checkerboard patterns with different relative positions will be obtained. These patterns are represented by CP(1,1), CP(2,1) �� and CP(H,1) respectively and H is the number of the patterns in the horizontal direction. CP(1,1) represents the original or first pattern. Similarly, the origin checkerboard pattern can be moved in the vertical direction and several patterns will be obtained, denoted by CP(1,1), CP(1,2) �� and CP(1,V) respectively. V is the number of the patterns in the vertical direction. In this way, the original pattern can be moved in both horizontal and vertical directions and a group of checkerboard patterns can be generated. The number of these patterns is H��V. According to the position relative to the first pattern, these patterns can be expressed with a 2D array. Actually, the edges of every checkerboard��s grids scan the surface of the object in a way, like laser lines. Thus, a dense 3D point cloud can be acquired by capturing and processing these images with different checkerboard patterns.
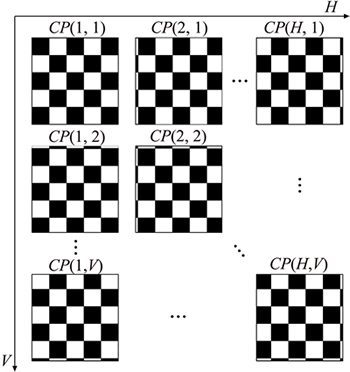
Fig. 2 Checkerboard patterns projected toward object
2.2 Four-view images matching
Stereo matching can be performed as searching the homologous points. As shown in Fig. 1(a), for any space point P of the surface of the object, four homologous image points denoted by PUL, PLL, PUR and PLR, exist in the four images captured by the cameras accordingly. The 3D space coordinates of the point P can be computed with the corresponding parameters of the cameras by the triangulation method. Before the measurement, these cameras are calibrated with a traditional pinhole model [16] for obtaining their parameters.
2.2.1 Extraction of region of interest
After the images with checkerboard patterns are captured by the FMS, the region of interest (ROI) covered by these patterns needs to be extracted from the images in order to reduce the process region. Subsequent operations will be performed in the ROI. The relative offset between the patterns in the first row and the patterns in the last row is nearly the size of a grid. Similarly, the patterns in the first column are offset off the patterns in the last column by nearly the size of a grid. Hence, the ROI can be extracted by calculating the differences between the images with the patterns in the first row or column and the images with the patterns in the last row or column. The average difference of these images can be described as the following expression:

 (1)
(1)
where H is the number of columns; V is the number of rows; I(x, y, h, v) is the intensity of the pixel at (x, y) in the image with the pattern in row v, column h.
Figure 3(c) shows the average difference from UL images using Eq. (1). The target object is obviously brighter than the background. An intensity threshold is selected for binarization of the average-difference image. The pixels of the object are returned one and most pixels of the background are returned zero. Besides, dilation and erosion are used to fill the small holes and remove some noises in the average-difference image. Figure 3(d) shows the ROI extracted from the average-difference image. The target object is located inside the ROI in comparison with the image with checkerboard pattern shown in Fig. 3(b).
2.2.2 Initial matching
Before matching, feature points should be extracted from the images captured by the FMS. With high detecting speed and high position precision, Harris corners [17] are chosen as the matched feature points. In order to reduce the search range, the Harris corners are stored in a sub-regional way. Concretely, a minimum rectangular region can be searched for covering all detected corner points. This region is divided into many rectangular sub-regions with a small window size which was actually set to 20��20 pixels. Each corner point is stored in the corresponding sub-region according to its position.
After extracting Harris corner points of the four images, for every point in the UL image, its corresponding points in the other three images need to be searched based on epipolar constraint. Template matching methods are used to search the homologous points in most stereo matching algorithms. Traditional
matching methods include sum of squared differences (SSD), sum of absolute differences (SAD), normalized cross correlation (NCC) and zero mean normalized cross correlation (ZNCC) [18]. These methods perform template matching by comparing the correlation level between a rectangular window around the current pixel in the left image and different rectangular windows around some pixels along the epipolar line in the right image. Because of the stronger anti-noise ability of ZNCC, it is used for stereo matching here. ZNCC is given by the following expression:


 (2)
(2)
where ZZNCC is the zero mean normalized cross correlation; I1(x, y) is the intensity of the pixel at (x, y) in one image and (x1, y1) is the coordinates of the matched pixel in the same image; I2(x, y) is the intensity of the pixel at (x, y) in the other image and (x2, y2) is the coordinates of the matched pixel in the same image; N is the half of the template window size and was actually set to 10 pixels in matching; I1 is the average intensity of the pixels inside the window around (x1, y1); I2 is the average intensity of the pixels inside the window around (x2, y2). These two average intensities are given by
 (3)
(3)
Figure 4(a) shows the four-view matching scheme based on epipolar constraint. lUL-LL, lUL-LR, lUL-LR, lLL-UR, lLL-LR and lUR-LR represent the epipolar lines which can be obtain with the parameters of the cameras [19]. The detailed matching procedures are described as following and a simple flow chart for matching is given in Fig. 4(b)
(a) For any point PUL in the UL image, search its corresponding point in the LL image along lUL-LL. Because of the small disparity between the two points, its corresponding point should be located in a range above the position of PUL. The disparity range was actually estimated as 50-300 pixels. Considering the calibration error of the cameras, its corresponding point is considered to be offset from lUL-LL at a maximum distance of Dmax. So, the search region can be estimated as a narrow rectangular region along lUL-LL.
(b) Find some possible points by a ZNCC value above ZS in the search region. Rank these points by ZNCC value from high to low and the top five are chosen as the candidate matched points.
(c) The first candidate point is represented by PLL. lUL-UR, lUL-LR, lLL-UR and lLL-LR can be obtained from the position of PUL and PLL, respectively.
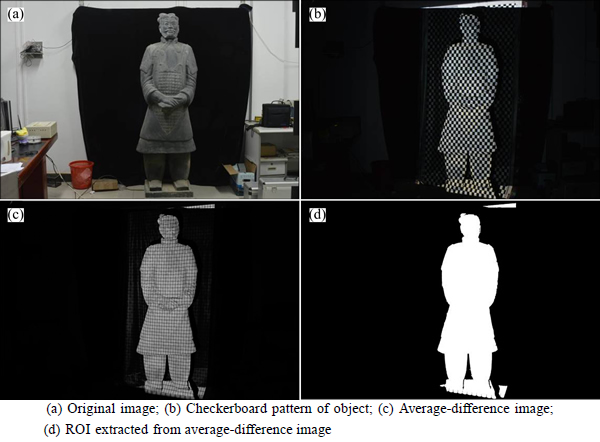
Fig. 3 Extraction of ROI:

Fig. 4 Four-view matching method:
(d) Find the matched point PUR in the rectangular region with a size of 2Dmax��2Dmax around the intersection between lUL-UR and lLL-UR by the maximum ZNCC value with PUL. If the maximum ZNCC value is less than ZL, remove PLL from the candidate points and return to step (c).
(e) Find the matched point PLR in the rectangular region with a size of 2Dmax��2Dmax around the intersection between lUL-LR and lLL-LR by the maximum ZNCC value with PUL. If the maximum ZNCC value is less than ZL, remove PLL from the candidate points and return to step (c).
(f) Calculate the ZNCC value between PUR and PLR. If the ZNCC value is less than ZS, remove PLL from the candidate points and return to step (c).
(g) Obtain lUR-LR from the position of PUR. If the distance from PLR to lUR-LR is above Dmax, remove PLL from the candidate points and return to step (c).
(h) Regard PUL, PUR, PLL and PLR as the homologous points and return to step (a) for the matching of the next point in the UL image.
Actually, Dmax was set to 8 pixels in matching. ZS should have a higher value than ZL because of the smaller difference between the images with the short baseline. ZS was set to 0.9 and ZL was set to 0.75.
2.2.3 Removal of mismatched points
Figure 5(b) shows an initial 3D point cloud extracted from one of the four-view images by using the above matching method. The point cloud can describe the shape of the object as a whole and only a few mismatched points exist. For comparison, a point cloud was obtained from just the UL and UR image based on epipolar constraint, as shown in Fig. 5(a). Many noise points were mismatched because of the repeatable features of the checkerboard pattern in the two images. Thus, the use of the FMS significantly reduces the probability of mismatching.
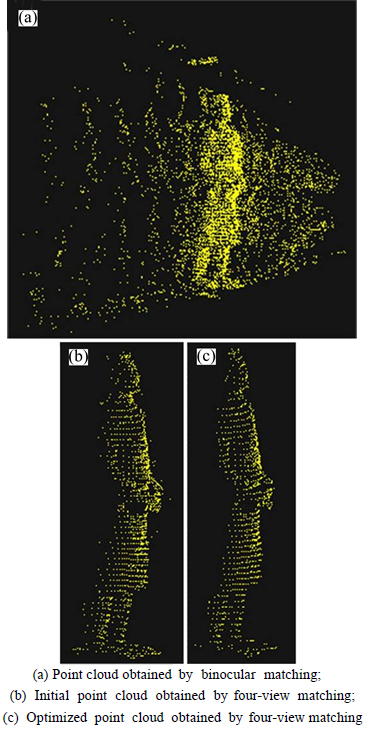
Fig. 5 3D point clouds of target object:
As shown in Fig. 6, a few feature points were mismatched in initial four-view matching because of the similar window intensity distribution of the feature points located on the edge of the grid in the checkerboard pattern. These points surrounded by the circles are regarded as the homologous points in initial matching and the colored lines near each point are the epipolar lines determined by the other points. The four mismatched points are actually not homologous although they conform to the conditions based on epipolar constraint and ZNCC constraint.
If the four matched points of the images with one pattern in the initial matching are truly homologous points, they should be homologous in the images with other patterns and meet the requirement of ZNCC value. Thus, noise points can be removed by the following conditions:

 (4)
(4)

 (5)
(5)
where ZZNCCp(P1, P2, h, v) is the ZNCC value between P1 and P2 from the images with the pattern in row v, column h in the array of the patterns; H is the number of columns of the array; V is the number of rows of the array; v0 is the row number of the current pattern; h0 is the column number of the current pattern. According to the above two equations, the images with these patterns in the same row or column as the current one were used for testing the initial matched points. The mismatched points were removed based on these conditions and an optimized point cloud was obtained, as shown in Fig. 5(c).
2.2.4 Subpixel interpolation
After removal of mismatched points, subpixel interpolation is performed to improve precision of the measurement. The common interpolation methods
mainly include bilinear interpolation, nearest-neighbor interpolation and bicubic interpolation. With smoother interpolation effect, bicubic interpolation was chosen to resample images. During interpolation, ZNCC was used as the similarity evaluation function. Collect all the point cloud data extracted from the images with all the checkerboard patterns and a dense point cloud can be obtained, as shown in Fig. 7.
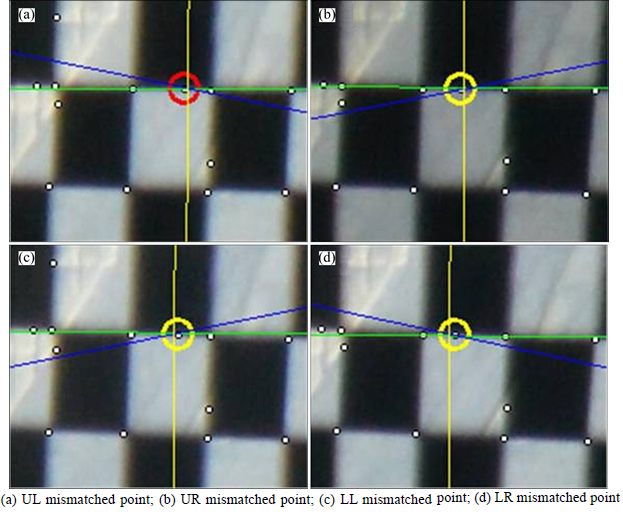
Fig. 6 Corresponding mismatched points in four images:
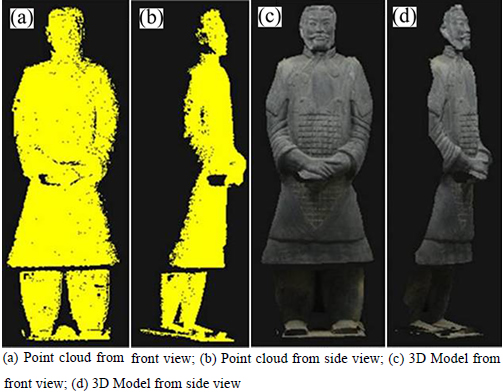
Fig. 7 Dense point cloud and 3D model:
2.3 Delaunay triangulation and texture mapping
The surface of the target object is generally expressed and described with a triangulated irregular net. The point cloud obtained from stereo matching is triangulated by Delaunay method [20]. To avoid appearance of large or narrow triangles, the length of each triangle��s sides should be limited.
Every 3D point is extracted from stereo images and has color and intensity information. So, texture mapping can be used to increase the reality of the point model. The UL image is selected as the texture image. For every triangle obtained by Delaunay triangulation, the texture coordinates of each vertex can be expressed by the location of its corresponding matched point in the UL image. By using the OpenGL tool [21], the textures in UL image are automatically mapped to these triangles. Figures 7(c) and (d) show the 3D model of the terracotta soldier sculpture with texture information obtained in this way.
3 Experiment results and analysis
In order to test our 3D reconstruction method, a terracotta soldier sculpture and two scenes including the buddhas of the Mogao Grottoes were reconstructed. During capturing the images of the three scenes, 81 checkerboard patterns were projected onto the surface of each target separately to obtain a dense point cloud. Figures 7(c) and (d) show the 3D model of the terracotta soldier sculpture containing 84258 points, which truly describes its shape. It shows the feasibility of our method in reconstruction of such textureless objects. In the same way, the models of the buddha scene A and the buddha scene B were obtained respectively, as shown in Fig. 8 and Fig. 9. The reconstruction results show these 3D models are good expressions of the appearance and shape of the Buddha scenes and demonstrate the validity of the method.
Furthermore, one of the four-view images captured from each of the three scenes was randomly chosen and separately used for the comparison between our method and the traditional binocular matching method. Actually, the LU and RU images were used for the test of binocular matching method and the corresponding point clouds containing many mismatched points were obtained and shown in Fig. 5(a), Fig. 8(f) and Fig. 9(f), respectively. Conversely, as shown in Fig. 5(b), Fig. 8(g) and Fig. 9(g), just a very few mismatched points exist in the point clouds obtained by the four-view matching method. Figure 5(c), Fig. 8(h) and Fig. 9(h) show the optimized point clouds obtained by removing these mismatched points using Eq. (4) and Eq. (5).
Moreover, the processing time of each method was recorded under the same hardware condition and is listed in Table 1. Relative to binocular matching, in four-view matching, the homologous points in the LL image are searched along the much shorter epipolar line between the UL and LL images. The other homologous points in the UR and LR images are found in a small region around the intersection of the epipolar lines respectively determined by the matched points in the UL and LL images. Due to the smaller search region, our method generally has less total time consumption despite containing extra time of removing mismatched points and more time consumption of extracting Harris corners because of processing more images. It is reflected in the processing time of buddha scenes A and B. As the region of the terracotta soldier sculpture has a short range in the horizontal direction of the image, the time gap between four-view matching and binocular matching is small. Although the total time consumptions of the two methods are approximately equal in the scene of the terracotta soldier sculpture, our method presents its advantage because of removing the mismatched points. In a word, compared with traditional binocular matching, our method shows a good effect on greatly reducing the mismatches and has less consumption of processing time in most cases.
To test matching precision, randomly choose one of the four-view images captured from the terracotta soldier sculpture and manually find the corresponding points in the other three images for the matched points in the UL image. These manually matched points were obtained by positioning in a local enlarged window for a sub-pixel
level. The space coordinates of a 3D point can be obtained from four space positions calculated from four pairs of binocular images. The dispersion degree of the four space positions can express the positioning error of the 3D point to some extent.
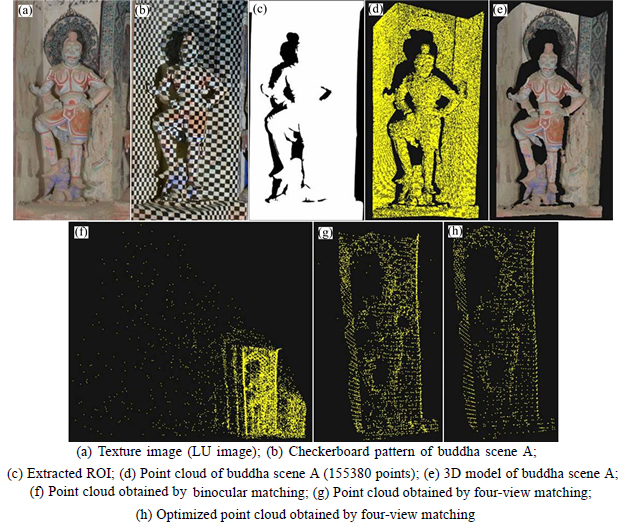
Fig. 8 3D reconstruction result of buddha scene A:
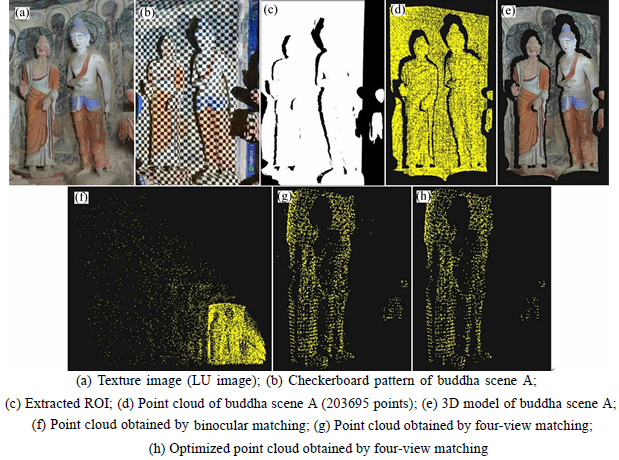
Fig. 9 3D reconstruction result of buddha scene B:
Table 1 Processing time of traditional binocular matching method and our method

Figure 10(a) shows the distribution of positioning errors of the manually matched points. The average is 0.96 mm and the maximum is 1.80 mm. Figure 10(b) shows the distribution of positioning errors of the automatically matched points. The average is 0.96 mm and the maximum is 1.90 mm. Positioning precisions of the two ways are basically in the same magnitude. By the way, the positioning precision of each space point for 3D modeling can be doubled than the precision of the space position obtained from any two cameras with the long baseline due to its position value gained from the average of the four corresponding space positions.
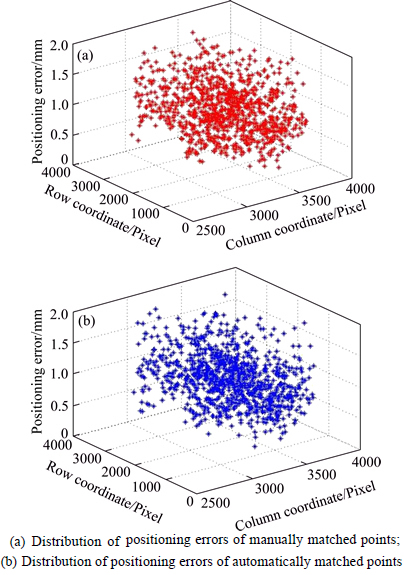
Fig. 10 Distribution of positioning errors:
4 Conclusions
1) An automatic 3D reconstruction method based on four-view vision is proposed for 3D modeling of objects in close range. Compared with the traditional binocular systems, the FMS is used for capturing images to greatly reduce the probability of mismatching, especially in processing the images including similar or repeatable features.
2) In four-view matching, the corresponding homologous points in the LL image can be searched along the much shorter epipolar line between the UL and LL image relative to binocular matching. The other homologous points in the UR and LR images can be found in a small region around the intersection of the epipolar lines respectively determined by the points in the UL and LL images. So, this method has less time consumption and improves the efficiency of matching.
3) Because of the structural characteristics of the FMS, it contains four binocular systems with a long baseline and can offer multiple measurements which improve the precision of the point cloud data. Moreover, subpixel interpolation is performed to enhance the matching accuracy.
4) In order to obtain the dense point cloud, a series of checkerboard patterns are projected towards the target during capturing images. Due to strong contrast between black grids and white grids, sufficient Harris corners can be extracted for dense stereo matching. Based on the variation characteristics of the cherckerboard pattern array, the mismatched points can be removed from the initial point cloud by matching them in the images with other patterns.
References
[1] OLIVEIRA A, OLIVEIRA J F, PEREIRA J M,  B R D, BOAVIDA J. 3D modelling of laser scanned and photogrammetric data for digital documentation: The Mosteiro da Batalha case study [J]. Journal of Real-Time Image Processing, 2014, 9(4): 673-688.
[2] CHEN Zi-yue, XU Bing, DEVEREUX B. Urban landscape pattern analysis based on 3D landscape models [J]. Applied Geography, 2014, 55: 82-91.
[3] LI Hu, YANG Jian-yu, SU Peng-cheng, WANG Wan-shan. Computer aided modeling and pore distribution of bionic porous bone structure [J]. Journal of Central South University, 2012, 19(12): 3492-3499.
[4] LIU Xi-ling, LI Xi-bing, LI Fa-ben, ZHAO Guo-yan, QIN Yu-hui. 3D cavity detection technique and its application based on cavity auto scanning laser system [J]. Journal of Central South University of Technology, 2008, 15(2): 285-288.
[5] GOMES L, SILVA L, BELLON O R P. 3D reconstruction methods for digital preservation of cultural heritage: A survey [J]. Pattern Recognition Letters, 2014, 50: 3-14.
[6] SON H, KIM C, KIM C. 3D reconstruction of as-built industrial instrumentation models from laser-scan data and a 3D CAD database based on prior knowledge [J]. Automation in Construction, 2015, 49: 193-200.
[7] NEFTI-MEZIANI S, MANZOOR U, DAVIS S, PUPALA S K. 3D perception from binocular vision for a low cost humanoid robot NAO [J]. Robotics & Autonomous Systems, 2015, 68: 129-139.
[8] CHEN Sheng-yong, WANG Yue-hui, CATTANI C. Key issues in modeling of complex 3D structures from video sequences [J]. Mathematical Problems in Engineering, 2012, 2012: 856523.
[9] CIACCIO E J, TENNYSON C A, BHAGAT G, LEWIS S K, GREEN P H R. Use of shape-from-shading to estimate three-dimensional architecture in the small intestinal lumen of celiac and control patients [J]. Computer Methods and Programs in Biomedicine, 2013, 111(3): 676-684.
[10] HARO G,  M. Shape from incomplete silhouettes based on the reprojection error [J]. Image and Vision Computing, 2010, 28(9): 1354-1368.
[11] THELEN A, FREY S, HIRSCH S, HERING P. Improvements in shape-from-focus for holographic reconstructions with regard to focus operators, neighborhood-size, and height value interpolation [J]. IEEE Transactions on Image Processing, 2009, 18(1): 151-157.
[12] SABATER N, ALMANSA A, MOREL J M. Meaningful matches in stereovision [J]. IEEE Transactions on Pattern Analysis & Machine Intelligence, 2012, 34(5): 930-942.
[13] SETTI F, BINI R, LUNARDELLI M, BOSETTI P, BRUSCHI S, CECCO M D. Shape measurement system for single point incremental forming (SPIF) manufacts by using trinocular vision and random pattern [J]. Measurement Science and Technology, 2012, 23(11): 115402.
[14] HAERTEL M E M, PINTO T L F C,  A A G. Trinocular stereo system with object space oriented correlation for inner pipe inspection [J]. Measurement, 2015, 73: 162-170.
[15] RASHIDIZAD H, RAHIMI A. Building three-dimensional scanner based on structured light technique using fringe projection pattern [J]. Journal of Computing & Information Science in Engineering, 2014, 14(3): 035001.
[16] TSAI R Y. A versatile camera calibration technique for high-accuracy 3D machine vision metrology using off-the-shelf TV cameras and lenses [J]. IEEE Journal of Robotics & Automation, 1987, 3(4): 323-344.
[17] HARRIS C, STEPHENS M. A combined corner and edge detector [C]// Proceedings of the Fourth Alvey Vision Conference. Manchester, UK: The University of Sheffield Printing Unit, 1988: 147-151.
[18] LAZAROS N, SIRAKOULIS G C, GASTERATOS A. Review of stereo vision algorithms: from software to hardware [J]. International Journal of Optomechatronics, 2008, 2(4): 435-462.
[19] XU Shuo-bo, XU Di-shi, FANG Hua. Stereo matching algorithm based on detecting feature points [J]. Advanced Materials Research, 2012, 433-440: 6190-6194.
[20] TSAI V J D. Delaunay triangulations in TIN creation: An overview and a linear-time algorithm [J]. International Journal of Geographical Information Systems, 1993, 7(6): 501-524.
[21] WRIGHT R S, HAEMEL N, SELLERS G, LIPCHAK B. OpenGL SuperBible: Comprehensive tutorial and reference [M]. 5th ed. New Jersey: Addison-Wesley, 2010.
(Edited by YANG Hua)
Cite this article as:
XIONG Jie, ZHONG Si-dong, LIU Yong, TU Li-fen. Automatic three-dimensional reconstruction based on four-view stereo vision using checkerboard pattern [J]. Journal of Central South University, 2017, 24(5): 1063-1072.
DOI:https://dx.doi.org/10.1007/s11771-017-3509-6Foundation item: Project(2012CB725301) supported by the National Basic Research Program of China; Project(201412015) supported by the National Special Fund for Surveying and Mapping Geographic Information Scientific Research in the Public Welfare of China; Project(212000168) supported by the Basic Survey-Mapping Program of National Administration of Surveying, Mapping and Geoinformation of China
Received date: 2015-10-30; Accepted date: 2016-03-31
Corresponding author: ZHONG Si-dong, Professor, PhD; Tel: +86-13908656587; E-mail: sdzhong@whu.edu.cn
Abstract: An automatic three-dimensional (3D) reconstruction method based on four-view stereo vision using checkerboard pattern is presented. Mismatches easily exist in traditional binocular stereo matching due to the repeatable or similar features of binocular images. In order to reduce the probability of mismatching and improve the measure precision, a four-camera measurement system which can add extra matching constraints and offer multiple measurements is applied in this work. Moreover, a series of different checkerboard patterns are projected onto the object to obtain dense feature points and remove mismatched points. Finally, the 3D model is generated by performing Delaunay triangulation and texture mapping on the point cloud obtained by four-view matching. This method was tested on the 3D reconstruction of a terracotta soldier sculpture and the Buddhas in the Mogao Grottoes. Their point clouds without mismatched points were obtained and less processing time was consumed in most cases relative to binocular matching. These good reconstructed models show the effectiveness of the method.


