J. Cent. South Univ. (2016) 23: 102-111
DOI: 10.1007/s11771-016-3053-9

Influence of cutter diameter on meshing performance in spiral bevel gears
MA Zhi-hao(��־��), HAN Xing-hui(���ǻ�), HUA Lin(����),
XIONG Xiao-shuang(��С˫), ZHENG Fang-yan(֣����)
Hubei Key Laboratory of Advanced Technology for Automotive Components,
Wuhan University of Technology, Wuhan 430070, China
 Central South University Press and Springer-Verlag Berlin Heidelberg 2016
Abstract:
Playing a critical role in transmitting movement and power, the meshing performance of spiral bevel gears has a significant effect on products�� operational performance. To evaluate the meshing performance, the accurate three-dimensional (3D) spiral bevel gear models are established through the Pro/E and MATLAB softwares, and the finite element analysis (FEA) methods are applied to the theoretical investigation of the influence of cutter diameter on meshing performance in spiral bevel gears. The results obtained show that the cutter diameter has a significant influence on spiral bevel gears�� meshing performance, such as the contact area, contact pressure, bending stress, torsional stiffness and transmission error.
Key words:
spiral bevel gears; meshing performance; finite element analysis; cutter diameter��
1 Introduction
Playing a critical role in transmitting movement and power between angularly crossed shafts, spiral bevel gears are widely applied in automotive, aerospace, petroleum, chemical and many other important fields because of their many advantages, such as high transmission efficiency, smooth transmission, high load- bear capacity. In modern industry, spiral bevel gears with high operational performance are required, which leads to the extensive attention towards improving meshing performance of spiral bevel gears.
The traditional method to evaluate spiral bevel gears�� meshing performance is to smear some red lead powder on tooth surfaces to observe their operational performance. However, with the rapid development of computer technologies, the meshing performance of gears can be tested before manufacturing, which can largely reduce the cost. By now, many research works have been directed towards spiral bevel gears. In Ref. [1], a review of recent progresses for the analysis of spiral bevel gears was presented. Based on the engaging principal and CAD software, the research on the accurate parametric modeling method for spiral bevel gears was conducted by Wang and Hua [2]. Chen et al [3] studied the geometry design of spiral bevel gears based on conjugate curves. Suh et al [4] developed a tooth surface for spiral bevel gear with a crown. In Ref. [5], different cutter profiles were used to introduce the optimal tooth modifications. Deng et al [6] applied the TCA, LTAC, elastic theory and the sensitivity matrix methods in the analysis of the influence of the contact path on the contact stress and bending stress in spiral bevel gears. Argyris et al [7] proposed an integrated computerized approach for stress analysis of enhanced spiral bevel gear drives. HWang et al [8] presented a contact stress analysis for a pair of mating gears during rotation. Using the finite element methods, the results of a detailed analysis of torsional stiffness of a pair of involute spur gears in mesh were presented by Wang and HOWARD [9]. Bu et al [10] studied the meshing stiffness of helical gear pairs with different helical angles. Munro [11] reviewed the theory of gear transmission error, discussed the methods of measurements and studied the relevance of transmission error with gear vibration and noise. Ji et al [12] introduced the analytical system of gears transmission errors testing and used the digital signal processing techniques to analyze the transmission errors. Spiral bevel gears with seventh- order function of transmission error were designed and analyzed in Ref. [13]. Wei et al [14] studied the effects of dynamic transmission errors and vibration stability in helical gears. Astoul et al [15] proposed a new methodology to reduce the transmission error of spiral bevel gears. The scope of installation errors of a face-gear drive with an involute spur pinion was studied by He and LIU [16].
However, the research on the influence of cutter diameter on meshing performances in spiral bevel gears is still scant. Therefore, the primary purpose of this work is to investigate the influence of cutter diameter on meshing performance, such as the contact area, contact pressure, bending stress, torsional stiffness and transmission error.
2 FE model of spiral bevel gear
Table 1 gives the parameters of the spiral bevel gear. The data points of tooth surface are firstly obtained in the MATLAB software, which is shown in Fig. 1. Then, the spherical involutes of tooth surface can be obtained in the Pro/E software, which is shown in Fig. 2. Finally, the 3D model of spiral bevel gear is established, as shown in Fig. 3.
The difference of different gear pairs lies in their tooth surfaces. The character of tooth surface is mainly determined by the spherical deflection angles between spherical involutes on tooth surface. The spherical deflection angles are determined by cutter diameter. Thus, different gear pairs can be obtained by using different cutter diameters. The selected cutter diameters of driven gear and driving pinion can be shown in Table 2 and Table 3, respectively. The decrease/increase of the difference of cutter diameter of mating members will lead to the decrease/increase of the relative curvature of meshing tooth surface of gear pairs.
The FE analysis of the gear pairs is carried out in the ANSYS software. The appropriate scale of grids is created, as shown in Fig. 4. The nodes in the inner race of the driving pinion��s axle hole are coupled and the freedom of them should be constrained except its rotational freedom, and the toque (T=500 N��m) is applied to these nodes. The freedom of the nodes in the inner race of the driven gear��s axle hole should be constrained.
3 Results and discussion
3.1 Influence of cutter diameter on contact region
In a meshing cycle, the influence of cutter diameter on the position (the major axis of the elliptical instantaneous contact region in the contact pressure contour is used to represent the position of the contact region) and area of the contact region of the driven gear as shown in Fig. 5 and Fig. 6, respectively.
It can be seen from Fig. 5 that the mesh of the driven gear starts from the tip of the tooth when the driven gear��s tip scrapes the driving pinion��s root. During the following meshing process, the meshing position moves towards the root. When the tooth is about to quit meshing, the driving pinion��s tip scrapes the given gear��s root. Thus, through the alternation of the single-tooth meshing region and double-tooth meshing region, the movement and power are transmitted between two linked components. It can also be seen from Fig. 5 that there is an inclination angle of the elliptical instantaneous contact region. With the decreasing of the difference of cutter diameter of mating members, the relative curvature of meshing tooth surfaces of gear pair decreases, the contact lines become longer obviously and the position of the contact region moves towards the heel of the tooth. It can be seen from Fig. 6 that the contact area of spiral bevel gear in a meshing cycle changes in parabolic. With the decreasing of the difference of cutter diameter of mating members, the relative curvature of meshing tooth surfaces of gear pair decreases and the contact area becomes larger obviously.
Table 1 Parameters of spiral bevel gear


Fig. 1 Data points on tooth surface
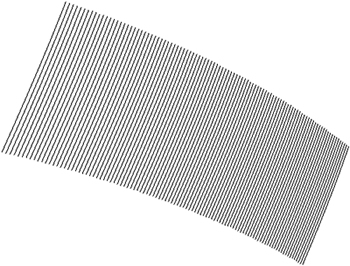
Fig. 2 Spherical involutes generated in Pro/E software
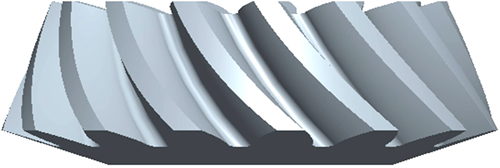
Fig. 3 3D model of spiral bevel gear
Table 2 Cutter diameter of driven gear (cutter diameter of driving pinion is a constant)

Table 3 Cutter diameter of driving pinion (cutter diameter of driven pinion is a constant)

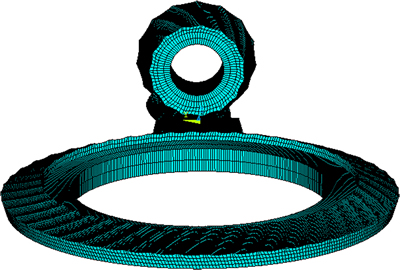
Fig. 4 Grid model of spiral bevel gear pair
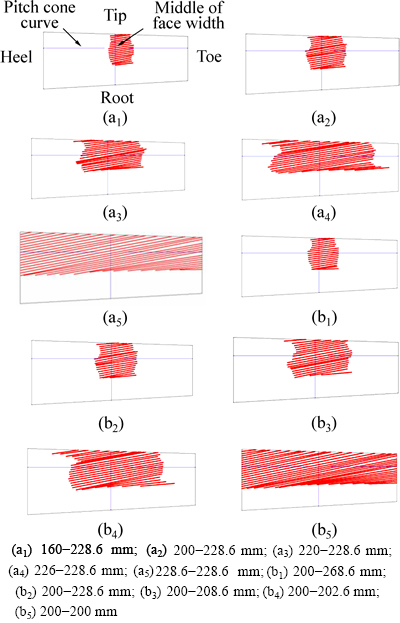
Fig. 5 Influence of cutter diameter on position of contact region of driven gear (former value is cutter diameter of driven gear while latter one is cutter diameter of driving pinion): (a1-a5) Influence of cutter diameter on position of contact region of driven gear (cutter diameter of driven gear changes while that of driving pinion is a constant); (b1-b5) Influence of cutter diameter on position of contact region of the driven gear (cutter diameter of driving pinion changes while that of driven gear is a constant).
3.2 Influence of cutter diameter on contact pressure
The contact pressure contour of the driven gear in a meshing cycle (driving pinion rotates about 24��) can be shown in Fig. 7. The contact pressure of a specific node on meshing tooth surface in a meshing cycle is shown in Fig. 8. In a meshing cycle, the influence of cutter diameter on the maximum contact pressure of the driven gear is shown in Fig. 9.
It can be seen from Fig. 7 that the changes of the contact pressure contour in a meshing cycle agree with those of the contact region.
It can be seen from Fig. 8 that the contact pressure of the node on meshing tooth surface is zero before entering into meshing. With the node gradually entering into meshing, the contact pressure increases rapidly up to the peak. After that, the contact pressure decreases rapidly with the node gradually being out of meshing. When the node is wholly out of meshing, the value of the contact pressure is zero again.
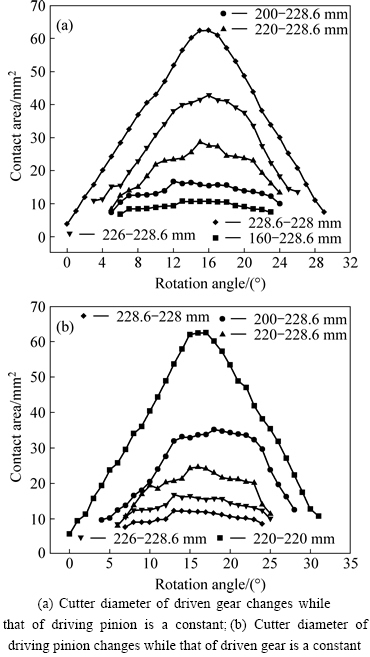
Fig. 6 Influence of cutter diameter on area of contact region of driven gear:
It can be seen from Fig. 9 that during the meshing cycle, the maximum contact pressure in the single-tooth meshing region decrease. After that, the value of the maximum contact pressure increases abruptly at the beginning of the double-tooth meshing region when the driven gear��s tip scrapes the driving pinion��s root. In the following meshing positions before the mating members wholly entering into the double-tooth meshing region, it decreases rapidly. When the double-tooth meshing region wholly arrives, the change is moderate. Then, the value of the contact pressure increases sharply once again with the tooth being about to quit meshing. It can be also seen from Fig. 9 that the maximum contact pressure in the double-tooth meshing region is much smaller than that of the single-tooth meshing region except the meshing locations in which the gear tooth just begins to mesh and the gear tooth is about to quit meshing, which leads to the increase of impact in the meshing process. However, when the cutter diameter of the mating members is equal, the relative curvature of meshing tooth surface of gear pair is zero, so there will be no single-tooth meshing region but the alternation of the double-tooth meshing region and three-tooth meshing region in the whole meshing process. Thus, the phenomenon of the driven gear��s tip scraping the driving pinion��s root or the driving pinion��s tip scraping the driven gear��s root will appear during the whole meshing process for a pair of unmodified spiral bevel gears. This leads to the moderate change of the maximum contact pressure and little impact in the meshing process. With the decreasing of the difference of cutter diameter of mating members, the relative curvature of meshing tooth surface of gear pair decreases and the contact pressure decreases obviously.
3.3 Influence of cutter diameter on bending stress
The bending stress of a specific node on meshing tooth surface in a meshing cycle is shown in Fig. 10. In a meshing cycle, the influence of cutter diameter on the maximum bending stress of spiral bevel gears is shown in Fig. 11.
It can be seen from Fig. 10 that the driving pinion��s bending stress of the specific node in the single-tooth meshing region changes in parabolic because of the existing of an angle between the minor axis of the contact region and profile. The driven gear��s bending stress of the specific node in the single-tooth meshing region changes in linear because the minor axis of the contact region is nearly parallel with the profile. After that, the value of the bending stress abruptly decreases at the beginning of the double-tooth meshing region for both the driving pinion and driven gear. In the following double-tooth meshing region, the change is moderate. Then, the value of the bending stress decreases rapidly with the tooth being about to quit meshing.
It can be seen from Fig. 11 that when the difference of cutter diameter of mating members is big, the bending stress of driving pinion in the single-tooth meshing region changes in parabolic. However, when the difference of cutter diameter of mating members is small, the bending stress of driving pinion in the single-tooth meshing region changes in linearity. In the following double-tooth meshing region, the change is moderate. When the tooth is about to quit meshing, the value of the bending stress decreases rapidly. However, when the cutter diameter of mating members is equal, the bending stress decreases firstly and then increases, but the change is moderate in the meshing process. The bending stress of the driven gear in the single-tooth meshing region decreases in linearity. In the following double-tooth meshing region, the change is relatively moderate. When the tooth is about to quit meshing, the value of bending stress increases. However, when the cutter diameter of mating members is equal, the change of the bending stress in a meshing cycle is moderate. It can be also seen from Fig. 11 that the bending stress in the double-tooth meshing region is much smaller than that in the single-tooth meshing region. With the decreasing of the difference of cutter diameter of mating members, the relative curvature of meshing tooth surface of gear pair decreases, the bending stress decreases distinctly.
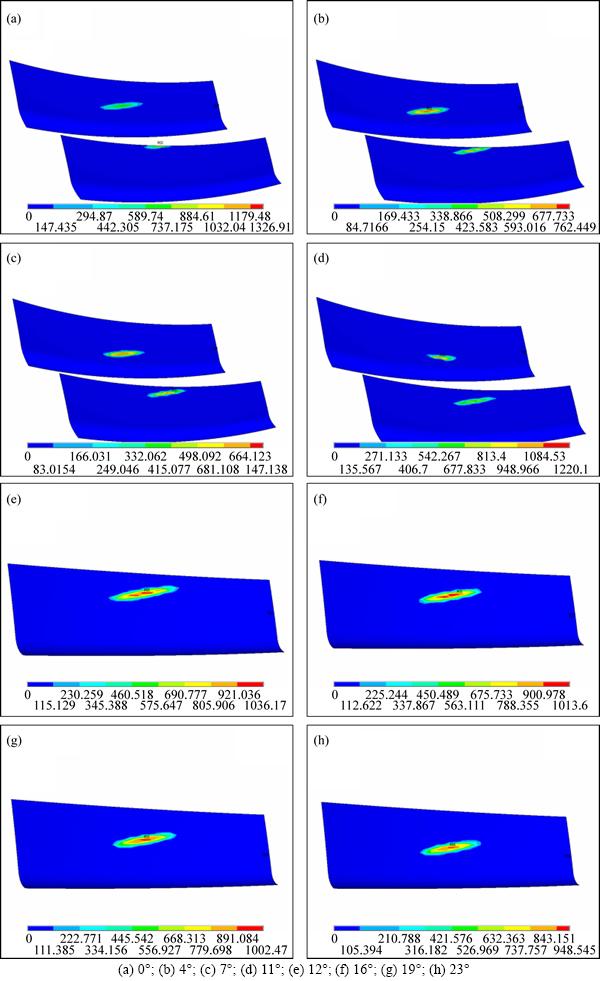
Fig. 7 Contact pressure (Unit: MPa) contour of driven gear in a meshing cycle (from 0�� to 23��):

Fig. 8 Contact pressure of specific node in a meshing cycle
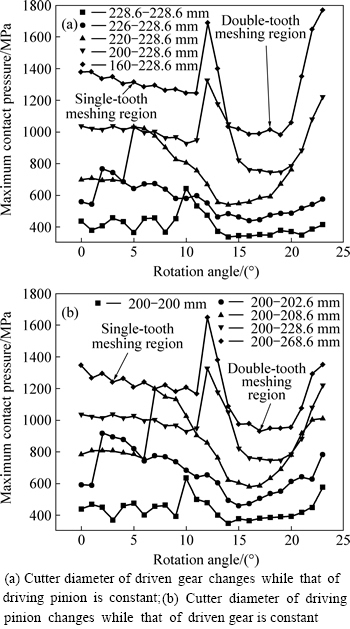
Fig. 9 Influence of cutter diameter on maximum contact pressure of driven gear in meshing cycle:
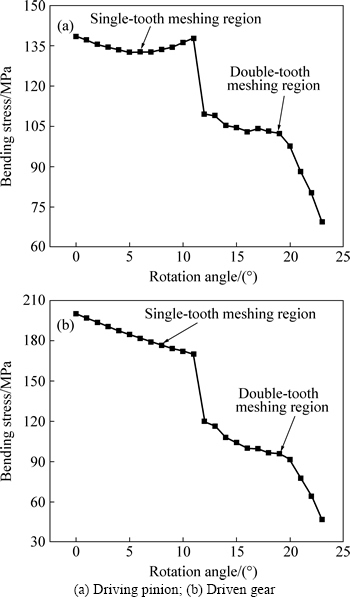
Fig. 10 Bending stress of specific node on meshing tooth surface in meshing cycle:
3.4 Influence of cutter diameter on torsional stiffness
In a meshing cycle, the influence of cutter diameter on the torsional stiffness of spiral bevel gears is shown in Fig. 12.
It can be seen from Fig. 12 that the torsional stiffness of spiral bevel gears in the double-tooth meshing region changes in a parabola while it is linear in the single-tooth meshing region. The torsional stiffness in the double-tooth meshing region is much higher than that in the single-tooth meshing region. It can also be seen from Fig. 12 that with the decreasing of the difference of cutter diameter of mating members, the relative curvature of meshing tooth surface of gear pair decreases and the torsional stiffness is considerably enhanced. When the cutter diameter of mating members is equal, the change of the torsional stiffness in a meshing cycle is moderate.
3.5 Influence of cutter diameter on transmission error
In a meshing cycle, the influence of cutter diameter on the transmission error of spiral bevel gears is shown in Fig. 13.

Fig. 11 Influence of cutter diameter on bending stress in meshing cycle:

Fig. 12 Influence of cutter diameter on torsional stiffness in meshing cycle:
It can be seen from Fig. 13 that the transmission error in the double-tooth meshing region changes in a parabola while the change of the transmission error in the single-tooth meshing region is linear. The transmission error in the double-tooth meshing region is much smaller than that in the single-tooth meshing region. It can be also seen from Fig. 13 that with the decreasing of the difference of cutter diameter of mating members, the relative curvature of meshing tooth surface of gear pair decreases and the transmission error decreases distinctly.
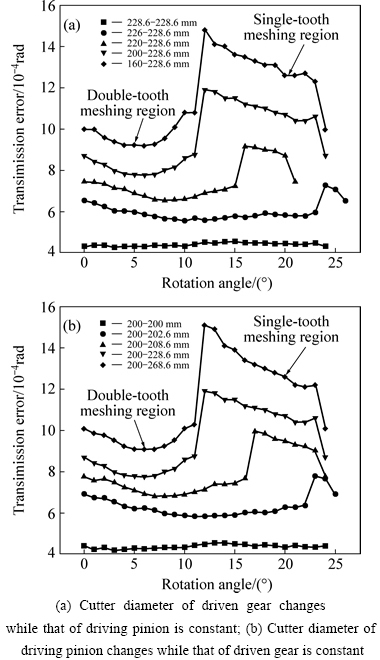
Fig. 13 Influence of cutter diameter on transmission error in a meshing cycle:
When the cutter diameter of mating members is equal, the change of the transmission error in a meshing cycle is moderate.
3.6 Comparison of meshing performance of selected cutter diameter of driving opinion and driven gear
In a meshing cycle, the comparison of spiral bevel gears�� contact area, contact pressure, bending stress, torsional stiffness and transmission error of the selected cutter diameter of driving pinion and driven gear (there, we just compare the 220-228.6 mm with the 200-208.6 mm), are shown in Figs. 14-18, respectively.
It can be seen from Fig. 14 to Fig. 18 that the contact area and torsional stiffness of one condition (the cutter diameter of the driven gear changes while that of the driving pinion is a constant) is much larger than the other condition (the cutter diameter of the driving pinion changes while that of the driven gear is a constant). The contact pressure and transmission error of the one condition (the cutter diameter of the driven gear changes while that of the driving pinion is a constant) is much smaller than the other condition (the cutter diameter of the driving pinion changes while that of the driven gear is a constant). The driving pinion��s bending stress of the one condition (the cutter diameter of the driven gear changes while that of the driving pinion is a constant) are much smaller than the other condition (the cutter diameter of the driving pinion changes while that of the driven gear is a constant), the bending stress of driven gear has the contrary law.

Fig. 14 Comparison of contact area in meshing cycle

Fig. 15 Comparison of maximum contact pressure of driven gear in meshing cycle

Fig. 16 Comparison of maximum bending stress in meshing cycle:
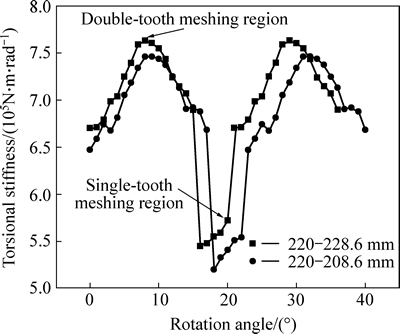
Fig. 17 Comparison of torsional stiffness in meshing cycle

Fig. 18 Comparison of transmission error in meshing cycle
4 Conclusions
1) The finite element analysis methods are applied to the detailed investigation of meshing performance (such as the contact area, contact pressure, bending stress, torsional stiffness and transmission error) of spiral bevel gears milled by different cutter diameters.
2) The cutter diameter used to mill the spiral bevel gears has a significant influence on the meshing performances. When the cutter diameter of the driving pinion is a constant, with the increasing of cutter diameter of the driven gear (the cutter diameter of the driving pinion is bigger than that of the driven gear), the relative curvature of meshing tooth surface between the driving pinion and driven gear decreases and the contact area and torsional stiffness become larger obviously while the contact pressure, bending stress and transmission error decrease distinctly. The above variation laws are wholly suitable to the condition that the cutter diameter of the driving pinion decreases when the cutter diameter of the driven gear is a constant (the cutter diameter of the driving pinion is bigger than that of the driven gear).
3) The meshing performance of spiral bevel gears under one condition (the cutter diameter of the driven gear changes while that of the driving pinion is a constant) is better than that under the other condition (the cutter diameter of the driving pinion changes while that of the driven gear is a constant).
References
[1] Handschuh R F. Recent advances in the analysis of spiral bevel gears [C]// International Conference on Mechanical Transmissions and Mechanisms. Tianjin: China Machine Press,, 1997: 635-641.
[2] WANG Ben, HUA Lin. Accurate parametric modeling of spiral bevel gear based on CAD software pro/E [J]. Journal of Wuhan University of Technology, 2010, 32(10): 99-103. (in Chinese)
[3] CHEN Bing-kui, LIANG Dong, LI Zhao-yang. A study on geometry design of spiral bevel gears based on conjugate curves [J]. International Journal of Precision Engineering and Manufacturing, 2014, 15(3): 477-482.
[4] SUH S H, JUNG D H, LEE E S, LEE S W. Modelling, implementation, and manufacturing of spiral bevel gears with crown [J]. International Journal of Advanced Manufacturing Technology, 2003, 21: 775-786.
[5] LITVIN F L, FUENTES A, HAYASAKA K. Design, manufacture, stress analysis, and experimental tests of low-noise high endurance spiral bevel gears [J]. Mechanism and Machine Theory, 2006, 41: 83-118.
[6] DENG Xiao-zhong, FANG Zong-de, WEI Bing-yang. Influence of contact path on the contact stress and bending stress in spiral bevel gears [J]. China Mechanical Engineering, 2003, 14(22): 1895-1898. (in Chinese)
[7] ARGYRIS J, FUENTES A, LITVIN F L. Computerized integrated approach for design and stress analysis of spiral bevel gears [J]. Computer Methods in Applied Mechanics and Engineering, 2002, 191: 1057-1095.
[8] HWANG S C, LEE J H, LEE D H, HAN S H, LEE K H. Contact stress analysis for a pair of mating gears [J]. Mathematical and Computer Modelling, 2013, 57: 40-49.
[9] WANG J, HOWARD I. The torsional stiffness of involute spur gears [J]. Institution of Mechanical Engineers, Part C: Journal of Mechanical Engineering Science, 2014, 218: 131-142.
[10] BU Zhong-hong, LIU Geng, WU Li-yan. Research on the variation rules of meshing stiffness of the helical gear [J]. Journal of Aerospace Power, 2010, 25(4): 957-962. (in Chinese)
[11] MUNRO R. A review of the theory and measurement of gear transmission error [J]. Mechanical Engineers, Part C: Journal of Mechanical Engineering Science, 1990, C404/032: 3-10.
[12] JI Qiang, FANG Zong-de, WANG Kan-wei, LIU Jian-ming. A study of the transmission error measurement of a gear [J]. Mechanical Science and Technology for Aerospace Engineering, 2009, 28(12): 1652-1656. (in Chinese)
[13] SU Jin-zhan, FANG Zong-de, CAI Xiang-wei. Design and analysis of spiral bevel gears with seventh-order function of transmission error [J]. Chinese Journal of Aeronautics, 2013, 26(5): 1310-1316.
[14] WEI Jing, GAO Pan, HU Xing-long, SUN Wei, ZENG Jing. Effects of dynamic transmission errors and vibration stability in helical gears [J]. Journal of Mechanical Science and Technology, 2014, 28(6): 2253-2262.
[15] ASTOUL J, MERMOZ E, SARTOR M, LINARES J M, BERNARD A. New methodology to reduce the transmission error of the spiral bevel gears [J]. CIRP Annals-Manufacturing Technology, 2013, 63: 163-168.
[16] HE Peng, LIU Guang-lei. Tooth contact analysis of face-gear meshing [J]. Mechanical Science and Technology for Aerospace Engineering, 2008, 27(1): 93-95. (in Chinese)
(Edited by YANG Hua)
Foundation item: Project(51575416) supported by the National Natural Science Foundation of China; Project(IRT13087) supported by Innovative Research Team Development Program of Ministry of Education of China; Project(2014CFB876) supported by the Natural Science Foundation of Hubei Province, China; Project(2012-86) supported by High-end Talent Leading Program of Hubei Province, China
Received date: 2014-11-24; Accepted date: 2015-03-29
Corresponding author: HAN Xing-hui, Associate Professor, PhD;Tel: +86-27-87168391; E-mail: hanxinghuihlp@126.com
Abstract: Playing a critical role in transmitting movement and power, the meshing performance of spiral bevel gears has a significant effect on products�� operational performance. To evaluate the meshing performance, the accurate three-dimensional (3D) spiral bevel gear models are established through the Pro/E and MATLAB softwares, and the finite element analysis (FEA) methods are applied to the theoretical investigation of the influence of cutter diameter on meshing performance in spiral bevel gears. The results obtained show that the cutter diameter has a significant influence on spiral bevel gears�� meshing performance, such as the contact area, contact pressure, bending stress, torsional stiffness and transmission error.


